If there are no plans to use any special design in the ceiling decoration, but a practical and easy-to-install cladding is required, then the easiest way is to make the ceiling from plastic panels. You can use PVC; its excellent appearance, easy installation and long service life make vinyl plastic one of the most popular solutions.
Plastic panels compete well with natural cladding
Ceiling installation from PVC panels
If the surface of the ceiling is a perfectly flat, smooth flat plane, then the installation process is greatly simplified. This situation happens extremely rarely, but it does happen. In this case, you can install plastic panels on the ceiling using regular acrylic glue or similar compositions, for example, liquid nails. PVC panels are cut to size and sequentially glued to the surface of the ceiling, not forgetting to connect the material into a lock. All that remains is to close the gap around the perimeter of the ceiling with a decorative plastic corner. Any worker even slightly familiar with PVC can make such a plastic ceiling with his own hands.
Unfortunately, ideal ceilings are incredibly rare; almost always, even in modern apartments and houses, the ceilings have a slope or even crooked plaster. Therefore, before you try to line the ceiling with plastic, you need to do a little preparation:
- Mark the walls and ceiling surface along the horizon line;
- Calculate the material consumption, both plastic panels and slats or profiles for sheathing;
- Assemble a supporting frame on the ceiling.
As a result, a frame sheathing appears on the ceiling, strong enough to support the weight of the plastic panels, and at the same time perfectly aligned with the horizon. If you follow the assembly technology, then the decoration process itself, sheathing the ceiling with plastic over the finished sheathing, will take literally a couple of hours.
For your information! Making a ceiling from PVC panels is not difficult, but there is one peculiarity: plastic decor can significantly affect the level of comfort in the room.
For example, PVC panels, despite the presence of internal cavities, reflect and conduct sound well. Therefore, it is recommended to lay soundproofing material under the sheathing, usually foamed polyethylene with a thickness of 2-4 mm.
You also need to take into account that the slabs significantly reduce the vapor permeability of the ceiling. The layer of plaster will be shielded with plastic, therefore, before planning to make a ceiling from PVC panels, you must take care in advance to provide additional ventilation to the room. Otherwise, the ceiling surface will be covered with a microlayer of condensation. This does not affect the level of comfort in the room, but it collects house dust very well.
Preparatory activities
Like other finishing work during repairs, it will not be possible to attach panels to the ceiling without preliminary preparation. A number of activities need to be carried out:
- Calculate the number of panels, accessories, and fastening materials. The plan takes into account the placement of lamps and wiring routing.
- Check the readiness of the tool and accessories.
- Clear the room of furniture that interferes with the pre-treatment of the ceiling and direct installation.
- Remove the remains of the old finish from the ceiling surface.
- Check wiring. If it is in a deplorable condition, as well as if a change in the position of the lighting devices is planned, it is dismantled, having first disconnected the input wires from the electrical network.
- Inspect the ceiling for defects. Pay special attention to the joints of floor slabs and wall joints on the street side. Putty on the cracks.
- Prime the ceiling plane with antibacterial mixtures.
Attention! If the installation is planned to be carried out on suspensions (suspended ceiling), then the scope of these measures is sufficient. But in the case of attaching the guides directly to the ceiling, the plane is additionally leveled with gypsum-based putty.
Principles of calculation
A simple mathematical calculation makes it possible to purchase the required number of panels and other consumables. First of all, determine the installation area by multiplying the length and width of the room. Then the result is divided by the area of one PVC part, and the required number of parts is obtained. You should add 10-15% to the result obtained, rounding the value to the whole panel. This reserve will come in handy in case of erroneous dissolution or installation errors.
Installation of panels
The following is calculated:
- purchase volume of ceiling profiles, as well as suspensions (fastening interval 500-600 mm);
- the length of the starting profile, where it is equal to the length of the perimeter and 100 mm of margin;
- dowels, if the metal profile is fastened in increments of 500 mm;
- self-tapping screws, with a consumption of pcs./meter, respectively, 1/0.5.
Additionally, you should purchase a profile for connecting the end parts of the panels, internal and external corners for joining the structure.
Tools and accessories
To perform the work, you should prepare the following tools and accessories:
- Drilling holes. This can be an electric or hand drill, a semi-professional or professional screwdriver with a set of drills and bits.
- Dissolution of blanks. Carpenter's knife, hacksaw with blade for cutting metal.
- Measurements and markings. Tape measure, building level, twine, marker or pencil. Hangers.
- Metal profiles for installation of ceiling structures: UD – 25/25 mm and CD – 25/60 mm in the calculated quantity.
Advice! Repair is a planned event. Therefore, it is recommended to prepare tools and purchase consumables in advance.
Do-it-yourself ceiling cladding with PVC panels
There are two real options for arranging the base for plastic cladding of the ceiling surface:
- In a simplified design for small spaces. In order to assemble a ceiling from PVC panels with your own hands, you will need to sew a wooden frame made of a block measuring 40x20 mm around the perimeter of the bathroom or toilet;
- Using a full-fledged frame assembled from wooden slats or metal profiles.
When using a simplified scheme, the slats can be mounted not on the ceiling, but can be edged around the perimeter of the upper edge of the wall. What is the difference? The ceiling in an apartment is almost always a concrete slab, which will need to be drilled with a hammer drill or impact drill, or a drill with a carbide crown. Internal walls are, as a rule, gypsum blocks or bricks; it is much easier to make plugs for installing the sheathing and align the frame slats to the horizon level. All that remains is to correctly attach the plastic panels to the ceiling, approximately as in the video:
For large rooms, such a scheme is unacceptable; the strength and rigidity of the perimeter slats is clearly not enough. Even if you try to install plastic panels on the ceiling using only the edge laths of the sheathing, the PVC cladding will still sag in the center when the work is completed. Moreover, a sudden opening of doors with a flow of air or a gust of wind outside the window can cause the plastic panels to bend and inflate like a sail. Therefore, a full-size sheathing is required on the ceiling under the PVC panels, and moreover, each must be attached at least at four points.
The fastener heads on the ceiling will not be visible
Plastic ceiling lamps
Changing the ceiling finish makes it possible to check the condition of electrical wiring, change the location of lighting fixtures, and install modern models. If the ceiling in the bathroom is made of plastic panels, then you can zone the lighting without damaging the wall tiles and place the wires hidden above the panels.
Ceiling lamps made of PVC panels
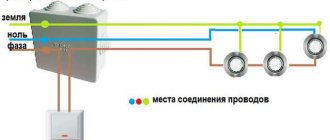
When independently tracing and connecting peripheral electrical devices, you must adhere to safety rules, namely:
- Dismantling and subsequent work are carried out after disconnecting the room from the general electrical network. A household “indicator probe” in the form of a screwdriver will help you make sure there is no voltage.
- It is recommended to first prepare an electrical wiring diagram for the location of lighting devices and switches.
- Wires for new wiring are purchased with a cross-section corresponding to the maximum load when all devices are turned on. Consultation on this issue can be obtained from trade organizations.
- In the places where lamps and switches are connected, the wire is left with a reserve - the “loop” will be useful if you have to carry out repair work or change equipment if it malfunctions.
- After tracing the wires, it is useful, without connecting to the network, to check the correct execution of the circuit using a household voltmeter.
Attention! If the home technician does not have experience in independently installing wiring and connecting devices, in order to avoid accidents from electric shock during subsequent operation, you should invite a professional electrician.
Features of the selection and installation of 220 V lamps
When choosing lighting fixtures, consider the following:
- The ignition temperature of plastic is high and it is almost impossible to achieve it by contact with a light bulb. But exceeding the heating norm will lead to melting of the seat, a change in color, structure and the appearance of an odor. In this regard, light bulbs with a power not exceeding 40 W are used.
- Security parameters of the lighting device itself. Their importance increases when used in rooms with high humidity levels. Therefore, it is recommended to use lamps with a protection level of at least IP44.
- Based on safety requirements, lighting devices should not be located closer than half a meter to the location of the bathtub or shower stall.
- The distribution panel of lighting devices in rooms with high humidity is located outside the room.
- Places for installing lamps are prepared during the direct installation of the panels. The diameter of the seat for the lighting system, depending on the brand and manufacturer, ranges from 58-74 mm. There are two ways to make a hole.
The first is represented by the use of a suitable-sized wood crown.
The second one takes a little longer, but does not require the use of a special tool. The installation site is marked using an ordinary compass. A small incision is made with a sharp knife, and the outline is cut out with a household jigsaw. With all the increase in time for the procedure, the likelihood of damage to the panel as a result of careless use of an electric drilling tool is reduced significantly.
Halogen and LED
What distinguishes halogen and LED lighting devices from standard ones is a twelve-volt supply voltage, and to create it, a step-down transformer is included in the electrical supply network. The location of its installation should exclude the possibility of penetration of condensate, and especially water. Safety requirements require the installation of a separate automatic fuse with a rating of at least 8 A.
LED lightening
When determining the number of spotlight sources in any rooms where it is planned to install a plastic ceiling with a height of more than 2.6 meters, take into account the following:
- the cone of lighting when they are turned on does not exceed an angle of 300;
- for good light density, lamps are installed at intervals of no more than one meter;
- the distance from the wall plane to the first lama is 0.6 m or more;
- to connect groups of lamps, special blocks are used; even soldered “twists” are not recommended;
- to ensure accurate polarity at the device’s power terminals, the wire should be routed uniformly, for example, black – plus, white – minus, wire with a notch – “ground”;
- When attaching lamps to the frame, special devices (latches, clamps) must be used.
The installation procedure for a spotlight is as follows:
- Disconnect the base part from the light element.
- The block is connected to the wire terminals.
- The light element is placed in its normal place and the operation is checked.
- If the result is positive, the spotlight is attached to the base with clamps.
- The installation of the decorative trim and thermal insulator completes the installation. It should be noted that the designs of lamps differ, and therefore it is recommended to study the instructions for the device before installation.
How to install lighting elements is presented in the following videos:
Preparing the ceiling for covering with plastic panels
The strength and reliability of plastic cladding largely depends on the correct marking of the future sheathing and high-quality fastening. Therefore, before attempting to mount the frame, it is necessary to carefully examine the surface of the ceiling, determine, as far as possible, the thickness of the plaster layer, the presence of cracks and the location of the joints between the concrete slabs.
This is extremely important so as not to hit the damaged area with the punch or, even worse, the joint between the floors, then the rail or strip suspension will be suspended. Gently tap the layer of plaster with the handle of a hammer and check for any peeling areas. All defects are chipped off, and the resulting holes are filled with gypsum putty. At the end of the work, the rough ceiling must be primed.
The second step is to make a control measurement of the height of the ceiling in the room. To do this, draw a horizontal line on the walls, 10-15 cm away from the ceiling. This must be done using a building level. Next, several pairs of nails are hammered along the line on two opposite walls, and a painting cord is pulled between them. Using a regular carpenter's ruler, a square and tensioned markings, you need to take several measurements of the distance from the conventional horizon plane passing through the cord to the surface of the rough ceiling.
The cord will need to be rearranged at least four to five times, and four to five measurements taken at each position, as a result we get an objective picture of the presence of a slope on the ceiling.
Advice! It is clear that all the fiddling around with cords, markings and building levels takes time and patience, but this is the only correct way to determine the lowest point on the ceiling. You can significantly simplify the task and get the job done in a short time by using a dual-beam laser level.
The device can be rented or begged from friends; it will take a maximum of one and a half to two hours to measure the ceiling for cladding with plastic panels, while working with the cord will take at least 4-5 hours.
Preparing for work
Since there is no need to prepare the surface to decorate the ceiling with PVC panels yourself, the following steps are as follows:
- Lighting fixtures and electrical wires are being dismantled, and the previous coating is removed. The ceiling surface should be cleaned of dust and dirt.
- Eliminate weak ceiling fragments by tapping on the surface.
- Get rid of cracks using cement mortar.
- After the solution has completely dried, the surface is primed.
Next, to finish the ceiling with PVC panels, you should prepare construction tools:
- Building level.
- Pencil or marker.
- Roulette.
- Dowel screws.
- Metal scissors.
- Profiles or wooden slats.
- Hammer.
- Hacksaw.
- Screwdriver.
Tools and materials for installing a plastic ceiling
In addition to the facing material, for high-quality and comfortable installation you will need a small set of tools:
- A hammer drill or impact drill with a carbide drill for a 10-12 mm plug;
- A screwdriver with an additional battery and a chuck for quick clamping of a drill;
- Set of drills, screws and dowels;
- Hammer, Phillips screwdriver;
- Hand saw, cutter or utility knife. You can make it yourself from a broken metal hacksaw blade.
The screwdriver and drill must be equipped with a speed controller. Drills must be sharpened to work with thin metal. If you plan to mount plastic panels on a metal frame, then you need to make a supply of 3-4 drills, 2.5-3 mm in diameter, for screwing in self-tapping screws. You can, of course, use a self-tapping screw with an end drill, but, as practice shows, it is better to pierce the metal at the fastening point with a low-speed drill and carefully tighten the fastener than to accidentally make a hole in the plastic panel larger than the self-tapping screw itself.
In addition to tools, you will need belt hangers, a supporting, starting and finishing profile. If you plan to make a lathing for PVC panels on a wooden batten ceiling, you will also need a guide profile and hangers.
Calculation of material quantity
The parameters of plastic panels are as follows: thickness ranges from 5 to 10 mm, width - from 250 to 500 mm, length - from 2700 to 3000 mm. Mounting profiles are available in a standard length of 3000 mm.
First you need to calculate the area of one panel (multiply the width by the length), and then the area of the ceiling. The second number must be divided by the first, and then add 15% for trimming and stock. It is recommended to round the resulting figure to a higher number so that during work you do not have to purchase additional material.
It is also very important to correctly count the number of metal profiles or wooden slats. For this purpose, you need to draw on paper a proportionally reduced ceiling plan. After this, draw longitudinal lines along one wall, and set a distance of 400-600 mm between the profiles. Now it’s easy to calculate how much material is needed for the entire room.
To find out the required number of profiles and hangers, you need to draw a plan, where to indicate the distance between the structural elements, and then make a calculation
Having completed the calculations, draw a line on the walls along the perimeter of the ceiling: more rigid profiles that can support the entire structure will be laid here. This data also needs to be recorded. The number of dowel screws is calculated based on the number of profiles and the installation pitch of fasteners measuring 30 cm. It is also advisable to add a little for reserve. To reduce the cost of work, you can replace the metal profile with a wooden one, and the fasteners with brackets.
If you plan to install a ceiling plinth, then you just need to calculate the length of the perimeter of the walls. Such a profile, as a rule, has a standard length of 3000 mm, so at the end of the work a significant part of the material may remain.
Frame for finishing the ceiling with plastic panels
Now you need to say a few words about what is required to assemble the sheathing. PVC cladding is lightweight, so there is no need to try to make a full-fledged metal or wooden frame, as for drywall.
You can make a ceiling from PVC panels with your own hands using three types of lathing:
- The metal frame allows you to attach plastic panels to the ceiling with a guarantee for a couple of decades. The process is quite lengthy, but it’s better to do it a little longer, but it’s guaranteed to be reliable;
- Wooden sheathing can be made from longitudinal slats, attached to the ceiling with hangers or direct fastening to plugs;
On a plastic profile, it is attached directly to the ceiling with self-tapping screws. Due to the low rigidity, special attention to marking accuracy is required. If you tighten the fastening, it will be very difficult to correctly make a ceiling from plastic panels.
Metal profile for ceiling made of plastic panels
The metal frame consists of two types of profile, load-bearing and guide. The latter is attached to self-tapping screws on the walls along the lines of the beginning and end of laying the plastic cladding and its completion.
The metal profile is placed only on hangers, otherwise the plane cannot be leveled horizontally
A supporting profile 60 mm wide is laid out on previously installed metal guides in the required quantity. Next, you need to install the hangers, to do this, make a couple of holes in the concrete slab and tighten the tape to the rough ceiling with dowels. All that remains is to place the supporting profile under the tape fastening and secure it with a self-tapping screw.
Wooden ceiling sheathing
The timber sheathing can be made in a similar way. The difference between wood and metal is that you cannot make two holes or two fastening points for screws next to each other. This may cause cracks or pinholes to form. The distance must be at least 40 mm. Therefore, many craftsmen recommend making G-loops instead of a ribbon suspension, which are used to secure the timber to the ceiling.
Assembling lathing for plastic panels on the ceiling
The process begins with installing a laser level or painting cords under each section of the supporting profile. It is easier to make tension markings and rearrange them as needed than to control the position of the profile using a building level.
The deviation should not exceed 1 mm, the weight of the plastic panel is small, so you can’t count on self-leveling of the ceiling and cladding under its own weight. After all the profiles or wooden blocks have been aligned, you can drill into the metal and connect the suspension parts with self-tapping screws.
How to cover a ceiling with plastic panels without a frame
There is another way to make ceiling cladding, but without using a frame. You can stick it on, but if the surface is uneven, it will obviously not be possible to secure the plastic panels to the ceiling evenly and beautifully.
Therefore, they resort to a little trick:
- First of all, wooden slats with a cross-section of 20x30 mm are attached to the ceiling; you need to make 4-5 lines of support for the panels;
- Each line is trimmed with a plane or sander so that the supporting surface of the slats lies approximately in the same plane; it will be enough if it is possible to make the support lines even, without waves or slopes;
- A small amount of polyurethane foam is applied to the back side of the plastic and placed on the ceiling.
In order to press the panels to the ceiling, use a plywood sheet and a support. Usually they try to make a package of 3-4 pieces of plastic panels, after which they apply foam and press it to the slats on the ceiling.
Correct installation - choosing panels
Let's look at how to mount these panels on the ceiling with your own hands correctly - and most importantly, reliably.
Tips before starting work
What else is worth remembering before starting installation work?
- Today's construction market offers a wide range of panels, the choice of which depends on the nature of the following work, the characteristics of the room and its dimensions. A trivial example - it is worth choosing the right length of panels in order to minimize the amount of waste or get rid of it altogether.
Advice! Avoid cheap PVC panels, as they will not only smell and look bad, but will also not be able to withstand the slightest mechanical loads, although for the ceiling this is not so important, on the other hand.
- It is better to postpone the installation of PVC panels on the ceiling if the ambient temperature is below 0° C. Unpacked panels that have previously been outside in low temperatures (up to 10° C) should remain at room temperature for approximately 12 hours. If they are brought in from frost, the “acclimatization” time is at least 48 hours.
Tools for work
You can do precise and relatively complex work well with your own hands only if you have a serviceable and functional tool.
You cannot make a ceiling with a saw and shovel, so prepare in advance and check the condition of the following items:
A hacksaw works better than others
- Hacksaw with fine teeth, transverse;
Not required often, but in any installation work it is indispensable
- Hammer weighing up to 400 grams;
A construction stapler and staples for it will simplify installation on a wooden frame
- Staple driving gun;
The hammer drill easily drills holes in concrete and bricks
- An impact drill with a screwdriver function, but a hammer drill is better;
Cordless screwdriver is very convenient when working at heights
- Screwdriver;
These constant companions will be useful always and everywhere
- Measuring devices and marking accessories;
The construction level will allow you to quickly double-check the evenness of the frame
- Construction level from 1 meter long;
A screwdriver can be useful not only for its intended purpose, for example, it is very convenient to pry off bent staples
- Slotted screwdriver and shaped screwdriver.
Materials
Now let's select the required material. Naturally, the panels are in the foreground.
You need to choose the right panels
What you should pay your closest attention to:
- There should be no dents or holes on the surface;
- The surface should have an even, uniform color;
- A high-quality panel should be smooth along its entire length without bends or waves;
- Minor, smooth bends are allowed, which will straighten out after attaching to the frame sheathing.
Attention! The panels should fit together, forming an almost imperceptible tight seam. Insert one panel into another and make sure there is a good fit.
The frame is very important
Metal frame - a win-win solution
Now that we've sorted out the panels, it's time to choose the right material for the frame. As we have already understood, it is undesirable to use wood for rooms with high humidity - it not only rots, but is also capable of great deformation from external influences. This means we need a metal profile.
Our advice: if you want to get a high-quality and reliable frame, use a galvanized profile for it. This decision is the most correct in this situation.
Correct fastening – long service life
As for fastening the panels themselves: there can only be one answer - the use of self-tapping screws with a press washer.
Self-tapping screws with a press washer - ideal fasteners for plastic
You can, of course, use other types of screws, but the ones we propose are the most preferable: they will not damage the edge of the panel, and their head will not interfere with the next one.
These self-tapping screws come in both piercing and drilling types. This does not affect the quality of fastening, so choose for yourself what suits you best.
The author of this article prefers to use drilling ones - they are more convenient. But some may prefer piercing ones. We repeat, this is not important.
Installation - where to start
The time has come to assemble the structure, but before that one more point needs to be resolved:
- On our resource we have already described many suspended ceilings, and we have always said that before starting work it is advisable to draw a diagram and also resolve the issue of its functionality.
- Functionality means the ability of a suspended ceiling to not just decorate an existing ceiling. This also means the ability to hide various communication lines.
- The final height of your ceiling directly depends on whether you need to hide something or not.
Important - The larger the size of the communications, the more inter-ceiling space you will need, and accordingly, the lower your new ceiling will be - and vice versa.
The principle of constructing a suspended ceiling frame
- We have described this issue, so we will not repeat it. Next, you need to make markings for installing and mounting the frame. The best option in this case would be to use a hydraulic level.
Our advice is that if the room in which you plan to install the ceiling is small, in this case you can do without a hydraulic level. Use a regular building level and a large ruler or straight edge.
Using the marks obtained, draw a line around the entire perimeter at the level of fastening the frame profile.
Suspended ceilings - general solutions
By and large, the installation of a PVC ceiling is not much different from the installation of other types, be it plasterboard, lath, cassette, etc.
How to make ceiling cladding, or how to attach panels
- Our pages describe in some detail all the methods for performing markup, and therefore we will not focus our attention on this. After all, our regular readers are already familiar with this procedure. Next along the line you need to secure the guides.
Our advice is to use the UD profile as guides.
- Someone may have a question about how to attach the profile to the wall. Let’s say right away: there is no definite answer to this question - it all depends on the material of the walls. In any case, the fastening must be reliable and durable.
- Assembly of the frame is no different from other suspended ceilings, all the rules remain the same. We have written a lot about this on our pages, so we will not repeat ourselves.
- Those who are unfamiliar with this procedure can read in the relevant sections of our resource and familiarize themselves with detailed instructions, supplemented by video.
When the frame is ready, you can proceed directly to installing the panels themselves. But before that, we want to give you one more small recommendation: sometimes it may happen that the frame has already been assembled, and the ceiling parts themselves have just been delivered.
Then:
- You don’t need to start installation right away.
- It is necessary that the plastic parts undergo acclimatization in the installation room.
- Leave them in the room for a day, and only after that you can proceed directly to installation.
With the right approach, you will get results no worse than the examples of finished ceilings below:
How to make wiring under a plastic ceiling
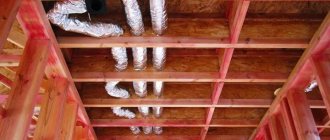
The use of PVC cladding seriously complicates access to electrical wiring, so for cable laying, corrugated ducts are used, laid in grooves cut into the wall and ceiling.
If, according to the installation conditions, the ceiling space turns out to be large enough, then the corrugation can simply be tied to hangers or made into separate loops - brackets without contact with the metal frame. To lay the wiring, you will need to make a copper loop and place it inside the corrugation in advance.
Glue mounting
If the ceiling surface is flat, you can do without assembling the frame. In this case, installation occurs using liquid nails or tile adhesive.
First of all, you will need to clean and prime the ceiling . Then you need to treat the back side of the first panel with an adhesive solution and glue it to the corner of the ceiling space. The remaining panels will be attached to each other using groove connections. The last panel needs to be cut. All that remains is to attach the ceiling plinth.
To install ceilings with plastic panels, it is not necessary to have special education. The main thing is to follow the instructions and follow safety rules.
How to attach plastic panels to the ceiling
Installation of the cladding can be done in two ways:
- Use only the starting profile, close the remaining gaps on the sides with a decorative threshold;
- Make two additional guide curbs from the F-profile; this will allow you to temporarily fix the plastic panel until it is finally attached to the supporting beam or profile.
Sometimes PVC plates of large width and size are additionally fixed with clamps to free up your hands and secure the material without distortions in the locks.
Fixation with staples significantly speeds up work
Installation of a starting profile for plastic panels on the ceiling
In order for the cladding to lie on the sheathing without distortion, it is advisable to make a leveling strip or starting profile. Essentially, this is a thin profiled plastic strip with a longitudinal lock element for connection to the mating surface of the first panel.
The starting strip only helps to align the first plastic panel on the ceiling
The rail is attached to the plugs, but before making the fasteners, it is necessary to level the base to the profile with any gypsum putty. You can’t just lay the rail, otherwise it will become skewed.
How to attach plastic ceiling panels
After the plastic cladding element has been docked with the starting rail, it is carefully pressed in and fixed to the frame with a piece of tape in two places. During this time, you need to make two holes with a screwdriver or drill in the edge and profile. Next, we press the plane, insert a self-tapping screw with a pressure washer into the hole by hand, and carefully tighten the fasteners.
It is even easier to make fastening on a wooden beam; this is usually done with a stapler bracket or an air hammer. You can, of course, just use nails, it’s better to do it automatically, it’s faster, and there’s less risk of breaking the plastic. The assembly of a ceiling made of plastic panels is shown in more detail in the video https://www.youtube.com/watch?v=tin1l3UDHb8.
How to insert the last plastic panel on the ceiling
To install, the part must first be cut in width so that the end does not extend beyond the line of the frame guide profile. To simplify the work, they try to make the cut so that there is a small gap, which simplifies installation, and the thin gap can be easily covered with a decorative overlay.
The panel is brought inside into the ceiling space, placed on the guides and fed forward using a couple of pieces of tape until the lock is completely connected.
The last panel must have two transverse support lines
Types of PVC ceiling panels
A polyvinyl chloride panel for finishing the ceiling space consists of two plastic sheets connected by stiffening ribs. Along the edges of the panel there are fastening strips: large on one side, small on the other. The large strip allows you to easily attach the panel to the frame; with the help of a small strip, the panels are fastened together. For greater adhesion strength, each panel is equipped with a spike on the side. With proper care and proper use, plastic ceiling panels can last up to 10 years.
Ceiling panels have two types of connections. In one case, after installation, a visible joint is noted between the elements; in the second case, the junction is not visible.
Based on color, ceiling panels are divided into the following types:
- Plain products are characterized by simplicity and practicality at the same time. Thanks to its resistance to ultraviolet rays, the shade is maintained throughout its entire service life.
- Lacquered panels have a glossy surface due to the application of a layer of varnish. This coating makes the surface of the panel stronger and its appearance more stylish. However, varnished panels are afraid of any mechanical impact, as a result of which cracks or scratches form on the surface.
- Patterned products have specific patterns on the outside. For the manufacture of such panels, soft plastic is used, which makes them cheaper, but shortens their service life.
- Laminated panels can imitate natural materials, such as wood and stone. The disadvantage of such products is poor resistance to sunlight, under the influence of which cracks appear on the surface. As a result, consumer performance is significantly reduced.
There are also several standard sizes of PVC panels. The standard length of products is 2700, 3000, 4000 and 6000 mm, the width of the panels can range from 100 to 250 mm.
Depending on the shape, the following types of polyvinyl chloride panels can be distinguished:
- Sheet products are characterized by fairly large sizes. Small fasteners are used to secure them.
- The design of tile-type panels is similar to conventional tiles. The size of such elements is not very large, their appearance is quite aesthetic, and operation is not particularly difficult.
- The slatted material resembles lining in appearance and in the method of installation. Special construction staples are used for fastening.
DIY two-level ceiling made of PVC panels
It is clear that the possibilities for manufacturing plastic PVC cladding are not limited to flat, single-level schemes. Decorative finishing can be done in several levels, highlight a corner, and even make an oblique turn or slope.
For these purposes, special guide profiles are used, laid on a wooden frame. Small elements in the form of pencil cases and niches can be assembled using an adhesive base or simple hangers.
The system of edges and finishing profiles allows you to assemble quite complex multi-level surfaces
Main sizes of PVC ceiling panels
Standard PVC panels are presented for sale in factory packages of six pieces each, and have different sizes:
- The lengths of PVC ceiling panels are 270 cm, 300 cm, 400 cm, 600 cm.
- The width of PVC ceiling panels is 10 cm, 20 cm, 25 cm.
- The thickness is 10 mm.
The longest ones can be used for finishing ceilings in very large rooms (garages, industrial blocks). For an apartment or house, it is better to buy short elements - 2.7 or 3 m.
Sealing gaps after covering the ceiling with plastic
Polyvinyl chloride cladding materials have a high coefficient of thermal expansion; slight heating of the plastic on the ceiling can lead to deformation and swelling of individual lamellas. Therefore, there should always be a gap of 3-5 mm between the ends of the plastic and the wall.
The easiest way to hide this part of the ceiling cladding involves using a PVC corner, which is glued along the wall using the usual “Titan” or “Dragon”. Sometimes, instead of PVC decor, customers prefer to make ceiling edging from cheaper and more accessible foam plastic corners, ceiling plinths and overlays of non-standard width.
Installation of panels
Covering the ceiling with plastic panels works like this:
- After installing the main structure, the U-shaped profile is installed. To attach it you will need self-tapping screws.
- The ceiling plinth is inserted into the profile. The resulting gap between it and the main structure is used to attach the planks.
- The first panel can be mounted in a gap or a U-shaped profile.
- To ensure finishing materials are installed correctly, it is necessary to use a building level.
- Then you need to assemble the covering from panels fastened together using groove joints.
- After finishing is completed, holes are cut along the walls for lighting fixtures.
- Next comes the covering of the main part of the ceiling.
- Then follows the installation of plinths and plastic plugs covering the corners.
- At the end of the work, lighting fixtures are connected.
Frame installation
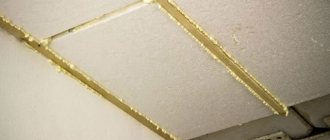
Along the lines drawn, holes are marked every 50-100 millimeters, drilled with a hammer drill. After this, dowels are inserted into them. Using holes drilled in the wall using self-tapping screws (for example, a 6x40 mm self-tapping screw), the main frame, made from the UD-27 profile, is attached with a lid to the wall. In this case, do not forget to use a level and ensure that the frame elements are positioned strictly horizontally.
Wooden lathing for mounting PVC panels
Then, using hangers and the CD-60 profile, guide rails are created to which the PVC panels will be attached. The optimal distance between them is 500 millimeters. The metal profile CD-60 is installed with the cover facing the floor; the ends of the slats should be inserted into the profile of the main frame.
Advice! It is very difficult to correctly mount the frame and install PVC panels alone, so this work should be done together with a partner. It would also be useful to have the help of a person who will give and receive tools, cut and bring plastic panels.
Having finished installing the frame, check it several times for horizontalness and the absence of a difference in height - the future ceiling made of PVC panels should be perfectly flat, and this largely depends on how well the sheathing is installed.
Profile lathing
Next, you should begin installing the electrical wiring (if you plan to make ceiling lights). It is advisable to place it in a corrugated plastic sleeve, which will protect the wiring from moisture.
An alternative to a metal profile can be a frame made of wooden beams. This design will cost less, but is susceptible to moisture. The technology for its installation is in many ways similar to that for a metal profile.
- We draw two strictly horizontal lines on opposite walls.
- We drill holes along them at intervals of 5-15 centimeters.
- Insert dowels into the holes.
- We fasten the beam of the main frame to the wall using self-tapping screws and the above-mentioned holes.
- We mount guides made of wooden beams using hangers.
- We attach the guides to the main frame using corners.
- We check the entire structure using a level and tape measure.
It is worth noting that for a wooden frame, the most optimal fastener for plastic panels would not be self-tapping screws, which are screwed in with a screwdriver, but staples, which require a construction stapler . Also, metal fasteners can be replaced with “liquid nails” - construction adhesive that can firmly hold the plastic panel and frame together even under relatively heavy loads.
Prices for “liquid nails”
liquid Nails
Methods of fastening PVC panels
Important! If there is an additional load, such as a large chandelier or a second level of suspended ceilings, the frame must be reinforced. To do this, it is necessary to install more guide rails, reducing the gap between them. This is mandatory not only for a wooden frame, but also for a metal profile structure.
Design of plastic ceiling panels
The use of PVC boards for ceiling decoration does not provide much scope for imagination and creative experimentation. Usually these are plain white, cream, gray panels or cladding that imitates the pattern of wood fibers.
You can diversify the type of PVC ceiling cladding in several ways:
- Installation of ceiling lamps;
- Using decorative inserts or alternating materials of different colors;
- Painting PVC panels in different shades and forming patterns at your own discretion.
Using multi-colored slats
For your information! The most successful solution is to stick a PVC film on the ceiling with a printed image.
This method is the most difficult, and not only for decorative reasons. PVC has a fairly large coefficient of expansion, so any film finish if installed incorrectly can subsequently be deformed and even torn off.
What will be needed for installation?
Everything you need for installation is listed below in an easy-to-view list:
- self-tapping screws;
- anchor bolts;
- dowels;
- bars (for wooden frame);
- ceiling plinth;
- CD and UD profiles;
- "crab" type pendants.