Shower with comfort - stall and base
There are several options for arranging a bathing area, and a shower stall with a tray is the most widely used.
This popularity is justified by the specific design of the cabin and the practicality of operation: when swimming, water does not splash around, but is collected in a tray, from where it flows into the sewer.
Also, a shower stall with a tray is popular due to the fact that the lower part of the structure can be used as a mini bath: the water outlet into the sewer is closed, and a small container is quickly filled. This is convenient for the elderly and disabled.
Which base for a pallet is better?
Installation of a shower tray can be done in various ways:
- on a brick foundation;
- on plastic support parts;
- on a metal frame.
The base is selected depending on the model’s configuration and its technological characteristics. The need for a foundation is due to the fact that the drain hole must be located above the level of the sewer line so that the water drains well. Experts believe that the angle of inclination from the bottom to the entrance to the sewer line should be at least 3 degrees. If it is impossible to make a pedestal or lower the sewer inlet, you will need a special pump to pump out the water.
Most deep models are equipped with a special metal profile frame. But if the tray is thin-walled, the feet of bathers will quickly push the bottom between the guides, especially if the owners of the bathtub are not of fragile constitution. In these places, acrylic options may even develop through cracks. Therefore, deep, thin-walled pallets also require a stable foundation.
Installation of a ceramic shower tray is possible without a foundation, directly on a flat floor without an installation gap.
Here it is necessary to monitor the quality of laying the sewer lines so that the drain hole is higher than the outlet and the water quickly leaves the container. The element itself is attached to the floor using glue or cement tile mixture.
Cast iron elements are usually simply placed on the floor. Their height is sufficient for reliable drainage into the sewer. The same applies to stone products. But there may be a problem with the siphon. It will have to be installed directly on the floor surface or connected to a flexible unit and hidden in a specially equipped niche in the wall.
Let's look at how to install different types of foundations when installing shower trays.
Metal or plastic frame
If you choose this type of base, it won’t take much time for installation. The main actions here will be:
- Leveling the legs using a building level.
- The installation of the shower tray itself.
- Connecting to the sewer and fixing the drain hole.
An extruded polystyrene board can be placed under the bottom to insulate the area. Polyurethane foam is used in the same way. This is especially important when installing steel pallets. It will also help reduce the sound of falling water.
Once the installation of the shower tray is complete, you need to check its stability. If the pallet wobbles or creaks, additional supports from steel angles or brick columns will be required.
To secure the thin bottom and give the structure stability, you can make removable formwork and pour concrete. The installation of the shower tray will be carried out on the resulting pedestal. This method has disadvantages: it is impossible to check and eliminate the leak. Replacing a sewerage unit and installing a siphon is also quite difficult. Alternatively, you will have to use flexible connections and hide the siphon in a niche in the wall.
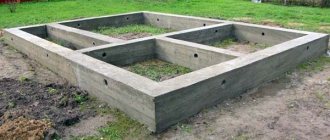
Installing a shower tray on a brick foundation
This is an excellent solution for most pallets, allowing you to eliminate any deformation and extend the life of your plumbing fixtures. The main thing is to choose the place where the siphon will be installed.
In this case, the bricks are laid not only around the perimeter of the product. Otherwise, the bottom will bend over time. In structures with legs, to eliminate this drawback, additional support is provided in the center. Since there is a convexity there, such a model cannot be installed on a flat brick foundation. It is necessary to provide a recess for this tubercle.
The correct technique for creating a brick foundation is as follows:
- Draw the foundation lines according to the required dimensions.
- Mix the cement mortar for masonry.
- Apply several strokes of the composition to the floor using a spatula.
- Lay the first row of bricks, starting from the corner, and tap them with a mallet for a better fit to the floor. The thickness of the seam should be 5–7 mm.
Installation of the shower tray is carried out after 3 days, when the masonry is completely standing.
If the pallet is semicircular, at the bend the bricks are laid out in a fan with the butted edges facing outwards.
A welded frame made of metal corners 20 by 20 mm can act as a support in the center of the bottom. It is installed between rows of bricks and secured to the floor with dowel nails. Acrylic should be protected from friction on metal surfaces with a layer of insulating rubber glued to the metal.
Classification
The price of a pallet varies, and in most cases it is justified by the size, shape and material of the product used. Thus, acrylic models are the most popular because they weigh little and the variety of shapes is wide. Cast iron products are used much less frequently, but they are also in demand. In general, products are classified according to:
- Material of manufacture: plastic, cast iron, ceramics, acrylic, marble or other natural stone, metal or alloys.
- Installation location: corner, front, straight, combined.
- Location of the drain hole: corner, central, several drain points or one.
- Dimensions: high or low sides, large or small pallets.
- Appearance: round, oval, square, quarter circle, polyhedral or rectangular.
The choice of one model or another is individual, depending on personal preferences and the stylistic decision of the room.
How to choose the right pallet
When purchasing, many questions arise that you have never had to deal with before. There are important parameters when purchasing a high-quality and convenient product:
- Noisiness . The unpleasant loud sound of water droplets in the morning is not the most pleasant thing. Therefore, you need to pay attention to the material from which the pallet is made, the thickness: the noisiest are metal or cast iron, while acrylic models are the least resistant to sound. It is also worth remembering that the thicker the bottom, the less noise and echo from the splash of water.
- Durability . The most durable ones are made of steel and cast iron, but high-quality acrylic or plastic (reinforced) will not be inferior in quality.
- Price and external indicators . Of course, you want to buy a high-quality and stylish bathtub or shower without spending a lot of money. But, unfortunately, inexpensive options are simple and without sophistication. You also don’t have to guess about quality: high strength and wear resistance are always higher in cost.
- Design . Compliance with the requirements of the stylistic design of the room plays a big role, because the shower base should not only be practical, but also meet the high requirements of interior style.
Model selection
When purchasing a specific shower stall, you cannot consider the tray and walls separately. Often this is a ready-made kit, especially if it is closed. If you plan to choose structural parts separately, then look at the strength of the walls, the height of the sides and functionality. Also pay attention to the presence of an overflow: if water accumulates, the system will protect it from leaking outside the bathtub.
Pallets with high sides are considered the best option. In this case, you can use the installation as a bath and shower.
Selecting a base
The bottom of the structure is always thicker than the walls.
This helps ensure the stability of the entire installation, and also prevents swaying from side to side when taking water procedures. Therefore, a bottom thickness of 3 cm and above is preferable.
The exception is acrylic options; strength often depends not on the thickness of the walls, but on the quality of the material.
Choosing the right model
Shower trays come in various shapes - square, rectangular, with rounded edges. The choice here depends on the wishes of the owner. It is much more important to take into account the depth of the structure when installing:
- Deep trays resemble small bathtubs. They have high sides (from 20 cm) and rest on a powerful frame with six height-adjustable legs
Prices for deep shower trays
Products with medium depth have side heights from 10 to 20 cm. Their support system can be the same as deep ones or like shallow ones.
- The sides of small or low structures are small; they are also sometimes equipped with legs. But in most cases they have no support. And under them it is necessary to lay a special foundation.
- mechanical deformations from the feet of people washing;
- surface cracking due to temperature changes;
- need for a solid foundation.
In some cases, a waterproofed floor with drains for draining water acts as the bottom of the shower stall.
Pallets are also built-in and removable. This point must be taken into account during installation.
The thickness of the walls of the selected plumbing element is no less important.
Pallets with thin walls are made of acrylic and plastic. The advantages of such models include ease of transportation and installation, as well as a budget price. But thin-walled models have a number of disadvantages:
The coating on steel pallets may peel off and rust stains may appear in damaged areas. Acrylic analogues are easy to scratch if, for example, you decide to wash your beloved dog.
Ceramic trays or those made from brick and concrete are more durable. The most durable are cast iron models.
How to choose a shower tray, video:
Installation: instructions
After choosing a model, you can proceed to the important stage - installation of the structure. The appearance of the shower stall depends on the correctness of the work done, because a crooked corner cannot be visually aligned after installing the walls.
Preparatory work
If previously there was already a drain hole at the intended installation location of the shower stall, and the sealing of the base of the floor is good, then work on installing sewer pipes and drainage is not carried out. In the opposite situation, you will have to level the base, fill the concrete floor with mastic, and level the angle of inclination of the drain into the sewer so that it is 3-4% below the main level.
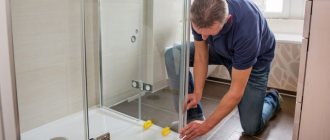
How to place an acrylic tray
An acrylic pallet is a common option, and therefore installation is often in demand. The advantage of this option is ease of installation, so no outside help is required.
Sequence of work:
- Screw the legs to the base. Make sure that there are special silicone or rubber gaskets between the base of the bottom and the fasteners. With their help, the leg is tightened firmly and does not move from side to side.
- Turn the product upside down; you can make sound insulation with foam or fiberglass.
- Turn the unit over to the desired position; do not adjust the legs at this stage.
- Install at the booth location.
- Screw on the siphon and remove the sewer pipes.
- Level it so that it stands as level as possible without wobbling.
- Secure and tighten the legs.
- Check the level again.
- Seal the connection between the siphon and the outlet from the inside.
- Apply sealant to the junction of the pallet and the wall.
How to install a steel pallet
Steel models are mounted similarly to acrylic pallets. The installation option differs only if the product is without legs.
Installation of a cast iron pan
- The legs are screwed to the bottom of the pallet.
- A siphon is connected.
- It is turned over to its original position and brought to the place of future installation.
- Seal the siphon and external drain.
- Install sewer pipes and, if available, overflow.
- Check with a level or laser that the tilt is correct, adjusting the height of the legs if necessary.
A feature that needs to be remembered during installation is the heavy weight of the cast iron installation. If the legs from the manufacturer do not inspire confidence. You can carry out additional fixation with a pipe. To do this, thin steel pipes are welded into a U-shaped structure. The installation is initially placed on this structure, and only then the legs are screwed on.
Installation of ceramic or marble
The marble product is also quite heavy, and therefore before installation you need to pay attention to the thickness of the floor surface. As a rule, the manufacturer of products made from natural or artificial mesh provides components and parts for installation. It is impossible to find individual parts in the store. Installation is carried out in the same way as described previously.
Ceramic options are also extremely popular, but they always come with legs. Installation of this type does not require special skills. All you need to do is screw on the legs and siphon, turn the tray over and level it, adjusting the lifting height of each individual leg. After installation, seal the joint between the wall and the walls of the frame.
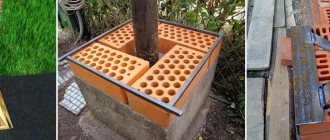
DIY pallet
In the case when the pallet is made by hand, installation is carried out as follows:
- 2 rows of brickwork are laid out;
- the base of the floor is poured with concrete;
- after the concrete has dried, treat the surface with mastic or silicone;
- A layer of special glue is laid on top of the brick wall, and a pallet is installed on top.
DIY pallet construction
The process begins with preparing the future space for the shower stall.
Step 1 . To begin with, the installation area is waterproofed, as in the previous paragraph. This will help protect the walls and floors from mold, mildew and dampness.
The process of making a pallet yourself includes the following steps:
Image gallery
Photo from
Stage 1: Installation and connection of the shower siphon
Stage 2: Construction of sides and preparation of the bottom for pouring
Stage 3: Pouring the solution to the bottom and processing the walls
Stage 5: Covering a homemade pallet with mosaics
Step 2 . Preparing the drain. A ready-made drain assembly can be purchased at a hardware or plumbing store. It is also called a shower drain. It must be of high quality.
The drain hole is immediately connected to the sewer system. The installation must be very tight, so you can use glue and sealants on all threaded connections.
When purchasing a drain for a homemade pallet, you cannot save money. Choose a quality product that fits in size and will last as long as possible.
Step 3 . Now you need to lay the base (use brickwork or rough screed) after the waterproofing composition has dried.
We lay the walls using silicate or ordinary bricks. Before this, you need to put a metal mesh on the base to make the structure solid.
Experts recommend laying out the sides in a square, and making the protruding corner beveled. This will prevent injury from the corner and visually expand the space. After 3-4 days you can move on to the next stage.
We treat the entire base of the pallet with waterproofing material. After it dries, we apply a layer of screed over the entire surface of the pallet to hide all the brickwork behind it.
It is important that the screed has a minimum slope towards the drain so that water does not accumulate after using the shower stall. After drying, apply the penultimate layer of waterproofing.
Step 4 . Leveling the surface of the pallet. To do this, you can use a self-leveling mixture. We apply the final layer of waterproofing and cover the pallet with tiles. It can be mosaic or any other tile.
Subtleties of installing a shower tray in the bathroom
When the shower stall is of standard sizes, with legs or special fixing devices, all that needs to be done is to consistently fasten the bottom. But sometimes difficulties arise because the dimensions of the booth are non-standard, there are no legs or do not fit the style of the room. In this case, problems arise and “savvy” and ingenuity will be required.
Installing a frame on foam concrete without legs
If the pallet has no legs, you will first need to prepare 4 stands. The best material for this is foam block. Installation is carried out on 3-4 cut-out stands at all corners:
- 3 blocks if it is a corner pallet;
- 4 blocks if it is a round or square pallet.
The height of such stands should be within 10 cm. The foam block is placed on the floor on a layer of glue, which, after hardening, prevents the bricks from spreading apart.
On legs
Installing a tray with legs is not difficult. Each product contains instructions, and all that is required is to perform the following steps according to the manufacturer’s recommendations:
- screw the legs, turning the tray upside down;
- install a siphon;
- fix everything with sealant (pipes and siphon);
- turn the pallet over and install it in the desired place;
- level the slope.
On plastic stands
Some manufacturers of bathroom products complete the trays with durable polystyrene foam bases. These settings are very low and require a different approach:
- The pallet is unpacked and the workpieces are taken out.
- The parameters of the bottom of the pallet are measured: the width of all sides.
- The plastic stand is turned upside down and fitted to the pallet.
- Measurements are taken of the location of the future drain hole and the location of the ribs.
- Openings of the required diameter are cut out at the marks.
- The legs are screwed into the mounting sockets.
- The height of each leg is adjustable.
- A siphon is attached to the drain and sealed.
- Mark the future location of the frame with a pencil on the floor.
- The surface of the stand is cleaned of dust.
- Polyurethane foam is applied to the center of the floor contour.
- The stand is installed.
- The slope is checked by level.
- The tray is installed on top.
- The pallet is pressed tightly against the stand; it is better to put something heavy in all corners of the pallet until the glue or foam hardens.
- Start with decorative finishing.
Try to adjust the height of the stand so that the gap from the floors is minimal. If the floor slopes towards the wall, then twist and turn the legs several times, checking the horizontal position.
On bricks
Installation on bricks is carried out if the pallet does not provide for mounting on legs. In this case, it is better to take measurements of the bottom of the pallet, make marks on the floor, and lay several rows of brickwork along these marks. After the cement mortar has hardened (about 3 days), install the pallet, fixing it with glue on top of the bricks.
How to attach to the wall
The tray is attached to the wall by tightly fixing it with silicone or sealant.
If the manufacturer has provided for fixing lightweight plastic by attaching the curtains to the wall, then you need to make holes with a drill, screw in dowels and secure the bolts.
As a rule, such fastening is implemented on a rough wall. Either decorative tiles or plastic panels are placed on top of the curtains.
Fastening panels and cabin doors to the pallet
After the installation of the frame or pallet has been completed successfully and the solution has dried, you can begin attaching the walls or doors of the booth. The walls are fixed not directly to the pallet, but to the floor base or vertical bases on the curtains.
Installing a shower tray with legs
This pallet is installed much faster; it often comes with a special plastic screen, which allows installation without masonry work. If the screen is not included in the kit, then at the final stage the perimeter of the pallet must be trimmed with blocks or bricks of appropriate parameters and covered with ceramic tiles. Before starting work, check that all pallet installation elements are present and carefully read the manufacturer’s instructions.
Each pallet comes with instructions
Step 1: Lean the tray against a wall or place it on your workbench. Find the places where the legs are fixed; they have factory markings or are thicker due to molded fastening inserts.
Step 2: Screw on the legs. Pre-adjust their height using a tape measure. Exact height adjustment must be done on the floor.
Screwing the leg
Decorative screen assembly
Leveling the legs
Important. Please note that each leg has a lock nut to secure the element in the selected position. Make sure that all the locknuts are in place, otherwise you will have to remove the legs again to install the nuts.
Step 3. Place the pan in the desired location and decide on the method of connecting the water drainage. Depending on the location of the inlet pipe of the sewer pipe, additional connections will have to be made to connect the siphon. The siphon should be sold together with the tray; if not, buy it separately. At the same time, make sure that the dimensions of the equipment allow it to be installed under a pallet. If you don’t have enough personal experience, consult a store sales consultant.
Step 4. Assemble the siphon, pay great attention to the quality of all connections, do not allow leaks. Remember that eliminating them will always take much longer than a high-quality assembly. Not to mention the financial side of the issue and possible negative consequences.
Siphon
Step 5. Put the tray back in place and use a level to set it to a horizontal position. Control all sides and do not allow them to slope in any direction. After adjustment, be sure to tighten the locknuts.
Pallet leveling
Step 6. If the kit includes metal profiles to support the side surfaces against the wall, install them. Mark a specific location and use a level to check the horizontal position. The metal profiles are fixed to the wall with dowels; drill holes for them in the right places.
Marking for drilling a hole for mounting the stop
Drilling a hole
Screwing the fastener
Fastening the pallet with clamps
Important. If the walls are already finished with ceramic tiles, then all measures should be taken to prevent them from cracking during drilling.
How to avoid unpleasant situations?
- Never drill a hole where tiles meet. When installing metal profiles, it is always possible to move them slightly to one side or another and thus choose a safe place for drilling holes. However, such manipulations will in no way affect the fixation strength of the pallet.
- Always work only with serviceable tools and sharp drills. Do not apply much force while drilling.
- It is strictly forbidden to use a drill in hammer drill mode; ceramic tiles do not tolerate shock loads. The hammer is turned on only after the thickness of the tile has been passed.
Step 7. Connect the drain.
Assembling the siphon, installing the grille
Never assemble rubber seals with great force; lubricate them with mastics or at least moisten them with ordinary water. It is very easy to damage the seals, but they cannot be repaired; they need to be completely replaced. A problem may arise when searching for an identical replacement. Such troubles especially often arise during the search for spare parts for imported pallets. It is not recommended to use silicone as a sealant when assembling the water drain; it will definitely peel off after a certain amount of time and leak.
Applying sealant
Next, you can begin installing the shower unit and mixer. The protective polyethylene film is removed only after complete completion of installation work.
If damaged, what should I do?
If for some reason during installation the surface of the product is damaged, scratches or cracks appear, then do not be upset. Sometimes restoration work saves the day:
- If it is an acrylic base, then drill small holes on the sides of the crack into which a fiberglass cord is placed. Epoxy resin is poured over such a crack or a special mixture is sprayed from an acrylic spray can.
- A product made of steel or cast iron is also treated with sprayed acrylic from a can.
- Stone cast pallets can be restored in a similar way.
The only coating that cannot be repaired is ceramics.
Final finishing
After the installation work has been completed, decoration is carried out. The sequence of work depends on the type of shower stall and the style of the room. Decorating options with ceramic tiles are popular. High installations are also decorated with decorative plastic panels on slats in a “coupe” style.
Work on installing a pallet with or without legs is carried out by hand. Difficulty arises if natural stone or cast iron is being installed. Products made from such components are heavy, which complicates the process.
Option 3 - making your own pallet
An inexpensive shower tray for your home or bathhouse is suitable for those who want to save money or people who prefer original designs. Self-installation of a shower tray gives you the opportunity to choose any design shape, color and cladding material.
The base is prepared from concrete screed (or plastered bricks) lined with ceramic tiles. As the walls of the shower stall, special translucent panels are used, which can be bought ready-made, or ordinary shower curtains.
You need to start by laying the drain pipe and installing the drain neck. It is better to take plastic products: they are easy to install and last a long time.
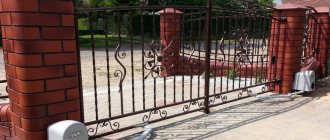
Installation of enclosing sides. They are necessary to prevent water from spreading throughout the room.
The sides can be either concrete poured with formwork, or brickwork, plastered several times. In any case, the resulting structure will need to be faced with ceramic tiles
- Concrete screed inside the pallet.
Are you planning to purchase an expensive shower cabin for your dacha? Take your time - there may always be a cheaper option! The low cost of a product does not mean its poor quality; more can be said - almost always it is just a simplified and minimized design. In this article, together with the website, we will study a steel shower tray, which will help you build a primitive, but quite nice shower stall.
Rectangular shower tray