Aerated concrete is a building material that is created synthetically. It is made by mixing certain components, which are then treated with high temperatures. The advantages of this material are its low weight, strength, high thermal insulation rates and ease of production. Therefore, laying aerated concrete blocks is often done with your own hands. The step-by-step instructions assume strict adherence to all standards so that the walls are erected correctly.
Tools used
First of all, you need to prepare special tools for laying aerated concrete. So, you will need:
- A carriage equipped with a dispenser, necessary for uniform application of the solution between the blocks;
- Mallets in the form of a rubber hammer, which allows you to knock out installed products;
- A saw, which will be needed to cut the blocks to fit them to the required size;
- Sanding board to eliminate existing defects on the surface;
- A corner with which the laid elements will be attached;
- Planer, also used to level the surface of products;
- Wall chaser for creating grooves in blocks;
- A cord that is used as a guide and also a level.
Additionally, you need to prepare a container where the masonry mortar will be mixed.
Selecting Tools
To build a structure made of aerated blocks, you will need the following materials:
- roulette;
- building level;
- construction mixer or drill with special attachments;
- rubber hammer;
- manual wall chaser;
- notched trowel;
- corner;
- hand saw;
- electromill;
- grater;
- container for mixing the solution.
Before construction begins, you need to purchase a sufficient number of gas blocks and dry adhesive mixture or materials for preparing cement-sand mortar. It is better to take both aerated blocks and masonry materials with a small margin (10-15% above the calculated quantity). During the construction process, you will definitely need reinforcement and rolled waterproofing material, so they also need to be purchased in advance.
A set of tools for working with aerated concrete.
Necessary materials
There are two types of mortars used to secure aerated concrete blocks. These include cement and adhesive mixtures. In this case, the first row should always be laid only on cement mortar. It is worth considering each type separately.
Glue solution
To work with such material, standard tools for working with aerated concrete are used. In order to prepare a mixture with a uniform texture, mixing is recommended to be carried out with special low-speed equipment. In proportions it turns out that for 5 kg of dry glue you need to take 1 liter of water. To do this, water is first poured into the container, and then glue is gradually poured in, which immediately begins to be beaten. After this, the solution is left to brew for 10 minutes and mixed again. Only now the adhesive mixture is considered ready for use, and its consistency should be similar to thick sour cream.
After drying and, accordingly, hardening, the solution can no longer be used after re-diluting with water.
Cement-sand mixture
These types of mortars are also used for laying blocks. Their main feature is considered to be ease of manufacture, as well as the reliability of the fastening they create. In this case, similar tools are used for laying aerated concrete blocks as when working with adhesive mortar. The cooking recipe may vary based on the need for characteristics. So, for some purposes, plastic mixtures are made by additionally adding clay, as a result of which the solution does not crumble and is laid more accurately. Despite the composition, such options are quite economical, which allows them to compete with adhesive mixtures.
Brief characteristics of the material
Let's start with a brief description of the products. After all, in order to understand the essence of the work process, it is worth thoroughly studying the material itself. This will help determine why you need to do it this way and not some other way.
Basic properties and types
Aerated concrete is one of the varieties of cellular concrete. It has a special porous structure, which is achieved during the production process. The cells are formed as a result of a chemical reaction between lime and aluminum powder.
Thanks to their special composition, manufacturing technology and some other factors, the blocks are endowed with properties that differ from other materials, which largely also depend on the type and scope of the product.
Let's consider what aerated concrete can be. In accordance with GOST 21520-89 “Cellular concrete wall blocks”, the material is divided into several types, depending on the characteristics of the material.
According to density, the material can be:
- Thermal insulation. Such products have a density of 300-400 kg/m3. They are used as a material for insulation, since they cannot withstand any loads other than their own weight.
- Structural and thermal insulation. This type of product is characterized by a higher density - 400-800 kg/m3. It is used in the construction of walls and partitions.
- Structural. The most durable material of all types. Its density varies from 900 to 1200 kg/m3. It can withstand significant loads and is used in the construction of buildings up to 12 meters high.
Thermal insulating and structural thermal insulating aerated concrete, photo
Depending on the type of binder component, the material is distinguished:
- On a cement binder;
- On limestone;
- On slag;
- On ash;
- On mixed.
This means that the concentration of the main component is from 15 to 50%. The content of the silica component also determines the special varieties.
Products can be manufactured:
- On sand, most often quartz;
- On the ashes;
- On other secondary industrial components.
Also, the gas block is divided depending on the type of hardening.
Products can be:
- Autoclave;
- Non-autoclave.
Autoclaved and non-autoclaved aerated concrete
- Autoclaved aerated concrete, or synthetically hardened aerated concrete, is processed using special machines - autoclaves, in which it is exposed to high temperature and pressure.
- When producing a non-autoclaved product, hardening of the product occurs naturally. Sometimes they are dried in special machines in which the temperature does not exceed 100 degrees and the pressure is below atmospheric.
- These two types of products differ from each other: non-autoclave is grayer in color, fragile, less durable and inexpensive.
Gas blocks can have different accuracy categories.
Depending on the deviations established by GOST, products are:
- The first category of accuracy, when possible deviations in size cannot exceed 1.5 mm;
- Second category of accuracy. Such products may differ by 2 mm in size and 3 mm diagonally.
- The third category of accuracy may differ by 2-4 mm in size and diagonal, and chips of up to 1 cm are allowed.
Products of categories 1 and 2 are laid mainly on glue, category 3 - on mortar. In the latter case, of course, there will be much more cold bridges. Therefore, such gas blocks are usually used in the construction of various outbuildings. Their prices are much lower.
Now it’s worth paying attention to the main indicators of the quality of the material. Let’s use the table and at the same time, for clarity, compare the material of the autoclave and non-autoclave curing methods.
Characteristics:
| Characteristic name | Its meaning for a representative of cellular concrete of synthetic hardening | Its meaning for hydration hardening material |
| Frost resistance, cycles | 35-150 | 15-35 |
| Thermal conductivity | 0,096-0,155 | 0,17-0,25 |
| Strength in accordance with GOST | B 1.5-B5 | B1-B2.5 |
| Shrinkage | 0.3 mm/m2 | 0.4-0.5 mm/m2 |
| External wall thickness | From 0.4 m | From 0.6 m |
| Durability | Up to 200 years | Up to 50 years |
As you can see, the performance is quite good for both types, but the autoclave still wins.
Strengths and weaknesses of buildings
Let's figure out what positive and negative characteristics the products have and what the future structure may have.
Let's start with the advantages:
- Aerated block is a lightweight material; it does not place a large load on the foundation.
- It is large in size, so the laying speed is quite high. If you compare the product with the size of a brick, it will replace up to 12-14 units of it. Agree, it will be much faster to lay 1 gas block than such a quantity of ceramics.
- The material has a low thermal conductivity coefficient. It is able to maintain the temperature in the room.
- Decent density, which is quite enough to build a house of several floors.
- Frost resistance adds competitiveness to products. Manufacturers guarantee that the material can withstand up to 150 freezing and thawing cycles.
- Environmental friendliness. The material does not harm the environment and people.
- Fire resistance.
- Large selection of sizes and manufacturers. Possibility of producing standard sizes to order.
- Easy to process. The material is cut, sawn, polished. Almost anyone can build walls with their own hands, and all they need is instructions.
- High resistance, in part, to atmospheric and biological influences. Mold and mildew do not tend to form on aerated concrete.
Advantages
There are also disadvantages, let’s analyze them:
- Fragility. Transportation is recommended to be carried out with extreme caution.
- The main disadvantage is the ability to absorb water. The material absorbs moisture quite strongly, up to 20-25%.
If it crystallizes at subzero air temperatures, irreparable damage will be caused to the products. The crystals will begin to destroy the structure of the block from the inside. Here it is also worth paying attention to the fact that its pore structure is open, and, therefore, more vulnerable in this regard.
- Shrinkage. This is typical for this material. It is not uncommon for cracks to form on finished walls.
- Minor difficulties encountered when fixing the fasteners. It is necessary to use specialized hardware suitable for products made of cellular concrete.
You can also note a minor disadvantage related to products using a non-autoclave curing method. The fact is that the simple manufacturing process and low requirements for equipment and premises provoked the organization of a large number of handicraft industries. As a result, purchasing a low-quality product is quite possible.
Preparatory work
The preparation process before erecting aerated concrete walls consists of several stages.
Mixing the mixture
First, prepare a container of the required size, as well as an industrial mixer. To prepare the adhesive solution, use dry composition and plain water. The beating process continues until the mixture being prepared has a uniform consistency. After this, no more than 20 minutes are allotted for its use, otherwise it hardens and accordingly loses its properties. Therefore, it is recommended to make small portions in order to be able to produce them in a short period of time.
When carrying out construction work in low temperature conditions, a special frost-resistant type of mixture must be used. So, components are added to its composition that reduce the freezing degree. As a result, the solution retains its properties even at low temperatures.
Marking
Before starting laying, markings are required. It is made along the axes of the surfaces of the structure being built. To do this, products are laid out on the line and their size is adjusted to fit one clear horizontal line. Fitting is carried out by using the above tools for aerated concrete in the form of a saw or a regular hacksaw for processing. It is important that all products are cut evenly. When bandaging is carried out, grooves are first made in the materials in which the reinforcement will be laid.
Tools needed to build a house from aerated concrete
One of the key features of aerated concrete is the ease of processing blocks. Aerated concrete can be sawed, grinded, sanded, tapped, with an inexpensive set of simple hand tools in your arsenal. At the same time, when choosing a tool, you should remember that the quality and speed of work largely depend on its characteristics.
The minimum set includes:
- Trowel. Using this tool, an adhesive composition is evenly applied to the surface of aerated concrete blocks. The trowel ensures strict rationing of the mixture, which guarantees fine joints of the masonry. For convenience, speed and quality of work, the width of the working part of the trowel should correspond to the thickness of the aerated concrete block.
- Saw on aerated concrete. A saw for aerated concrete blocks is a hand tool - a hacksaw, which differs from a saw for wood in the thickness of the blade and the shape of the saw teeth.
Using a saw, you can cut an aerated concrete block in half, cut additional elements from the blocks, and make the necessary technological protrusions in the block.
- Mallet. A rubber hammer allows you to upset and level the stacked blocks vertically and horizontally without damaging their surface.
- Planer for aerated concrete. This is a special tool necessary for grinding down small irregularities and height differences in aerated concrete.
The saw blades are fixed in the working part (sole) of the plane. Due to the multidirectional position of the teeth, the tool grinds down the surface of the aerated concrete block without leaving deep grooves on it.
- Sanding board. The tool allows you to sand roughness on the surface of aerated concrete or rub the surface after using a plane.
- Bubble level. The tool is necessary to control the geometry of the masonry (the evenness of the plane of the laid blocks) both horizontally and vertically. The optimal length of the bubble level is from 600 to 800 mm.
- Wall chaser. The tool is used for quickly making grooves for laying reinforcement (reinforcing masonry under window openings), as well as for cutting cable channels for laying utility routes, for example, electrical wiring.
In addition to the above tools, to build a house from aerated concrete you will need:
- Spatula - it is necessary to remove excess mortar from the seams and grout the surface of the blocks from dirt and chips.
- A sweeping brush – with its help, all the dust remaining after sanding and grouting the surfaces is necessarily removed from the blocks .
- A square, which is used to mark places for sawing blocks with a saw on aerated concrete.
- Marking construction lace mooring.
Step-by-step masonry instructions
It is worth taking a closer look at how to build buildings from aerated concrete blocks. It is important to note that each stage of constructing a structure made from such material has its own characteristics.
First row
Regardless of what type of mortar will be used for the main part of the walls, for the purpose of arranging the first row, it is necessary to use only cement-sand. The reason for this is the need:
- Align the horizontal level;
- Make reinforcement between the base on which the waterproofing layer is laid, as well as the first row;
- Reduce the impact of foundation unevenness.
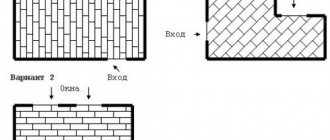
It is important to start the process of laying walls by arranging the corners of the structure. After this, a cord is stretched between them, based on which the blocks are then laid along all the walls.
The levelness of the construction of the entire wall is determined by how correctly the first row is laid. In subsequent rows it becomes more difficult to correct the horizontal level.
Subsequent rows
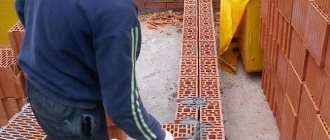
The procedure for laying the second and all subsequent rows is simpler. To do this, glue is applied to the surface of the previous rows, as well as to the end part of the adjacent product. Using a notched trowel, the glue is evenly distributed over the surface and the block itself is laid. After this, it is leveled and pressed against the end surface with a rubber mallet. Each subsequent row is laid with a step of at least 20 cm to the previous one, and an indent of half a block is considered ideal. Installation of 2 and subsequent rows also involves laying products in the corners and pulling the rope to create a level. In the process of building walls, it is important not to forget about the need to leave openings for future doors and windows.
Every fourth row must be reinforced to give the structure stability.
Door and window openings
An important step in the construction of aerated concrete walls is the installation of lintels in door and window openings. It's not difficult to make them. For this purpose, the foundation is first made, and the beams will be laid on it. It must be very strong so that the blocks that will be placed on top do not lead to its deformation. Such a base is mounted on the opening blocks, after which tray blocks are laid on top and glued together. A reinforcing frame is made inside them, which is then filled with concrete mortar. It should be more durable than what is used for masonry.
Reinforcement
The first stage of reinforcement is performed between the waterproofing layer, as well as the first row. The need for it is due to the distribution of the load exerted on the foundation or ground floor. In addition, this significantly improves the load-bearing capacity of the lower rows. For reinforcement, a masonry mesh is used, in which the thickness of the rods varies between 3-4 mm, and the size of each cell is 5x5 cm.
In addition, every fourth row needs to be reinforced. In these cases, metal or fiberglass reinforcement is used. To lay them, make 2 grooves in the previous row, fill them 50% with glue and lay the reinforcement. Next, all these connectors are completely filled with masonry mortar so that it is flush with the blocks.
Where there is a break in the reinforcement, it is important to overlap it. In addition, it is necessary to avoid breaks in the reinforcement at the corners. To do this, in such places it needs to be bent so that it overlaps the other wall by at least 30 cm. This will strengthen the corner joints and make them more reliable. The strongest reinforcement is obtained by using steel reinforcement options, which well hold the entire structure in the desired position.
It is recommended to always have tools for working with aerated concrete blocks on hand. They will be needed at all stages of building construction.
The last row
Special attention should be paid to laying the last top row, which precedes the installation of the roof. The fact is that the mass of the future roofing structure, for which natural materials in the form of slate or tiles are used, places a serious load on the wall. Because of this, when installing it directly on aerated concrete blocks, further deformation and damage are possible. To eliminate this, it is recommended to create a reinforced belt around the entire perimeter of the building. This design will allow:
- Eliminate point loads on walls;
- Distribute the force evenly over the wall area;
- Make the masonry surface level and horizontal.
The size of the reinforcement in such situations is determined by the mass of the future roof.
Laying technology
Before starting work, you need to do a little preparation: carefully study the instructions for laying aerated blocks, unpack the blocks and move them as close as possible to the laying site.
This is important when planting with glue: it hardens quickly, and the laying must be done as quickly as possible.
It is also necessary to carefully place special signal beacons around the entire perimeter of the walls being kicked out. A special cord or wire is pulled along these beacons, which serves as a level during masonry, with the help of which the correctness of the masonry is monitored.
At the corners of the building under construction and at the junctions of the partitions, special horizontal marking strips are installed with markings of the heights of future rows, onto which the leveling wire is attached. If necessary, such slats are installed in other places of the masonry, ensuring that the wire is tensioned evenly and does not sag anywhere.
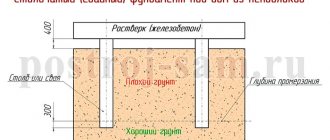
Be sure to waterproof the foundation before starting masonry.
Mixing the mixture
The adhesive solution is prepared in small portions, for 15-20 minutes of laying. Knead in a special container (you can use a bucket), pour warm water into it and add the dry mixture. For whipping, use a construction mixer or an electric drill with a special attachment. You need to knead until the adhesive mass acquires a homogeneous consistency.
For construction at low temperatures, there are special mixtures, to which manufacturers add components that allow the finished adhesive to maintain its technical characteristics even at sub-zero temperatures.
Marking
Before starting masonry, markings are made. It must be carried out along all axes of the surface of the building under construction. The blocks are pre-laid out in a line. If necessary, adjust the blocks using a hand saw, achieving the most even horizontal line. To do this, in places where there are protruding defects on the foundation base, the blocks are sawed down from below.
Carrying out markings.
Laying and reinforcement
1 row of gas blocks is laid on a cement-sand mortar in order to level the foundation base due to the greater thickness of the laying seam. Also, the use of a cement-sand mixture for laying 1 row, due to the longer duration of its hardening, allows you to carefully align the blocks in a horizontal line in order to mount the remaining rows of the driven out masonry on it.
Laying begins with corner blocks and the rest of the row is aligned along them. The adjustment of blocks of internal partitions is carried out, focusing on the already laid facade ones.
The 2nd row begins to be laid no earlier than after 2-3 hours. It is better to lay 2 and subsequent rows with glue. The blocks are laid with obligatory bandaging, for which each block in the upper row is shifted by half the length in relation to those laid in the lower row.
Before ligating, grooves are first made in the blocks for later placement of reinforcement. The grooves are made to a depth sufficient to completely bury the reinforcement used in them. The laid reinforcing bars are filled with glue.
The first layer of reinforcing belt is installed between the plinth and 1 row of masonry, then the reinforcing layers are regularly repeated every 3-4 rows of masonry. It is imperative to install a continuous reinforcing belt in the top row of the masonry, on which the roof will rest.
Checking the correctness of the masonry
During masonry, you regularly need to check the evenness of the laid rows and the thickness of the fastening adhesive layer. For control measurements, use a ruler, a rule and a building level.
To check the vertical plane, the rule is leaned against the constructed section of the wall. If the laying is done correctly, it should fit tightly against the wall. The building level is placed on top of the stacked blocks and, according to its readings, a horizontal line is determined.
If deviations of the laid blocks from the vertical or horizontal plane are detected, the masonry section must be redone. If no deviations are identified, then laying can continue.
Useful tips
All the steps listed above can be completed independently without any problems. However, if you do not have the skills to work with building materials, as well as tools for laying aerated concrete with your own hands, it is recommended to entrust the laying of at least the first row to professionals. This will avoid the most serious problems, which are the hardest to fix. Also, to simplify the process of constructing a building from a similar material, it is worth:
- Use blocks that have clear and uniform dimensions;
- Mix the glue using electronic tools. This will reduce the likelihood of lumps and uneven consistency;
- Place blocks on each subsequent row according to a clearly chosen pattern. Start doing this from the corners, and then lay out each wall level;
- It is worth reinforcing not only external walls, but also joints with internal ones;
- Using a plane, grind the blocks in order to achieve their maximum compaction.
Calculation of the cost of masonry
So, how much does it cost to lay aerated concrete blocks? Of course, construction from large-sized blocks is much faster, and the absence of the need to use specialized equipment allows you to reduce costs.
Before you start building a house, you should make a full and detailed calculation of all expenses , the lion's share of which is the cost of building materials. You will also need funds to purchase glue, fittings, tools, etc. But before that, care should be taken to build a reliable foundation and waterproof it.
Next, the consumable part is replenished: transportation of blocks, their loading/unloading . To carry out the actual masonry of the box at home, you can hire professional specialists or, if you have at least minimal construction experience and the necessary tools, take a risk and do it yourself. In the first case, it is necessary to take into account labor costs , which are calculated based on the cubic volume of construction; on average, the cost of 1 m³ of masonry ranges from 1,200 to 2,500 rubles.
It is sometimes possible to optimize costs if the blocks are purchased from a company that provides free transportation to the construction site, and sometimes even unloading. In some cases, you can agree with the workers themselves to include unloading of aerated concrete blocks in the list of their work for a small additional payment.
You can save a lot if you do the construction yourself, but in this case you need to be completely confident in your abilities, otherwise the illusory benefit will result in quite tangible additional costs.
After a full cost estimate for the construction of an aerated concrete box has been drawn up, 15 to 25% of this amount should be provided for unforeseen expenses. And then you can safely begin construction.
Common Mistakes
There are common mistakes that are made when building walls from aerated concrete:
- Neglecting to create a waterproofing layer between the foundation, as well as the first row;
- Carrying out masonry without displacing subsequent rows;
- Lack of reinforcement in the arrangement of partitions;
- Use of non-frost-resistant types of mortar for installation in winter;
- Ignoring the strengthening of window or door openings. To do this, you need to use steel corners or reinforced concrete lintels;
- The seams between the blocks are poorly or unevenly filled.
Laying aerated concrete walls does not require serious experience; it is important to adhere to the laying technology, as well as strictly observe the horizontal level. This will allow you to achieve high levels of strength and thermal insulation.
Tools for aerated concrete masonry
Before starting construction work, you should prepare the necessary tools:
- Construction level or laser level;
- Hydraulic level;
- Roulette;
- Cord plumb line;
- Special saw and trowel for aerated concrete;
- Square;
- Trowel;
- Rubber mallet;
- Wall chaser.
Joining walls and bandaging blocks
- Metal flexible connections are used to join load-bearing and non-load-bearing walls.
- Bandaging of load-bearing walls and load-bearing partitions is carried out across the entire width of the block across a row.
- Vertical ligation of blocks in the wall is carried out with a minimum distance of 13 cm.
You have become familiar with the rules for laying the blocks themselves. But there are other important stages and points that you need to know, namely:
- Reinforcement of lintels
- Armored belt device
- Laying partitions
- Masonry tools
- Drying aerated concrete
- Drilling aerated concrete
- Laying aerated concrete in winter
We have included all this information in separate articles using links.
What tools and materials may be needed
Expert opinion Vitaly Kudryashov builder, aspiring author
Ask a Question
Laying aerated concrete blocks is a construction and installation work that requires special knowledge and skills. Despite its apparent simplicity, working with blocks requires special knowledge and skills. The devil is in the details!
To perform masonry work during the construction of load-bearing walls, you need:
- Construction Materials:
- aerated concrete blocks;
- roll waterproofing (for example, hydroisol );
- mounting adhesive solution.
- Tools and equipment:
- electric mixer or drill with a mixing attachment;
- spatula 6-8mm;
- rubber hammer (mallet), grater for leveling;
- electric grinder;
- building level, tape measure, concrete saw.
- wall chaser
The quantity of materials is indicated in the estimate calculated on the basis of the project.
How to lay aerated concrete blocks on a mortar: step-by-step instructions
Masonry work begins with the preparation of the construction site. is laid on the strip or slab foundation . Using a laser level and a metal tape measure, the highest point on the foundation is determined. Masonry begins from this area. to the waterproofing and we begin laying gas blocks. The first gas block is being laid. Next, we also lay blocks in all other internal and external corners, controlling the horizontal level with the first block, diagonal and linear dimensions according to the project. Masonry work is carried out in the following sequence:
- Applying markings (ordering) of future walls, window, doorways, ceilings.
- The laying of the first row of blocks is controlled by the building level, then we control the laying... of each row!
- All rows are laid out along the cord with control of possible sagging. The solution is applied with a notched trowel and spread onto the block in one direction - parallel to the masonry! The thickness of the glue layer is 1-3 mm. In winter, before applying the mixture, the gas block is cleared of snow and ice.
- The position of the block is adjusted using a rubber mallet until the mounting mortar sets.
- If it is necessary to add blocks, they are cut with a hacksaw. The cutting areas are processed with a grater .
- When laying a row is completed, the surface of the blocks, especially at the joints, is leveled with a trowel to avoid cracking of the material as a result of stress.
- The rest of the walls are laid out in the same way. Defects are cleaned using a grinder .
Before starting construction, you need to decide how to lay the gas block on the solution. To do this, before starting to lay each row, the blocks are laid out dry, without glue, to determine high-quality connections with the internal walls and form additional blocks of sufficient size.
Installation of corner blocks
Laying corner blocks should begin from the very top corner of the foundation. The first block will be installed at the intersection point of the lace. Using a water level or level, all corner blocks are placed on the solution strictly in the same plane and level.
You need to adjust the blocks using a level and a rubber mallet.
The entire first row of blocks is laid exclusively on the mortar, since the thickness of the leveling mortar layer will not shrink.