Gates are constantly subjected to heavy loads. Skewed entrance structures are a fairly common occurrence. Many gates that can be found on the streets of any city have rickety posts. It doesn’t take a lot of experience to figure out that the cause of support pillars collapsing is due to improper installation. There is no rigid connection between such elements. The foundation for them was poured incorrectly. Before building a gate, you need to understand the intricacies of installing supports, for example, how to install mortgages for gates in brick pillars.
Necessary materials
To make reliable gate posts in a suburban area, you will need to prepare a number of materials. The parameters of various structural parts are calculated taking into account the expected load. To create a gate you will need:
- a pipe having a diameter of 100 mm;
- corner 100x100 mm;
- Bulgarian;
- cement powder;
- carpentry tools;
- welding machine;
- sand;
- timber and edged board - formwork will be constructed from them.
Having prepared such tools, you can begin work on creating and installing gate posts.
Features of installing supports under gates
Some craftsmen bury the supports, others strengthen them with concreting. If you decide to install brick gate posts, the second option is more suitable. If the fence and gate are not high, there is no need to concrete the base. Experts advise digging recesses that correspond to parameters that exceed the cross-section of the support and have a depth greater than the depth of the buried part of the support.
Please note that the installation of posts fixed under the gate is not possible to adjust the fixation of the supports relative to the height. Then the component is aligned to the level of the fence in compliance with the verticality requirement. Stretch twine or cord between the outer supports. When working, it is important to constantly use a building level, which is applied perpendicularly.
If you do the work yourself, use 2 levels. Attach with masking tape to the 2nd level support and continue working.
How is the hole formed correctly where the support will be buried to secure the gate? How to make it, use step-by-step instructions:
- Fill with sand and crushed stone with a fraction of 20-40.
- Compact the layers. They should lie tightly.
Manufacturing of foundations and metal racks
First, the blanks from which the gate will be made are cut. For the racks, pipes with a diameter of 100 mm are prepared in advance. The length of the elements depends on the sum of the height of the valves and the depth to which each support will be buried. The last figure is 0.8-1 m. If the height of the gate is 2 m, the blanks for the pillars are made 3 m long.
The jumper used to connect the racks is made from a 100x100 mm corner. The length of this element must be equal to the width of the gate. For standard structures, it is 3 m long. When choosing a metal pipe for supports, one flange of the corner will have to be cut off and then bent slightly so that the edges of the corner fit better to the posts during welding.
Then the following actions are performed:
- The gate frame is assembled. This work should be done on a level piece of land. The frame should resemble the letter "H". It consists of two racks and a jumper. The last part should be placed at a distance of 2 m from the top of the structure. During operation, several conditions must be met - the racks must be parallel to each other, and the jumper must be perpendicular to them.
- The jumper is welded to the posts. Any metal pieces should be welded to the jumper in three places. They should be pointing down.
- These elements will play the role of reinforcement that will connect the lintel to the foundation.
- Then you should dig a trench for the foundation. The width of the pit should be 350-400 mm. The length of the pit is 3.5 m - if it is necessary to manufacture a 3-meter gate. The required depth of the hole should be determined taking into account the level of soil water and soil freezing.
- It is necessary to make wooden panels - for this you will need to prepare an edged board. Then the formwork is assembled. It should have dimensions of 0.3x3 m. The formwork walls are made with a downward expansion. This will prevent the foundation from being pushed out by the soil.
- Then the gate is installed in the formwork. This must be done so that the jumper is level with the ground, and the racks are installed strictly vertically.
When performing work, the racks should be strengthened. To do this, stone supports are placed under them. Then the pillars must be strengthened with stops. In order for the foundation to be strong, it should be reinforced with profile scraps. They are fastened with knitting wire.
Then the concrete mixture is prepared. It should contain four parts sand and one part cement powder. Then the formwork is filled with mortar. Broken bricks and stones are used to save the mixture. The solution must harden before the gates are hung on the posts. You need to wait about a week.
Requirements for pillars
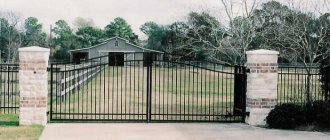
Gates on pillars
According to their rigidity to the posts, all gates can be divided into groups:
- Gates that are locked with a bolt, an electronic lock; gates with heavy leaves; gates that may be damaged by passing trucks.
- A gate that is locked with a chain or barrier.
Products of the first type are usually placed where they need to be opened and closed frequently - for example, at the entrance to a large shopping center. Typically, such a passage has a significant width - about five meters.
And in some cases - even more, so that two cars up to eight meters wide can easily pass each other. The doors in this case can weigh from 500 kg to four tons.
Yes, and in a private house, many will want to have a gate that closes with an electronic lock - they can be opened and closed without leaving the car, or just look from the window who has arrived and open the gate for him without leaving the house.
Before you install gate posts, you need to know that the most stringent requirements are imposed on them here. They must ensure reliable operation of the bolt mechanism and a stable position of both doors relative to each other.
Gate with chain
Gates that are locked with a chain do not impose any special requirements on the rigidity of the posts.
The chain, although it does not provide sufficiently reliable protection against penetration, will still be an obstacle to the penetration of thieves.
Here it will be enough to ensure sufficient strength of the pillars themselves - after all, when using gates, there is still a possibility that they will be hit by a trailer when entering.
It would also be a good idea to ensure that the pillars are maintainable. Barriers also do not impose any special requirements on the posts. An exception is electronic barriers with the beam being locked when lowered by a stop.
In this case, the same requirements are imposed on the pillars as for gates of the first type. In addition, they should be stronger - a barrier at the entrance is easier to miss in the dark than a closed gate. The disadvantage of chain-locked gates is that you have to open and close them manually.
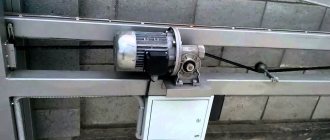
Installation of metal gates
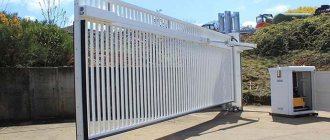
Once the area is fenced, you need to think about installing a gate. They can be of several types - sliding or swinging, lifting or opening in one direction. You can only install swing gates or a structure that opens in one direction with your own hands.
Before work you should prepare:
- welding machine and bolts;
- hinges;
- flat block;
- supports.
In country houses and dachas, swing gates are most often installed. Such designs have two doors. They are welded from iron. If desired, you can build wrought iron gates. To install the gate, you need to dig in the pillars, determining the size of the gates. Both wooden and iron supports can be installed.
The hinges are attached to the posts with bolts. Store bought products are not suitable for this purpose. This is explained by their low reliability. You should purchase powerful hinges made independently by a turning specialist. Such designs must have a ball mechanism. This will allow you to open the gate quite easily.
The work of installing and securing the gate is difficult. One person is unlikely to be able to carry out this procedure, since the valves are quite heavy. They are hung at a certain height above the ground.
To create an opening under the gate, you should lay a block between the supports, and then install the sash on it. Now you can weld the hinges - first the upper ones, then the lower ones. The second sash is installed at the same level as the first.
Which pillars are best to use and when?
Gate posts can be made from the following materials:
Metal pipes
Profiled or round pipes are used. The thicker the pipe walls are, the longer such supports will last with proper care. The pipes are perfectly held in concrete and can withstand the significant weight of the valves. Requires pre-treatment with waterproofing materials and painting. The light weight of the pipes makes it possible to install them independently.
Profiled pipe for poles
Reinforced concrete pillars
Reinforced concrete structures do not tolerate mechanical stress and vibration well, so it is not advisable to install them as supports in places where freight vehicles often pass. The products are heavy, so their installation requires special equipment. If you use small cross-section posts, they will not last long and the fence or gate will simply collapse.
Reinforced concrete pillars
Stone or brick supports
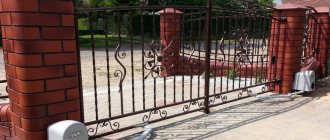
Quite strong and durable, look presentable. Can be successfully used for gate installation. To strengthen the brick or stone masonry, a metal pipe is inserted inside the future support. The masonry is carried out around this pipe, connecting to it through anchors or embedded elements. The voids between the bricks (stones) and the pipe are filled with concrete mortar.
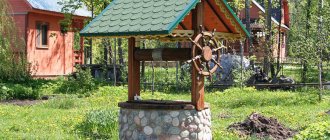
Installation of wooden gates
Owners of country lands want to install gates in such a way that they are convenient to use and have an aesthetic appearance. Wooden structures are the most affordable and easiest to manufacture.
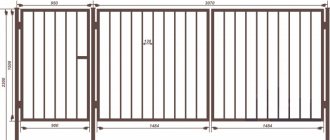
Those who want to make wooden gates with their own hands must first make a drawing of the future product. This will help calculate the amount of materials needed, as well as find out the scope of work. When making a drawing, it is necessary to compare the dimensions of each element.
Installation of supports
Vertical pillars are created from wooden beams. Their dimensions are calculated quite simply - a meter is added to the height of the structure for immersion in the ground. The greater the depth, the more stable the gate will be. This will eliminate the possibility of distortion of the structure.
Debris should be removed from the installation site of the support posts. It is necessary to dig holes with a diameter exceeding the diameter of the pillars by 20 cm. The part of the pillar that is filled with cement mortar must be pre-treated with bitumen mastic. This will protect the wood from rotting. A plumb line checks the vertical position of the pillars. Pits with installed supports should be filled with concrete and then wait until it hardens.
Manufacturing of wooden gates
To create one of the posts for wooden gates, you will need to prepare bars for the bottom and top, 2 bars for the side supports and two for creating the middle lintel. Dimensions are calculated based on the dimensions of the car of the owners of the land plot. Each wooden element must be impregnated with an antiseptic.
The gate frame elements must be laid out on a flat area, and then holes for the pins must be made using a drill. Such parts will add reliability to the structure - they secure the nodal connections. In the center of the frame it is necessary to install jumpers made of beams. In the corners, jibs are attached, which are located at an angle of 45 degrees.
When calculating the height of the frame, it should be taken into account that the boards for sheathing should protrude beyond it from above and below by 20 cm. Before starting sheathing, the boards should be prepared. They are processed with a plane.
There are several ways to cover a frame with boards. After installing all the elements in place, the top is trimmed and sanded. Now you can install hinges on the sashes. For this purpose, self-tapping screws should be prepared. They are also used when fixing fasteners on racks.
There must be a distance of at least 5 cm from the ground to the bottom of the gates. When closed, the gates are secured using bolts, locks or latches. It is wiser to carry out painting after installing the wooden gates.
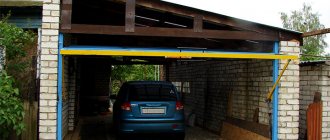
Swing gate design
No matter what materials appear, no matter how the fashion for decorating gates changes, the basic principle of their arrangement remains unchanged. Structural device:
- pillars (racks). In fact, they are not gates, but they are supports for their fastening;
- frame for swing gates. Wood or metal can be used in its manufacture. The latter is more popular because gives the frame greater rigidity;
- finishing (cladding) material for cladding;
- loops;
- latches and locks.
So, we have decided what swing gates are and what features they differ from.
Concreting fence posts
By concreting the pillars, the fence becomes much stronger. At the same time, the service life of the structure increases. Metal supports are perfectly protected from rust. There are several types of concreting. They have certain differences that are worth considering.
Full concreting
The first thing that needs to be done is to prepare the site for installing the fence. In places where the supports will be concreted, all plant roots should be removed and the fertile layer should be cut off. Using a garden auger, you need to make a hole with a depth below the soil freezing level. If the drill is equipped with a special expander, you need to make a slight widening in the lower part of the pit. This will prevent the foundation from being pushed out by the soil during frost heaving.
The site is marked around the perimeter. The plan must indicate the installation locations of the pillars. If the soil is highly susceptible to frost heaving, soil should be removed within a radius of half a meter around the installation of supports and sand should be poured into the holes.
Metal poles are prepared in advance. They must be thoroughly cleaned of rust stains. Then the metal elements are treated with an anti-corrosion compound. If possible, use a welding machine, weld two transverse rods at the bottom. This will make the pillars more stable.
The supports are installed in the hole and fixed with braces. You need to check with a level how vertical the pillars are and level them if necessary. Pouring cement mortar is carried out using an old bucket without a bottom. It is better if a mixture of cement and crushed stone is poured. When choosing this option, you should first mix all the components, and then simply pour the mixture into the pit. When pouring the solution, the vertical position of the supports is simultaneously checked.
Partial concreting
If a lightweight fence is being installed, it makes sense to carry out partial concreting. When choosing this option, the area is first marked out, and then the supports are driven into the ground using a sledgehammer. In case of heavy soil, it is drilled in advance with a drill. The diameter of the funnels should be slightly smaller than the diameter of the pillars. Then the supports are aligned plumb. The space around the pillars is filled with cement mixture.
Partial concreting is suitable for areas with low groundwater levels. Otherwise, in the spring the gate may become askew. When the soil absorbs water well and the fence is not too heavy, this method is optimal.
How to choose pillars
The types of pillars are presented in the table.
| View | Description |
| Wooden | Designed for mesh and wooden gates. They are not suitable for more powerful and heavier structures. Before carrying out work, the area must be cleaned. Then it is marked. When installing a temporary structure, the supports are treated with roofing felt. If you want to install a permanent structure, the insulation must be more reliable. Wooden supports will last much longer if the anchor is concreted in a timely manner. Before this, you need to treat with insect attack and temperature changes. You should also protect the selected structure as much as possible from moisture and rotting. |
| Metal | Gate posts made of metal pipes are designed for all types and methods of fastening. To make a steel support, a pipe made of high-quality metal is used. The cross section is different. The structure will acquire the necessary strength only after welding the upper and lower crossbars together. Also, the product must be carefully concreted. Anti-corrosion treatment is required. A primer is used for this. The pillars are fixed using concrete. In order to further secure the structure, vertical supports are used. Welding is used for connection. The structure must be provided with additional reinforcement. A crossbar located on top is used. It is attached to the top of the supports. |
| Brick | The design performs not only its main, but also a decorative function. If there is a pipe inside made of first-class metal, then the support will be provided with additional strength. Installation of the foundation for the support depends on its massiveness. Concreting is required. A special “cap” must be installed on the top of the pillars, which protects the support from the adverse effects of external factors. |
| Concrete | Used for tall, imposing structures. The installation method is similar to the installation of structures made of metal. The only difference is the need for deeper concreting. It can be replaced by installing a strip foundation. Having installed such a support, you can hang any gate - both swing gates, which are made of wood, and heavy forged ones. |
What tools are needed?
If you decide to install swing gates yourself, then you will need to do everything yourself, from laying the supports up to creating the leaves and installation. To lay the pillars you will need:
- Drill or shovel;
- Master OK.
For working with metal: electrodes and a welding machine, as well as a grinder with threaded or grinding discs. To assemble, stock up on a screwdriver or screwdriver, a drill with drills of different diameters.
Some people use a gun to secure the skin more firmly. For measuring purposes, a marker for drawing on wood and metal, as well as a level with a tape measure, are used.
To carry out painting work, it is best to take a spray gun, but if you don’t have one, then use brushes that are familiar to everyone. Don’t forget about the equipment that will protect you from injury – gloves and goggles. It wouldn't hurt to buy a helmet for your own safety.
Gate diagram
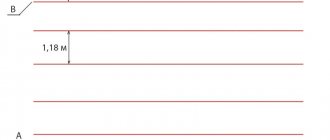
Preparing a trench for the foundation
By this stage, you need to decide what kind of gate you will have - swing or sliding. You can order the gate from us, and having previously drawn a drawing with dimensions, you can work on the foundation, or you can assemble it yourself (the dimensions must be accurately maintained).
The best solution, in our experience, is to install the gate directly into a single slab. The trench for this should be 0.5 m wide and 0.5 m longer than the width of the gate. In the conditions of the central part of Russia with heaving soils, the trench should be deeper than 1.8 m (Moscow and Moscow), and if the soils are not heaving, then 1.2 meters is sufficient.
Before pouring, be sure to fill it with a sand and gravel cushion 20-30 centimeters thick. We prepare the entire structure in advance directly on your site to reduce transportation costs.