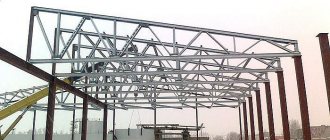
A frame house is considered one of the most rapidly erected, fairly light wooden structures. Its basis is considered to be a frame made of wooden logs. Sometimes such a frame is made using metal parts. The frame has:
- harness;
- sheathing;
- vertical racks;
- thermal insulation materials.
Diagram of a frame house.
The outer part of the house, i.e. its walls are lined with finishing materials.
Design project and drawing of a house
A frame house design project will help you significantly reduce construction time, avoid many mistakes and reduce material consumption. But this is not only about designing the interior of the rooms. The design project also includes drawings . They are simply necessary for the foundation, rafter system and wall frame.
Drawings help calculate the consumption of building materials and the load on structural elements. They reflect the dimensions of all parts and assemblies, their proportions and connection methods, and the wiring of utilities.
To develop a design project and drawings, you can turn to professional designers or try to master specialized programs. For example: ArchiCAD, Arcon, WoodEngine, CadWork. However, please note that some programs require the purchase of a license key and time to master.
Laying the foundation for a frame house
A frame house can be erected by you on a slab, pile, column or strip foundation. Each has its own advantages and disadvantages and is suitable for a certain type of soil. How to determine which one to choose?
Soil analysis at the construction site
A foundation selected in accordance with the characteristics of the soil is not just a reliable foundation for the entire structure. This is also a rational use of your money. A frame house does not always need an expensive slab or deep strip foundation.
An analysis of the soil taken from the construction site will help you make the right choice What it will help determine:
- Depth of groundwater. If they flow close to the soil surface, you will have to abandon the construction of a cellar.
- Qualitative composition of the soil (fine sand, gravel, clay, etc.). The best option for construction is gravel soil, the worst is fine sand.
- The depth of soil freezing. The larger it is, the more labor-intensive and expensive the foundation work will be.
For research, you can dig a hole yourself, at least one and a half meters deep, take soil samples and take them to the laboratory. A less labor-intensive option is to invite geological engineers directly to the construction site.
Features of strip foundation
The strip foundation is a closed loop made of reinforced concrete. It is laid under the load-bearing walls of the house along their entire length.
Despite the labor-intensive and expensive installation, a strip base is the best option for a frame house. It has a large load-bearing surface, allowing you to equip a basement and carry out construction work even on heaving soil.
Sequence of construction of a strip foundation:
- Digging a trench and laying a sand cushion on its bottom.
- Waterproofing trench walls.
- Installation of wooden formwork.
- Assembly and installation of reinforcing mesh.
- Pouring the formwork with concrete and compacting it.
The height of the strip foundation should be at least 2 times its width. Under such conditions, transverse deformation does not occur in it.
Pile-screw foundation - a simple and affordable foundation for a house
A pile-screw foundation allows you to build a residential building on weak areas and areas with uneven terrain without construction experience. It becomes a reliable support for the walls, since the piles firmly cling to hard rock below the freezing level of the soil.
Useful: How to build a garden house with your own hands
Screw piles are metal rods with blades welded onto their pointed ends. This design allows you to simply screw them into the ground like a drill. This can be done using special equipment or manually. But in the latter case, at least three people will be needed.
Laying a columnar foundation
The columnar foundation is erected only on stable soils with high bearing capacity.
The work is carried out step by step:
- Round holes are drilled in the ground along the selected perimeter.
- They install a metal frame connected from reinforcement.
- Formwork made from casing pipes is lowered into the wells.
- Above-ground elements are cut one level at a time.
- The wells are filled with concrete and compacted.
The height of the heads (the above-ground part of the pillars) should not be less than 400 mm. Otherwise, the wood flooring will rot from constant exposure to moisture.
Slab foundation - when considerable investments pay off
The slab foundation is rightfully considered the most expensive. This is due to the large load-bearing area, which is the main advantage of a monolithic foundation.
A house built on such a slab is protected from distortions, because even when exposed to the forces of frost heaving, it moves along with the foundation.
The base laying technology involves
- Removing the top layer of soil (fertile).
- Laying geofabric, backfilling the sand and gravel cushion and compacting it.
- Flooring waterproofing material.
- Installation of wooden formwork.
- Installation and installation of mesh knitted from ribbed reinforcement.
- Pouring concrete and its subsequent compaction with a special vibration machine.
The height of the slab base is usually 100 mm .
Preparing for work
In order to install a wooden frame under drywall, you should prepare some tools, including:
- pencil;
- perforator;
- saw;
- spatulas;
- plumb lines;
- screwdriver;
- roller;
- level.
In addition to all this, you will need timber for the sheathing, self-tapping screws for fastening drywall, fire retardants, antifungal agents, as well as putty and sickle tape for working with drywall.
Bottom frame of the house
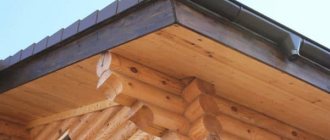
If you are planning to build a frame house with your own hands, you cannot do without the bottom frame. It unites all the elements of the foundation, if it is columnar or pile-screw, connects the base of the house with its walls, and serves as a support for laying the floor.
To install the bottom trim, use a 150x200 mm beam or a bunch of boards placed at the end. Lumber must be pre-treated with an antiseptic and fire retardant.
They are fixed to the foundation using anchor bolts with a wide nut. The beams are connected to each other using panels or “half a tree”, “in a paw”, additionally strengthening them with nails and steel corners.
How to install drywall
Installation of drywall is carried out using frame and frameless methods.
- Frameless - sheets of plasterboard are attached directly to the walls using special glue.
Installing drywall sheets directly onto the finished surface
- Frame - a frame for drywall is mounted from galvanized metal profiles of a certain shape or wooden slats, and sheets are secured to it with self-tapping screws.
Each method of attaching drywall has its strengths and weaknesses.
- Frameless allows you to save room space, but its installation requires smooth wall coverings and installation work takes a long time due to the fact that you need to wait until the glue hardens before further work.
- The frame mount makes it easy to install thermal insulation and communications, but you have to install sound insulation, and the size of the room is hidden, albeit slightly.
Wooden sheathing is a fairly cheap option, which is also more environmentally friendly
Important! With the frame installation method, stripping walls for electrical wiring can be avoided. That is, there will be practically no dust during work.
Drywall not only levels walls. When remodeling a room, gypsum plasterboard partitions are the best option. They are lightweight, easy to use and can be covered with anything.
Related article: Making a simple and effective heater with your own hands in half an hour
Can be used in the bathroom to finish the bathtub
- Band screwdriver
- Dowel wood
- How to make a drywall frame
Laying and insulating the subfloor
The base of the subfloor is the basement beams. Their function is performed by beams with a cross-section of 140x180 mm or boards measuring at least 160x50 mm. The ideal option is material with the same cross-section as the elements of the lower trim.
The floor beams are fastened “in half a tree”, making appropriate cuts. For additional fixation, use two nails at each junction of the beams.
Then the flooring and its insulation are carried out according to the following scheme:
- Attaching the cranial bars to the bottom of the beams.
- Fixing subfloor boards on them.
- Waterproofing beams and decking using dense polyethylene.
- Laying insulation in cells formed by beams.
- Installation of vapor barrier.
- The flooring is plywood, floorboard or OSB board.
This “pie” is ready for finishing at the final stage of independent construction of a frame house.
Foundation installation work
Work on the construction site begins with the foundation. A frame wooden house is significantly lighter in weight than any other wooden building. Therefore, a frame structure will require a simpler foundation. The most common and popular types of foundations for wooden frame houses:
- Shallow strip foundation (for two-story houses or residential buildings with significant wall thickness);
- Columnar foundation (for country houses and residential buildings with one floor or thin walls);
- Pile foundation (suitable for any type of frame structures on soils with good bearing capacity);
- Foundation on screw piles (suitable for any type of structure and any soil). The technology is quite young, but has already proven itself on the positive side, and is becoming more widespread every year.
Installation of grillage, installation of floor joists, floor insulation
For frame houses, reinforced concrete grillage is rarely used (except for strip foundations). Therefore, in most cases, the strapping beam will be a grillage. Waterproofing must be laid between the strapping beam and the foundation. After installing the strapping in one plane and checking the level of the timber, you can begin installing the floor joists. A feature of frame technology is the need to install the floor of the first floor or at least floor joists before erecting the walls. To install the first floor logs, a beam is used, the cross-section of which is calculated depending on the load, the pitch between the logs and the span length of the log supports.
For the convenience of subsequent construction work, immediately after installation, the floor is insulated and the floor covering is laid. Floor insulation is impossible without installing a rough base, which serves as a platform for laying insulation between the joists. To lay the subfloor, bars are attached to the side surface of the joists, and a 25 mm thick edged board is laid on them. A vapor-permeable membrane is spread over the subfloor. Now you can lay insulation between the floor joists - mineral wool or fiberglass.
Since we decided to build a strictly wooden frame house, we will use wood as the finishing floor covering. You can make the flooring from edged boards 40 or 50 mm thick, then lay a layer of plywood and only then lay the finishing floor covering. But this option is not the simplest and is very expensive. The best option would be to use a solid floor board (floor slats) with a thickness of 28 or 36 mm, depending on the pitch between the joists. The board is equipped with a tongue and groove, which allows installation in a lock. This material is laid immediately after the vapor barrier contour on top of the floor joists. The floor board is secured with self-tapping screws. As a result, we get an even planed fabric without gaps or differences, which does not require scraping or sanding. The finishing for such floors is parquet or yacht varnish.
Stages of construction of the frame of walls and roof
The subfloor with its rigid base is the reference point for the construction of the wall frame and installation of the rafter system under the roof. This is one of the most labor-intensive stages of building a frame house.
Installation of vertical racks for external walls
Markings are made along the existing bottom trim for attaching the vertical frame posts . Their length determines the height of the ceiling on the floor minus its finishing.
Work begins with the installation of corner elements with a cross-section of at least 100x100 mm. They are fixed in two main ways:
- Using a wooden dowel, which should rise 80-100 mm above the corner connection of the trim. In this case, the stand is literally strung on it.
- Using galvanized metal corners with reinforcement.
For racks on straight sections, timber with a smaller cross-section - 50x100 mm - is suitable. Its connection to the harness is made by complete or partial cutting or using steel corners. Here you can use fasteners without reinforcement.
Useful: Installation technology of sandwich panels in frame housing construction
When determining the pitch of the racks, be guided by the width of the insulation or sheet material of the wall cladding. To prevent the vertical elements of the frame from tilting, they can be fixed with temporary jibs.
Upper frame frame and interfloor slab
Only after fixing the racks strictly vertically and in a stationary position do they begin to work on the upper trim. All grooves and fastenings in it must be similar to those in a similar lower chord. This will give the structure good spatial rigidity.
Note! The width of the top frame beams should be equal to the width of the vertical posts.
The interfloor ceiling is installed in the same way as the basement floor. Logs from boards 50x200 mm with a pitch of 600-800 mm are fastened with nails to the beams of the upper frame.
If the ceiling is not an element of the roof truss system, but the floor of the second floor, it must be additionally reinforced with spacers. Their function is performed by edged boards, which are lined up between the joists in one line and fixed with nails. With a second floor span of 2.5-3 m, one line of spacers is sufficient. For a larger span you will need two parallel lines.
Assembling the rafter system
The rafter system determines the shape of the roof of a frame house built from scratch. Most often it is gable.
Boards with a section of 50x150 mm or 50x200 mm are suitable for rafters . They are installed on the bars of the upper trim in increments of 0.6-1.1 m.
The rafters are also connected to each other, which gives the roof appropriate rigidity and determines its load-bearing capacity. To do this, use the following elements:
- longitudinal runs;
- lathing;
- crossbars;
- racks;
- sill;
- puff.
If the span of the second floor or attic is less than 10 m and there are no load-bearing walls in the house except external ones, hanging rafters can be installed. This system involves fastening each rafter with one end to the frame, and the other to the counter element. Tightening in the form of a horizontal beam allows you to strengthen the structure.
Layered rafters are appropriate where there is an intermediate support for them in the form of a load-bearing wall or a columnar element.
They are reinforced with internal middle pillars.
Wooden frame for wall cladding
It is advisable to install plasterboard on a wooden frame when covering walls if their height is more than three meters or the walls have significant roughness and poor-quality plaster coating.
- The wall is marked for the frame.
- Dangerous areas with weak plaster and unevenness are identified.
- The sheathing is installed in accordance with the measurements taken, starting with a horizontal beam, which is fixed to the floor.
It’s quite difficult to make the required radius of curvature from wood, so you can’t do without using a metal profile
- Vertical slats are mounted to the horizontal beam with a distance of 10 mm from the edge of the sheathing. The step between them is taken to be 600 mm.
- After the verticality of the structure has been checked with a plumb line (level), a second horizontal beam is fixed to the ceiling, to which vertical slats are attached.
- Leveling the structure on an uneven floor under a horizontal beam is carried out using a lining of chipboard scraps or wood left over from the slats.
Adviсe:
- To avoid making cuts in the drywall when making sheathing near door or window openings, the vertical slats are moved.
- During subsequent sheathing with sheets, there should be no joints above window or door openings.
Installing drywall on a wooden frame with your own hands is not at all difficult, even without a partner. Even easier, if the floors are level, the installation process will not be difficult.
It is also easy to attach the gypsum board to a ready-made wooden sheathing.
- Sheathing for plasterboard
- Drywall frame
- Plastering walls with plasterboard in a wooden house
Simplified assembly of a wooden frame
If the size of the room allows, then it is easier to assemble the frame on the floor.
- Its size must correspond to the size of the wall on which it will subsequently be fixed minus 5 mm on each side.
- A frame is assembled from load-bearing vertical and horizontal beams.
- Additional slats are fixed in increments of 60 cm and auxiliary wooden crossbars.
- Thermal insulation is attached directly to the wall and covered with an assembled frame.
- Fixation is carried out around the perimeter. The frame is secured with dowels, screws, or dowel-nails.
Adviсe:
- Do not forget that the electrical wiring is laid before the wall sheathing, and is placed under a plasterboard frame and thermal insulation materials.
- You need to be especially careful not to get caught in the wiring when securing the structure.
If you encounter some difficulties while performing this process, you can watch a video on our website and get acquainted with the step-by-step procedure for completing the frame manufacturing work. It shows step by step what to do in a given situation.
Related article: At what distance should trees be planted? Landing distance
If the frame is no longer than the length of the sheet and does not cover window or door openings, the installation of transverse beams is not required during its manufacture.
Thermal insulation of walls and roof
Work on insulating walls and roofs should begin only after all windows and doors have been installed.
In a proper frame house, the technology for their implementation is similar and comes down to creating a “pie” consisting of several layers.
- External cladding. It can be plywood, fiberboard, OSB, DSP or facade board.
- Waterproofing. Necessary to protect the insulation from moisture from the street.
- Thermal insulation material. This can be polystyrene foam, extruded polystyrene foam, mineral wool, etc.
- Vapor barrier. Typically, a membrane film is used to remove moisture from the room.
- Internal lining. Suitable for these purposes: plywood, OSB, drywall.
The roof is not sheathed on the outside with sheet material. Its place is taken by sheathing , which serves as the basis for the roofing material.
The insulation of the interfloor ceiling is similar to the thermal insulation of the subfloor.
Frame house engineering systems
Without utilities, a frame house will be a dark and cold box. For this reason, it is necessary to know where and at what stage they are laid.
- Heating and water supply system pipes are mounted inside frame walls. This is done before they are insulated. The cold water supply pipe is placed in a corrugated moisture-resistant “sleeve”, which is associated with the constant formation of condensation on it.
- Sewer pipes are installed in walls and under the floor. Their supply to septic tanks is provided at the stage of laying the foundation.
- Electrical cables are located inside the walls, under the suspended ceiling or in the channels of the baseboards.
- The laying of hidden electrical cables can only be carried out in special pipes and ducts. These works are also carried out before the walls are thermally insulated.