When choosing a suitable foundation for a building, many people choose a strip foundation.
This option has many advantages, but if ventilation openings were not taken into account during its construction, this situation can lead to problems in the future - both the wooden and concrete coverings in the room will collapse due to an excess of moisture combined with a lack of air.
Floors on the ground in a strip foundation help to avoid troubles of this nature.
What is it: concept, application, device
The installation of floors on the ground on a tape is a monolithic concrete screed, which helps prevent heat leakage and reliably serves for a long time.
This solution is relevant for any type of soil . The created concrete or dry screed is in no way connected to the foundation, and therefore does not experience loads from load-bearing walls or roofing.
Floors on the ground will be an excellent solution for a modern energy-saving house, which is equipped with a “warm floor”.
The damper layer, for which slab-type insulation is used, is installed so that the floor screed does not come into any contact with the base tape, which provides additional strength to the floor structure.
Garage floor requirements
So that during operation the flooring in the garage does not create problems during repair work on the car, it must meet the following requirements:
- Strength and reliability of the floor against mechanical damage. Almost every day its surface is subjected to abrasive friction, impacts and high loads, since the vehicle has significant weight. Therefore, an incorrectly executed garage floor screed can make the top finishing layer unusable. Resistance to fuel and lubricant mixtures and chemical reagents. Both laminate and linoleum will quickly deteriorate under their influence.
- Fire safety. Based on this requirement, it can be argued that wooden floors cannot be laid in garages due to their increased flammability.
- Wear resistance. The room where the car is located is intensively used.
- Moisture resistance. Heating in garages is infrequent, which leads to the formation of condensation on the walls and ceilings. In the winter season, snow falls off the fender liners and wheels of cars and melts. Therefore, the floor covering material must be moisture resistant.
Based on the above requirements, a concrete garage floor can be called the best solution.
Advantages and disadvantages
This design has a number of advantages. The following are distinguished:
- does not require large financial costs;
- withstands significant mechanical loads;
- does not increase the load on wall structures;
- can be easily repaired and lasts a long time;
- suitable as a base for any finished floor option;
- allows you to install a “warm floor”.
A fairly simple solution to construct can answer a number of basic tasks during the construction of a building. However, you need to take into account some nuances:
- requires high-quality insulation;
- not suitable for large backfill layer thicknesses (it cannot exceed 60 cm);
- the floor is dependent on the groundwater level - not recommended for use in areas where it is high.
In addition, the floor on the ground requires a serious approach and attention to detail. However, existing technologies are well established and, if strictly followed, problems usually do not arise.
The depth of the aquifer can affect the condition of the finished floor, so the area must be surveyed first.
Floor pie on the ground
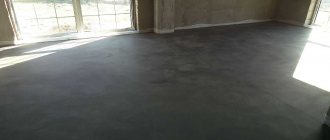
Creating smooth floors in a new home is not the easiest thing. And it is the construction of a rough screed that is the main step on the way to a level base suitable for laying various types of coatings. It ensures the reliability of the base and its strength. This is a rather labor-intensive and time-consuming process, but at the same time it is financially quite economical.
Making a subfloor in a private house
As a rule, laying the rough screed on the first floors is done directly on the ground. And most often, ordinary concrete mixture made from sand and cement is used as the base material.
Rough screed
Floor screed mortar
However, the process of creating a rough screed cannot be called completely simple. The fact is that it involves laying several layers of different materials and several preparatory stages:
- soil preparation - it must be thoroughly compacted;
- laying sand and gravel mixture;
- flooring waterproofing material, insulation;
- installation of the rough screed itself;
- installation of finishing material.
Thus, the floor consists of several layers. And this design has its own name - floor pie. It may also contain a reinforcing layer. Reinforcement is necessary to increase the strength of the screed.
Footing for floors on the ground
Expert opinion
Afanasyev E.V.
Chief editor of the pol-exp.com project Engineer.
A rough screed can only be installed on dry soil. It will not be possible to create a full-fledged one in damp conditions, as problems with waterproofing may arise. Also, a rough screed can only be installed if groundwater is at least 4 m below the surface.
Installation of rough screed in a private house
Also, during the installation of the rough screed, a floor heating system and other communications can be installed inside, if necessary according to the house construction project.
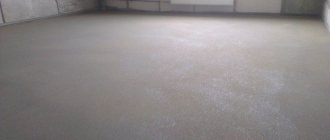
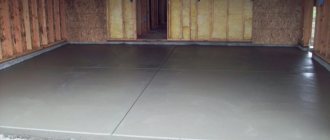
In general, a concrete floor on the ground in private construction is probably the most acceptable option for creating a foundation. It is often installed inside garages, on terraces, verandas, in warehouse premises and others.
Concrete floor in garage
On a note! Most often, concrete floors on a soil base are installed where there is no severe cold in winter, that is, in the middle or southern zone of the Russian Federation. In cold regions, it is recommended to use wood to create the subfloor.
This type of foundation appeared in the country relatively recently, during a period when there was a shortage of wood building material. Previously, low-rise construction was carried out without the use of concrete mixtures - houses were built on a wooden foundation, which attracted rodents and other pests/parasites. However, now it is quite difficult to find a wooden base - creating a concrete floor is both cheaper and easier.
In the photo - crushed stone bedding
The right “pie”: layer-by-layer guidance
If wooden subfloors do not require much effort - a sand backfill with a layer of geotextile is enough for them, then for a concrete screed you will need to create a more multi-layered “pie” .
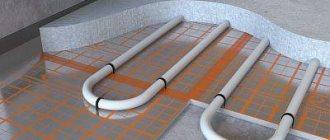
Experts advise reinforcing the finishing layer, as this helps prevent cracking after hardening. In the finishing layer you can place communications of the “warm floor” system.
Experts recommend following this technique:
- The first layer is compacted sand.
- Next, a gravel cushion is poured.
- A reinforcing mesh is installed, which can be made of either fiberglass or metal.
- A ten-centimeter layer of concrete mortar is poured.
- A waterproofing layer is created.
- A layer of insulation is laid, for which expanded clay or penoplex, or other insulating materials can be used.
- Another layer of waterproofing is laid.
- A clean concrete screed is poured.
The last layer of the “pie” can hide any utilities, for example, sewerage or water supply , but it is recommended to provide a backup system that will help avoid destruction of the concrete layer when repair work is required.
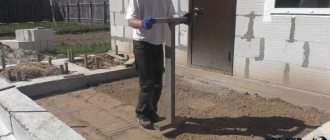
Installation
Preparing the base. Work on arranging the floor in a private house on the ground begins from the zero level mark. How to find it? Marks are made on all walls using a tapping cord. Do not forget that the zero level must coincide with the bottom plane of the door frames.
Finally, it is recommended to regularly use technical oil. There is no real rhythm or cycle that follows, which is quite "attractive". In the living room, where you circulate frequently and in your shoes, it is recommended to maintain the oil every 3 months. However, in a room where you are most often in socks or barefoot, once a year will be enough. wide.
Application of technical oil, often sold in a spray, is very simple and does not require special equipment. Note: Multipurpose maintenance oils are ideal for all types of oiled parquet flooring. Parquet: your free downloadable guide. You will find in this guide written by specialized authors.
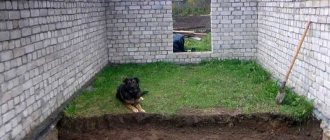
After this, they begin to prepare the soil. Since the floor thickness will be at least 35 cm, the top layer of soil is removed exactly to this depth. Then the ground needs to be leveled and compacted. This can be done using a vibrating plate or a hand tamper. If a rough screed is poured over floor slabs, their surface should not have cracks, holes, mold, etc. Existing defects are repaired using plaster or tile adhesive, and then the slabs are primed.
Turn your floor into concrete!
- A complete vision of understanding the subject.
- Basic information to help you make your choice.
- Tips for purchasing, installation and maintenance.
There is no "line".
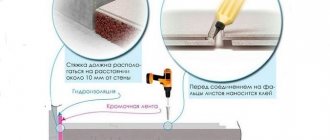
Avoid the unsightly streaking that occurs on floors coated with resins or paints. The surface is smooth and not coated with waxes, resins or film-forming products, which can be harsh. Declaration. Turn your old floor into a new aesthetically pleasing floor, it is much cheaper than any other solution. Respect for the environment. The floor is sanded and polished without the use of resins, paints or other potentially hazardous or carcinogenic materials. This is the time for the transfer of odors into the air or the evaporation of microparticles that are hazardous to health or may cause allergies. Next step: hydro- and thermal insulation. Gravel, crushed stone (fraction 40-50 mm) or expanded clay in the same layer is poured onto a sand cushion at least 10 cm thick, and then thoroughly compacted. When the surface is prepared, waterproofing materials are spread over it (you can also use polyethylene film or bitumen roll material). In this case, the material should extend onto the walls by 15-20 cm.
Durable dust protection. Aesthetically pleasing. Resistant to heavy traffic and forklifts. Resistant to external agents. High hygienic environment in the workplace. Technology in a few words. concrete polishing. eliminating differences in height. Consolidation of concrete with a special hardener. This process causes a chemical reaction that occurs as the concrete hardens. polishing to achieve high cleanliness, shine and luster of the floor during cleaning, you can perform cleaning operations with reduced chemical consumption.
Expanded clay, perlite, extruded polystyrene foam or basalt wool are used as thermal insulation for the subfloor in a private house. If a rough screed is made on the ground, then thermal insulation is required; if on floor slabs, then insulation is applied if necessary.
Don't forget about sound insulation. A special soundproofing material is glued to the wall at a height of 15-20 cm.
Water-repellent and oil-repellent; This type of surface is very popular in the workplace. There are only four possible methods for polishing concrete. This old solid hardwood floor was filled with successive layers of products. Careful sanding, punctual repairs and a layer of vitrification give it a new youthfulness.
The product is sold in pharmacies and processed with great care. Touch the area with a cotton stick soaked in the product. Let dry and restore if necessary. If your floor is waxed, start by removing it with a stripper. If it is an old glass floor, clean it with a special shampoo or a solution of St. Mark's water and laundry. This will prevent premature clogging with abrasive.
The next step is reinforcement. It is performed in order to strengthen the screed and increase its strength. This type of work is necessary if the screed is poured on the ground. For reinforcement, a plastic or steel mesh with a cell size of 100x100 mm or a mesh assembled with your own hands from reinforcement is used. The reinforcing frame is laid on supports with a height of 20 to 30 mm, so that it is located in the thickness of the future concrete screed.
The blade end and small gap are quickly filled with wood pulp. Choose a product with a matching shade or a little darker. The reason is simple: some woods, such as oak, darken in contact with the glaze. Wood pulp, on the other hand, retains the same color when vitrified. To get an idea of the true color of your floor, apply a wet sponge to a bare sanded knife so that you are corrected.
Big slots are quite rare. If the occasion presents itself, fill the void with a piece of wood cut to size. The grinding step always causes a mist of suspended particles. To prevent the entire house from receiving this dust, close the bottom of the doors. And to protect your lungs, get a mask that can be easily found in the trade. It is recommended to use a belt sander for large areas and an eccentric sander for less accessible areas. If the floor is very dirty and requires deep sanding... or if the surface is large, do not hesitate to rent a professional machine.
Next, beacons are installed, with which you can control the level of the screed and its filling. The height at which beacons are installed depends on the nature of the base:
- Concrete – 60-70 mm;
- Soil or insulation – 80-100 mm.
The profiles are evenly distributed along the base parallel to the wall. They are fixed with screws, which are screwed in every 60-80 cm. In this case, their caps should be at the same height, 5-10 mm below the final floor level. The distance between the lines of screws should not exceed 1.5 m. The width of the resulting sections should be no larger than the tool that will be used to level the poured mortar. Then concrete mortar cakes are placed on the screws. Using a level, be sure to check how level the guides are.
Work according to the carving of the wood without stopping at a certain place. As with sanding, grind down the coarse grit and then move to the medium grit. If oak flooring requires good abrasive force to cover the wood, be careful with soft woods such as fir. In this case, start with medium grains, then stop.
Once the repair is dry and the surface is clean and vacuumed, vitrification occurs. This operation became easier, the ovens were mostly odorless and quick drying. They are divided into two families: ready-to-eat and two-component. Once warm, apply the first coat by crossing passes and then smoothing the direction of the grain. The surface of the wood may appear rough and dull the next day. In fact, the wood simply absorbed the product and some of the fibers straightened out. In this case, very light sanding and a small blow of vacuum will allow the second coat to be applied.
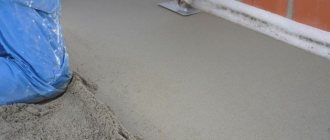
After this, you can proceed to mixing the solution. You can prepare the cement-sand mixture yourself. Cement (grade 400 and higher) and sand are taken in a ratio of 1:3 and thoroughly mixed with a shovel or construction mixer. Then water is added to the mixture in such an amount that the solution does not turn out to be too liquid. The solution should stand for at least five minutes, and then it should be mixed well again. For some, this option seems too complicated, so you can use a ready-made product, in particular, a dry mixture.
Eccentric grinding sand
Always work in the direction of the light.
Depending on the time spent in the room, two or three layers will be required. Dust is an important phase. Slide the blade along the crevices to remove any residue. Use a vacuum cleaner with a fine fine tip. Repairing small defects with wood pulp. Before each use, thoroughly stir the contents of the pan until the dough is homogeneous. Garnish and then smooth in the direction of the grain. Wood pulp is used to fill small holes. Wooden floors for large gaps. In powder form, the product should be diluted with a small amount of water. Clean the laminate floor with dishwashing liquid. For your mercy, don't do this! You don't wash in liquid wash, do you? As the name suggests, dishwashing liquid is used to wash dishes. Dishwashing liquids can attack the surface of your laminate floor and create a dull veil or unsightly discoloration.
Preparing for work
The preparatory stage includes studying the soil on the site, calculating the depth of the aquifer and possible fluctuations throughout the year. It is necessary to provide the building with a drainage system, thanks to which moisture from the ground will drain to a safe distance.
During the preparation process, the thickness of the backfill is calculated. The sand and gravel cushion should have good density, and the greater the thickness, the more difficult it is to compact the layer.
Experts recommend carrying out the rough screed over geotextiles , this way the concrete solution will retain moisture, which is needed to ensure normal hardening. If pouring is carried out on the preparatory layer, it will absorb moisture, which will ultimately weaken the strength of the resulting screed.
The amount of shrinkage of the preparatory layer is usually proportional to the selected thickness.
Before starting work, it is recommended to introduce all communications that will be located below floor level; at subsequent stages this will be much more difficult to implement.
When pouring concrete layers, it is necessary to withstand the entire hardening layer in order to prevent deformation or complete destruction in the future.
Otherwise, there is a risk that the overall pie will lose strength or geometry defects will appear.
To do or not to add bedding
Pouring a garage floor - technology for creating a concrete floor
Compacting the sand bed manually
Despite all the arguments given above, there are cases when it is absolutely not needed. Therefore, we should list the cases when pouring sand and forming a cushion is more likely to harm than help:
- If sand is poured into dense soils, such as clays or loams, then in comparison with the surrounding soils, the sand will be a less dense filler that will draw all the water into itself. As a consequence of this, the cushion will protect against moisture rising to the base of the foundation, but will accumulate water from precipitation. As a result, the soil under the foundation will be less strong, which will reduce the performance of the foundation. To avoid such a mistake, a drainage system is installed to drain rain and melt water.
- Moisture in the soil is present both in the form of water and in the form of steam. Steam easily overcomes the sand barrier and leads to moisture condensation directly on the foundation. In order to prevent the formation of condensation, moisture-resistant concrete is used or waterproofing is performed.
- Leveling the soil and uniform distribution of the load over the entire surface are necessary for prefabricated structures, for example, from FBS blocks. When they are installed on an uneven surface, voids are formed under the blocks, which can be located in different places. As a result, after completion of work and uneven shrinkage, deformations are possible. Therefore, pouring a sand cushion under such a base will eliminate differences and evenly distribute the weight of each element.
Adding sand is not necessary when pouring a monolithic tape. Plastic concrete will fill possible differences and prevent the formation of voids. The monolithic structure will transfer the load and distribute it over the entire surface.
How to do it yourself?
There are three main methods for creating floors on the ground if the building was erected on a strip foundation. Each of them has its own advantages and nuances, but they all have good load-bearing capacity.
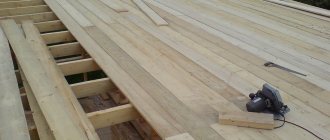
Wood flooring
The simplest method that requires the least financial costs . To support the structure, you will need columns placed on the surface of the ground so as to create a support system for wooden logs.
Expanded clay must be poured between the posts; sometimes you can leave the space empty, but then you will need holes for ventilation.
The logs must be leveled so that the plane of the supports is absolutely level , after which the subfloor is laid. A film is placed on it, providing vapor and waterproofing, and a standard substrate.
Laminate, linoleum can be used as a final floor covering, or a floor made from a material at the owner’s request can be installed.
Dry screed
This option provides good results in the shortest possible time. Work required:
- A sand and gravel cushion is poured, where the components are arranged in layers twenty centimeters thick, carefully compacted, after which a sheet of geotextile material is laid on them.
- A reinforcing mesh is installed onto which the concrete mixture for the rough screed is poured.
- The next layer is a waterproofing film - the canvases are placed ten to fifteen centimeters above each other, the joints are sealed with construction tape, the edges are brought out onto the wall to a height of twenty centimeters.
- Plaster profiles or other structures are installed that will act as beacons allowing the formation of a flat surface.
- Expanded clay is poured in and leveled according to the previously installed beacons.
- The subfloor is being installed. Drywall or plywood sheets are used for it. Experts consider tongue-and-groove plasterboard to be the most suitable, which is reliably connected into a single sheet thanks to a special profile.
Next, all that remains is to install the finished floor covering, using any materials that the owner likes - from laminate to tiles.
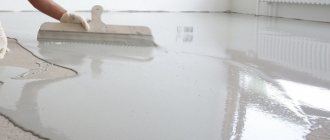
Concrete screed
This method turns out to be more labor-intensive than others. It is recommended to use it if the air temperature does not drop below five degrees, the sun will not shine on the surface, and the site is prepared for work.
The screed algorithm is as follows:
- About ten to twenty centimeters of sand are poured out to create a pillow. The layer can be larger, but not exceed 60 cm. Compaction is carried out for maximum density, for example, like on a well-traveled road.
- A layer of gravel or crushed stone is formed on the resulting cushion, the thickness of which is similar to that of sand. Compaction is being carried out.
- The geotextile fabric is laid overlapping, with an overlap of fifteen centimeters. The same is done on the foundation walls.
- A damping layer is installed around the perimeter.
- Reinforcement is carried out with a special mesh of fiberglass or metal reinforcement, after which the concrete composition is poured. Now you will need to wait until the mixture completely hardens.
- Waterproofing is being installed. Suitable as roofing felt in combination with bitumen mastic, or modern impregnations.
- A layer of insulation is laid. Experts recommend penoplex, as it is dense and copes well with loads.
- A steam-waterproofing film is placed with an overlap on the walls. Overlap up to fifteen centimeters, on walls - up to twenty. All joints are sealed with construction tape.
- A reinforcing mesh is installed for finishing pouring. The concrete layer does not exceed ten centimeters.
If the owner of the building has planned to install a heated floor, then pipelines and other necessary communications are laid before pouring concrete. It is necessary to make sure that all connections can withstand the load and are made with the required safety margin.
Concreting floor cracks
To complete this stage of repair you will need the following tools and auxiliary materials:
Scheme for repairing a crack in a seam.
- Ready frames for cracks.
- Container for mixing cement-sand mixture.
- Sandpaper (coarse grain).
It should be noted that frames for cracks are usually made of wooden slats, with edges no larger than 2 cm. The dimensions of the frames should be 2-3 cm larger than the dimensions of the cracks on each side. The process itself will not take much time. First, the cement-sand mixture is mixed. As a rule, the ratio of cement and sand is either 1:3 or 1:2. A 1:3 mixture is used in cases where additives are added to the cement to increase the wear resistance of the mixture. However, if you do not plan to use additives or plasticizers, it is better to choose a cement to sand ratio of 1:2.
The cement itself must be M400 or M500, otherwise the patches on potholes will not last long
When mixing the mixture, pay attention to the details. It is advisable to choose fine- or medium-fraction sand, clean, without lumps and random large fragments
The water for mixing the mixture must also be clean, without the slightest impurities, as they lead to cracks in the installed patches. However, you should not add too much water: the patch mixture should not run off the shovel, but fall off it in large fragments.
To ensure that the repaired floor lasts a long time, reinforcing elements such as fiberglass or fiberglass can be added to the patch mixture. Both 900 g and 600 g fiber packs are available for sale, so purchasing a small amount of fiber will not be difficult. When reinforcing fibers are added to the cement-sand mixture, the service life of the patches, their abrasion resistance and impact resistance increase significantly. In addition, a plasticizer (complex additive) can be added to the mixture. For example, M5Plus, which combines well with reinforcing fiber and improves the wear resistance of patches. The sequence of work when applying patches during repairs is as follows:
- Installation of the frame.
- Applying cement to the area of cracks.
- Removing the protruding upper part of the patch using a grinder (grinder) or sandpaper.
Removal of the protruding part of the patch should be done only after the cement has completely set. Considering that the thickness of the patch is relatively small, it is quite enough to wait 7 days and then process the patch with a grinder or sandpaper.
After the DIY floor repair is completed, you can go over the floors with compounds that help protect the concrete from corrosion. This procedure is called concrete dust removal. Thin-layer protective compounds (Elanor-PU, Neomer-LP, Amphor-formula) and polymer protective compounds (Retroplay, Elanor-ED Grunt, Elast-Pu) are used for it. All of them are applied with a brush in 2 layers. Dust removal will help further increase the service life of repaired concrete floors. If desired, the supplied patches can be even more durable than the base on which they are placed.
Tips from the experts
To avoid adverse consequences, you should remember some points:
- drainage protection protects against excess moisture, which cannot be avoided after melting snow or heavy rainfall;
- a floating concrete screed not fixed to the foundation will help you forget about the negative aspects associated with soil shrinkage;
- The geotextile fabric does not allow the sand cushion to absorb moisture from the concrete, which ensures complete hardening of the layer.
Fiber reinforcement
Fiber protects against microcracks, but will not protect against the appearance of significant defects.
Reinforcing a screed with fiber fiber is somewhat different from using mesh. The reinforcement material is a mixture of special fibers (basalt, fiberglass, steel, polypropylene), which are added to the screed solution. When hardened, they form a single durable monolithic coating. Fiber protects against microcracks, but does not protect against the appearance of significant defects.
The choice of fiber type depends on the characteristics of the floor and its purpose. For example, to obtain a light screed, glass or polypropylene fiber is used. Metal fiber is suitable for high traffic floors. If the screed will be performed outdoors or in difficult aggressive conditions, then choose basalt fiber.
To use fiber, it is poured into a dry composition in a concrete mixer. Once mixed with cement, water can be added. The prepared mixture is placed on the base and leveled along the beacons. Fiber can be used in combination with any reinforcing mesh to increase the strength of the screed.