Once upon a time, carrying out major renovations in a private house or apartment required a lot of time: saving the required amount, selecting high-quality materials, hiring professional workers. Today, everyone can cope with this task on their own. Practical sheets of plasterboard are best suited for repairs and insulation of premises. Various interiors, expressiveness of rooms - your imagination is limitless. The easiest way to make partitions is from gypsum plasterboard. But, unfortunately, after installation, the sheets of drywall will not create a pleasant atmosphere in your apartment - existing chips, cracks, joints, and protruding screw heads will spoil the overall picture. But there is a way out - putty. A high-quality putty will solve all the problems that arise. The question arises - how to putty drywall ?
Why putty drywall?
Nobody wants to work extra hard, waste precious time on unnecessary work, so we often wonder - is it possible to do without finishing putty, because it is much easier to putty only with rough putty? Yes, in some cases it is possible, but not in all.
Every time after working with drywall, we have to seal the joints, hide the screw caps, and smooth out any unevenness that arose during installation. Also, long-term storage of gypsum boards or improper transportation can also make their own adjustments.
, which is one of the flagships of our market for the production of drywall, makes it possible to avoid puttying gypsum board sheets when using them under wallpaper or tiles, not counting only the corners, joints and the screw heads themselves.
They achieved this goal with the help of a special primer - water-dispersion paint diluted with water. This primer on the surface of the sheet being processed turns into a thin film layer that combines perfectly with any type of adhesive, and also protects the drywall from damage if the wallpaper breaks.
Therefore, the question of how to putty drywall is irrelevant if you choose.
Using a primer for gypsum boards
There are a number of significant advantages to drywall primer. Firstly, it helps adhesion of adjacent materials, which greatly reduces the occurrence of bubbles and peeling of wallpaper or tiles. Secondly, it is distributed evenly over the entire surface, which helps reduce material consumption.
Primer is always used when finishing rooms, especially when working with drywall, because with its help we improve adhesion with putty and reduce glue consumption when gluing wallpaper. In addition, a primer is also used after the starting putty, so that the finishing layer will stick better, otherwise you may encounter some problems, such as rolling or falling off.
It is best to choose primers depending on the type and stage of work. It is better to use putties that have deep penetration properties.
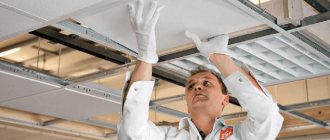
Step-by-step instructions for performing the work
When you have finished installing plasterboard sheets , you will have to further finish them. If you plan to paint, puttying the drywall should be done in at least two stages.
The technology for puttingtying drywall is as follows:
- Be sure to apply a primer with deep penetration properties to the drywall.
- We seal the holes left by the screws.
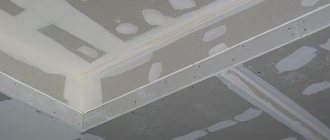
- We putty the joints.
- We putty internal and external corners.
- Apply primer for gypsum boards.
- Finish the surface with starting putty.
- We sand the rough edges.
- Apply primer to drywall.
- Puttying with finishing composition.
- We cover the walls with primer for final work.
And now we’ll find out what kind of putty to putty on drywall. Both polymer and gypsum are used. Polymer putties are used for final finishing, as they help level the surface. Gypsum, on the other hand, can be both starting and finishing, depending on the size of the grains.
Putty for drywall comes in different types - ready-to-use, or dry, requiring dilution with water. Of course, it is better to use the first one, so you are guaranteed to protect yourself from lumps that can arise if the dosage is not correct, but it is also much more expensive.
Useful tips
Joints are often located not on flat walls, but on external and internal corners formed by plasterboard slabs. Apply a little mortar to the outer corner with a spatula, strengthen it with a perforated corner, and then press the corner a little. Cover the profile with putty. When caulking the seams on the inner corner, we lay the reinforcing tape at an angle of 90 degrees.
If, after installing the plasterboard boards, a wide gap has formed between them and the floor, we seal this defect with sealant. After this we install the baseboard. In the situation described, you cannot rely on putty, since in this case there will be a sound bridge to the finishing material from the floor. The consequence of the sound bridge will be an increase in the noise level in the room and cracking of the putty layer.
Prime the surface
Even before puttying, you need to prepare the surface of the drywall in advance as a dry and clean material. We remove dust and various contaminants using a vacuum cleaner or a damp cloth. Prepare the primer and lubricate the walls using painting tools.
For rooms with high humidity, it is recommended to choose a special primer to prevent the formation of mold.
Basically, drywall is primed with one layer, but if necessary, it can be duplicated, as, for example, in the kitchen or bathroom. The following finishing steps can be started only after the applied layer has dried.
Drywall puttying technology
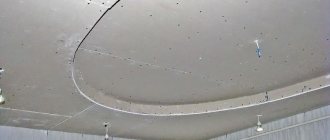
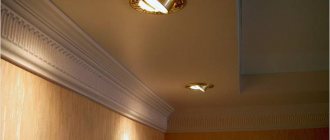
Puttying the ceiling with your own hands
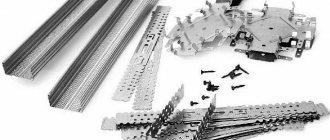
To get started you need:
- Stationery knife;
- Roller;
- Brush;
- Large, small spatula;
- Mesh or sandpaper;
- Putty mixture;
- Primer;
- Duct tape.
The work consists of the following stages:
- Priming the seams, sealing with adhesive tape.
- Applying putty to joints and screws.
- After drying, a second layer of material is applied.
- Grouting with sandpaper.
- Prime the surface using a roller.
- Apply the mixture in a thin layer.
- If necessary, prime and putty again.
- Sanding with mesh or sandpaper.
The surface dries after applying the material.
Seal seams and screw heads
To seal seams, special compounds Fugenfuller, Knauf Uniflot, Knauf-Fugen, as well as their analogs are used. These types of putties dry out very quickly, so it is recommended to dilute them in small doses.
It is best to apply the putty with a small spatula on the heads of the screws; at the same time, you can cover the seams.
The edges of gypsum boards have their own characteristics: along the edge the edge is thinned, and across it is straight. Of course, butt joints are somewhat more difficult to seal, but more on that later.
Cut seams
You can putty plasterboard with a straight edge in the places where the sheets are cut and joined only by treating them first. It is necessary to moisten the edges of the plasterboard with water, and after wetting the gypsum, make small grooves at an angle of 45°. This work is best done before priming.
Lubricate the resulting joints with a primer, and when dry, fill the seam with putty. It is best to use two spatulas 10 and 20 cm. The first, smaller one, distributes the mixture. The second, larger one, removes the excess. It is very important to fill the seam well, so that you get a small bump protruding above the plane. If this happens, then everything was done correctly.
Lubricate the seam again using freshly prepared putty. The thickness of the new layer should be about half a millimeter. After this, we attach pre-soaked paper tape to the seam for reinforcement. Use a spatula to remove excess putty.
It is necessary to ensure that there are no wrinkles on the paper tape. Once again we collect the excess composition and distribute the remaining putty with a thin ball.
"Knauf Uniflot"
Knauf Uniflot putty is a specialized super-strong waterproof mixture for plasterboard joints, its properties superior to all analogues.
- The increased strength brings it to the same level as the cement composition, however, the putty in question is significantly superior to it in ductility.
- Good adhesion, which brings this type of putty closer to synthetic glue, makes it possible to seal gypsum board joints with a semicircular thinned edge (PLUK) without the use of reinforcing tape.
- The composition does not shrink and does not crack.
- Perfect for sealing the most problematic transverse joints between gypsum boards.
- Suitable for rooms with any humidity. Despite the fact that the base of the mixture is gypsum, the putty does not absorb water after drying, acquiring hydrophobic properties.
USEFUL INFORMATION: Decorative plasterboard partition (11 photos): design and location
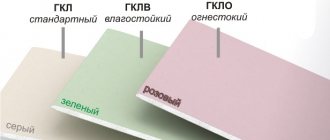
The color of the powder can vary from snow-white to gray and even pink: this factor is associated with the location of gypsum extraction and does not affect the quality of the mixture.
Knauf Uniflot putty is designed to work no longer than 25–30 minutes. After this, the solution hardens. Hardened putty forms a durable coating, and it is difficult to sand it with sandpaper. The composition should be applied without calculating shrinkage, since the protrusions will then have to be ground down for a long time.
Work order:
- the joints are filled, the composition is pressed in with a 150 mm wide spatula;
- after 50 minutes, excess material is removed, the surface is smoothed with fresh putty;
- the recesses from the screws are also processed in 2 passes.
When chamfering yourself at joints, you should use reinforcing paper tape, as for other compounds.
The high cost of the Knauf Uniflot putty mixture is compensated by the quality of the material. In addition, the sealed seam does not require much consumption.
What if it’s like this: first tape, then putty?
Some are chasing to save time and money by simply applying glue to the gypsum board or a self-adhesive mesh, or sickle tape, or paper tape. In this case, the junction remains unfilled. Such a connection will come out with warped wallpaper and cracks. In this case, saving is inappropriate. If you apply the right technology, then plasterboard walls will not let you down when wallpapering.
By the way, serpyanka and self-adhesive have significant drawbacks. Serpyanka cannot maintain the necessary rigidity, it is deformed and stretched. Fabric fibers interfere with finishing, sticking out with small wrinkles. The self-adhesive mesh comes apart immediately, without strengthening anything.
Puttying external and internal corners
Puttying the corners of drywall is an important and crucial finishing step. They are finished using metal Shitrok and aluminum corners, paper tape and serpyanka. When finishing internal corners, reinforcing tape or sickle tape is usually used. The principle is the same as in finishing seams. The joint is puttied, paper or sickle is attached on top, and excess compound is removed. Then the corner is finished again with the thinnest layer.
Perforated aluminum corners are used to finish external corners. It is cut at an angle of 45° or slightly less. The 90° angle is not used. This is done so that the metal does not bristle during work.
To attach the aluminum corner, putty is applied in small doses at an equal distance of about ten centimeters. The corner is pressed, its position is checked, the excess mixture is removed, bringing it into an even plane in relation to the entire surface. After the putty has dried, the edges are sanded, if necessary, putty again.
The Sheetrock corner is more convenient to use as it has a paper base. It is stiffer than paper tape and, unlike aluminum perforated corners, does not lead to sudden changes with the rest of the surface.
Selection of materials and tools
Before actually performing the work, it is necessary to prepare tools and materials. It won't take much effort as there are many offers at retail.
Putty for drywall joints is made using staples. To choose them correctly, you must follow the following recommendations:
| Type of instrument | Characteristics and dimensions | In what cases is it used |
| Regular spatula | The length of the working part is no more than 10 cm | Necessary for leveling small surfaces and as an accompanying tool for applying the mixture |
| Wide spatula | The length of the working part is from 30 to 40 cm | Used for applying a layer of prepared putty to the surface (for large areas) |
| Rubber spatula | Made of hard rubber (sizes vary, but small) | Used for sealing hard-to-reach places |
| Corner putty knife for outside corners (or corners) | Can be made in different sizes | It is used to putty seams in outer corners |
| Corner spatula for internal corners (or husks) | Can be made in different sizes | It is used to putty seams in internal corners. |
In addition to the selected spatulas, filling joints also involves the purchase of other means:
- container for making a solution;
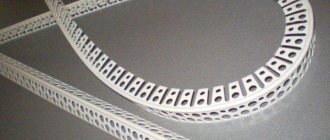
- serpyanka or perforated tape;
- fine sandpaper.
For the manufacture of putty, it is proposed to use the following dry mixtures. They are easy to use and have a long shelf life:
| Name of material | Purpose, functional features | Advantages | Flaws |
| Putty KNAUF-Uniflot | This is a special development for putty in drywall joints. | Tape is not used for work as it is not necessary. | It's quite expensive. |
| Putty "Knauf-Fugenfüller" | Knauf putty is used to seal drywall seams. The plastic mass, after diluting the dry mixture with water, does not dry for a long time, which allows the work to be done efficiently. | Available in volumes from 5 to 25 kg, this allows you to purchase the required amount of material. | Serpyanka tape is necessary before applying it. |
| Putty "Knauf-Fugenfinish" | It is based on the use of gypsum powder and fine fillers. Used for sealing joints over large areas. | Highly flexible and quick to prepare, joints are quickly filled. | It dries quickly, so it is recommended for use by professionals. |
| "Fugenfüller-hydro" | The composition includes lime and gypsum, and sand is used as a filler; bone or flesh glue is added for adhesive properties. | The plasticity of the material attracts many buyers. The material does not allow moisture to pass through and is successfully used for sealing joints in bathrooms. | Setting time up to 50 minutes. |
To prepare a plastic mass, you do not need to have any special skills; just carefully read the recommendations for preparing the mixture.
Some cooking features:
| Name of material | Nuances of preparation |
| Putty KNAUF-Uniflot | A liter of water is added to 2 kg of dry mixture, everything is mixed and applied to a previously prepared surface. Setting time: 20 minutes. |
| "KNAUF-Fugenfüller" | 2.5 kg of the mixture is mixed with 1.9 liters of water, mixed and applied to the wall. Work should not be carried out at an outside air temperature of less than 10 0, as this may not produce results. Curing time 30 minutes. |
| "Knauf Fugenfinish" | Place 1.5 kg of the mixture in half a liter of water, mix thoroughly, leave it at rest for a couple of minutes, and then use it. Strength gain is achieved within 24 hours. |
| Fugenfüller-hydro | For 1 liter of water you need to add 1.5 kg of dry material, leave to infuse for 3 minutes, and then mix. |
It is important for an inexperienced worker to know that from 300 to 800 grams of finished putty are consumed per 1 square meter. After acquiring the necessary materials and tools, you can begin processing the drywall seams with your own hands.
Sanding corners and joints
Sanding is delicate and very dusty, so you should take precautions. You really need to curtain it with a damp cloth - this will prevent dust from penetrating into other rooms. It is also good to cover the floor with wet rags or wood shavings.
If the previous work was carried out carefully and in compliance with technology, then grinding will take a little time.
First, all protrusions are cut off. Then the actual grinding begins. A sanding mesh with a mesh size of 180-200 is attached to the block. They do the work. For better grinding, use oblique light. But if you plan to use wallpaper, you can sand it even less conscientiously.
It is necessary to use personal protective equipment - goggles, respirator, gloves. This will save your health.
After sanding, prime everything again, since settled dust will interfere with further work.
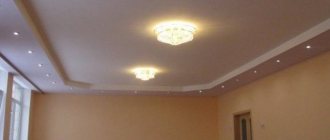
DIY drywall putty
To enjoy your home walls to the fullest, it is better to putty the drywall. Your home will acquire a presentable and well-groomed appearance. In addition, contemplation of uneven walls can negatively affect the psychological climate within the family. Puttying plasterboard walls is a responsible undertaking. It happens that the owner himself, an unprepared and impressionable person, undertakes the repairs. He faces a lot of questions. The first question: how to putty drywall, what tools to use? You will need two spatulas - a large one, with a blade length of 40 cm, and a small narrow one. GKL putty is carried out in several stages. Which putty should I choose for drywall at the first stage of work? First use the starting one. It is applied in a thick layer of 5 mm to hide all the flaws and irregularities.
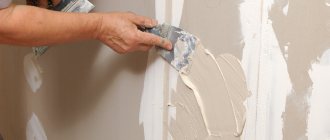
Question two : how to putty drywall correctly? Let's answer - it's a simple matter. Using a small spatula, apply some putty along the edge of the large spatula. Then, pressing the spatula against the wall, we distribute the putty. Repeating in this way, we putty the plasterboard walls. Then carefully level the surface. The better the alignment, the less sanding will be required. After the putty has dried on the drywall, we begin sanding. Clean the surface from dust and prime it. We use a primer with deep penetration. Let it dry again and move on to further work.
How to putty drywall at the second stage? You need to apply finishing putty. What kind of putty is up to you. It can be based on gypsum or polymers. Finishing putty is diluted thinner and is more difficult to use. In order to properly putty plasterboard walls and get an ideal surface, it is best to pre-prime the walls and then everything will be at its best. The technology of work itself is similar to the first stage. The difference is that the putty is applied in a thin layer and quickly leveled. After the putty walls have dried, they begin sanding. This is done with fine sandpaper attached to a block. For a completely smooth surface, use side or bottom lighting, preferably an LED lamp. It will help identify the smallest irregularities.
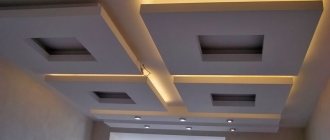
Putty layers
- Drywall is puttied in several layers. Preliminary puttying is done when sealing and gluing seams. I wrote about this in a previous article: Puttying drywall joints on a wall, partition, ceiling
- The second layer of putty is called leveling and can be considered preliminary. This layer levels the overall surface of the drywall and is applied as a continuous layer up to 3 - 4 mm thick.
- The third layer of putty is corrective. It is applied in a continuous layer 1-2 mm thick.
- The fourth layer is called the finishing layer. This layer, oddly enough, can be multi-layered. It all depends on the required quality of finish. The surface must be perfect before painting and one to three layers of the finishing coat must be applied. Each layer of finishing putty decreases in thickness. So the first layer can be made up to 1 mm, the next layers up to 0.5 mm.
But this is not enough for an ideal surface. The last layer cannot be called a layer. This is a focal sealing of small spots on the surface of the putty, as well as cracks and grooves that could remain from grinding the surface.
So, we have four layers of drywall putty. There is no need to buy separate putty for each layer. It is enough to buy two types of putty.