Stretch ceiling technology was developed in Europe for interior decoration. In essence, a stretch ceiling is a thin membrane sheet stretched over a durable profile frame. The form of installation is determined by the profile, the overall appearance depends on the panel itself, which is made in any color, finish and degree of gloss.
Do-it-yourself stretch ceiling: step-by-step instructions
What kind of suspended ceilings can you make with your own hands?
According to manufacturing technology, there are two types of suspended ceilings:
- Film.
- Fabric.
The main difference is the material of the canvas. In the first case, a thin polyvinyl chloride film is used, in the second, a synthetic fabric made of polyester impregnated with polyurethane. Each material has both pros and cons.
The main advantages of PVC film:
- waterproof - when flooded, the suspended ceiling retains water, and after the liquid is drained, it returns to its previous appearance;
- many color variations - more than 250 shades of various textures are available (glossy, matte, satin, textured, with patterns or photo printing);
- the ability to carry out wet cleaning - thanks to this, the ceiling is easy to care for and remove even the most stubborn stains.
Advantages of fabric sheets:
- frost resistance - polyester can withstand negative temperatures down to -50ºC without losing properties;
- large width of the canvas - 5.1 m versus the maximum 3.2 m for film, which allows you to make seamless ceilings in almost any room;
- durability - withstands an accidental blow or a flying champagne cork;
- breathability - thanks to microscopic holes in the structure of the material, the canvas does not interfere with air exchange in the room.
The disadvantages of film ceilings include low strength - PVC breaks from contact with sharp objects and does not tolerate negative temperatures. The main disadvantages of fabric canvases are the high cost and a modest selection of colors - only about 20 shades of mostly pastel colors.
Installing a suspended ceiling with your own hands is possible for both options, but there is a difference in installation technology. PVC film is preheated so that the material becomes elastic and stretches. For this, a gas heat gun is used. After cooling, the film stretches and forms a flat surface. The polyester fabric does not require heating and immediately after installation it has a finished appearance.
Previously, we have already described in detail the technology for installing a fabric stretch ceiling; in this article we will look at how to stretch a PVC fabric.
Selecting a fastening profile for fabric fabric
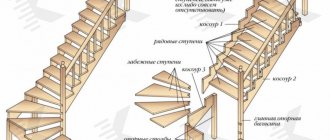
The fabric ceiling is produced in the form of a wide-format panel, the weight and elasticity of which differ from the properties of PVC film. Therefore, to install such a ceiling, a different type of frame is needed. Most often, two types of profiles are used for fabric suspended ceilings.
- The plastic AP profile is used for linear sections of the perimeter and provides a very thin air layer between the membrane and the ceiling slab (1 cm). This profile guarantees the stability of the panel in the event of drafts and gusts of wind. The profile is attached with the wide side to the ceiling and may have a thin plastic part on the profile on the wall side, which seals the space and prevents the accumulation of dust, moisture and bacteria.
- A plastic AM profile is used if it is necessary to leave additional space between the membrane and the ceiling. The height of this profile is 30 mm. One of the most common uses of this profile is for additional acoustic insulation of a room using sound-absorbing materials.
Common profiles for installing fabric stretch ceilings
The fabric fabric is prepared 10–15 cm larger than the width of the ceiling and secured in the profile grooves without a harpoon using a special plastic wedge or glazing bead. Excess fabric is carefully trimmed after installing the entire panel.
The principle of installation of suspended ceilings
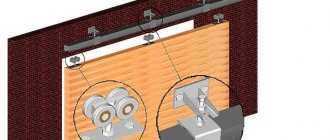
The technology of the device is as follows: the construction of a stretch ceiling is a canvas stretched over a frame made of aluminum or plastic profiles (baguettes), which are attached around the perimeter of the room. PVC film is tucked into the frame and securely fixed. Due to tension, a flat ceiling surface is formed. The fastening diagram is clearly shown in section in the photo.
Installation occurs in stages. The installation procedure is as follows:
- First, the room is measured. Then a sketch of the future ceiling is prepared with the locations of the lighting fixtures. Based on the drawing, the PVC film is cut.
- If necessary, the base is prepared for stretching the fabric.
- After this, markings are made to attach the frame and the profile is mounted.
- Next, the fixtures for the lamps are installed and the electrical wiring is laid in accordance with the installation diagram.
- Then the PVC film is heated with a heat gun, stretched and fixed in a baguette.
- After this, lighting devices are installed and connected.
- At the last stage, the installation gaps that remain at the junction of the walls and the stretch ceiling are masked.
2 Preparing the base
9 Masking joints
The cutting of PVC film is done in production, so it is better to entrust the measurement and preparation of the drawing to professionals.
The fact is that the canvas is cut exactly to the size of the room, taking into account the stretching of the material. It is important not to make mistakes in the calculations, since it will not be possible to correct the error during the installation process. The film will sag, wrinkles will form, or it will simply not stretch to the required width. The remaining steps are easy to complete on your own, the installation technology is simple, any home craftsman can do it.
Preparing the profile and panel
Before directly installing the ceiling, it is necessary to prepare a profile for attaching the panel.
- The first step is to prepare markings for the location of the fastening profile on the walls in order to correctly place the ceiling membrane. Usually the profile is attached to the wall around the perimeter at the required height. The correctness of the marking is checked by level. In order not to lose the height of the room, you can use a mounting profile for the ceiling. In this case, the presence of ceiling lighting fixtures should be taken into account, because the ceiling must be lowered to the height of the lamp suspension.
- It is necessary to attach the profile to all external and internal corners of the room with a step of 8–12 cm between fastenings. All sharp corners should be smoothed with a file to prevent punctures and cuts to the panel.
Profile fastening
- Carefully unpack the ceiling membrane, avoiding touching contaminated surfaces - the panel must remain clean during installation.
Prices for stretch ceiling “Starry Sky”
stretch ceiling “Starry sky”
Unpacking the canvas
- Using special clamps, the panel must be secured at several points in the profile. If the room is rectangular, first secure the membrane in the corners. If the profile forms a rounded shape, the fastening points are distributed evenly along the arc.
- When installing a ceiling made of PVC film, it is necessary to bring the room temperature to 40–45 degrees. It is recommended to block all possible sources of cool air - windows, doors, ventilation grilles. Draft and cooled air can mechanically damage the membrane, creating irregularities on it that will affect the properties of the panel and complicate the installation process. Installation can begin when the film is uniformly flexible and without creases. Deep folds in the film can be treated with a heat gun or hairdryer.
- When installing a fabric panel, heating the room is not required; the so-called cold installation is performed. However, the fabric panel will be trimmed at the end of installation, unlike PVC film, which is initially cut to the size of the room, taking into account the 6% stretch of the film.
Heating PVC sheet with a heat gun
Video - Preparing the room before installation
General installation rules
Film ceilings retain their properties only at above-zero temperatures, so they are installed exclusively in apartments or houses for permanent residence. PVC is equally suitable for utility rooms and living rooms. It is especially recommended in bathrooms, toilets and kitchens, since the film is not afraid of moisture, protects against leaks from above and is easy to clean compared to other types of materials.
It is recommended to install a suspended ceiling at the last stage of repair, when all finishing and construction work has already been completed. An exception is wallpaper, since when installing baguettes they will most likely get dirty, and it will be quite difficult to remove dirt, especially from textured surfaces.
There is no need to level and prepare the rough floor before installing the stretch ceiling. But if the plaster is old and crumbling, you need to remove everything that could subsequently fall onto the canvas, and then strengthen the surface.
Attention! During the process of stretching the PVC film, the room warms up to +40ºC, and next to the gun the temperature reaches +70ºC. Therefore, it is better to remove furniture, paintings and other items that may be damaged by heat.
Basic installation techniques
There are 3 main techniques for installing suspended ceilings:
- harpoon;
- wedge;
- glazing bead
When using harpoon mounting, a profile is used that has a hole along its entire length. So-called “harpoons” are inserted into it, which are welded to the panel. They are plastic wedges. The part received its name because of its distant resemblance to a whaling weapon. There is a special groove in the hole, and in the harpoons there is a notch. The recess fits into the groove, a snap occurs, and the structure is fixed.
Harpoon mounting is very convenient. It allows you to calculate in advance the required area of the canvas and does not require highly qualified specialists. In addition, the harpoon can be removed at any time for ceiling maintenance. The main disadvantage of the technology is higher costs.
Wedge installation involves fastening the canvas to the profile using plastic wedges. The main advantage of the technique is the price. However, there are also disadvantages. The first is the complexity of installation. The second is the impossibility of maintenance of the panel. If you remove even one wedge, the tension will be broken and it will be almost impossible to restore it.
Technology of fastening suspended ceilings
To fix PVC film, special baguettes are used, which are mounted around the perimeter of the room at a short distance from the base ceiling. There are different types of profiles for stretch ceilings. They differ in the material of manufacture, design, fastening system and installation method.
Fastening systems
For film ceilings, two methods of fixing the canvas are used:
- Harpoon . Recognized as the most reliable. To attach it to the edge of the PVC film after cutting, a curved plastic edge (harpoon) is welded. During the installation process, the edge is inserted into the baguette and clings to a special protrusion in the profile structure. The canvas is securely fixed and held on like a harpoon, which is why the fastening received its name. The remaining gap is closed with a special masking tape. There is also a gapless profile, but its installation requires perfectly smooth walls.
- Bead (wedge). The film is measured with a reserve. The canvas is tucked into the profile and secured with a special plug in the shape of a wedge or glazing bead. The excess film is then trimmed, and the gap is closed with a decorative insert.
The technology for installing ceilings with harpoon fastening requires accurate calculation of the dimensions of the canvas, otherwise there will not be enough film or the ceiling will sag. But installation is quick and easy, since the tension is calculated during cutting; you just need to insert the harpoon into the baguette. Additionally, this fastening system allows you to easily remove the covering and re-install it. This is necessary, for example, to drain water after a flood or to repair the electrical system behind the ceiling.
With glazing bead fastening, the cutting of the canvas is done approximately and mistakes are not so terrible. But adjusting the film tension manually is much more difficult and can only be done by experienced specialists. In addition, this method is non-separable. After dismantling the coating, you will have to purchase a new film.
Thus, for self-installation of a PVC stretch ceiling, it is better to choose a harpoon fastening system.
Profile types
Baguettes are made of plastic or aluminum. Metal ones are more expensive, but stronger and more durable. In rooms larger than 20 square meters, it is recommended to install aluminum ones. If the room is smaller, plastic ones will do.
Based on the place of attachment, baguettes are divided into wall and ceiling. Which one to choose depends on the height of the structure and the condition of the sub-ceiling. The minimum distance from the ceilings is achieved by the ceiling profile (2-3 cm). But in such cases it is impossible to install built-in lighting or a hidden curtain rod. And the rough ceiling must be perfectly flat and strictly horizontal, which is extremely rare in practice.
When attached to walls, more height in the room is lost, but under the canvas you can hide fixtures for lamps, power supplies or utilities. Also, the wall profile makes it easy to set the horizontal level, even with strong differences in the roughing flow.
In practice, ceiling moldings are rarely used and are used only in cases where there is no alternative. For example, there is no access to the wall due to a wardrobe or the material of the partitions does not allow the profile to be securely attached.
Preparing for installation
You can install a stretch ceiling in a few hours. But preparation, as well as connecting lighting, sometimes require even more time. So let's begin.
First, we clear everything that might fall from the ceiling. This is very important for aesthetics. Everything after the ceiling is stretched can be seen through.
Ceiling prepared for installation: everything has been cleaned, lighting fixtures have been installed
If the film is white or light, dark spots, if any, may be visible through it. The same problem exists in a log house: the dark ceiling will be visible. In this case, you can pre-sheath it with some material (plywood, plasterboard, etc.) and cover it with white paint. As an option, shoot some white material (at least a vapor barrier).
At what stage of repair should I install
Installation of suspended ceilings is carried out after the main “dirty” stages of repair have passed, and the walls are leveled. You can do it before wallpapering, or you can do it after. Both options are imperfect. And that's why:
- If the walls are already covered with wallpaper, they will get dirty when installing the baguette. To avoid contamination, you have to close the walls, and this is extra time.
- If you glue wallpaper after installation, you need to work very carefully: the films (if they are stretched) tear very easily. And during such work it is very easy to tear it.
What is the lesser evil for you - choose. In other periods this is not possible.
Mount the ceilings after all the dusty work is done, on flat walls
Where and at what height is it mounted?
There are two types of profiles - for the ceiling and for the wall. Ceiling ones are used in cases where for some reason it is impossible to screw a supporting structure onto the walls (wiring running in the required place, very unstable material). In other cases, a baguette is mounted on the walls.
At what height is the baguette attached? If there are no distortions, at a level of 4-5 cm below the junction with the ceiling. Why not at the very top? Because the higher the strength of the wall is reduced, it can crumble. Loads when using PVC films are created decently, so load-bearing capacity is important. In addition, wiring is often laid in this place and it can be damaged. So be careful with the wiring, designate the area where it is located. This height reserve also allows the use of a wider range of lamps. As you can see, there are enough reasons.
You need to attach the baguette to flat walls, retreating 4-5 cm from the main ceiling
If the walls in the room have not been leveled, but you want to install a suspended ceiling, level the area in which the molding will be attached. If this is not done, it will bend, which will be clearly visible from below.
On walls made of foam concrete, a beam is mounted to the wall, and a baguette is attached to it. The tension created in this way is transferred predominantly to the beam, and the wall experiences less stress.
For normal ceiling tension, it must be stretched in a strictly horizontal plane. Therefore, they find the lowest point of the ceiling, set aside those same 4-5 cm from it, and then beat off the horizontal along all the walls. So relative to the existing ceiling, the height difference may be different.
The difference relative to the main ceiling may be uneven...
It is most convenient to apply a line using a painting cord (a thin cord “stained” in loose dye such as blue).
If you decide to make a two-level stretch ceiling, it is attached to a plasterboard structure. If the fastening is on one of the horizontal guides, everything is fine and there are no problems. If lower or higher you need to add gain. This can be a profile fixed in the right place or a strip of plywood 5-6 mm thick. Both methods have been tried and work well.
When installing in a room whose walls are tiled, attach the baguette 2 cm below the edge of the tile. It is important that there are no voids underneath.
Electrical wiring and fittings for lamps
Since lower-power lamps are used in suspended ceilings (no more than 40 W for incandescent lamps and 35 W for halogen lamps), a larger number of lamps is required. In addition to the main chandelier, peripheral lighting is also provided in the center. In this case, built-in lamps are usually used.
It turns out that there are a lot of wires running along the ceiling. They must be well and correctly secured. If a suspended ceiling is made in a wooden house, all electrical wires are laid in fireproof pipes, a special corrugated hose or mounting box. In other cases, it is enough to secure them to the ceiling with mounting tapes or using clips.
Reliable way to secure wiring
For the installation of lamps in a suspended ceiling, embedded elements are made. Their design depends on the type of lamp and is selected separately each time. It is only desirable that the lampshades be either directed downward or located no closer than 40 cm from the ceiling. Otherwise, after a while, yellowish spots from overheating will appear on it.
Perhaps the best solution when choosing lamps for a suspended ceiling would be LED ones. They produce a powerful stream of light, last a very long time, draw very little electricity and practically do not heat up. The downside is the high price. But it is justified quickly - by saving on electricity.
Preparation of tools and materials
Now let's look at what you need to prepare for work. To make a suspended ceiling with your own hands, you will need the following tools:
- ladder;
- laser or water level;
- roulette;
- pencil;
- chop cord;
- hammer drill (it is convenient to use a tool with a built-in vacuum cleaner, but a regular one will do);
- drill;
- screwdriver or screwdriver;
- grinder or hacksaw;
- file;
- construction or stationery knife;
- a special curved spatula for tucking the canvas into a baguette;
- heat gun and propane tank.
Selecting Tools
It is best to take care of everything you need in advance - there is less chance that something will be forgotten and you will have to quickly look for the item in nearby stores. To perform stretch ceiling installation work, we use the following tools:
- Roulette;
- Pencil;
- Hammer;
- File;
- Hammer drill with vacuum cleaner (read more about it below);
- A screwdriver (or better yet, two);
- Hand mount holder;
- Spatula;
- Hacksaw (or grinder);
- Passatizhi;
- Ladder;
- Laser axle builder with a rod on which it is attached;
- Hangers for the ceiling canvas (“crocodiles”);
- Thermal gun (+ propane tank).
Please note: You can replace the gas heat gun with an electric one. Focus on which device is most convenient for you to work with.
We’ve decided on the tools, now let’s study the installation of suspended ceilings from “A” to “Z” in our step-by-step photo instructions with video explanations.
Stage 1. Applying markings
If you want to get a smooth canvas, then you cannot do without this item. Marking is a preliminary outline with a pencil of the desired level of the stretch ceiling. We suggest using a laser axle builder - it is the most accurate and virtually eliminates errors. Shall we begin?
1. First of all, decide where you plan to place the baguette. Everything is quite simple here, if you take into account two nuances:
- The minimum height of the laser from the ceiling should be 5 centimeters. If you leave less, then working with a hammer drill will be difficult.
- Step back one centimeter from any of the protruding ceiling elements. In our case, this is a junction box.
2. Set the axle builder to a certain height.
You can do without a telescopic rod. For example, your partner will hold the axle builder, and at this moment you will trace the laser beam with a pencil. But, frankly speaking, this method cannot be called convenient and accurate.
Having finished with the markings, we begin the next stage of work.
Stage 2. Installation of baguette
It can be called one of the key ones - if you make a mistake in installing the baguette, or fix it unevenly, the canvas will become deformed or even tear.
Let's look at an example on an external corner:
- 1. First, take a measurement with a tape measure.
- 2. Place it on the aluminum profile.
- 3. Using a hacksaw or grinder, we cut the baguette in a special way. Watch how exactly to do this in this video.
Please note: The internal corner must have one undercut, and the external corner must have three, with a distance of 10 mm from the measurement line in both directions.
4. Clean all cut edges with a file. This is necessary to preserve the canvas.
5. Bend the corners. In the end you should end up with something like this:
6. Next, we set the profile using the laser and take out a hammer drill.
Advice from an experienced person: a hammer drill paired with a vacuum cleaner is a really practical and very convenient solution for repairs. Simultaneous drilling and suction of construction dust will save you a lot of time on cleaning and your health.
7. All that remains is to drill the holes, insert the dowels there and use screwdrivers and self-tapping screws to secure the baguette itself.
8. We continue to work in the same spirit, installing a baguette around the perimeter of the room.
We pay special attention to the joints, they should turn out as smooth as possible, like in the photo:
Attention: Before starting work, you need to decide on the electrical wires. You need to understand exactly where they are. Typically, wiring runs strictly vertically along the walls to sockets from the floor, and to switches from the ceiling.
But there are exceptions. Therefore, in places where you assume that you have wiring, the baguette should be made approximately according to this model:
One little secret: If you can’t secure the baguette in the standard way, then you can resort to a trick that will help you press it to the wall. Attach a small strip (10-15 centimeters) to the ceiling, perpendicular to the baguette. Then carefully attach it to the joints.
In order not to damage the ceiling fabric during tensioning, we glue all joints with tape as follows (see photo below). You will need a spatula. Carefully apply the adhesive tape to the joint, and then level it with the flat side of the spatula, removing the smallest air bubbles. We tuck the edges under the baguette.
Let's look at the result of the second stage. You should end up with something like this around the perimeter:
We recommend using aluminum baguettes - they have several advantages over PVC:
- The high flexibility of PVC baguettes complicates installation;
- They can become deformed when the canvas is heated with a heat gun;
- If the profile is rigid, then there is a risk of breakage during installation;
- Durability is questionable: if an aluminum baguette will serve you for 20 years, then the PVC will have to be changed along with the canvas after 5 years.
Therefore, we advise you not to save money when installing suspended ceilings and choose a more reliable option.
Stage 3. Preparation for lighting installation
After fastening the baguette, we proceed to installing platforms for chandeliers or lamps. Plastic platforms look like this:
And you need to make the following structure out of them:
To do this, you will need so-called pawns, which are often used in the installation of plasterboard ceilings.
We drill a hole with equal indentations and secure the platform.
When you have installed all the structures, it’s time to move on to the most important thing - installing the stretch ceiling.
Stage 4. Stretch the fabric
You should start by installing “crocodiles”, which are hung on the four corners of the room,
to attach the coating to them.
When unpacking the canvas, pay attention to the location of the harpoon (a hard strip around the perimeter of the canvas that will be attached to the baguette). It should be placed curved into the room.
After this, we begin to heat the room using a heat gun - this is done to stretch the canvas, and also to soften the harpoon (which is also made of PVC, only denser).
When the room is warm enough, using a spatula, we begin to insert the harpoon into the baguette.
Attention: you need to start from the corners (!), and then go along the perimeter.
This technology for fastening suspended ceilings is called harpoon-baguette.
Let us clarify that in addition to this, there is another type of installation - beading, when the strips are initially made larger than the ceiling area. In this case, preheating is not needed, but...
- 1. If the master did not tighten the canvas during installation, after six months the coating may wrinkle.
- 2. Operation of the ceiling. In the baguette-harpoon technique, you can always remove the ceiling to get to the same soldered box or wipe the stain after a flood from above. In a glazing bead, if you remove the ceiling, you will have to buy a new sheet. You can read more differences in this review.
As you can see, there is nothing particularly complicated. Let's move on to the final stage.
Stage 5. Final work.
After the canvas is stretched and secured, you only have to deal with two points:
- cut holes for chandeliers or lamps;
- place a decorative insert around the perimeter of the room (we are not talking about the ceiling plinth, but about masking tape, which allows you to hide the joints at the walls).
Let's start with lighting. To make a hole in the ceiling you will need special plastic rings that need to be glued to the canvas.
For this:
- 1. find the center of the hole of the previously fixed platform;
- 2. coat the surface of the ring with glue;
- 3. and glue it so that the marked place on the ceiling is exactly in the center of the ring.
When the glue dries, cut a hole around the inner perimeter.
Important: Please note that rings and platforms can be of different diameters. Their choice depends on what type of chandelier or lamp you want to hang.
All that remains is a decorative insert around the perimeter. There is nothing complicated here - carefully lay it along the joints using a construction spatula.
The only thing that can be added here is that it would not hurt to glue the corners of the insert with white silicone. This will ensure reliable adhesion to the canvas.
By the way, you can see the entire process described above in this cool video. Be sure to check it out.
Is it possible to stretch the ceiling alone?
A conventional single-level structure can be installed alone. The basic principles of installation remain the same, although it will take longer. But installing a two-level ceiling or more complex shapes will require help.
If the work is done alone, when marking, the laser level is installed on a platform stand or a special holder (a rod that is fixed directly between the floor and the ceiling). During tapping, a screw is screwed in at the marking point and a cord is pulled from it. You can also attach the rope to tape.
The second likely problem is the installation of a large, heavy chandelier by one person. It is difficult to hold and screw such a lamp at the same time. If possible, it is better to choose something simpler and lighter (a compact chandelier or built-in lamps).
Stretch ceilings for an apartment or a house: a convincing “yes”
Everything new is well forgotten old. The walls of dwellings, including the ceilings, were covered with fabric back in the era of the pharaohs. The great popularity of installing suspended ceilings in rooms today is explained by a combination of the following design qualities:
A stretch ceiling can make an accent and decorate a faceless and expressionless interior.
- high level of aesthetics;
- accessibility and speed of installation;
- the ability to hide the shortcomings of the main ceiling under the canvas;
- variety of coatings.
Among the products offered on the market, it is easy to choose an option for every taste, corresponding to a certain design style. With the help of stretched fabric you can make an accent by decorating a faceless and inexpressive interior.
As for the physical costs, any other method of making the ceiling perfectly flat will require much more. Puttying involves preparing the mixture using additional tools already at this stage. Then follows application, leveling, waiting for drying, sanding... After working with putty, serious cleaning of the room will be required.
The suspended ceiling cannot withstand competition either. To make it like a tension ceiling, ideally evenly and quickly, such a ceiling will not work. The need to install each fragment, fixing it to the concrete ceiling (most often this is what it is), will require a significant amount of time.
The market offers a wide selection of suspended ceiling options
In terms of performance characteristics and installation specifics, tension structures today occupy a leading position.
Nuances and secrets of installing suspended ceilings
In the process of work, beginners often encounter various difficulties. If you do not know the nuances of installation, mistakes can lead to irreparable consequences. Let's look at the most common problems that arise during self-installation.
How to properly heat a suspended ceiling
When stretching the fabric, the distance from the heat gun to the PVC should be at least 1 m. The heat gun is not directed at one point for a long time, but smooth swinging movements are made. Heating should be uniform. Otherwise, the film may be damaged.
If the installation of a stretch ceiling is carried out by two people, one person threads the canvas, and the second stands behind and warms it up.
How to tighten a suspended ceiling
Wrinkles may form during installation. To straighten the film, do this:
- Carefully remove the harpoon on both sides of the problem area (about 30 cm).
- Warm up the fold with a gun.
- Fill the middle into the baguette.
- Then - the centers of free areas.
- Continue until the entire canvas is installed.
Attention! If it is not possible to remove the fold, the operation is repeated, but a larger area of the film is released.
What to do when the canvas collapses
After installing a stretch ceiling, sometimes an unpleasant problem arises. When a door or window is opened, the film is drawn in and adheres to the base ceiling. The outlines of mortgages and other elements located behind the canvas become visible.
The reason for the collapse is the difference in air pressure. When air flows in the room, it rises, but behind the ceiling it remains the same.
There are two ways to fix the problem:
- Seal all gaps between the film and the walls.
- Install ventilation grilles. Then the air will quickly pass into the space behind the canvas, and the pressure will equalize.
In the first case, carefully inspect the ceiling to find all the gaps. The cracks are sealed with sealant.
The second method is more preferable, since additional ventilation will ensure ventilation of the inter-ceiling space, which reduces the likelihood of fungus appearing. To locate the gratings, select inconspicuous places: in corners, behind curtains, etc. A hole is cut in the canvas. For this purpose, a protector ring under the lamp is used. Then a small ventilation grill is glued on so as to completely cover the hole. The product can be matched to the color of the ceiling.
It is enough to install two grilles in opposite corners.
How to choose lamps for lighting fixtures
The film melts and turns yellow at high temperatures. Therefore, traditional incandescent lamps are not suitable. For PVC ceilings, energy-saving or LED devices are used. They consume little electricity and have a long service life. When using halogen and incandescent lamps, the power should not exceed 35 W. The most popular are spots with base G5.3 and GX53.
Security measures
To heat the canvas, use a heat gun. But when working with it, there is a danger of explosion or gas leakage. Therefore, it is imperative to follow the safety rules:
- Before starting installation, check the connection of the gas cylinder, hose and gun.
- Make sure the equipment is in good working order. At the slightest suspicion, it is better to contact the experts.
- View the date the cylinder condition was checked (indicated on the body).
- Refueling or repairing equipment should only be performed in specialized workshops.
- Do not increase the length of the hose yourself.
- Do not point the gun at a gas cylinder or place it near a radiator, heating pipe or other source of elevated temperature.
An electric gun is safer to use, although it is more expensive. But it is more difficult to warm up a large room with its help, so it is recommended to use a composite gas cylinder.
Features of operation and care of the coating
Film ceilings are very easy to pierce with a sharp object; you need to be careful during installation. It is also important to take this property into account during further operation.
It is unacceptable to use abrasives or acetone for cleaning. They will damage the coating. It is also prohibited to press hard on the fabric while washing.
Modern film ceilings are treated with an antistatic agent, dust does not easily settle on them, but sometimes cleaning is still required (especially in the kitchen due to grease and splashes). Wet cleaning is suitable for PVC. Take a soft sponge or rag, lightly moisten it and wipe it without unnecessary pressure. Suitable products include glass cleaning liquid, dishwashing gel or soap solution. Then the surface is wiped dry. Glossy ceilings are additionally treated with a weak solution of ammonia, this increases shine.
Thus, installing suspended ceilings with your own hands is a relatively inexpensive and durable finishing method. If the correct installation technique is followed, the coating will last for decades. And if you have certain construction skills, the work can be done alone without the assistance of assistants.
Installation of the canvas
Let's look at the example of a rectangular room.
First of all, we attach garters (clamps) to the profile in the corners of the room.
Carefully unpack the canvas and secure the corners of the film into the clamps.
If the film was in a cold room, first bring it into a warm place and let it warm up. During unpacking, you can heat the material from a heat gun, only very carefully (do not point the gun nozzle at the same part for a long time, you can burn the film).
So, the film is suspended, we fill the first corner (any). Then we move to the corner diagonally. We take the corner of the canvas in our hands and remove the clamp. Your partner starts the heat gun and begins to heat the canvas from the angle set in the profile, diagonally towards you. After some time, the ceiling will begin to stretch under your efforts. You can use the help of a partner: he can climb on a stepladder and help pull the film to the corner. All you have to do is snap the harpoon into the baguette using the special. spatula (spatula). We perform the same actions with the remaining corners.
Next, we proceed to securing straight sections along the walls. To ensure that the process proceeds evenly and folds (wrinkles) do not form on the canvas, we divide all unfixed areas in half and fasten them into a baguette. If you lack experience and skills in installing a stretch ceiling, divide the loose areas in half as often as possible. This will make it much easier to fix the canvas.
There are times when folds (wrinkles) appear during installation. Eliminate them with a heat gun. Point the nozzle and heat the crease area for a few seconds. Wrinkles will disappear.
The ceiling is stretched, we install a decorative insert or ceiling plinth. We glue heat-resistant plastic rings under the chandelier and lamps, if necessary, completing the installation process.
How to stretch a ceiling with your own hands: everything is quite real
This process causes a strong and rather persistent fear in many homeowners - what if something is torn, or the ceiling will sag later?
Yes, this process is significantly different from, say, gluing wallpaper or laying linoleum, but, nevertheless, having studied the articles and the corresponding video and photographic materials, you can cope with this without any problems.
If you want to save on hiring labor, then this work can be done with your own hands, and there is nothing impossible about it. But, as they say, closer to the point.
So, you need to remember the following:
- This work is performed by the same people as you, therefore, with appropriate effort and patience, everything will work out great for you, and you can do everything yourself;
- Before you start work, you need to prepare the tool, as well as prepare the room for safe and comfortable work;
- Each package for ceilings contains instructions that must be carefully studied;
- It is necessary to study photo and video materials in order to avoid annoying mistakes during installation;
- Neatness and cleanliness of the workplace is the key to successful work!
- You need to tell yourself before work: - Let's stretch the ceiling correctly! - For yourself and your assistant.
- By following all the installation rules, you will do everything yourself, without the help of professionals.
This work is not an example of something particularly creative - you just need to be careful and careful.
Ceiling manufacturing technology
Step-by-step instructions for making a stretch ceiling with your own hands include the following steps: preparatory work and marking, installation of a baguette, tensioning the canvas and finishing (if necessary).
For different types of construction, there are certain features that must be taken into account.
Preparatory stage
Preparation for installation consists of the following activities:
- Cleaning the ceiling. To install the tension system, careful leveling of the ceiling surface is not required, but obvious defects should be eliminated. First of all, it is necessary to prevent any shedding of the coating onto the canvas. To do this, peeling and areas of poorly fixed plaster are removed. It is recommended to seal large gaps and cracks using polyurethane foam. Particular attention is paid to areas with mold and fungi. They must be treated with a solution of copper sulfate. If there are wooden parts on the base ceiling, they must be treated with an anti-rot compound.
- Preparing the wall. In the area where frame profiles are installed, the wall surface should be leveled. Convexities can lead to deformation of the baguette. Typically, a strip of wall is puttied before installing the frame.
- Marking. It is made on the wall and limits the location of the lower edge of the baguette. The task is to ensure a horizontal position of the canvas, strictly parallel to the floor. The actual height of the room at different points varies slightly, and therefore it is measured in all corners. The first mark is placed in the lowest corner at the required distance from the ceiling. Usually it is 3-4 cm. If there are significant unevenness or communications have been laid, then it can be increased to 6-8 cm. The exact height of this mark from the floor is measured, and the same height is measured in other corners. The marks are connected to each other by lines that indicate the location of the frame profiles.
- Electrical wiring. If wires run along the ceiling, they are placed in a corrugated hose or cable duct and secured to the base ceiling.
When preparing a room for work, you should ensure free access to the walls. It is advisable to remove the furniture from the room or move it to the center. Before starting to stretch the fabric, it is recommended to increase the room temperature above 30 degrees (preferably to 40 degrees).
Installation of baguette
Taking into account the type of ceiling, the necessary profiles and fastening elements for the baguette are selected. When carrying out work independently, aluminum strips are most often chosen, which have increased strength, which facilitates the process of tensioning the canvas. Plastic baguettes, as a rule, are completed with fabric ceilings of certain models. Their installation requires special care.
Installation of the frame begins with the formation of places for their fastening on the wall. Standard profiles already have holes for fastening, and therefore they are first applied to the wall for marking. If there are no holes on the planks, then they are drilled in increments of 40-60 cm, and the outer holes are made at a distance of 10-12 cm from the end.
In the marked places, holes are made for plastic dowels. To do this, use a hammer drill (for concrete walls) or an electric drill. The diameter of the holes is 8-10 mm. The profiles are secured to the dowels with self-tapping screws. The horizontal position of the elements is checked by the building level.
Polymer fabric stretching
How to stretch a PVC sheet taking into account its significant elongation during mechanical stretching? The issue is solved on the basis of the well-known law of thermophysics - bodies expand when heated and contract when cooled. Accordingly, when the film heats up, it becomes wider in all directions. In this state it is fixed on a baguette. During the cooling process, it narrows, and its natural tension occurs in the frame. To ensure this effect, it is enough to heat the PVC sheet to 60-65 degrees. Heat guns or a heat fan can provide this.
Installation of the canvas is carried out in the following order. The corner of the PVC film is inserted into the frame fastening element located at the corner where the first mark is made. The next step is to secure the film in a diagonal corner. Then the remaining corners are fixed. A screwdriver is used to push the film through the fastening element.
The main fastening is done from the sides. The canvas is squeezed into the side profile in increments of 9-12 cm, for which a spatula is usually used. The pulling force is set manually, and the tension itself is done carefully and smoothly. Excess film is cut off with a knife. After the insertion of the canvas into the baguette along the entire perimeter is completed, the gap between the wall and the frame, as well as the profile cavity, is closed with a decorative overlay. Its shape differs for different types of fasteners. The cover is manually pressed from below until it clicks.
Features of fabric stretching
The fabric is stretched without heating.
To eliminate wrinkles, professionals wet the fabric with a spray bottle. As it dries, it shrinks and tightens more, eliminating minor defects on its own.
Unlike polymer film, the fabric fabric is stretched starting from the middle of the frame. In the center of the profiles it is pulled through the fastening element using a special spatula. First, the middle of the canvas is attached in the center of the first profile, and then on the opposite wall. After fastening, a kind of cross is formed on all walls. The entire fabric is stretched like this: moving from the center to the corners. Excess fabric is cut off with scissors. After completion of the work, a decorative overlay is installed.
Certain problems arise when stretching a ceiling with a pattern. If it is offset relative to the center, then it is the middle of the pattern that is taken as the center of the original tension cross. In other words, first the correct pattern is formed, and then the rest of the “background” is gradually stretched.
Features of manufacturing a two-level ceiling
The differences in technology begin already at the marking stage. In addition to drawing the border of the frame, the location of the second level zone is marked on the ceiling. At this mark, a T- or U-shaped profile is fixed to the ceiling, the lower boundary of which corresponds to the location of the stretched fabric of the first level.
First, the first level canvas is stretched across the entire ceiling. The technology for its formation does not differ from the method discussed above. Next, a baguette for the second level is attached to an additional profile. Metal screws are used for fastening. The pre-cut fabric is stretched inside it, below the first level. The back side of the baguette and the bottom part are covered with special decorative overlays.
For those who do not have experience in installing hanging systems, video tutorials will be useful.
Measuring work
After completing the preparatory work, the question arises: how to measure a suspended ceiling? A number of tips will help in this important matter.
- Measurements should be made using instruments that give the most accurate results. A laser meter is best; in extreme cases, you can use a tape measure.
- Measuring work must be recorded on a drawing, which will look like a top view of the room.
- Mark the corners in the drawing with Latin letters and connect them with diagonals.
- Measure the perimeter and diagonals of the room as close to the ceiling as possible and record the results on the drawing.
With the result obtained, you can go shopping for ceiling canvas.
How to install a suspended ceiling: features of tensioning the canvases
The stretch ceiling structure is presented as a kit, which includes fastening elements and the main fabric. The structure must be placed around the perimeter of the room, then material is attached to it, which is subsequently stretched, creating a perfectly flat and smooth surface.
Stretch ceilings are divided into two types:
- PVC film. It is distinguished by a wide range of color shades, thickness from 0.15 to 0.35 mm, safety for health, and therefore such a ceiling can be installed for a child’s room without fear.
- The fabric fabric is created by weaving from individual fibers, has less tightness than PVC film and does not have such a rich palette of colors.
But the fabric can be painted in any shade and a pattern can be applied. Also, such materials breathe well and are environmentally friendly.
Important! The production of suspended ceilings is carried out based on the client’s order after taking measurements of a specific room.
Installation of canvases on the frame is carried out in one of two options:
- Hot method. Designed for PVC film and involves the use of a heat gun, which heats the coating to the required temperature. The film stretches as it cools.
- Fabric coverings are installed using the cold method. They are attached to baguettes and stretched, after which the seams are decorated with ceiling plinths.
Ceiling mounting methods
There are several options for installing a suspended ceiling. They all have their advantages and disadvantages, and in order to decide which method to choose, you first need to familiarize yourself with them in more detail.
Harpoon method
Fastening elements are installed and fixed around the perimeter of the room. The canvas for this installation method should be 7–10% smaller than the size of the room. A harpoon is welded along the edges of the canvas; special equipment is used for this, so this is done only at the enterprise. The canvas is hung on hanging holders and begins to heat up.
To install the canvas, use a special spatula; work starts from one corner, after which they move to the one that is placed diagonally and continue like this. After fixing the corners, you can proceed to filling the middle of the canvas into the baguette. There is no need to control the tension of the canvas, since it is already precisely cut to the size of the room. At the last stage, a decorative insert is installed and the ceiling is ready.
The harpoon is welded to the canvas and ensures its reliable fastening
The advantages of the harpoon mounting system are as follows:
- the canvas can be removed and reinstalled at any time;
- since the canvas is 7–10% smaller than the size of the room, the possibility of it sagging will be minimal, the harpoon reliably fixes the canvas;
- it is convenient to drain water that has entered from neighbors above; it is enough to remove one side of the canvas and then put it in place;
- suitable for creating multi-level structures.
Among the disadvantages of this installation method, it can be noted that its cost will be higher than that of the glazing bead method and the height of the baguette is greater; for a harpoon it is 3.5 cm, instead of 1.5 cm for the glazing bead system.
Putty or wedge method
These two methods differ from each other only in the elements of fixing the canvas. In the first case, glazing beads are used, and in the second, special wedges are used. The glazing bead system is more common, since the cost of glazing beads is less than that of wedges.
First, a baguette is fixed on the walls around the perimeter. After this, hang the canvas and heat it. In this case, the canvas should have a margin of 10–20 cm in width and length. First, the canvas is fixed on the short side of the room; for this, a glazing bead is inserted into the baguette. After that, installation is carried out on the long sides of the room and, at the last moment, installation is carried out on the second short side.
When using the glazing bead method, you need to take the canvas with a small margin
When using the glazing bead method, it is important that the canvas is placed evenly and does not shift to one side. All that remains is to trim off the excess fabric and secure the decorative inserts.
The main advantages of the glazing bead installation system:
- low cost of necessary components;
- the height between the suspended ceiling and the base is only 1.5 cm, which is very important for low rooms;
- there is no need to accurately measure the canvas, as is done in the harpoon method.
This system also has a number of disadvantages that must be taken into account when choosing it:
- after installing the glazing bead, deformation of the canvas occurs, so after dismantling it, it will not be possible to reinstall it;
- if the neighbors above have flooded it, then draining the water by removing the canvas from one side of the baguette will not work and you often have to replace it;
- after some time, the glazing beads may change their size and fall out of the baguette;
- if the tension of the fabric is carried out by insufficiently qualified installers, the seams may be distorted;
- possible sagging of the canvas;
- This installation method is not suitable for creating multi-level structures.
Cam method
When using the cam method of installing a stretch ceiling, a special tape is used, which has adjustable cams. One element is stationary, and the second is dynamic, between them the canvas is installed and fixed. The cams, when moving the film with a spatula, move apart, after which they automatically compress and reliably fix the stretch ceiling. When using special baguettes, the distance between the canvas and the ceiling can be only 8 mm.
This method is very similar to the previous one, so it has the same advantages and disadvantages. After installation, a white plastic profile will be visible around the perimeter of the ceiling, and if the area of the room is large, then small folds may form along the perimeter and in the corners, which do not decorate the ceiling.
In a clip system, one cam is stationary, and the second is automatically compressed
No matter how the stretch ceiling is installed, until the lamps are installed, the surface will not take on a finished look. Proper placement of lighting fixtures will help create beautiful effects.