We carry out the work carefully and efficiently
In this article we will try to explain to you in detail how to correctly putty the corners of drywall: internal and external.
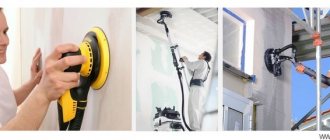
Necessary tool
- Sanding paper.
- Set of spatulas.
- Electric drill with mixer attachment.
- Grinding grater.
To ensure that puttying drywall corners goes without problems, use the following materials to help with the work:
- Perforated corner. There are 4 types: iron, rounded, adhesive, plastic. All of them can be used to finish external corners. Rounded ones are more suitable for rooms where active activities are expected to take place, in order to prevent deformation of the corners.
Plastic perforated box.
- Construction mesh “Serpyanka”. It is used to seal the internal corners of drywall.
Serpyanka is a necessary part when working with plasterboard corners.
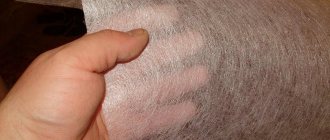
- Non-woven tape. It is necessary to secure the acquired structure.
Tape to secure the structure.
Choosing putty
Building materials shopping centers have a fairly large selection of dry building mixtures.
There are such a huge number of them that you won’t be able to figure out what specific putty to use for the work.
- Some are intended for finishing ceilings and walls, others - for cracks and slopes. Still others are used only for decorative purposes. By the way, the price for different types is very different.
- Dry mixtures are cheaper to buy because they last a long time. Both in warehouses and shopping centers, and after purchase.
- In addition, dry mixtures can be used in doses: painted on in some place, leveled, and used in large quantities for emergencies. But ready-made putties are subject to all sorts of changes, not for the better.
Depending on the purpose of use, putties are:
Advice! All three that were mentioned are suitable for gypsum board putty, but not in any room. If you need to putty a kitchen or bathroom, it is better to use cement putty, since gypsum cannot withstand changes in moisture: when it dries, the gypsum putty will crack. Polymer putties are all suitable and plastic. They are better suited for sealing drywall joints.
Making external corners
70 percent of successful puttying of the outer corners of plasterboard walls depends on the correct installation of the reinforced corner. Additional adaptation is provided by a perforated corner made of narrow aluminum, and it can be attached with glue .
Perforated iron corner.
When finishing the outer corner of drywall, the following instructions are available:
- The outer corner of the drywall must withstand small overloads and impacts. Because when passing by a wall, the corners quite often get caught and, consequently, they are required to withstand these overloads.
- The drywall itself is not very strong against automatic influences, and in order to strengthen it, you need to use iron or plastic corners when finishing the corners.
Application of perforated iron angle.
- Later, apply the mixture with a spatula from top to bottom, holding all sides of the corner - edges. It is not recommended to make the first layer of drywall putty too narrow.
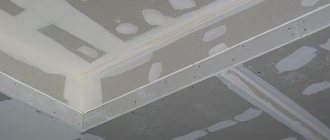
Photo: finishing putty on the outer corner.
- As soon as the corner is completely dry, it is cleaned using a spatula and the subsequent layers begin to be applied. When cleaning corners, you need to act very prudently so as not to in any way destroy the texture of the corner with the sharp edge of the spatula, which is quite easy to destroy.
- After the layer has dried, they begin to sand the outer corners, and then the entire plane of the wall.
Making interior corners
In order for the putty of the internal corners of drywall to be successful, you need putty, a circular spatula and a mesh.
- Preparation of putty. It must be diluted in accordance with the instructions on the packaging in a special container.
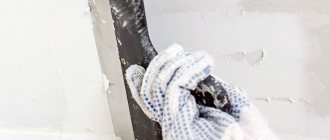
- The corner is glued with “Serpyanka”. Its middle must be exactly in the corner at the junction.
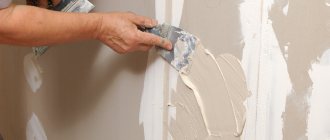
- Apply a thin layer of the original putty on top to either side of the corner.
The final stage of puttying internal corners.
- Next, the applied putty is leveled with a spatula.
Brief information about the technique of puttingtying drywall
- The key goal is to reinforce and level the joints of the gypsum boards, external corners and the corresponding comprehensive improvement of the geometry.
- Technological aspects indicated in the video on the method of puttying drywall - basic preparation of joints, external corners and fastening points for self-tapping screws with the application of two or three layers with intermediate drying and, if necessary, sanding.
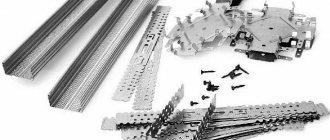
- The devices used are fiberglass or serpyanka tape (reinforcement of joints); plastic, iron punched corners and punched tape (strengthening external corners); starting and finishing putty.
What materials and tools may be needed for work?
The corners of plasterboard boards are the most vulnerable places. Therefore, in order not to damage them during the operation of the room, they must be properly puttied. Since internal and external corners are considered “difficult to work areas”, special tools and materials will be required.
In order for the putty of wall corners to be of high quality, you need to purchase the following materials:
- Perforated corners. These products can be of several types: plastic, metal, rounded, self-adhesive. You should choose based on personal preferences, since all of them are successfully used for finishing external corners. Rounded corners are usually used in rooms where small children live, so that they do not get injured.
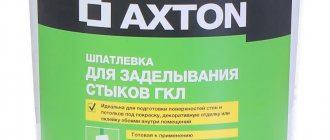
- Starting putty. Experts identify several manufacturers that have good quality and an affordable price: Knauf, Axolit, Fugenfüller.
- Non-woven tape. It strengthens the resulting structure well.
- Reinforcing mesh. With its help, you can not only strengthen the surface of the wall, but also seal the internal corners.
- PVA glue for attaching reinforcing mesh to the wall surface.
- Fine sandpaper.
In addition to materials, you will definitely need special tools that will greatly facilitate the finishing process.
- Angled spatula. With this tool you can create perfect internal corners.
- An ordinary metal spatula.
- Construction stapler.
- Brush.
- Construction knife.
- Construction mixer (or drill with attachment).
- A container with a flat bottom for diluting putty.
When starting finishing work, you need to understand that the internal and external corners have a different design, therefore the actions that will be performed during puttying will be different.
Using construction tapes when filling joints
The joints of Knauf plasterboard or any other are processed in several ways. The best option is a method using special tapes.
- Serpyanka for putty, or fiberglass mesh, is easy to use, often self-adhesive, suitable for longitudinal joints, however, experts do not recommend reinforcing transverse joints, which are especially susceptible to cracking, with serpyanka. It has standard sizes and is therefore suitable for seams of any width and length.
- The paper tape used is particularly strong, with fiberglass reinforcement and a special fold in the middle, making it easier to putty corners. With good moisture absorption, after mixing with putty, the output is a very strong reinforced connection.
USEFUL INFORMATION: Using moisture-resistant drywall in the bathroom
Depending on the choice of material - tape or serpyanka - the technology for filling the seam will be slightly different.
Puttying internal corners - process features
In principle, this task is not difficult to carry out, the main thing is to gain a little experience, which is done in the process of working in areas that will be covered with furniture. For work we will need putty, a sickle and an angled spatula. Now let’s look step by step at how the workflow should go.
First you need to prepare the putty in full accordance with the instructions, if it was purchased in the form of a dry powder. To do this, putty is slowly poured into a container with clean water and stirred with a construction mixer for about 10 minutes. Afterwards, you need to let it stand for another 10 minutes and mix again.
The inner corner is glued with reinforcing mesh, and its middle should be located exactly at the junction of the walls. A regular or self-adhesive mesh can be used here. If you use a regular serpyanka, then PVA glue is applied to its surface using a brush, then it is attached and the opposite side is coated with glue.
After the glue has dried, starting putty is applied to both sides of the corner using a regular spatula. The layer should not be too thick, but such that it covers the mesh. The applied putty is leveled using an angle spatula. After drying, the surface must be treated with fine sandpaper to remove all irregularities and sagging. Finishing of internal wall joints using finishing putty is carried out together with the final finishing of surfaces.
Puttying external corners of drywall
Finishing the external corners of plasterboard walls has its own specifics. In this case, various materials can be used that require a separate approach. However, finishing with a metal or plastic corner is no different - the actions when using such products are completely identical. The putty is prepared in accordance with the instructions located on the product packaging. The length of the metal/plastic corner must be prepared in advance by first measuring the height of the ceiling.
A layer of starting putty is applied to both sides of the joint. The layer thickness should not be too large. The perforated corner is placed over the treated corner and pressed down so that the putty protrudes through the holes. Next, you need to level the surfaces; for this, most likely, you will need to apply a little more solution. At the end you need to remove excess putty that has not yet hardened.
Once dry, you will need to sand the area with fine sandpaper to remove any imperfections. The final stage of finishing the corners is performed during the finishing putty of the walls. Finishing an outside corner with plastic angle iron with an alternative fastening is another way to keep drywall corners intact. In this case, you will need to prepare a small amount of putty. The solution is mixed strictly according to the manufacturer's instructions.
A corner of the appropriate length is applied to the corner and attached using a construction stapler. The putty is applied to both sides of the corner and leveled using a regular narrow spatula. All excess putty on the end of the corner must be removed before it dries. After the surface has dried, it is checked for defects and processed using a fine sanding belt. The final finishing of the corners is carried out together with the finishing putty of the walls.
Each corner has its own approach
Now you can start processing the corners of the structures. Be patient and do this in a certain sequence.
Internal corners
You can putty them with a regular spatula. But for convenience, you should use a special angle tool. The process goes like this:
- Apply a layer of putty to the joining surfaces of the corner.
- We cut off the required length of the serpyanka and press it into the leveling material.
- We putty the mesh evenly.
- We wait for it to dry completely, then sand it.
- We check the verticality of the angle using a building level. It happens that due to the shrinkage of the putty, it moves. If this happens, we level it out.
- If there are any irregularities, you need to go through the compound again.
External corners
The outer corners of plasterboard structures must be shock-resistant, because sometimes they can be accidentally touched. Therefore, rather fragile drywall needs to be strengthened in such places. To do this, use metal or plastic corners.
They must completely repeat the joint of the planes being processed. Trim the pieces at the top and bottom in the shape of arrows. Then the spatula will not cling to the edges, and the composition will lie evenly.
Then we proceed as follows:
- Apply the putty evenly in small beads along both planes of the corner.
- Place the perforated plate parallel to the joint and carefully press it into the composition.
- When securing the part, you can use a construction stapler; it’s easier and faster.
- Don’t forget to check the verticality using a level; if necessary, add additional mortar under the base.
- Sand after drying and apply one or two more layers of the composition.
Corners of arched passages
To properly process such structures, special plastic corners are used. They are thicker than metal ones; they are usually attached with a construction stapler, and then covered with mortar in two stages.
The composition is applied in a thin layer so that the surface remains as smooth as possible. It is important that at the first stage the solution fills all structural cavities. When it dries, you need to apply another layer, leveling the joints of the part with the surface. You can watch the video on how to make an arch from plasterboard:
Final cleaning
When the main layers of the solution have been applied and dried, it is necessary to clean the surfaces. To do this, you can use a fine-grained emery cloth attached to a hand grater.
It should be 2 cm larger than the size of the tool at the edges. We grind the treated surfaces first on one side of the corner, then on the other.
The end result should be an absolutely smooth and even edge. You can also use a special abrasive mesh for cleaning.
After this, the surface must be treated with a penetrating primer and, if necessary, a finishing putty must be applied. Then the corner must be sanded again very carefully so that the abrasive part does not cut off the layer of mortar and expose the reinforcing part.
Some professionals advise chamfering the cut edges of drywall, that is, cutting them in a V-shape. Indeed, the putty will lie smoother, but if you plan to use wallpaper, then you don’t have to do this.
Note! Reinforcing parts are used only at the joints of planes equal to 90 degrees. If the corners are obtuse, then they must be processed without additional overlays and the process must be approached more carefully.
Finishing an external corner using a semicircular corner
In this case, the finishing of drywall corners has one feature. In order for the corner to fit tightly to the base, before starting work you should prepare the corner of the drywall. First, the corner is cut using a construction knife. The cut is made at an angle of 45° and goes to a depth of 1–1.5 cm. The course of subsequent actions is completely identical to the method with a metal perforated corner.
Some craftsmen prefer to additionally fasten the semicircular corner using a construction stapler, but without applying a preliminary layer of putty.
It is also recommended to use non-woven tape in all of the above methods, which gives the structure even greater strength. It is glued after applying the last layer of starting putty in the places of transition from the corner to the main area of the plasterboard. The tape adheres perfectly to the putty, thereby ensuring a very durable installation of the corner.
In addition to the corners, the seams that form between the plasterboard slabs also deserve attention. In this case, the use of reinforcing mesh will also be required to ensure a strong connection between the sheets. Pre-prepared putty is applied along the entire length of the seam being processed. The mesh is applied to the fresh layer and pressed with a spatula, and carefully leveled. The second layer of putty is applied over the serpyanka so that it completely covers it. After drying, it is necessary to sand the putty layer.
In such cases, it is recommended to additionally treat both the plane and all corners with finishing putty, which will hide all minor irregularities and give the surface a beautiful aesthetic appearance. Before you putty the drywall in the corners with finishing putty, you need to additionally prime them. After applying a layer of the finishing mixture, a special non-woven tape is glued over the not yet hardened putty and carefully leveled with a spatula.
Subsequently, the tape is impregnated and hardens, providing additional reinforcement and resistance to mechanical damage.
Assembling the internal structure
So, let's look at installing the internal corner. To make a structure from a metal profile you need to do the following:
- We install a guide profile on the floor along the surface. We attach it to dowels;
- then, on the other hand, to the already installed profile, you need to attach another profile;
- next you need to make a mirror image on the ceiling;
- After that, we attach a guide profile along the entire length of the wall.
The result is an almost finished design. Next you need to do the following operations:
Sheeting
- We install rack jumpers along the entire length, which are attached between the vertical guides;
- the fastening step must be taken based on the load expected for the structure. The greater the load, the shorter the mounting distance will be. Use a distance from 30 to 60 cm.
This method is acceptable if one wall has already been completely covered with sheets. This method is very simple and therefore widely used. There is no need to go through the hassle of cutting profiles and forming them into a single structure. But you can also use another method, when you need to make cuts on the profiles and connect them using self-tapping screws. To do this, you need to do the following operations:
- we take two rack profiles and cut them so that the side of one element is attached to half of the front of the other;
Correct connection
- we connect them with self-tapping screws;
- Then we combine the entire structure with the perimeter guide.
That's it, the inner corner is ready for covering. In this case, drywall is attached according to the standard scheme.
Note! We first cover one wall with plasterboard, and then another, while covering the entire structure. For the second installation option, the same algorithm is followed.
How to putty external and internal corners of drywall
How to putty the corners of drywall? This problem always arises when you have to work with this material. And the point is not even that you need to make a smooth surface, it is very important to create a correct and even angle.
- remove all excess - scraps of cardboard, falling off areas;
- wipe with a damp cloth, but without letting the drywall boards get wet;
- stir the primer well and apply it to each corner;
- Allow the treated areas to dry.
It all starts with preparing the necessary tools, materials and consumables (accessories, etc.). Why is this so important? It’s worth imagining what a workflow would look like, during which you constantly have to search for the right element.
There should be order in everything; this is the key to a quality finish. It is affordable and has all the necessary qualities. Namely, it allows you to putty any part of the wall in a short time, and also creates a strong and reliable layer.
In general, we can say with confidence that working with corners is one of the most difficult and painstaking activities. It seems that making them will be very simple, but in reality everything is different. And therefore, this process is divided into several stages, each of which is important in its own way.
Work technology
If you are working with angles, then you must follow a certain technology, which looks like this...
- Putty must be applied over the entire height of the corner, which is very important.
- First, a rough solution is applied, then a corner is applied and pressed into this solution.
- Afterwards, you need to use a bubble level to measure the correct fit of the corner and adjust it - smooth walls and edges look much more beautiful than those filled with a level.
After the solution has set, it must be measured again, as it may deform slightly, which ultimately leads to a change in level.
Puttying internal and external corners of drywall
As soon as work begins on arranging interior plasterboard partitions and other structures, many people have difficulties; they do not know how to putty the corners of plasterboard. It is often easy to make a smooth surface, but to create an even and correct angle, you will have to work hard. Even experienced builders argue about how to do this correctly, so it is worth examining this issue in detail so that there are no problems when creating an ideal surface. This material is inexpensive and at the same time has qualities that are suitable for arranging the intersections of a structure. Thanks to gypsum putty, a durable and strong layer is obtained on the surface that can withstand any facing material.
Any process in repair and finishing begins with the preparation of the necessary materials, consumables and tools for drywall. This is the only way the work process will proceed without interruptions and stops. High-quality puttying of drywall with your own hands directly depends on the quality of the material, since the strength of the equipped surface as a whole will depend on its choice. The material offered on the construction market is varied and differs in cost, composition, manufacturer, and so on. Alternatively , gypsum-based mixtures are preferable, since its structure meets the quality and strength requirements.
They are suitable for arranging the intersection of planes; the same composition is used to putty plasterboard walls under wallpaper. It seems to some that puttying the corners of drywall is a very simple process, because it is a smooth material and during installation everything turns out level, but this is not always the case, there are certain nuances, without knowing which you can make a mistake that can ruin the entire effect of the repair due to unevenness. The arrangement of corners occurs in stages, and each stage is important and necessary.
The final part is finishing
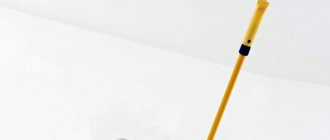
Compared to the installation part, the finishing process is quite simple - treating drywall with putty can be done even by an inexperienced person. But before this, it is necessary to prime with an adhesive composition that penetrates deeply into the material - this will increase strength and will not allow moisture to penetrate into the plasterboard sheet.
The primer is applied using a wide brush or roller. Puttying should begin after the sheets have dried.
Sequence of actions for puttying:
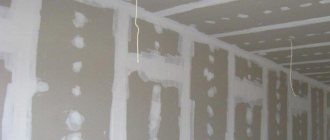
- After using self-tapping screws, indentations from them remain in the corners - you need to fill them with a spatula.
- The joints must be covered with reinforcing mesh, gluing it in strips over the connecting line. Any glue, including PVA, can be used as an adhesive base.
- When the glue has dried, it is applied in as even a layer as possible, but you should not try to create a perfectly smooth surface - this is unnecessary.
- For the outer corner, first check the verticality using a level, and then grind the surface. If a deviation from the vertical is detected, then to eliminate it it is necessary to apply a small amount of putty in the right place.
- When the putty has completely dried, you can begin sanding the surfaces using sandpaper with a small grain, thus eliminating various smudges and other irregularities.
The angular joining of structural elements made of gypsum plasterboard is traditionally the most difficult part of the installation, because obtaining an ideal joint is hampered by the rather high fragility of the building material. But at the same time, the corner is the most noticeable part - it literally “catches the eye,” which forces us to pay increased attention to the arrangement of such elements and to be as careful as possible when performing work and selecting high-quality materials. But the result can be truly flawless-looking surfaces.
style=»text-align: justify;»>Video
Video
Puttying drywall corners
It is not necessary to putty the corners; it depends on whether you want the corners of your rooms to be symmetrical and you can save money on this. You can do without sanding if the previous work was carried out by an experienced craftsman who did not leave behind splashes and streaks from the movement of the spatula (which happens well, very rarely). And also, if in the future you use thick vinyl or non-woven wallpaper for decoration, small mistakes underneath will not be so noticeable.
The use of paint will highlight them. Also, if sanding for paint is done on all surfaces, and for wallpaper - in places where roughness is identified. To apply putty to the inner corners, use a special spatula with a 90º angle. Such corners are much more difficult to align than external ones, because there is little room for maneuver.
In addition, if the corner is covered with plasterboard, it takes a day. When the start has dried, you can begin to apply the finishing layer; again we use a regular spatula. Roll out the finish around the perimeter as thinly as possible.
When it dries a little, acquiring plasticity, we level it with a special corner spatula. The type of putty depends on the purpose of the room being finished. For the kitchen and bathroom, cement is suitable, which is not damaged by high humidity.
Dries in 1-2 hours. Gypsum is used for finishing interior spaces, except for the bathroom, because there it will eventually fall behind the wall. Plaster dries in 2 hours. There is also a mixture of lime and cement for finishing the facade, which can withstand any weather conditions.
It also takes 1-2 hours to dry. We take a small spatula, apply the composition to the places where the screws are installed, and remove the excess. There should be just enough putty in this place so that the surface is even. This way we go through all the screws. They can be sealed parallel to the seams, or they can be sealed first.
It doesn't matter. To putty surfaces, you will need a large spatula - with a blade of 40 cm or more and a narrow one - 10 cm. The first layer is applied with starting putty. It is applied in a layer of about 5 mm (the maximum should be checked in the instructions for the specific putty) and hides all the unevenness.
Dilute it with water until it becomes thick sour cream, stir thoroughly so that there are no lumps.
- Serpyanka.
- Fiberglass tape.
- Paper with perforation. Some companies offer paper tape with a glass fiber composition, which is considered the most modern type.
- Not expensive paper tape.
If canvases in the form of PVC panels, MDF and similar building materials are used on drywall, the base does not need puttying; it will be enough to treat it with antiseptic solutions or primer, especially in rooms with a high humidity threshold. In order for the puttying of drywall corners to go without problems, use the following materials to help with the work: By strictly following the instructions, you will quite simply achieve the desired results, or rather, strong and even corners that are ready for further upcoming finishing. First you need to prepare the putty in full accordance with the instructions, if it was purchased in the form of a dry powder. To do this, putty is slowly poured into a container with clean water and stirred with a construction mixer for about 10 minutes. Afterwards, you need to let it stand for another 10 minutes and mix again.
Some craftsmen prefer to additionally fasten the semicircular corner using a construction stapler, but without applying a preliminary layer of putty.
Putty external corners
Knowledge of puttying technology at joints and corners will prevent cracking of the coating. In this regard, the alignment of the outer corners is more difficult - you need to overlap the corners (for the inner ones, it is enough to use a serpyanka).
Drywall sheets are fragile and susceptible to damage; be careful when handling them. First, apply a perforated metal or plastic perforated corner - it will create an even angle and protect the drywall from damage.
Note! The cost of corners made of galvanized steel, aluminum, and plastic is almost the same. Each of them has pros and cons that you should familiarize yourself with before purchasing. For example, the former, when used in rooms with high air humidity, can form rust stains. Aluminum eliminates this possibility, but close proximity to copper and some other materials destroys them. PVC is gaining popularity every year due to the fact that it is impervious to corrosion, does not rot, and resists deformation.
- To begin with, measurements are taken of the joints, corners are cut at an angle of 45º, metal ones - with metal scissors, plastic ones - with a painting knife (but most often with ordinary scissors).
- Next, a level is applied on each side of the slope to determine the evenness of the slope of the surface. Marks are made on the wall indicating the approximate thickness of the future layer of putty.
- A solution is prepared and applied to the slopes at intervals, according to the marks.
- The pre-selected corner is pressed in before the putty is squeezed out through the holes.
- The excess is removed and the angle of the angle is checked with a level. By applying pressure, the correct vertical or horizontal position is created.
- The excess is removed, another layer of putty is applied, leveled with a spatula and wait until it dries completely.
- If at the end of the work there are still unevennesses, a correction layer of “zeroing” is applied.