Features of the type of finish
Plaster with imitation of different textures is very popular in modern interiors. The embodiment of loft and industrial style is impossible without rough stone finishing. Often a brick wall made of plaster is used in the Scandinavian direction.
The peculiarity of this type of work is the preservation of usable space in the room. Additional masonry, even decorative brick, reduces the living space, and in order to bring the chosen style to life, a good solution would be to create an imitation.
The textured finish accurately repeats each element and when done, it creates the full impression of an unplastered surface, which brings the designer’s idea to life. You can make a brick wall with your own hands; this does not require a large amount of mortar or the use of complex technology. Regular plaster and a little patience are enough to make every element of the masonry look natural.
A brick wall fits well into almost any interior
Styles: country and loft
The color of the brick is selected based on the style of the room. Interior ideas that use the effect of a brick wall are based on two styles:
- Country. The style personifies comfort and tranquility, dominated by pastel colors and soft shades. This “masonry” is distinguished by neatness and strict lines. The bricks are predominantly light in color. An excellent addition can be rough and massive wooden beams that imitate the ceiling. The impression will be as if this is the attic of a cozy European house or attic.
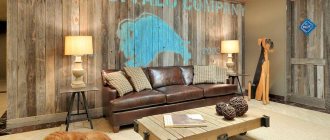
- Loft. There is always room for eccentricity and some zest. It seems as if around the walls of an ancient building, perhaps built two hundred years ago. Such a room may resemble an abandoned plant, workshop or factory. The style goes well with rough-planed floors, house plants, upholstered furniture, bright carpets, etc. Finishing can be done with decorative stone.
Wall decoration with decorative bricks is suitable for any room - from the kitchen to the bedroom. Brickwork goes in combination with plain wallpaper and plaster. It is not at all necessary to decorate most of the room in this way: it is enough to decorate a corner of the room, a fragment of a doorway , a fireplace.
How to paint
One of the most successful options for covering such decor is elastomeric paint . Filling all the unevenness, it provides reliable protection from moisture and strengthens the structure.
Acrylic and water-based paint are suitable for more catchy, bright decoration, where different colors may be present. The paint is applied with brushes, and a fur roller is used to create waterproof and dust-repellent coatings.
Style and design
Imitation of a brick wall is used not only in industrial areas. It is also used when decorating interiors in the style of Provence and Scandinavia, which are difficult to perceive without the texture of natural stone and brick.
The finishing can look like a continuous surface, occupy part of the wall, or play the role of zoning the room in the form of masonry with separate elements. A variety of visual effects and color solutions allow you to use imitation in any room and different designs. This can be the embodiment of style or the original design of the room.
Options for using color and pattern of brickwork:
- Gray masonry. Light shades are perfect for creating a Scandinavian style; darker tones can create a neutral design. Gray color can be used in different textures - the embodiment of a rough and untreated wall or in the form of a neat apron in the kitchen.
- White brick. It will add airiness and can be used in all areas of design or as a decorative element of the interior.
- Red masonry. Used as a bright accent in a room, but requires caution in use. A bright color will visually narrow the space and make the room appear darker.
- Black brick. An excellent solution for zoning space, which is widely used when creating minimalist styles.
- Beige masonry. The color can be used in Provence, loft, and Scandinavian interior design. It does not visually reduce the space and makes the wall light and airy.
On a note!
Imitation brick made of gypsum plaster can be painted in any color. If necessary, small wall defects can be easily corrected and painted with your own hands.
You can change the texture and plaster the wall, making it smooth, when the idea of changing the interior style arises.
You can experiment with shapes and surfaces
Making a mold for casting brick tiles from plaster
An imitation of brick for interior decoration in an apartment or house can also be cast: you can make gypsum tiles in the form of bricks yourself. To do this, an impression is taken from interesting specimens of bricks (a mold is made to form an artificial finishing stone), and then a gypsum solution is poured into it. The resulting tiles are used for wall decoration. This technology is good because it allows you to prepare several molds in which you can make bricks of different colors for different rooms.
We find bricks of interesting shape and several almost ordinary ones, but with various minor defects. We will use them to cast the mold. It is desirable that there be at least a dozen of them, or better yet, more. “Artificial brickwork” will be more varied.
The result can be very similar to real masonry
On the side that we will “multiply”, apply grease or heated wax mixed with kerosene. This is necessary so that the silicone does not stick to the surface. When everything is dry, apply a layer of silicone sealant to the treated side. The layer thickness is 1-1.5 cm. Leave until the silicone is completely polymerized (the time depends on the type, it is written on the package).
You can also make the following shapes: imitation brick with marine motifs
When the silicone has hardened, take the foam and coat the mold without removing it from the brick. After the foam has hardened, remove the brick and level the bottom of the mold so that it stands level. Can be used by filling with gypsum mortar. It sets quickly; if you have a dozen molds, in 2-3 days you can make tiles for a couple of squares simulating a brick wall. By the way, gypsum mortar can be painted in bulk. Then new cracks and chips are not a problem - just like a brick.
Ways to imitate brickwork
There are many options for creating an original surface. To choose the optimal solution, you need to know how you can make a wall without much labor and material investment.
Ways to imitate brickwork:
- Covering walls with photo wallpaper. Manufacturers offer 3D formats that look realistic, but are unable to convey the texture of natural material.
- Pouring gypsum bricks. You can make the form yourself and create the elements in the required quantity. You can also purchase ready-made products in the store and stick them on the wall.
- Use a special bar. The cavity is partially filled with mortar and installed on the wall, but such work is long and requires care and patience.
- Cutting elements from thin foam plastic that perfectly imitate brick, are easily attached to the wall and painted. They do not weigh down the walls and look natural.
- Creating masonry relief by plastering the walls of the house. This method allows you to give the brick any size and relief.
Which method to choose depends on how well the home master knows how to work with solutions and how the imitation should correspond to reality.
Types of masonry
The decorative effect of brickwork is achieved by various methods of laying out and tying bricks, using bricks of different shapes and colors. The simplest and most common way to create a decorative wall is direct masonry: due to the thickness of the seam and its color, a smooth, colored, textured surface. With these elements you can create a unique look. What are the most famous types of masonry:
- single-row;
- multi-row;
- single row one third;
- American hedge;
- English dressing;
- Old Russian masonry;
- simple with the sixth row tychkovy;
- Flemish spiral and Flemish cross, diagonal;
- herringbone;
- network;
- diagonal single-row dressing.
Bavarian masonry is usually called a technique when bricks of different colors are laid. Classic Bavarian masonry is made from 4 shades of brick of the same or different textures.
Which plaster to choose
This type of finishing is used indoors and on facades. For work outside buildings, it is necessary to use cement mortars for the walls, which have sufficient strength and are not affected by precipitation.
Facade cladding of walls “like brick” requires careful preparation of the surface and the use of a construction mesh, which will ensure the reliability of the finish.
Internal plastering can be done with gypsum-based compounds, which are quite elastic and easy to work with. The material is sold as a ready-made solution and in powder form, which must be diluted with water in the required quantity.
When using mixtures in rooms such as a corridor, hallway and kitchen, the compositions must contain a plasticizer, which will provide the coating with resistance to variable humidity and the formation of fungus and mold.
Important!
The choice of material must be approached responsibly; you should not skimp on mixtures. The finished finish must be resistant to mechanical damage, moisture and have good adhesion to the base. Most mixtures based on cement, gypsum and lime have these qualities.
A variety of materials can serve as the basis for decorative plaster.
Gypsum products
Gypsum panels that look like brick look especially good in the interior; they most accurately convey the texture of this material, so such an imitation is practically indistinguishable from a real brick wall. Another advantage of gypsum products is absolute fire safety.
USEFUL INFORMATION: How to level the walls in the bathroom under tiles: how to level a wall under tiles
However, it should be remembered that gypsum is afraid of moisture, so this finish is only suitable for dry rooms.
Another feature of gypsum boards is their fairly considerable weight. So, for example, a 50 × 50 × 3 cm slab weighs 4 kg.
Advantages and disadvantages
This type of finishing has a number of undeniable advantages, the main one of which is versatility. You can plaster any surface and thereby create an imitation both inside and outside the house.
Advantages of creating a finish:
- The main feature of plastered brickwork is the simplicity of the work. And if you use special stencils, the reduction in labor costs will become even more noticeable.
- An absolute advantage is the cost of work and materials. In addition, plaster is recognized as a material with high environmental characteristics that do not have a negative impact on human health.
- Finishing with plaster will not affect the area of the room, since the thickness of the layer is small and does not visually affect the narrowing of the room.
- Imitating brickwork from plaster is quite possible for a person who does not have special knowledge and skills.
- Long service life of the finish and the ability to change colors. Imitation brickwork can be easily restored in case of mechanical damage, and if a smooth surface is needed, it can be plastered and leveled.
- The finish is easy to maintain. The painted surface is easy to clean and wash, which is very convenient if the plaster is used as a kitchen apron or in high-traffic areas.
The disadvantages of using such a design solution include high surface statics and dust settling in the seams, therefore, when performing work, they must be made as neat and smooth as possible.
What is needed for brick plastering?
To carry out the work, you need to prepare not only the tools for mixing and ensuring its application to the wall, but also devices with which you will create the effect of brickwork.
To work you will need:
- construction basin for diluting plaster mortar;
- spatulas;
- rule;
- trowel;
- Master OK;
- drill with attachment;
- roller for applying primer;
- oilcloth to protect the floor covering;
- gloves;
- level.
Depending on the effect you want to achieve, different options for plaster mortar are used. To imitate white brick, gypsum plaster is used. If it is necessary to obtain colored bricks, gypsum plaster is tinted by adding special pastes. The ingredients are mixed using a drill with a special attachment.
Any work begins with the preparation of tools
Note!
If you have no experience in such work, you should not mix a large amount of the mixture - the solution hardens quickly. The life cycle of cement-based compositions is 2 hours, lime - 1 hour, gypsum - 30 minutes.
Decorative bricks made of gypsum plaster
Decorative bricks made of gypsum plaster
Hi all! Today I’ll tell you how I made bricks from gypsum plaster at a cost of 200 rubles per square meter.
And I will say more that I earn money from this, I have a lot of experience in creating such brick walls. This is not the only way to do this work, but this is how I do it. I saw this method on YouTube a long time ago and it interested me very much. I decided to make myself such a wall, and I succeeded. Of course, it’s not as cool as I do it now, but nevertheless, everyone liked it, and they started ordering this kind of wall decoration from me. The photo below shows the first experience.
First experience To begin with, I’ll immediately explain that the wall should be more or less even and flat. Otherwise, it won’t work smoothly, although in some cases people want to imitate very uneven and crooked masonry. If that's the goal then please.
What you need for work
And so we went in order. What do we need to make our dream come true?
My wall was 15 square meters in size. and below I will write how much material I bought for my wall.
- Primer. We buy the most deep penetration shower primer, 5 liters. In my case, I bought soil, it cost me 350 rubles (the cost is indicated on the packaging)
- Paint, brush. Of course, it’s better not to skimp on paint, but I saved, and everything has been fine for 3 years. The most important thing is to buy washable acrylic paint, but if you buy a good one, it’s better to look at latex. This paint covers and rolls out better, and it also stretches, which allows you to hide micro cracks. I bought washable paint. The bucket is 10 liters but there are a couple of liters of paint left. Price 1500 RUR (consumption is indicated on the package)
- Beacons 6 mm. Take beacons, either iron or plastic. I mostly buy 6 mm. lighthouse, but sometimes people ask for texture then I use 10 mm. The number of beacons depends on the size of your rule, you need the rule to stand on two beacons and so on, calculate it yourself, my wall was 6 meters long and it came out to 5 pieces with a 2 meter rule. Price 150 rubles. (5 items)
- Plaster. We will work with gypsum plaster. But don't rush to the store. I’ll tell you the main secret: you don’t need to buy ordinary plaster, but for machine application. Why like this? The point is that we need maximum operating time. the usual mixture begins to harden after 15 minutes. And we are unlikely to have time to do anything good with it. And machine plaster, thanks to its additives, does not harden for up to 2 hours. So that's what we'll buy. This plaster is available in the range of most manufacturers. My choice fell on “Knauf” mp 75 and I needed 3 bags. Price 1200 rubles (consumption is indicated on the bag)
- Bucket. A regular 15 liter bucket. Where we will mix the plaster.
- Spatula rule. The usual rule. Select the size based on the size of the wall. If the wall is more than two meters, then the rule should not be taken wider than 2 meters; it is no longer very convenient to work with. I just had a two-meter rule. Well, any spatula I had was 100 mm.
- Joining + Semicircular chisel 10 mm. I did the stitching myself. It will be needed to form seams between bricks. I made it from a regular hanger, bent it in a U-shape with a width of 10 mm and trimmed it so that it was thinner. We will use a chisel to finish the seams between the bricks when the plaster has dried. Suspension
Let's get started
- The first step is to carefully prime the walls and wait for them to dry. The surface must be dust-free and dry.
- Afterwards we install the beacons, depending on the wall, we attach them either to a self-tapping screw or to a mixture. On plaster walls I use a stapler. You need to attach the beacons to the wall. Since we need to form the same depth for the seams between the bricks. Do not forget to measure the distance of the beacons from each other as a rule, it should stand on both beacons. I do not advise you to do more than 10 square meters of wall at a time, because you still risk not having time. Even with mechanized plaster. If your wall is longer, then you end at the nearest lighthouse, and not just in the middle of the lighthouses. In this situation, the beacons were simply shot with a stapler.
- Everything is ready, time to start applying. From now on, remember that there is no time for smoke breaks. Everything needs to be done very, very quickly. Prepare all the tools in advance so that everything is nearby. Start kneading according to the instructions on the package. The mixture should be neither liquid nor thick and plastic. We put on the plaster and stretch it with the rule. We achieve a more or less even base along the entire wall. If it turns out rough and not entirely smooth, no big deal, we just need that kind of texture. Plastered wall.
- After the entire wall has been plastered, we immediately remove the beacons. We are waiting for the plaster to become slightly stronger, but soft. Usually when you finish plastering a wall, it comes to the right consistency. Retrieving beacons
- We cover the grooves from the lighthouses. Stir the mixture a little thicker. Here it is better to work with a spatula approximately 200 mm wide. We tighten it relative to two planes already along the plaster. We should have a completely plastered volume without beacons.
Marking
Now we immediately begin to mark the bricks; we begin marking the horizontal lines from the middle of the line. This gives the most even bricks in the most visible place. For the width of the rule, we begin to mark the height 8 cm, width 24 cm. In the future, we will get bricks 7 cm by 23 cm. For marking, an ordinary knife is suitable, just make lines. We simply mark the height at 8 cm from the floor to the ceiling to the width of the rule so that we can cut along it later. And we will mark the width at 12 cm. Such markings need to be done at the floor, in the center, and at the ceiling. Of course, if your rule is not from floor to ceiling, then you don’t need to mark in the center. I’ll mark the pictures further for a better understanding, see the spoiler.
Show hidden content
1st step of marking the horizontal to the width of the rule 2nd step we cut the horizontal seams 3rd step we mark the vertical seams to the distance of the rule 4th step we cut out the seams alternating through the brick so it turns out to be 1/2 apart
Seam cutting
- We start cutting horizontal seams without changing direction. If you start cutting at the top mark, continue cutting until the very end. Otherwise, the brick sizes will be different. Cutting horizontal seams
- Next we begin to cut the vertical seams. Carefully without disturbing the spacing of the bricks, everything is not as difficult as it seems. It will be more careful; it happens that when cutting, the edge of the brick is pulled out. You need to get used to it and cut on both sides so that when you make the final cut it doesn’t go into the corners. Cutting vertical and horizontal seams
- Well, we’ve cut everything out and it already looks not bad and even beautiful. At this point, the usual wall looks like brick but with torn edges, chips and tears. This is normal and how it should be. You're doing everything right. Now I’ll tell you how to smooth the seams.
- In order to smooth the bricks, we take a brush and a bucket of water. You can add a little primer to the water and dip the brush. With a wet brush we begin to smooth out the jointing and, as if by magic, the bricks begin to round. They look nice. At this point we stop, make our way and rest until the next day. Let the plaster harden and gain strength. This is what we have come to
Working with the texture and finishing the seams
At this stage, our task is to level out what chipped during cutting. Also fill in unwanted and deep depressions and create texture.
Correction
Mix the plaster a little thicker in a small amount. It happens that the place where the lighthouse melted stands out, due to the fact that there is more shrinkage there, the plaster retracts a little. But this can be removed; you simply putty plaster along the entire height of the lighthouse, adding texture in places. Don't be afraid to get into the seams. Next, you cover up various chips received during cutting, and align the geometry of the bricks to your liking.
Working with texture
Now let's start making the texture. It can be made either smoother or completely embossed. For this, ideally we need a trowel. We apply a little plaster to the surface of the trowel and begin to randomly lean it against the bricks; we should get torn textured spots. Also, if you don’t have a trowel, you can take anything flat, or even stain the wall with your gloved hands, achieving approximately the desired pattern. After using a spatula, you can add different types of strokes so that the bricks look different with different textures, it’s up to the taste and color to suit you and what you want to achieve. We created the texture and calmed down for today, the next day we will finish it.
Please note that the color of the plaster may differ, don’t be alarmed, everything is fine. This happens due to the fact that one plaster has dried, the other has not, or the batches of plaster are different batches.
The next day
Our texture has dried out, now we will refine it. We take a spatula and cut off the sharp edges of the texture, thereby rounding it. You can also rub some places a little with sandpaper. In general, we are finalizing our plaster. If at this stage you want to further improve the texture, then add more relief and grease until you are satisfied with the result.
Often some seams remain covered. In this case, I take a 10 mm semicircular chisel and scratch out the seams. You can also use this chisel to cut off sharp corners on chaotic bricks, achieving the effect of old broken bricks.
After you have finished the wall and you are happy with the texture, remove dust from the bricks with a damp brush. We prime and you can start painting.
Painting
The last stage begins. Probably the simplest, we paint the bricks with a brush from the ceiling to the floor so as not to drip onto the painted surface. We paint at least once. You can’t paint it all at once. Since there is a lot of texture on bricks, it takes a lot of paint. When painting, your hand gets tired, which means you’re doing everything right.
Conclusion
Price and time
Comparison of store-bought bricks and those made from plaster.
We completed the brick wall in 3 working days. I spent 3,200 rubles, my wall area was 15 m2 and it turns out that this beauty cost me 200 rubles per sq. m. Which is quite cheap. Compared to store-bought bricks of this type, our bricks cost from 600 rubles per sq. m. Plus you need to glue them, buy glue, and also paint them, buying paint is generally several times more expensive.
Video
A long time ago I made a video about this process, it’s not particularly informative, but it’s something you can watch.
Also made videos on Tik-tok
Conclusion
How practical is it?
Such a wall is actually very practical. If you knock somewhere, the damage will not be noticeable and you can always touch it up. If you get tired of the color, you can always update it. Washable paint is easily washed off from various contaminants.
How to dismantle
There are two options for dismantling: 1. Knock down the bricks with a hammer drill, since this is ordinary gypsum plaster and it knocks down perfectly. And the second way is to plaster over the bricks, cover the seams and level with plaster. Everything is very simple and not labor-intensive.
Looks good
What does such a wall look like? yes gorgeous! Especially if your interior has a “LOFT” direction, it will fit very cool. Such a wall is greatly decorated with side light from wall lamps or ceiling spots located close to the wall. In this way, the entire relief on the bricks stands out.
Good luck and everything will work out
If you decide to make such a wall, I want to wish you good luck, don’t be afraid, you will succeed! My friends often asked me how to make such a wall, people are far from construction, but everything worked out well for them. They were happy with the result so do it!
Thank you!
Thank you for reading this article to the end! If you have any questions, you can ask in the comments or on VK. You can also write your opinion about these bricks or share your method!
You can also read How quickly gypsum plaster dries.
Preparing the wall for work
Even smooth walls need to prepare the surface before applying plaster. This is especially important in cases where there is visible damage to the walls, such as potholes or cracks.
Removing old coating
Removal of the old coating is necessary if there is a peeling of the mortar layer. Such a surface must be cleaned down to the ground. In brick houses, it makes sense to get rid of the plaster completely and look at the appearance of the masonry. If it is in good condition, you can use this surface to create a design. But this applies only to internal walls; external ones must be plastered to prevent loss of heat from the room.
Complete or partial removal of the old coating is carried out with a hammer, spatula or a special attachment on a drill. After work, the clean base must be dusted with an aqueous solution or a construction vacuum cleaner.
Leveling and filling defects
Before applying the decorative coating, the surface must be leveled and free from cracks, potholes and peeling of the old plaster layer.
To eliminate the above defects, cement mortar is used. Only after the solution has completely dried can you begin to coat the wall with a primer.
Padding
It is necessary to use a deep penetration composition, and to apply the primer you can use a foam roller.
It is worth noting that when carrying out repairs in new buildings, experts do not recommend applying plaster in the first two years. New houses shrink, so cracks may appear in the coating, which will affect the decorative finish.
Preliminary preparation of walls is very important
Preparation of plaster composition
You can prepare the finishing solution yourself; you don’t need any special knowledge to do this. By observing the proportions, the plaster mixture will be no different from the purchased one, and its cost will be significantly reduced.
The compositions are prepared from fine sifted sand, without silt inclusions and debris.
It is better to take quarry filler with a fraction of 1 mm.
The proportions of sand for mixing depend on the main binder. Cement mortar is prepared in a ratio of 1/3, and lime mortar 1/4. The gypsum-based mixture consists of 1 kg of gypsum, 0.6 kg of clay and 3 kg of sand.
Advice!
It is better to knead using a special attachment on a drill, this will prevent the formation of lumps.
The consistency of the finished solution should resemble a thick cream and should not run off the instrument.
Creation technology
Imitating brick from plaster will not be difficult and will delight you with its appearance for a long time if a preparatory cycle is carried out on the base. The surface for decorative finishing must be smooth and treated with a primer. If the wall is new and has not been treated, then before starting work it is recommended to secure a construction mesh to the surface. This stage of work is required if decorative finishing is carried out in rooms with high humidity and on the external facades of buildings.
Many home craftsmen know how to plaster surfaces, but find it difficult to choose a technique for applying plaster brick reliefs to walls. Professionals recommend several options that will help create a decorative finish.
Examples of methods are presented below; the master only needs to choose his own option for simulating plaster on a brick wall.
There are several technologies and methods for creating imitation brickwork
Wall marking
At this stage of work, it is necessary to determine how much area the brickwork will occupy. It will look like a continuous canvas or have partial inclusions on the surface.
For marking, a construction marker is used to identify the work area. If ordinary masonry is imitated, you need to adhere to the natural size of the individual elements: length 250 mm, height 65 mm and seam 1-2 cm.
By cutting seams
A solution with a layer thickness of about 1 cm is applied to the surface of the wall. As soon as the plaster begins to set, you can begin to mark the seams of the future masonry.
Here you can use one of the following methods: using a stretched rope, the horizontal seams of the future masonry are marked, after which the markings are cut with a knife by hand or a special tool is used, which creates grooves on the surface with a thickness of 1 cm. You need to start the seam from the bottom row, gradually rising upward.
Imitating a brick wall using masking tape
In this case, sufficiently high-quality surface preparation will be required. You will have to clean out even the smallest irregularities and mark the future masonry.
Stages of work to create imitation brickwork:
- Painting tape is applied along the seams of the future masonry. First, horizontal stripes are glued along the markings, and then vertical sections.
- The plaster is mixed in the container according to the manufacturer’s requirements.
- The resulting solution is applied to the surface with tape, smoothed out and given a texture.
- After the solution dries, the tape is removed and the unevenness is corrected.
After the layer has completely set, you can begin finishing with paint, wax or varnish. This method of simulating brickwork does not require the use of special tools. All that is required from a person is accuracy and perseverance.
In this way, imitation of brickwork is performed without special tools.
Using a stencil
To imitate a “brick look” with your own hands, you can use a stencil cut from linoleum. The prepared sample is fixed on a wooden frame in such a way that the frame helps to remove the mesh from the applied solution.
The solution is applied to the prepared wall surface and leveled. A stencil is placed on top under the masonry. The linoleum mesh should fit snugly against the wall; this determines how smooth the bricks will look.
Another layer of plaster no more than 5 mm thick is applied to the stencil.
The resulting surface is smoothed, and after the solution dries, the device is removed. Once the solution has dried, you can remove blemishes using a grater or brush.
Using a special template
Construction stores sell devices with the appropriate brick sizes. Using a template, a small imprint is made on the surface of undried plaster by applying it to the wall with a certain force. Next, seams are cut along the formed lines with a knife.
Using texture extrusion
For marking, you will need a stencil made of rubber or plastic. And, of course, be careful in your work, since you will have to monitor the junctions of horizontal lines and not allow the markings to shift vertically.
The work sequence is as follows:
- A layer of solution no more than 5 millimeters thick is laid out on the surface.
- The stencil is soaked with water. This prevents the base from sticking to the solution. Next, it is applied to the wall and pressed against it until an imprint appears.
- The steps from the second paragraph are repeated for adjacent areas.
The resulting masonry is dried for 24 hours, primed and covered with a finishing layer of paint.
The stencil will help you make decorative cladding quickly
Formation of individual bricks
Another way to decorate a brick in an apartment is embossing using a special roller. Thanks to the specific texture of the tool, the plaster is laid on the wall immediately in the form of a brick. Moreover, one pass with such a roller provides several rows of masonry at once.
Important!
The force on the roller and the rolling speed should be the same on all sections of the wall. This is the only way to get a complete picture.
Making a brick roller with your own hands
To make the device yourself, you will need a regular roller and sealant, as well as a container of soapy water and a rod for working with the roller.
The sequence of actions looks like this:
- The tubular part is removed from the handle, put on the rod and placed on the supports.
- A layer of sealant is evenly applied to the roller. To distribute it over the entire surface, you can use an old bank card. The sharp protrusions of the sealant are pressed down with fingers dipped in soapy water.
- A strip of sealant is applied in the middle of the cylinder, which will imitate a masonry seam. Two more similar stripes are applied on both edges of the cylinder. As in the previous case, sharp protrusions are smoothed out with your fingers.
- Two longitudinal lines are drawn. The first is between the first and second seam, and the second is on the opposite side between the second and third ring.
To use the product for work, all you have to do is wait until the sealant is completely dry.
How to apply it to the wall with your own hands?
Advice
The plaster is applied to a cleaned, leveled and primed surface.
Fill cracks and holes with Rotband. If the depth of the depression is more than 2 cm, drown the serpyanka in the composition. Apply a rough layer of putty or construction mixture. The surface is primed in 2 layers with a break for drying. When the primer is dry, you can start working:
- using a bubble level and a construction pencil, draw a brick pattern on the wall;
- first set the horizontal lines, then the vertical ones, taking into account the width of the seams of 10–15 mm;
- cut the wide packing tape on the tube with a grinder along the width of the seam to get a torn cut (you can use a cutter);
- stick the tape along the horizontal lines, leaving 10–15 cm of margin on the wall, and cover the vertical lines in the same way;
- mix the plaster according to the instructions on the package, add pigment if desired;
- attach metal beacons to the wall in increments of 1.8-2 m (for 10 sq. m of area you will need 5 beacons);
- fix the beacons by drowning them in the composition;
- throw the mixture onto the surface so that the beacons are completely hidden, fill the entire space;
- having slightly smoothed it out with a spatula, pull off the mantle using a rule, moving vertically from the bottom edge of the wall;
- remove the beacons, cover the holes with plaster;
- walk fragmentarily over the surface with a crumpled plastic bag, leaving small grains;
- wait for the composition to set (40–50 minutes), remove the horizontal, then vertical lines of tape;
- round the edges of the brick with a brush dipped in water.
After drying, you can begin painting and applying a protective coating. To seal, it is advisable to manually rub the seams with assembly adhesive. When calculating the distance between the vertical marking lines, add up the width of the brick and the seam. Remove loose elements and roughness with a spatula; no need to sand.
Important
Try not to level the plaster mark too much so that small drops and flashes form in the composition. The less time the mixture takes to set, the smoother the seams will be after removing the tape.
From the video you will learn how to make a brick wall with your own hands from plaster:
Correction
After applying the relief to the wall, you need to do the final stage of work so that the brickwork looks believable and realistic.
Sandpaper coated with different grain sizes will help remove uneven surfaces and smooth out defects on the surface. Correction should begin with material with coarse crumbs and gradually move to the fine fraction. This will allow you to remove the remaining solution from the surface without compromising the integrity of the entire coating.
Any manipulations with the finished coating are carried out after the solution has dried. For cement-based mixtures it takes 24-36 hours to fully set, for gypsum and lime plasters 12 hours. If the work was carried out with ready-made compounds, then on the packaging the manufacturer determines the drying time for each centimeter.
To make the walls look more natural, they are adjusted after hardening.
Finishing
Performed with brushes of different sizes. If the brickwork occupies a sufficient area, then it makes sense to use a roller to apply the main color, and then highlight the seams in a different tone. When highlighting individual elements with other colors - this is an antique technique, then you will have to use a brush and give the desired shade to each brick.
If you want to get the most realistic coating, then you need to use several shades of paint for mixing. The surface, which is covered in a dark brown tone, looks gorgeous. The white color of the seams between the bricks will make the imitated masonry even more attractive. The contrast of such a composition does not leave anyone indifferent. When performing finishing, it is recommended not to deviate from the general design concept. The presence of color solutions allows you to gain a certain freedom of choice. For example, a brick wall can be of different colors and still match the color of the furniture or flooring.
The final result will be achieved by covering the surface with matte acrylic varnish, this will fix the composition on the wall and make the masonry realistic.
Attention!
Painting the wall should be done after applying deep penetration primer after 24 hours for complete drying. This will ensure the reliability of the finishing layer and eliminate peeling during operation.
How to paint brick trim
Latex, acrylic and polymer compositions are suitable, which have good adhesion to all types of plasters and are easy to apply to the surface. You can use oil paints, but they take a long time to dry, emit an unpleasant odor and give a characteristic shine that is unusual for bricks.
To imitate a rough and poorly treated surface, designers often use slaked lime, which is non-toxic and can be tinted to any color.
To paint facades with imitation brickwork, acrylic-based compositions are used, intended for outdoor use.
The final paint color is selected according to the design of the room.
Difficulties and possible errors
In order for the final result to meet expectations, you need to carefully prepare the surface for applying plaster.
Before you start creating the imitation and applying the compositions to the wall, you need to make sure that the leveling layer is completely dry. Depending on the thickness, this may take 24-48 hours.
Many novice craftsmen overdry the surface before applying relief. The setting time for all solutions is different, so you need to take into account the characteristics of the mixtures and apply enough volume to the wall to easily create a pattern.
Final finishing is possible only after the coating has completely dried, otherwise the damaged texture will have to be restored.
Applying decorative putty
The product is applied in a small layer, but at the same time covering the previously applied markings.
When preparing the solution, mix thoroughly. Its consistency should not be too dry or liquid. The ideal solution is one that has a plastic shape, but does not flow down the wall.
Use smooth movements to spread the mixture over the entire surface.
Application is carried out with a spatula. The putty spreads evenly over the entire surface. It is important to wait for the material to dry completely. Only after this is it possible to delete the template or markup.
Tips and tricks for working with plaster
Specialists who regularly work with finishing materials know some subtleties that a novice master can take advantage of.
To ensure a high-quality and durable imitation, do not neglect the step-by-step technological process.
Recommendations from specialists for applying plaster:
- When purchasing mixtures, consider the conditions in the room. For the kitchen, bathroom and hallway, it is better to purchase compounds with moisture-repellent components.
- If you have no experience in mixing solutions, it is better to purchase ready-made plaster, this will eliminate errors in proportions, which will affect the strength of the coating.
- Creating an imitation of brickwork at windows, doors and corners should be done using a grid. This will eliminate premature peeling and the need for repairs.
- Prepare different sponges, brushes and washcloths - this will help make the masonry more realistic in the final formation of the elements.
- If you don’t have enough experience, try to create a texture on a small area outside the wall. You can use a wooden canvas to practice the technique.
Fact!
Craftsmen perform this type of finishing quite quickly. Everyone has developed their own technology for applying mixtures and creating a pattern, but this is quite accessible to the average person who wants to do the imitation with their own hands.
Main types of imitation brick for interior decoration
Brick wallpaper is a budget-friendly and at the same time interesting option. They are easier to stick on the wall; you can calculate the required number of rolls right in the store. There are more options here: leaves and flowers can be added to the wallpaper, but it is recommended to glue them only on small areas, otherwise a repeating pattern will be visible. However, upon closer inspection, you will see that this is just a picture with minimal texture.
The walls of the corridor are decorated with decorative stone
The corners of the walls can be made with decorative stone
Decorative panels - plastic panels are not afraid of water, dirt, and are attached to the surface using self-tapping screws. A good option for a balcony, where temperature changes and humidity have a bad effect on the wallpaper, or for the kitchen, since they are not afraid of any contamination and are easy to clean. Volumetric, inexpensive, easy-to-install brick panels are a good option if you want to decorate a small part or area of the room.
Brick tiles, or clinker tiles, have a more expensive price and are more difficult to install, but they are more durable, are not afraid of any mechanical damage, and are resistant to dirt. And most importantly, this surface even up close looks like a natural material, surprising guests with its unusualness.
A large clock against a brick wall will look stylish
A great idea would be to place the TV against a brick wall.
A brick wall will perfectly complement the interior
See also: Artificial stone in the interior of the hallway
Price
Work on this type of finishing is carried out by all teams that plaster walls. If you do the work yourself, then the costs will consist of the cost of materials: the average price of a ready-made dry mixture is 200-300 rubles per 30 kg or a ready-made solution is 1.5-1.7 thousand rubles per 15 kg. You also need to purchase the necessary tools to complete the work and paint for the finishing coat.
For craftsmen, the average cost for imitation brickwork is 1-2 thousand rubles per sq. m. m including consumables.
You don't have to spend a lot of money to imitate brickwork
Knowing how to plaster a wall in your home and apply relief, you can complete the entire process yourself. This will not be difficult for people familiar with plastering work. This technology is simple and requires patience, but the result is beautiful and completely imitates brickwork.
Did you learn something new? Share it in the comments!
Application technology
Before you begin work on decorating the walls with brick-like plaster, the surface must first be leveled with a primer, and all curvatures and differences of more than two centimeters must be removed. This must be done, because the plaster mixture will be applied in a layer of no more than 2 cm, and serious distortions will be noticeable. It is important to remember that concrete and wood walls require different primers. After the preparatory work is completed, it is better to wait 2-3 days for the applied composition to dry completely. Afterwards you can start plastering.
Gypsum plaster is best suited for depicting bricks. It is characterized by ease of application, lack of “shrinkage” (does not change after drying) and environmental friendliness. The mixture is applied in a layer of approximately 1–2 cm, while the total consumption of plaster will be 8–10 kg per 1 sq. m. m. Do not mix gypsum plaster with any other substances, for example, cement glue. This can lead to cracks and even peeling of the plaster.
Imitation of brickwork using a plaster layer can be done in two ways: apply seams with a scraper or use masking tape for this purpose. To apply seams with a scraper, you will need spatulas, wide and narrow. The wide one is used for applying and leveling the plaster mixture, and the narrow one will be needed for correcting corners and small depressions. You will need a scraper, but its role can be performed by an ordinary chisel or steel plate, as well as a rule of 1.5 to 1.8 m long and jointing used in stone work.
The plaster mixture is applied with a wide spatula and then leveled. The seams are marked after the solution has dried, but has not yet completely set. To mark the wall, you need to apply a rule and draw the seams. The width can vary from 5 to 10 mm; we recommend that you avoid too wide and deep seams with this method of application.
When marking, it is better to focus on the dimensions of a standard brick and use a pre-prepared model made of thick cardboard or linoleum.
After the seams are drawn, you can begin to work them out, that is, directly apply the design. You need to start with long horizontal seams, running a scraper under them and removing the “extra”, and then proceed to short vertical ones. The recommended depth of the seams is 3–5 mm, and they can be given a beautiful shape by working with jointing.
Masking tape is a popular means of depicting seams , although this method is more labor-intensive than the first. First, the walls are primed, and then future seams are drawn on top (you can use a regular pencil). Painting tape is applied along the lines, and its ends should extend beyond the area of the wall being treated. The tape should overlap.
Next, the entire wall space is covered with plaster, along with seams and tape, and leveled. You can use a spatula, or you can apply the plaster with your hands, it will turn out even more natural. It is advisable to do this only with latex gloves. It is necessary, without waiting for the plaster to dry, to pull the ends of the tape and remove it along with part of the plaster. If the tape does break, you can use any sharp object to free its tip.
The main problem is that the masking tape does not always come off neatly from the plastered surface. It may be removed with more than necessary part of the solution or torn. There is no point in delaying the work, since the quick drying of the gypsum plaster will not allow you to carefully remove the tape. After removing the painting material, the edges of the bricks must be further processed with a spatula and jointing. For those who find working with tape too difficult, there is the option of using ready-made stencils. They are sold in large construction supermarkets.
We recommend: What paint to paint the walls in the bathroom