When installing cables, various fastening methods are used. It all depends on the specific conditions, financial capabilities and tastes of the owners of the premises. When performing this work, everything must be securely fixed, the insulation must not be damaged, and the appearance must be consistent with the surrounding environment and be favorable.
Types of fastening cables and wires to the wall
The materials from which walls and ceilings are made can have different densities and structures. The cable, depending on the task at hand, can be completely or partially “hidden” in grooves (groove recesses), plastic pipes, corrugations or special trays. And if this is not really necessary, you should secure it more carefully.
All this can be done using a wide variety of devices. Let's try to take a closer look at the most common types of fastening.
General rules for cable installation
When laying cables on walls or ceilings, it is recommended to follow the following rules:
- When using screws, dowels and self-tapping screws, try to tighten them all the way. Otherwise, the protruding cap may damage the insulation.
- The maximum distance between fastening points should not exceed 50 cm, and at bending points (turns) it can be reduced to 5 - 10 cm.
- Laying is carried out without humps, evenly and preferably in a straight line (horizontally or vertically).
- If a margin is provided, it should be made less noticeable.
- When laying cables hidden in a groove, they are laid so that they do not interfere with further finishing of the walls.
- If you have suspended or suspended ceilings, there is no need to make grooves under them.
- The main tools that should be used during installation are a drill, a hammer drill, a screwdriver, screwdrivers and a hammer.
All these recommendations are universal and easy to implement.
How to fix a cable to the wall, we consider methods and technologies
Everything in the world is developing rapidly and we have long been accustomed to all kinds of electrical gadgets. And they, in turn, require reliable power supply via the network. In order to avoid problems during the operation of your wiring, you need to competently approach its construction and, in particular, properly fix the wires on the walls of the house. In this article I will tell you about modern and time-tested methods of fastening wires.
The most convenient way of fastening
Depending on which installation method you choose in your own home, the type of wire fastening will depend.
If you choose a hidden method of laying the cable, it is necessary to secure the wire properly so that it does not interfere with further repairs.
When using the open installation method, they try to choose fasteners that are as inconspicuous as possible, so as not to attract attention.
The choice of fasteners also directly affects further repairs. Let's say if you have chosen an Armstrong system ceiling, and the cable routes run along it, then there is absolutely no need to lay the wires in the grooves, because it will already be hidden by the finishing.
Preparing inventory
So, to lay cables we may need: a hammer drill, a screwdriver, a drill and possibly a hammer.
Dowel clamp
Now let's go through specific types of fasteners and start with the dowel clamp. It's quite easy to work with. To securely fix the wire, we need to drill a hole in the wall with a hammer drill with a 6 mm drill, then unfold the clamp, put the cable there and squeeze the already closed clamp into the drilled hole.
All wires are secured. There are two types of such clamps: for round wire and for flat wire. Ideally suited for holding a single conductor, either in a groove or simply on a concrete wall, and it is also quite cheap.
Installation site
This type of fastener is a compact platform of a rectangular or square shape with eyes for clamps and a central hole for a dowel nail.
These molds are easily fixed both on concrete and on wood (using self-tapping screws), and the availability of fastening a group of wires at once is considered a big advantage, which significantly increases the speed of laying all the wiring. But they are not suitable for grooves.
Special dowel for clamps
This type of fastener is a kind of hybrid of a regular dowel and a self-tapping screw, and is made of plastic. It is also attached to a hole drilled with a hammer drill, and then we insert a regular clamp into the eyelet and fix the conductor.
It does not stand out in anything special or remarkable against the background of the devices discussed above.
Dowel tie for fixing the cable
This is a truly universal means of fastening, which craftsmen call: a clamp with a dowel.
This gadget is made of two components: directly from the dowel and the screed itself.
It is assembled very simply: two components are compressed, which are then fixed with a specialized clamp. The finished screed looks like this:
Installation is as follows: drill a hole with a hammer drill, insert a fixed dowel, drive in a plastic peg and secure the cable with a clamp.
Cable tie with hole
In addition to the most standard zip ties, it is quite possible to purchase such modernized clamps in stores. Fastening is also very easy: we make a hole, drive a dowel into it and fix the tie with a self-tapping screw. The disadvantage of this method is that the fastening is disposable, that is, if you need to redo the fastening, you will have to use a new clamp
Mounting bracket
Now let's look at the fasteners, which are perfect for laying cables for repairs already made.
This type of fastener is very popular with cable specialists, since such a plate easily fixes the wire on the wood and plastic. But it is worth remembering that the bracket is not suitable for fixing the wire on concrete.
Metal bracket
But these fasteners usually secure cables laid in a metal corrugation. They are also considered reusable, because you can simply unscrew the lock and use the bracket in another place.
Plastic clips
Designed for fixing wires laid in plastic corrugations. They are easily mounted on concrete or wood and with their help it is quite simple to form routes for adjacent cables
Homemade fasteners
And the last type of fastener considered will be the good old homemade ones. After all, if there is not a single type of store-made product, then the fasteners can always be made with your own hands. For this we will need: our ingenuity, pieces of wires and dowel screws.
We cut the wire into pieces of 3-10 cm (the length depends on the thickness and number of fixed wires) and if the wire is double, then we punch it in the middle with a self-tapping screw
If it is single, then we form a loop around the head of the screw.
Rice
Such fasteners will be in no way inferior to store-bought samples, just remember, it is better to use single-core wires. Since stranded wire will not provide such fixation to the held wire.
In addition to pieces of wires, it is possible to use absolutely any available material, for example, metal tape will work well as fasteners.
That's all I wanted to tell you about ways to fasten wires to the walls or ceilings of your home. Thank you for your attention.
Dear Reader, was my article useful and interesting?! Then be sure to give it a thumbs up, subscribe to my channel ENERGOFIXIK and share the article on social media. networks. It is very important for me to feel your support. After all, it will allow you to create even more high-quality materials. If you have questions or suggestions, here is my email
Source: https://zen.yandex.ru/media/energofiksik/kak-zakrepit-kabel-k-stene-rassmatrivaem-sposoby-i-tehnologii-5b3bc7a8dfaecb00a9306062
Methods of fastening to walls made of various materials
Depending on the type of surface, the method of fastening is selected.
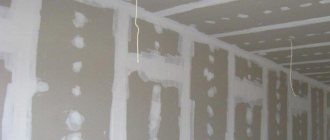
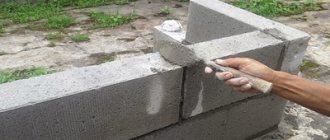
- Soft and thin . These include walls made of foam concrete, aerated concrete, fiberboard, plastic, plasterboard, etc. Simple fasteners will not hold here. More reliable and stable will be special devices in which the end or middle part is made wider. These can be butterfly dowels, umbrellas or dowels with a drill.
- Dense . These are wooden, gypsum, plastered surfaces, OSB and chipboard. In this case, use ordinary self-tapping screws or simple nails. If the screws are screwed in with great force, you can pre-drill holes with a smaller diameter.
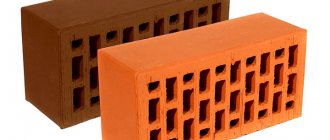
- Solid . Brick and concrete walls are the most common materials in this category. Here, even screwing self-tapping screws into pre-drilled holes will be problematic. It is in this case that dowels should be used. Most often, they consist of a plastic cap and a screw. Holes are drilled in the wall. For walls made of concrete and brick, the diameter of the drill must match the diameter of the dowel (drill 6 mm - dowel 6 mm). For less dense surfaces, the drill should be 1 mm thinner (5 mm drill - 6 mm dowel). Caps are inserted into the holes, the end of which should not protrude from the surface. Then the fastener itself (clamp, plates, etc.) is attached to them using screws.
Exposed wires
The cable fastening is carried out in some increments. The wiring remains open. For comparison, if the cable is laid in a groove, it can be completely hidden. However, it is much easier to maintain an open wire. In this case, detachable and permanent fastening elements are used. If you plan to increase the number of cores, use the first type.
Metal bracket
This type of cable fastener may have 1 or 2 ears. Fixed on the wall using nails and self-tapping screws. This type of product is used when laying cables in a metal sleeve. Withstands heavy wires. The bracket is selected taking into account the diameter of the metal sleeve.
Dowel tie
If you are interested in the question of how to fasten a cable using such products, you should know that first a dowel is inserted into the wall. It is equipped with a special lock on a flexible plastic tape. For fastening, detachable and permanent fasteners can be used. The disadvantage of this method is the lack of rigid fixation of the structure, since the dowel is simply connected to a flexible tape.
Screeds with platform
This option is externally similar to the previously discussed analogue. However, in this case, the dowel has a platform, thanks to which such an element is firmly fixed in the wall. If a flexible cable tie with a hole for a self-tapping screw is used for fastening, there is no need to use a separate dowel. This method requires the installation of self-tapping screws at some intervals.
Dowel clamp
Outwardly, it simultaneously resembles a dowel and a clamp. For fixation in the wall, there are notches located at the ends of the fastening element. First, the cable is tied, and you can attach the wire to the wall by placing a kind of dowel in a pre-made hole. The product is held in place thanks to notches - they do not allow the clamp to slip out.
Cable channels of various sizes
Cable duct is a very common method of fastening wires and cables in an open way. According to many electricians, this is the most convenient method of fastening. The cable channel is made of galvanized steel, flame retardant plastic, aluminum and is a simple U-shaped structure. Wires are placed in this technical box and covered with a one-sided or double-sided cover. They differ in manufacturing materials, colors, sizes, design (which cover), moisture protection, and also in design:
- floor;
- main lines;
- baseboard;
- parapet.
Types of cable channels
When installing a channel cable, first mark it on the wall, then fasten it using self-tapping screws, dowel nails or “liquid nails”. The video shows how to properly install a PVC box.
Description and types of SIP
A self-supporting electrical wire consists of several wires isolated from each other (aluminum wire intertwined). When laying new lines in accordance with GOST R 52373-2005, it is necessary to use a self-supporting cable. According to the new PUE rules, these cables are recommended to be used to connect electricity consumers.
Today there are the following types of SIP:
- SIP-1. This is a four-core cable used in three-phase electrical networks with voltages up to 1000 V. Moreover, three of its cores are designed for connecting phases (isolated from each other), and the fourth (zero) is without braid and has a steel core. They also produce SIP-1A cable, in which the neutral core is insulated.
- SIP-2. All cores in this cable are insulated. Its scope of application is the same as that of the cable described above.
- SIP-3. This is a single-core wire with polyethylene insulation. Thanks to the steel core, it is highly durable. It is used in electrical networks up to 35 kV.
- SIP-4. This is a four-core cable with polyethylene insulation, designed for power lines up to 1000 V. It does not have a steel core. It is often used to make branches from the main power line in country houses and in the private sector.
- SIP-5. It includes two or more insulated conductors, all of them without a steel core. This cable is used in electrical networks up to 1000 V.
Fastening with clips
These fasteners are quite popular when laying open cables. The clips look pretty neat after installation. They can be of different sizes, shapes and be metal or plastic,
A simple version looks like a bow, on both sides of which there are holes for dowels or screws. A good and simple design, but there is a small drawback - for installation you need to drill two holes. This slightly increases installation time.
Metal clips
Made from metal strip. To install, first “wrap” the cable with it, align the holes and secure it to the surface. Can be used on the wall and ceiling. For the latter, they are inconvenient only because you need to drill a lot of holes.
Plastic clips
They are mainly used for installing corrugated cables for hidden and outdoor installation. Corresponding clip sizes are available for different pipe diameters. They are mounted on concrete walls using dowels, and on wooden surfaces using ordinary self-tapping screws.
The installation can be performed for one cable, or combine several pieces to secure a bundle of wiring. The design of the clips allows them to be assembled into a single block. Each side has locks (special grooves), which help securely connect the clips to each other. The layout using these elements is neat and even.
Self-adhesive clip
They are used for fastening cables or wires of various shapes; they can be made in plastic or metal form. The surface where it will be attached must be cleaned of all dust and dirt. The clip has a one-sided adhesive tape on the back. This type of fastener is used for attaching cables to plastic panels or furniture. There is no need to drill holes in expensive or brittle materials.
Clips with nail
They are made in the form of a plastic bracket, on the side of which there is a hole for a nail. They can be very different in shape. Used for open installation on wooden and similar density walls. In the photo above.
This fastening is very fast and convenient. It is often used when it is necessary to route telephone, television and other small cross-section cables along the baseboard.
Fastening for cables and wires: types and varieties
For any type of installation of electrical wiring and cables, the same types of fasteners can be used. It is selected based on the existing conditions, capabilities and tastes of the owners. The main task is to ensure high-quality fixation and not to disturb the insulation either during installation or during further work and operation. And you select the type of fastening from the possible options. There are quite a lot of them - there are special ones that are produced specifically for cables, there are those borrowed from other areas, and there are homemade ones.
There are many cable mounting options
Clips for cable fastening
Using clips, you can secure the cable to the wall, ceiling, or floor. You just have to choose the right design, and there are many of them. Fastening the cable with clips is a very popular method - it can turn out very neatly and almost imperceptibly. This is if open wiring is assumed.
Clips for cable installation are available in metal and plastic, and in different shapes. The simplest ones look like a bow, which has holes for screws or dowels on one side and the other. They are all good, but installation requires drilling two holes, which takes a lot of time.
There is an option that allows you to maintain a fire gap when installing the power cable on combustible surfaces (pictured on the left). This fastener is fixed to the surface with one self-tapping screw. The good thing about it is that, if necessary, you can add threads to the same fastener. To do this, you do not have to remove it; you will need to unscrew the screws holding the upper part of the clip.
Metal clips for cable fastening
The third option is a kind of loop made from a strip of metal. To install it, you first need to insert the cables inside, then align the holes and secure them to the surface.
All these clips can be used both on the wall and on the ceiling. But when laying a large number of threads on the ceiling, they are inconvenient - too many holes are required for installation. They are made of metal, some of them are then painted so that when installed externally, the fasteners stand out less.
Mounting on plastic clips
Plastic clips are used mainly for securing cables in corrugated hoses. They are available in different sizes for different corrugation diameters. They can be installed individually or assembled in lines - for more accurate installation of large wiring bundles. This type of clips is used mainly for hidden installation, but if the corrugation is laid outside, then it is more convenient to fix it with their help.
Dowel clip
A dowel-clip is more invisible during installation. This is a curved strip of plastic with characteristic branches at the ends, which, due to elastic force, will hold the fasteners in the wall or ceiling material. The shape of these products is available for round and flat cables of different sizes. But you can’t secure serious cables with them—they’re too small. But they look very neat on conductors of small cross-sections, including television, telephone and Internet.
Dowel clips for cables of various shapes
They are installed simply: a hole of a suitable diameter is drilled, a conductor is inserted into the clip, the ends are tucked into the hole and inserted there with force. It’s a really good option - it’s quick to install and looks neat. Mainly used for open wiring.
Dowel tie
Another option for quickly attaching the cable is a dowel tie. It is made from non-flammable, self-extinguishing plasticizers and allows for quick installation of cable lines. Can be used for both open and hidden installation.
A dowel tie is a quick and convenient way to secure a cable to concrete, brick and other surfaces
There is a coupler with a detachable and permanent lock. The detachable lock allows you to change the number of wires if necessary. The installation method is the same as for a regular dowel. The difference is that the dowel here is also plastic.
Cable ties with dowel platform (KSP)
Another option for quick installation. It consists of a dowel with a thread and a platform with a tie attached to it. First, a dowel is installed, and a platform with a screed is screwed onto it. Wires are attached to the finished route.
KSP - cable tie with mounting platform for dowel
Material: non-flammable plastic, color: grey, temperature of use: from -45°C to +85°C. Can be mounted on concrete, brick and wooden surfaces.
Clips (staples) with a nail
An excellent option for attaching cables to dense surfaces - wood and its derivatives, plaster. There is a hole on the side of the plastic bracket into which a nail is inserted. The shape of the brackets is round and rectangular - for different shapes of conductors.
Plastic staples with nails for exposed cable installation
Fastening the cable with such brackets is quick and unobtrusive. Most often, small wires are also attached - television, telephone, for the Internet.
U-shaped staples from a stapler
Even the smallest staples and clips are still quite noticeable. There is a way to make fasteners virtually invisible, at least in some cases. If you have a construction stapler, wires and telephone cables can be secured to wooden surfaces or plaster with special staples. They have long legs and a rounded back. There are special stapler staples designed for installing cables with plastic stops (middle picture). They do not allow the wire to be crushed, which happens when working with conventional staples if too much force is applied to the trigger mechanism.
Securing cables using a stapler and special staples
A good method is high speed - just one click on the stapler lever and the staple is already installed. In an hour you can record a decent amount of footage. Another positive point is that the fasteners are hardly noticeable; when dismantled, very small holes remain in the wood, which are also practically invisible. With plaster and chipboard, OSB is somewhat more complicated - the damage may be greater, however, it is still less noticeable than from nails, even the smallest ones.
The disadvantage of fastening cables with a stapler is significant size restrictions. Such staples are not big. The maximum size for the width of the staple is 12.5 mm, and even then not in all types. This is more than enough for installing a telephone “noodle”, Internet cable or other similar conductors, but it is not always possible to secure VVG or NYM in this way. In addition, these cables have more rigid insulation, which requires more frequent installation of staples.
Fasteners for organizing a bundle of conductors
Wires do not always need to be fixed permanently. In some cases, you just need to arrange the bundles so that they do not get confused. For example, there are usually quite a few wires running to the desktop. There is no point in fixing them rigidly - after a while, alterations may be required, and the driven nails leave holes that can no longer be masked on the table. There are various devices for these purposes. They are more often called wire or cable holders.
Velcro cable clips
For example, the same staples, but of a different structure. On the right side of the photo above you can see a cable clip with double-sided adhesive tape attached to the back. This is very convenient for attaching to furniture or plastic panels - the glue can then be washed off, and the surface remains undamaged. In the center is the second option with the same idea, and on the left is the so-called mounting area for attaching cable ties. First, these pads are attached to the surface - they also have Velcro on the back. The bundle of wires is then secured to the holes with a regular plastic tie. Not so convenient and neat (the tails of the ties will stick out), but can also be used.
Plastic cable holders on the table
You can see several more options for attaching the electrical wiring harness in the photo above. The essence is the same, the methodology is different.
Cable trays - for hidden laying of large bundles
When installing ceiling lighting from spotlights, you have to lay a large number of wires, and they have to be fixed to the ceiling. When it comes to apartments, the floors are most often a concrete slab. Drilling a lot of holes in it is difficult and time-consuming; attaching wires individually or in small groups is not much easier. For such cases, suspended cable trays are used. They are usually made from galvanized wire or perforated metal.
Hanging cable trays
They come in different sizes, and there are several different types of fastening - on studs attached to the ceiling, on “T” or “L”-shaped hangers.
The installation procedure is as follows: first, the structure is assembled and mounted on the ceiling, then the cables are thrown into it. If desired, they can be secured with zip ties to the grilles, but this is usually not necessary.
In addition, there are metal trays made of perforated and non-perforated metal. The latter are necessary when laying cables inside combustible walls - in frame houses, for example.
Types of metal cable trays
The same trays can be used when laying cables in underground spaces. But then you can use the perforated version. It will also provide excellent protection from rodents and accidental damage.
Screeds with platform
It is a dowel with a thread and a platform (square or rectangular) to which a tie is attached. These fasteners (KSP) are convenient for quick installation. Made from non-flammable plastic.
KSP - screed with mounting platform for dowels
Initially, a dowel is installed, onto which the platform with the screed is screwed. After this, the wires are attached. Installation is suitable for wooden, brick and concrete walls and ceilings. With the help of such platforms you can attach several cables at once.
Dowel clamp
Used for quick fastening of one cable. The clamp is very easy to install. Using a hammer drill (if the wall is concrete), a hole of the required length and diameter is drilled. After this, the clamp is carefully opened, the cable is placed in it and the sharp end is inserted into the hole. The clamp will not fall out of it thanks to the double-sided notches on its sides.
The shape of the clamp must match the cross-sectional shape of the cable. Basically it is either round or rectangular. These installation elements are low cost and reliable in installation.
Do-it-yourself cable fastening
Selecting a cable for connecting an electric stove
Operating a gas mounting gun requires special operator training. The owner of a residential or other building can easily do the fastening of wires to walls and ceilings using a hammer drill himself.
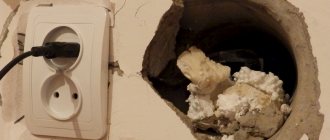
Fastening with mortar
If there is no need to take care of the interior of the room or the exterior of the facade of the house, then wiring with a low specific gravity is fixed to the walls with lumps of building mixture. Basically, the fixing composition consists of alabaster. The advantage of the method is that the cable is fixed to the fence with a plastic mass. Literally within 10-15 seconds the mixture hardens, acquiring load-bearing capacity.
Fastening with a dowel clamp (UW or hook)
The cable is fastened to the wall using a hammer drill. The wire is pulled into the opening of the clamp, and the free ends of the dowel are pressed into the finished recess until it stops. The ribbed surface of the fastener ensures reliable adhesion to the fence.
Securing the cable to the wall with brackets
They are used for placing electrical networks on concrete, brick and wooden walls. Steel staples hold electrical wiring laid in a metal corrugation. In all other cases, plastic products are used. The steel cable fasteners are screwed to the tree with self-tapping screws. The fasteners are nailed to concrete and brickwork with dowels using a hammer drill or a construction gun.
Fastening the corrugation with staples
How to fix a cable to concrete without drilling
You can do without drilling only in one case. This is shooting staples or other fasteners with dowels and nails using a construction gun. The exception is the method of fastening with a building mixture, and then it is effective only for power cables of small specific weight.
About other fastening methods
Home craftsmen are not concerned with purchasing factory-made fasteners; they make them with their own hands. Before installing the wire on the wall, strips of tin are cut. Holes are drilled in them. A plastic rod is inserted into the hole in the wall. The screw is threaded through a metal strip and screwed into the dowel. The cable is secured by bending the ends of the strips.
Dowel type bases
The dowel-type (BD) base for screeds is made of plastic. “Two in one” - like a self-tapping screw and a dowel. There is a hole in the head into which a tie is inserted to tighten the cable.
Installation is very simple. A bandage is hammered into the prepared hole. The screed is installed and the wiring is laid in it. Then tighten.
How to fasten the wire in the groove
- Alabaster - fast and reliable;
- Dowel clamps are used when it is necessary to separate one cable from the entire group of conductors;
- Dowel ties in the groove group the wires into separate branches;
- Cable ties for dowels are used in vertical channels to hold heavy electrical wiring;
- Plastic dowels for screeds in grooves are practically not used due to their low load-bearing capacity;
- Aluminum plates are used to strengthen groups of wires in areas where the groove changes its direction.
Construction mixture
Used for hidden cable laying in wall and ceiling grooves. For this, gypsum mortar is often used. This type of installation has a special name - “freezing”. There is nothing complicated about this method. An alabaster mixture is made and the cable is tacked in the groove in places evenly spaced from each other. This should be done promptly, since the plaster sets quickly enough.
Plaster solution for fastening wiring
This “freezing” is well suited for installation of a single cable in a groove. But this method is also used as an additional fastening of several cables, to secure already installed brackets, dowels, clamps, etc. After all this, the groove channels are filled with plaster mortar.
If the laying volumes are large, frequent preparation of the solution and fixation of the cable significantly reduces the installation speed. But in many cases this is completely justified.
Laying wiring on the ceiling
Before installing the suspended ceiling, the cable is secured to the ceiling with brackets, clamps and consoles. The electrical wiring is laid inside the metal profile of the ceiling frame or secured to the suspensions with nylon ties.
They often make the mistake of hanging wires on dowel clamps and other plastic fasteners. Over time, gravity can cause the cable to tear the polymer clips out of their sockets.
Laying corrugations inside a suspended ceiling
Additional Information. To avoid violations and errors when laying cables on the ceiling, you need to familiarize yourself with the characteristics of a particular type of fastener and its suitability for installation in such conditions. If you still have doubts about the choice of retainers, then consulting a specialist will not hurt. A professional will tell you how best to secure the wire to the ceiling and wall.
Insulators
In most cases, fastening wires to insulators is used for retro or decorative purposes. This open installation method is used for installing electrical wiring both in the house and in the bathhouse.
Retro wiring, mounting on insulators
The barrel is attached to the wall with a screw or nail and a pre-twisted wire is attached to it. You can twist it yourself or buy it already twisted.
Attaching the cable to a wooden wall
Wood is a soft material. Attaching wires to it does not cause any particular difficulties. You don’t need a hammer drill here, just get a screwdriver or drill. Despite its flexibility, the tree has good load-bearing capacity. To attach a cable to a wooden wall, you can use several methods for openly fixing electrical wiring.
Fastening with mortar
This method is rarely used. Basically, the building mixture is used to fasten the wires between the logs of the log house in the utility rooms. There is nothing to say about the aesthetics of the interior.
Dowel clamp
The fasteners require a minimum depth of 30 mm; this is not always possible due to the small thickness of the wooden cladding. However, if you wish, you can use this method.
Staples
This is the most acceptable option. The brackets are secured with screws, which the wood holds well.
Other ways
Home craftsmen come up with various homemade fasteners, sometimes without caring about the safety of the fasteners. It is best to use factory-made products.
Despite the variety of types of clamps for attaching cables to walls and ceilings, each model is designed for certain conditions for laying power lines inside buildings and structures. When purchasing fasteners, you should consult with a sales consultant.
Input of electricity into the building
As mentioned above, laying the input cable is the prerogative of the employees of the energy sales organization.
Connecting a house to a power line can be done in three ways:
- Overhead line from pole to building. Aluminum wires without insulation are used. The method is unsafe; in recent years, they have been trying not to use it.
- Input from the overhead line using SIP. Due to the reliability of the line and operational safety, this method of delivering electricity is considered a priority.
- Armored underground cable. The method is considered the safest (especially for wooden buildings), but its disadvantage is its high cost. Rarely used.
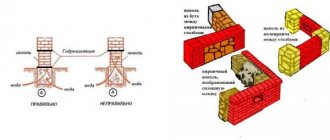
Despite the advantages of SIP described above, there are many opponents of this technology when it comes to residential buildings (even if they are houses made of brick or stone). Many experts consider the SIP insulation layer to be not reliable enough for residential buildings.
To prevent undesirable consequences in the event of an insulation rupture, cables must be positioned at a certain distance from building structures.
The fact is that overhead lines are protected from short circuits by an automatic device that operates under conditions of high currents, and shutdown, if necessary, occurs with some delay. Even in a short period of time, the resulting electric arc can ignite building structures, especially if they are wooden.
However, most specialists prefer SIP. The numerous advantages of this type of cable cancel out the disadvantages, especially since safety can be ensured using a special thick-walled metal pipe into which the cable is laid.
The pipe allows you to neutralize the effects of an electric arc. It is recommended to pay close attention to the inlet and outlet holes of the pipe: they should be covered with corrugated material to prevent the wire from rubbing against the metal.
One of the ways to organize the input is to switch from aluminum SIP cores to an internal cable, which is used for wiring throughout the building. The main requirement for such a cable is fire resistance. In addition, the area up to the switchboard must be additionally protected with a circuit breaker. An automatic device is all the more necessary if wires without insulation are used, connected to a piece of cable.
Note! The rating of the machine must be one value higher than the value of the input panel.
Pole connection
Next, we will consider ways to route the cable from the pole to the home electrical network. The least financially expensive option is to supply electricity by air. According to the requirements of technical regulations, the height at which the cable is inserted into the building should not be lower than 2 meters 75 centimeters.
If this standard is feasible, an RCD (residual current device) is mounted on the wall. A cable is supplied to the RCD from the pole.
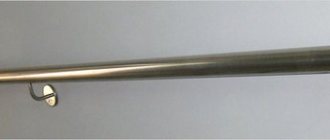
If the above height cannot be achieved, a stand made of a metal pipe is installed. The stand can be straight or in the form of a “gander” (curved). Each of the outlets has its own methods of fixation on the wall.
The distance from the pole to the entry point cannot be less than 10 meters. However, if this distance exceeds 11 meters, additional support will be required. In this case, the distance from the support to the power line should be no more than 15 meters.
For lines up to 10 meters long, copper wire with a 4 mm cross-section is used. If the distance is between 10 and 15 meters, a 6 mm section will be needed. For aluminum SIP wires, the diameter must be at least 16 millimeters.
Advice! If you use a regular SIP rather than a fire-resistant one, it is recommended to choose a copper cable of the VVGng brand.
Prices for copper wires are much higher compared to aluminum wires. Usually, in order to save money, aluminum wires are connected from the pole to the house.
The eyeliner procedure can be carried out in two ways. The first option involves tensioning a cable or support wire, to which a conductive cable is then attached. The cable is fixed using clamps.
Advice! If you plan to lay the SIP along the wall, you will need clamps (SA50, SFW50), since the minimum permitted distance from the cable to the wall is 6 centimeters.
In the second case, additional supports and fastenings are not used. Protective functions are assigned to insulators made of porcelain, glass or polymers, and to special fittings.
Thanks to the safety margin, the fittings provide reliable cable protection in case of accidents. Under powerful mechanical influences, the reinforcement may be destroyed, but the cable will retain its integrity and continue to perform its function - transporting electricity.
From the building entrance area to the electrical panel, the cable is placed in a metal pipe for safety reasons.
Advice! Before entering the house, it is recommended to bend the cable downwards - this will prevent water from penetrating through the protective pipe. Moreover, it is advisable to do this regardless of the presence of a sealant, since it will still dry out over time and lose its functionality. This simple measure will reduce the risk of a short circuit in the future.
The main disadvantage of the air liner method is its open location, which is associated with the risk of damage. Overhanging wires create difficulties for the access of large vehicles.