The level of everyday amenities in a private home is determined by its owners. A large house with a garage for two cars, with an independent sewer system, or a small, unprepossessing shack with a wooden toilet in the yard. Everything is in your hands and is limited only by the income level of the owners and their desire to create. Today we will look at how to make a cellar in a private house and add a little more comfort to country life.
To improve your garden plot and your home, you do not need to have high-level construction skills or own substantial capital. Only “experienced storytellers” talk about this, spreading all sorts of myths that you can’t build if you don’t have a chest of gold. Naturally, this will not hurt, but you must not be lazy and have a strong desire to improve your living conditions - that’s enough.
Why do you need a cellar in a private house?
Some people believe that you can use a refrigerator instead of a cellar. But this is not entirely convenient. Try placing the entire preparation in the refrigerator: homemade stew, smoked and salted lard, all kinds of pickles, jams and marinades. It’s unlikely that all this will fit there. But even the most compact cellar for a summer house can accommodate not only cans, but also a pig rolled up in cans!
And the electricity bills that are constantly rising? It becomes scary to use electrical appliances again. Just imagine how much 1 day of shoveling can save you! In addition, we must take into account that a cellar in a private house saves food that does not disappear in it for several months and saves gasoline, which will be used for their delivery.
“But all this can be bought at the supermarket,” you might think. Indeed, everything, but most products contain artificial additives, dangerous ingredients and very few useful substances. It follows that having your own cellar is simply necessary, and its construction is a reasonable thing.
Construction of a basement under the house
- If the depth of the foundation of the house is sufficient for constructing a basement, then a pit must be dug inside the old foundation, not forgetting that it is necessary to retreat from the existing foundation by at least 1 - 1.2 m. And if the house is two-story, then 2 m. This is It is necessary to ensure that the soil crumbling from the walls of the pit does not affect the stability of the foundation.
- The bottom of the resulting pit must be thoroughly compacted. Then polyethylene is laid on it and a cushion of crushed stone and sand is placed over it.
- Another layer of polyethylene is laid on top of the pillow, overlapping the walls of the pit, which will serve as waterproofing for the basement.
- A reinforced concrete slab is installed on top of the waterproofing layer, which will be the basement floor.
- After the floor has hardened, it is necessary to set up the formwork and fill the basement walls, also using reinforcement. If the soil is dense, then the walls of the basement can be laid with bricks and plastered.
- It is necessary to provide ventilation for the basement, otherwise it will be damp.
- All that remains is to restore the floors of the room and make a hatch into the basement.
If the basement area is large, then the descent to the basement can be organized as a regular flight of stairs. If there is not enough space, then you will have to use an extension ladder. The main advantage of this method of building a basement is the ability to do all the work yourself.
Among the disadvantages are the following:
- The need to carry out all work manually due to the impossibility of using technology.
- Soil is removed through living quarters, which is not very convenient for both workers and household members.
- Not everyone can properly install ventilation and waterproofing of the foundation, which in the future can make it difficult to use the basement for its intended purpose, as well as lead to the appearance of dampness in it.
If it is possible to make a basement during the construction of a house, you should prefer this option. The room will be much larger in area and better equipped.
(Visited 478 times, 1 visits today)
How to make a cellar with your own hands
Making it is not as difficult as it might seem at first glance. First you need to decide on the type of structure, area and other characteristics. It is also very important to consider all the nuances that may cause problems in the future. Let's start with our step-by-step instructions on how to make a cellar with your own hands!
STAGE 1: indoor or outdoor? We select the site for construction most carefully, taking into account all the details. Most people prefer building a cellar inside the house, since they will not have to go out in bad weather. However, this is not a very practical solution. You will only have to go down 2-3 times a week for a small portion of food (a piece of lard, a jar of stew and pickles), which will easily fit into the refrigerator (after all, you can’t give it up completely). Building a cellar in the basement of a house is very difficult due to “complications” that can lead to serious consequences. Thus, the best solution would be to place it in the yard.
STEP 2: choose a place for the cellar. To begin with, we determine the depth of groundwater, if any, under your site. It’s very simple, we choose a lowland and drill a well of a small depth of about two and a half meters, lower a pipe into it and wait 2-3 days. The appearance of water means that groundwater exists and is close to the surface. Don't be upset. We’ll just take this fact into account when building a cellar with our own hands.
Don't want to spend money on drilling? Use the “old-fashioned” techniques: remove the turf from the soil, put a piece of fat-free wool on it, and a raw egg on top, cover with a saucepan or pot. The next day at sunrise we check:
- if both the wool and the egg are wet, the water is very close;
- if the wool is wet and the egg is dry, the water is deep;
- if both the wool and the egg are dry, don’t worry, there is no groundwater.
It is advisable to choose a hillock for the pit. Then we draw up a plan for connecting communications and calculate a convenient location. Do not tempt yourself by building a cellar near the house (there may be a groundwater problem) or near large trees (powerful roots can damage the structure in the future).
STEP 3: choose a design. With a wide variety of designs, they differ mainly in their depth into the ground: either part of the cellar goes into the soil, or it is completely hidden underground. Underground structures are considered the most optimal in terms of differences in temperature fluctuations. However, this is not so important, if you decide to build a cellar with partial deepening (due to groundwater or for another reason), then a variety of building materials will always help out.
STAGE 4: preparing the foundation pit. First, we prepare the access road for the future construction site, clear the road of all unnecessary things, laying old boards on it. All this will be needed when you transport building materials (sand, brick, cement) along it with wheelbarrows. After this, we remove the turf to the side (there is no need to throw away a rather valuable thing), for example, in a low-lying place, and make markings. This is very important, although not difficult.
Let’s take a look once again, have you taken everything into account? For example, how far from large trees the cellar will be located, where the communications are located and whether it will be difficult to connect them and similar factors.
Choose the length and width of the cellar pit as desired. The cellar itself with classic dimensions is 2X3 m, or 2.5X3.5 m, and the dimensions of the pit will be much larger. Choose the depth of the cellar, starting from a meter of seventy centimeters and up to two and a half meters. It depends on the depth of the groundwater, what the soil composition is and what your intentions are. The main thing is not to overdo it - for structures that are too large, a slightly different approach will be required.
In case of loose and crumbling soil, be sure to place slopes on each wall. The bottom is covered with crushed stone (in extreme cases, broken brick or slag, although this is somewhat worse) about 15 centimeters thick, and if there is no groundwater, then it can be somewhat thinner. It is necessary to fall asleep in thin layers, compacting each one.
Although some recommend doing this when groundwater is high, this does not apply to our case - a solid structure must be drained. Next, we pour molten bitumen onto the crushed stone bed, not skimping, but not getting carried away either.
STAGE 5: stocking up on materials. To build a cellar at the dacha with your own hands, they use a variety of materials, sometimes even exotic ones - from wooden structures. However, after a dozen years, completely redoing and carrying out regular repairs of the cellar throughout its life will not appeal to everyone. Therefore, buy those materials with which the cellar will last a very long time. Stock up on: high quality red brick, slate, granite, sandstone, poured concrete and concrete blocks. Under no circumstances will they be suitable: foam concrete blocks, silicate and cinder block bricks (anything that does not absorb moisture).
STEP 6: preparing the flooring. A lot depends on what the level of groundwater is and what the composition of the soil is, so it is impossible to recommend anything. Rocky or sandy soil allows you to do nothing with the flooring, saving on it.
Naturally, taking into account the absence or low position of groundwater. But when choosing savings, prepare for possible flooding in the fall (it rains) and in the spring (the snow melts). So, choosing this option is economical at first glance, but looking deeper and anticipating future flooding and constant maintenance, you understand the futility of this idea.
It’s another matter when under the concrete base there is a cushion of compacted crushed stone filled with bitumen resin - this is a wise decision, although more expensive. You can replace bitumen (or mix with it) with fatty clay, removing impurities in advance and preparing it. It is applied in a relatively even layer approximately three centimeters thick and compacted thoroughly.
We pour the concrete immediately on top of the clay (when using bitumen alone, time does not matter) until it dries. Formwork is used and the concrete is carefully leveled. Concrete grade M300 (no less) is used, the thickness of the laid layer is about ten centimeters. A 5 cm thick screed is laid after 10-15 days. Filling the floor can be done using more economical options; the option we propose is used for more difficult cases.
STEP 7: actually, we are considering how to build a cellar with your own hands. Let's put up the walls first. A monolithic concrete wall is the most durable and reliable option (not the simplest and not the cheapest). The most important thing here is to fill the walls, using the entire perimeter at once, and after hardening the shields rise higher. By doing this, a “weak spot” will not appear and tension will not arise at the junction.
installation of panels
pouring with reinforcement
finished frame
They use special construction shields or make them themselves using boards. Construction panels can be bought or rented quite officially. We make the walls moderate in thickness (from 8 to 10 cm), always strengthening them with reinforcement - a simple single-row option is enough, fastening it to the floor.
Option for a cellar with brick walls . Traditionally, brick walls or concrete blocks are laid in a single row, although everything will depend on what cellar design you have chosen. When partially elevated above the ground, the wall experiences less load, therefore, this option is quite sufficient. Soft clay is poured 35 centimeters into the space from the ground to the walls and compacted well (repeat this whole process until completely filled).
Requirements for underground construction
Creating normal operating conditions for the underground is an important event that must be carried out without fail. This is especially true if you bought a new house, but didn’t think to look into the underground. In general, it is important to monitor the condition of the underground throughout the year.
The subfloor must always remain dry.
- There should be no soil saturated with moisture in the underground. If the soil in the area is wet or there is constant high water, then before starting to build a house, the ground level must be raised using imported fill. The second option is to install a high-quality drainage system and organize water disposal.
- If the foundation is strip, then you need to insulate all the strips yourself. Moreover, insulation should be carried out not only along the base, but throughout the entire underground part. This will protect the soil under the house from freezing. Modern polystyrene boards of small thickness can be used as a thermal insulation material.
- Builders can insulate the subfloor even at the stage of building the foundation, so that problems with this will not arise at all during the operation of the building. At the dacha, where people usually live seasonally, it is also necessary to carry out all the work on the correct construction of the underground. Otherwise, the house can be used normally for only a few seasons, after which it will literally begin to fall apart before our eyes.
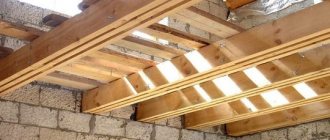
Making a cellar roof on a summer cottage
Choosing a roof design. Either we cover it with beams and non-edged boards as a base, or we cover it with a concrete slab - what load will be applied. For example, a concrete slab can be covered with a good layer of earth, which means there will be almost no temperature changes.
If you want to further improve the temperature regime (reduce differences), the concrete slab is covered with roofing felt, and then filled with filler (crushed stone, slag, expanded clay) in the shape of a mushroom - higher in the center, and lower towards the edges. We fill all this with a concrete solution three centimeters thick and lay waterproofing from roofing felt and bitumen.
Input and output device
The entrance to the room allows you not only to enter and exit it using the stairs, but also to ventilate the room, which is very important for combating mold on the walls, since opening and closing the door regulates the temperature inside the storage room.
The upper part of the staircase, which is made of concrete with subsequent reinforcement of each step, should be located on an inclined plane and end with a door. The entrance walls are reinforced and filled with concrete, for which formwork from boards is first installed. The door itself can be made of wood, for which two rows of boards are carefully knocked together, which are subsequently covered with decorative material.
The entrance and exit of the room can be made in the form of a hatch. To do this, a metal ladder is installed from the outside below, welded to the hatch frame. Such an entrance is equipped with a closing metal lid with strong external and internal closures and locks. To make internal bolts, you can use a wide, thick metal strip, bent yourself in a vice, since store-bought devices cannot provide high-quality protection. No one is safe from the invasion of thieves in the absence of the owners of the site. The lid should fit as tightly as possible against the protruding parts of the staircase walls so that water cannot get inside through it. For this purpose, you can also use waterproofing materials or make the lid protrude beyond the perimeter of the walls.
You can lay a garden path to the entrance to the root crop storage from the garden bed. This requires little time, but the aesthetics of the design will increase significantly.
When the ceiling, walls, floor and entrance are completely ready, you can start decorating the interior and exterior of the storage room. When choosing finishing materials, you should be guided solely by your preferences, and you need to remember that duralumin and hard wood are considered the best. Additionally, the basement can be equipped with a thermostat, and the outside can be surrounded with small berry bushes. Trees cannot be planted for these purposes, as their roots can destroy the walls of the building.
Making an entrance to the cellar
Usually a small house is built above the entrance. Although this is done mainly when the cellar is built into a hill. In a flat area, a wide ordinary door with a strong slope is installed, having thought in advance about protecting it and the cellar itself from inclement weather.
It’s better, of course, not to be lazy and build a house above the entrance, because this doesn’t require any special costs or skills. The main thing is that the protection of the cellar will be much better. You can also choose an interesting and beautiful design.
Making steps to the cellar of a private house
Do not skimp on materials for steps and do not save your energy - this will lead to disastrous results. The steepness of the steps and their insufficient width will be very dangerous both for your household and for you - you can be seriously injured if you save too much. After all, you need to rise, carrying a load in your hands. The step must be made so that the foot fits completely on it.
High-quality concrete is used, which is necessarily reinforced. In order to save money, you can use reinforcement (sheathing them with rubber) or wood to make steps, the main thing is reliability and for comfortable walking.
Metal
A metal staircase is the simplest option; you don’t have to make it yourself, but purchase it. Some still prefer the second option. This may be due to the non-standard size of the cellar. Well suited for a cellar with a hatch.
To create a metal staircase, you will need:
- a corner for edging;
- sheet metal for steps;
- welding machine;
- Bulgarian;
- concrete mixture;
- paint material.
First you need to calculate the dimensions. Next, cut the metal using a grinder. Using a welding machine, a frame is created and the steps are welded. The presence of sagging can be eliminated by using an angle grinder with a grinding wheel.
Canopy over the entrance to the cellar
Various canopies are relevant: arched, cantilevered, domed, straight with a valance, concave.
To create a canopy over the entrance yourself, you must use:
- hand saw or hacksaw;
- drill;
- measuring tool;
- screwdriver
The structure will consist of beams, roofing material, wood and metal processing products, and appropriate fasteners. The best option for creating a canopy is to use a ready-made option. Visors made of different materials and side sizes are sold separately. You can make a plastic cellar with a side entrance for each staircase or make it to order. You can assemble it yourself.
DIY cellar waterproofing
You can’t do without waterproofing – it’s not even discussed. We are building the cellar for a long time, not temporarily, so we try to do it without further alterations. The walls must be leveled and plastered with a solution (cement, sand and water). The ratio of sand to cement is 2:1.
After drying, waterproofing is applied to the plaster. Let's highlight two interesting methods - a waterproofing agent that penetrates concrete and, probably the most popular, ordinary bitumen resin and filler. Let's consider the popular method: apply a layer of bitumen resin, then a layer of roofing material and again bitumen.
Waterproofing is also ensured by all kinds of concrete additives that are widely available. By doing all this carefully, you will only receive benefits from the cellar.
Ventilation of a made cellar
With the help of a ventilated cellar, optimal humidity and temperature are maintained. Without ventilation, food cannot be preserved; it will be lost. To equip it, you need two pipes of twelve centimeters in diameter, if the cellar is standard. We install one below right next to the floor, and the other under the ceiling.
Due to the temperature difference between the top and bottom, the air in the cellar will circulate (ventilate). In severe frosts, it is advisable to block the access of very cold air by filling the pipes with insulation, polystyrene foam, burlap; a mass of dried oak leaves or ordinary straw will also work, which do not rot or mold, that is, the products are not in any danger.
Types of underground premises
There are two types of underground: warm and cold. Cold is used for houses that are not heated during the cold period; for this purpose, the floor is additionally insulated.
In such a subfield, the temperature depends on the temperature outside, and not in the house . Ventilation in the underground of a private house is carried out through vents in the foundation of the house; there is no air exchange with the interior of the house.
Floors with a warm underground are made in houses with permanent residence and heating. The temperature in the underground depends on the temperature in the house, since it is connected to the interior by ventilation vents in the floor.
To reduce heat loss, the foundation is insulated.
Most often, the depth of the warm underground is 15-25 cm. With a depth of more than 25 cm, heat loss increases, with less, ventilation will deteriorate.
Some useful tips for building a cellar
It would be good to plant a dwarf cherry tree near the cellar, a bush with berries that will absorb excess moisture, and their roots are not dangerous. It is better to plant moss on the roof, which also removes moisture. A proper DIY cellar should, with natural ventilation, maintain the correct temperature and humidity level for the food.
Slaked lime can be placed in a container to eliminate moisture, and sand poured into a bucket will eliminate excessive dryness (the sand is regularly watered).
Disinfection can be carried out using two methods:
- Place quicklime in a container filled with water.
- Use an ordinary sulfur bomb.
Whenever using the method, you must quickly leave the cellar and close the door tightly. We looked at how to make a cellar with your own hands and looked at the main mistakes that may arise during construction. Good luck in your work and only the most delicious preserves in the cellar!