The lack of the usual H2O in the water tap is a common everyday nuisance that is simply impossible to get used to. A person is able to adapt to the systematic shutdown of gas or electricity, but it is the lack of drinking liquid that he endures the hardest. Of course, you can collect life-giving moisture in bottles and cans in advance, but this is not a way out. It is much more reasonable to purchase a storage tank for the water supply system and install the container under the water.
Purpose of the water storage tank
The needs of a modern person are not limited to simply the supply of drink to the home. Every consumer of this resource wants H2O to flow from the tap under good pressure and ensure the uninterrupted functioning of household appliances. However, in a number of situations this is only possible if there is a water storage tank.
Installation is usually done:
- If there are no alternative water sources on the homestead territory or nearby. In this situation, a tank that is systematically filled from a tanker truck will be a real salvation.
- When liquid is supplied to residential premises through a centralized water supply system irregularly or in accordance with an established schedule.
- If you have your own well or well with low productivity. In this case, limited resources simply cannot meet all the needs of residents.
- During frequent power outages, without which pumping units are unable to function.
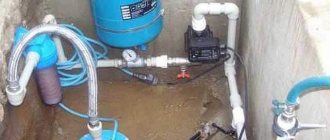
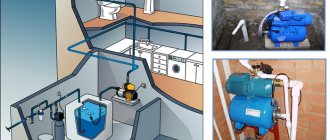
Standard water supply scheme for a house with a storage tank and pump
The unit consists of the following units, elements and parts:
- Plastic or metal tank with a volume of 100-1000 l;
- Water pump;
- Receiver;
- Water column adjustment relay;
- Adapter, pressure gauges, check and float valves, reinforced hose;
- American women with internal and external threads;
- Adapters and couplings МРН and МРВ;
- Water meter, coarse filter in a well or well, shut-off valves.
The supply and distribution pipeline is made of PVC pipes ø 32 and 20 mm.
Using the Water Tank
To use the reserve supply of H2O at any time, the storage tank must be connected to the water supply. The connection must be carried out taking into account the supply of an aqueous solution in automatic mode (if there is not enough external pressure) or the activation moment must be set using a conventional valve. There are many ways to install water storage devices. To decide on a specific option, you need to take into account the following factors:
- source type;
- probable location;
- living space layout, etc.
In addition, it is advisable to familiarize yourself in advance with the design of different storage tanks for water supply and consider their connection diagrams. Once all the important nuances have been taken into account and the available information has been studied, you can choose the most suitable configuration.
Installation process
The most affordable option for organizing an autonomous water supply system in a house or bathhouse is to install a container in the attic.
To do this, you need to make or purchase a bath tank of the required volume and configuration.
The container is installed on the top beam or in any convenient location in the attic.
Installation work is carried out in stages:
- The base under the water tank is being strengthened. The floor beams are covered with wide boards.
- The drive is installed on the prepared base.
- A float type valve is being installed. Step back 7.5 cm from the top edge, make a mark and cut out a hole of the required diameter. The tail part of the valve with a plastic sealing washer is threaded into the hole. A special stiffening plate is installed on the opposite wall of the container, another sealing washer is installed, and a nut is screwed on. All fasteners are securely fixed, a connector is screwed to the tail part, with which the water pipe is connected.
- Holes are made for outlet pipes of the required size. A connector with a washer is screwed into the finished holes on the inside of the container. The thread is strengthened with a special tape. Next, put on the washer and tighten the nut.
- Shut-off valves are inserted into the outlet pipes.
- Overflow is in progress. To do this, set a mark 2.5 cm below the location of the float-type valve and make a hole. The overflow pipe is led into the sewer system and secured to the walls of the tank using connectors using a similar principle. Next, the pipes are connected with compression fixation. The finished sections of the pipeline system are mounted to the walls of the tank and a wooden base.
- The connected tank is filled with water to check the tightness of the system, as well as to regulate the float valve.
- The container is insulated using polystyrene sheets or rolled mineral wool.
In this simple and reliable way, you can set up an autonomous water supply system, the main element of which is a storage tank for a bathhouse or home.
Features of the storage container
The water tank is designed to maintain the required pressure level (the same as an expansion tank). The optimal solution for these purposes is a storage tank with a closed type membrane. Such models are produced with a membrane base located inside. A mesh membrane divides the internal area into two halves. One section is occupied by air, the second by liquid.
Water storage tanks are used in individual systems. Their use is relevant in case of systematic interruptions in the supply of water to the home. The storage tank replenishes it from accumulated reserves. Water storage tanks are produced by manufacturers in a wide range of sizes and volumetric characteristics. Drainage and water supply adapters, filter elements, and ventilation outlets are located on the surface of the housing. There are also models equipped with pumping stations. They already belong to the category of expensive products.
The storage tank simultaneously performs a number of functions:
- stabilizes the pressure level when the supercharger is inactive;
- protects against water hammer occurring due to the penetration of air masses into the water supply system or power surges;
- maintains the set volume of liquid;
- ensures wear resistance of pumps.
Features of adjusting the hydraulic accumulator
Expansion tanks for water supply are sold with standard manufacturer settings - often the pressure in the air compartment is already set at 1.5 bar. The permissible pressure is always indicated on the label and the manufacturer does not recommend deviating from the specified parameters, especially in the direction of increasing it.
Before proceeding with the adjustment, the system is disconnected from the power supply and the shut-off valves are closed. The membrane tank is completely emptied by draining the water - an accurate pressure indicator can only be measured when the water compartment is empty.
Next, pressure readings are taken using an accurate pressure gauge. To do this, remove the decorative cap from the spool and bring the device. If the pressure differs from the required one, it is brought into compliance by pumping or bleeding excess air.
Considering that the manufacturer is against deviations from the recommended pressure values, it is necessary to select suitable equipment at the design stage, the parameters of which will not conflict with each other
When adjusting the pressure in the gas compartment of the tank, the manufacturer fills it with an inert gas, for example, dry nitrogen. This prevents corrosion of the inner surface. Therefore, users are also recommended to use technical nitrogen to increase pressure.
Setting the tank pressure in the water supply system
The pressure in a closed tank is always set slightly lower (by 10%) than the pressure level when starting the pump. By adjusting the pressure in the device, you can adjust the water pressure. The lower the gas pressure in the hydraulic tank (but not less than 1 bar), the more water it will hold.
In this case, the pressure will become uneven - strong when the tank is full and increasingly weak when it is empty. To ensure a strong and even flow of water, set the pressure in the chamber with air or gas to within 1.5 bar.
The water pressure in the water supply is set using a relay. When setting the pressure in the expansion chamber, these values must be taken into account
Adjusting the hydraulic tank in the water heater trim
The expansion tank, which is used for hot water supply, should initially not contain water. The pressure in the device is set at a value that is 0.2 greater than the upper pump shutdown threshold.
For example, if the relay is configured to turn off the equipment at a pressure of 4 bar, then the pressure in the gas compartment of the expansion tank should be set to 4.2 bar.
Installed in the water heater piping, the tank does not serve to maintain pressure. It is designed to compensate for expansion when water is heated. If you set the pressure in it to a lower value, then there will always be water in the tank.
Types of reserve tanks (water storage tanks) for cold water
In accordance with the technical characteristics and configuration features, water storage tanks are divided into several classes according to:
- Form. They are produced in round, rectangular, cylindrical, and in the form of non-standard models.
- Design differences: closed or open.
- The material from which the tanks are made. The most common are metal, polypropylene, stainless steel, and plastic.
- Volume. Water storage tanks have a capacity from 7 to 500 liters.
- Purpose: for hot water supply, hot water supply, heating systems and irrigation.
- Installation method. Possible vertical or horizontal placement, underground or wall mounting.
How to choose a drive and from what material
A water tank can be made of different materials and types. There are both open and closed types. A container for drinking water can be made of different materials: high-quality plastic, stainless steel, enamel-coated metal and others.
The stainless steel tank is quite durable, but after a period of time the protective layer may peel off. The same goes for an enamel coated tank. The price of a stainless steel tank is much higher than that of a plastic container.
When purchasing a plastic tank, you need to pay attention to the quality of the material. If the plastic is of poor quality, the water will stink.
Device and diagram for connecting a water storage tank to a water supply system
The liquid level in the storage tank is regulated by built-in level gauges, which are divided into float and electronic versions. The supercharger pumps H2O from the source to the backup storage. The aquatic environment fills the water storage tank to the set value, after which the float valve is activated and the water intake process stops.
When activated, the electric motor of the pump begins to fill the collection compartment of the reservoir. The air space compartment at this moment decreases. A decrease in air volume leads to an increase in pressure. As soon as a certain norm is reached, the injection unit is switched off automatically. It will work again when the atmosphere indicator drops to the minimum level.
MBFT-75 Membrane for 75GPD
SF-mix Clack up to 0.8 m3/h
SF-mix Runxin up to 0.8 m3/h
Installation of water supply
The installation of the water supply network is carried out in stages.
If water is extracted from a well, a pump is installed on it.
Its type depends on the depth of the source:
- up to 8 m – surface pump;
- from 8 to 20 m – surface pump with a remote ejector;
- over 20 m – submersible pump.
The suction line of the surface pump must be equipped with a check valve. If a submersible pump is used, a check valve is installed on the pipeline leading to the house.
In automatic mode, the pump is turned on and off by coordinated signals of three elements:
- level sensor installed in the well;
- dry running protection relay;
- float switch installed in the storage tank.
Using a flexible reinforced hose with a diameter of 1" the pump is connected to a polyethylene pipeline (outer diameter - 32 mm) laid to the storage tank.
If the tank has a large volume and is installed on an interfloor ceiling, a flooring of thick boards should be laid under it, which will distribute the weight load over a large surface.
Installation of the float valve is carried out in the following order:
- A washer is put on the valve shank, after which it is inserted into the inlet hole.
- Then, from the inside, they put on the shank: a stiffening plate, a second washer and a fixing nut.
- Now, from the outside, you need to screw the adapter to the shank, to which the supply pipeline will be connected.
- The float switch for the pump is installed in the same way.
When installed at the top, the tank remains connected to the sewerage system and water supply network. If the tank is located underground, it is necessary to install and connect a pumping station with a membrane accumulator. Like a well pump, the station must have dry-running protection, which will turn it off as soon as the tank is empty.
Nuances of choosing a storage tank
When choosing a suitable water storage tank, focus on the needs of future consumers of the water resource. Determine how many people will use it. Also count the number of water intake facilities in the house or apartment. These include: kitchen taps, showers, various household appliances that consume H2O during operation. Plus, consider the possibility of use by several people at once. So that it doesn’t happen when one family member is washing, and the second cannot wash the dishes at that time.
Purpose
Tanks are used for collecting and storing drinking liquids and other non-aggressive substances that meet the food category. A variety of sizes of water supply storage tanks with and without a pump for water in an apartment allow you to save a sufficient amount of resource. A certain amount of reserves is especially relevant during systematic supply cuts. And also in cases where there is no source on the plot.
Shape and volume
Many who in practice have encountered the purchase of reserve capacity believe that the optimal displacement should be 250 liters. This is exactly the amount of liquid that will be sufficient for mass flow. For example, it will be spent cleaning the house, washing the car, filling the bath. The aqueous solution will constantly move without stagnating. 150 or 200 liters is not enough for this.
However, it is impossible to confidently recommend any specific parameters. The most common but valuable substance - H2O - is consumed differently by everyone. Therefore, when purchasing a storage tank, focus on the needs of your household.
Materials
Manufacturers produce devices of two types: metal and plastic.
The first option is products made of stainless steel, which is impervious to mechanical damage and rust. In this regard, metal models are quite expensive and are often made to order. To avoid the negative effects of corrosion when collecting and storing hot liquid, the tanks are coated on the inside with heat-resistant enamel.
Storage tanks made of plastic are the most practical and common. They are easy to manufacture, light weight and low cost.
Storage tank volume
When calculating the volume of a storage tank, two factors are taken into account:
- Water consumption in a house or area : everyone’s water consumption is different, so it is impossible to recommend anything unambiguously in this case. For an approximate calculation, you can use average statistical data. So, in a house with all the amenities (except for a kitchen sink, toilet and bathroom, including a dishwasher and washing machine), approximately 170 - 200 liters of water are consumed per person per day. With a more modest regime - only for washing, drinking and cooking (for example, in a country house) - the needs are reduced to 60 - 80 l / day per person.
- “Operating schedule” and productivity of the water supply source : no matter how we calculate our needs, even two hundred or three hundred liters per person, a lot depends on how much water comes from the source. There is no reason to drag a cubic container into the attic if no more than 500 liters can be pumped into it per day. You can also do without a large tank if interruptions in water supply are short-term and a significant share of water needs is covered directly, without the “services” of a storage tank.
The storage tank is often confused with the hydraulic accumulator of pumping stations (PS). This is not entirely correct. Both devices perform a similar function, but the volume of the HC accumulator, which has a rubber bulb or membrane inside, is no more than 100 l (most often 25 - 50 l). It is needed only to prevent frequent starts of the pump, and cannot compensate for long interruptions in water supply.
Connection options
You can connect the storage tank to the water supply using two different methods: by placing it at a certain height or by placing it at ground level.
Upper placement is used mainly when there are no household appliances in the living space that are particularly demanding of good pressure. For the minimal needs of household members, such as washing dishes, cleaning the house, hygiene procedures, it is optimal.
The lower location is more efficient. Suitable for residential buildings that have all the amenities familiar to city residents. This type of installation requires mandatory equipment with a pump, since in its absence it will not be possible to obtain the required pressure.
AMETHYST - 02 M Residential building for up to 10 people or up to 2 cubic meters/day.
Aeration unit AS-1054 VO-90
Main table dispenser AquaPro 919H/RO (hot and cold water)
Methods for connecting storage tanks
The tank can be connected to the system in two different ways: by placing it at a high elevation or at or below ground level.
Top position
This scheme of supplying water to a house from a storage tank is practiced mainly in cases where there are no appliances in the house that require good pressure, and the residents’ need for water is minimal - to wash, wash dishes, etc.
And also with frequent power outages. Because water from a tank installed on the roof, attic or overpass flows to consumers by gravity, and such a system does not depend on the presence of voltage in the network.
Advice. When designing a gravity flow system for supplying water from a tank, keep in mind that a pressure of one atmosphere gives a height difference of 10 meters between the storage tank and the tap. And this does not take into account losses in the pipeline itself.
Such pressure in the system will be insufficient to operate the washing machine, and even taking a shower will be problematic. You can increase it by connecting a booster pump at the outlet of the tank. The advantage of this installation is its simplicity and ease of maintenance of the tank.
However, do not forget about the disadvantages:
- The storage tank takes up a lot of space, taking away useful space from the house;
- If you install it in the attic or outside on a special overpass, then you can use water only in the warm season. Or you need to properly insulate and heat both the tank itself and the pipes going to and from it;
- If the installation instructions were not followed or the system itself has worn out over time, leaks are possible, which can cause a lot of trouble.
Summer option - container in a cold attic
Winter option - insulated tank
The container is installed under the ceiling on a special ceiling
Wall brackets used here
Another “under-ceiling” option - on the cabinet
Storage tanks for seasonal water supply and irrigation
As you can see, each homeowner solves these problems differently depending on the needs of the family.
- To prevent the water from freezing, the tank is installed on a heated second floor or attic, sacrificing space.
- Or they use electric heating of a container in the attic. And they pay extra for electricity.
- Or they simply place it on the cabinet, being content with the minimum pressure in the system.
Bottom position
This is a more common and effective method of placement for houses with permanent residence and all the amenities familiar to a city dweller. Such a water supply system with a storage tank must be equipped with an additional pump or pumping station. Without them, the water itself will not flow to consumers, but with it you can get any necessary pressure.
There are also several options for lower placement:
- Ground - when the container is used only in the summer and does not need insulation;
- Underground - the tank is buried in the ground, and only the neck is brought to the surface, providing access to it for repair and maintenance;
House water supply - storage tank underground
- Basement - when the house has a heated basement or technical room.
The last option is the most convenient, since the container does not need to be insulated, it is always accessible and does not take up useful space.
The second most popular is the underground option. It also allows you not to use the space of the house, but in this case cleaning and repairs will be fraught with certain difficulties. And the upper part, located above the freezing level, will also have to be insulated.
In addition, not every container can be buried in the ground. It must be durable, with thick walls, stiffeners or metal formwork. Otherwise, you need to build a hard shell for it.
Installation of the tank in a caisson made of waterproof slabs
It is important. When installed underground, the bottom of the container should have a slope of 12-15 degrees so that suspended particles contained in the water settle in one place and are easier to remove through the hatch.
Design features
The design of the storage tank does not depend on the installation location. There are only a few nuances.
The container is equipped with the following structural elements:
- Float valve. It prevents it from overflowing and turns on the pump when the water level reaches the minimum level.
Float switch
- Overflow pipe in case of failure of the float switch. It is located at the top of the tank and connects to the sewer.
- Drainage pipe at the bottom. Designed to remove sediment. They are equipped with storage tanks for water supply located at the top or in the basement of the house. Underground tanks are cleaned through the top hatch.
This photo shows both pipes connected to the sewer system
- The filter located at the inlet will retain some of the suspended particles. It can also be installed at the exit, equipped with a finer mesh.
- Ventilation pipe or breathing valve. If you do not install them in the tank lid, when draining the water, its walls may collapse under the influence of atmospheric pressure.
Cover with breather valve
Advice. The diffuser on the supply pipe will prevent the water from bubbling and mixing with sediment that has settled to the bottom.
Water supply schemes with storage
They largely depend on the location and type of source, the process of preparing hot water, as well as the selected pumping system that supplies water to the container.
So, if water is drawn from a 7-8-meter well, it is quite enough to purchase a surface pump. A check valve will need to be installed on the inlet pipe to prevent H2O from escaping.
It will be possible to lift the aqueous solution from a depth of 15-18 meters only with the help of a remote ejector, which must be equipped with a supercharger.
Well, for an artesian well you can’t do without a submersible device.
Centralized water supply
When installing a water storage tank, regardless of the type of connection, you will definitely need a shut-off element. It is this that prevents the stored liquid from escaping back into the water supply.
Upper connection
The storage tank is mounted under the ceiling above the pipeline or in the attic. At the initial stage, it should already have a falling and water intake fitting, as well as a pipe for discharging excess into the sewer.
Next, a coarse filter device, a check valve, a water meter, and a valve are installed. Only after this can a tee be installed that leads the tube to the inlet adapter.
A hose to remove excess H2O is lowered into a sewer pipe or simply taken outside the living space, for example, to a garden or personal plot.
To control the filling level, special float elements are used.
Leading from below
In this case, all manipulations are performed similarly to the previous method. But unlike this, a pumping station is installed at the outlet, creating a certain pressure in the pipeline. To use the liquid, you must first activate the pump.
Bottom connection of storage tank with membrane
When studying water supply schemes with a storage tank for storing water in an apartment, one cannot help but pay attention to this option. You can connect a water storage tank of this type using just one tube connected to the water supply through a tee and valve. The water storage tank must be installed after the cleaning device, water meter and check valve.
Main table dispenser AquaPro 929CH/RO (cooling/heating)
Floor dispenser AquaPro 311 (empty, without cooling)
Floor-standing dispenser AquaPro 6207CH (cooling/heating/room temp.)
Autonomous system
Supplying H2O from an individual well or borehole source is extremely simple. It is lifted using a supercharger, the configuration of which depends on the height of the shaft and the depth of water resources.
Water tower
The storage tank is mounted 15-20 meters above the ground on an equipped tower or in the attic. The liquid from the pumping station is sent to a reserve tank, and from it is supplied to the toilet or kitchen in the living area. The necessary pressure is created due to the level difference between the water storage tank and the home tap.
Bottom connection
In this case, the storage tank is installed at the same height as the injection system or no higher than the first floor. Filling is carried out using a pump. The float switch acts as a control element. Optimal scheme for excessive H2O consumption.
Membrane design
Such a storage tank is installed immediately after the supercharger and the shut-off part (valve) through a lower connection.
Using a hydraulic accumulator
This device is designed to ensure the start of the pumping station. Can also be used as a reserve water tank. The more impressive the dimensions of the device, the higher the efficiency. However, the cost increases accordingly. Thanks to good tightness, it keeps the aqueous solution suitable for drinking.
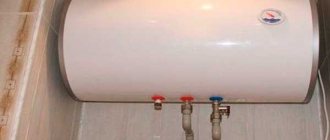
Application of water heater
Installed for heating liquids in residential premises. At the same time it serves as a water storage tank. It is characterized by ease of installation and the ability to obtain heated H2O, regardless of the season.
The principle of operation and piping of a storage tank in a domestic water supply system
The water supply system with a storage tank located at the bottom of the house operates according to the following algorithm.
When turned on, a submersible or surface electric pump or pumping station pumps water into the storage tank.
Usually it is fed through a filter system into the upper threaded pipe. After filling the tank, the electric suction pump must be switched off. This is achieved in the following ways:
- A float valve installed at the top point is used inside the chamber. As soon as the water level reaches a predetermined threshold, the float floats up and the mechanism blocks the water flow. The electric pump or pumping station begins to operate when the tap is closed, the pressure in the water supply increases, and when a certain threshold is reached (usually 3 bar), the pressure switch turns off the suction unit.
- A float switch is used. With this option, a float is placed inside the tank, connected to the power circuit of the electric pump suctioning water. As soon as the water reaches a certain level, the floating float opens the contacts and the power supply to the electric pump stops - the flow of water into the tank stops.
There is also a hole at the top of the tank, or a hole is made, which is used to connect the overflow pipeline. In the event of an emergency, in the event of a failure or failure of the float, it directs the water flow behind the house or into the sewer.
It is worth noting that one or two sand filters must be installed along the water supply pipeline. Usually this is a self-cleaning filter with a pressure gauge and a second cartridge type in the flask.
Rice. 9 An example of a tank piping diagram fed from a submersible well pump and a water main
Also, during wiring, two lines are installed - supplying water directly from the suction electric pump to the internal water supply and to the storage tank. In this case, it is possible to disconnect one or the other branch using shut-off ball valves.
Water from the reservoir is usually directed to the internal water main of the house using a pumping station. In addition to a centrifugal pump, it includes a pressure switch, a pressure gauge and a hydraulic accumulator.
If the pressure in the area from the storage tank to the taps and plumbing fixtures is below a certain threshold (usually 1.5 bar), the pressure switch closes the power contacts of the pump, and it begins to pump water into the pipeline. When the pressure level reaches 3 bar, the pumping station is switched off. The station’s hydraulic accumulator serves to compensate for water hammer, ensure correct operation of the pressure switch, and creates additional water reserves in the main line.
Also, at the bottom of the storage tank, at the very bottom or very close to its surface, a drainage valve is installed. It serves to drain contaminated water after cleaning the container or as a result of its contamination with bacteria or loss of its taste due to long-term storage.
If the storage tank is powered from a centralized water main with guaranteed high water quality, filters are not installed along the water flow path and the pipeline is directly connected to the tank.
Where are water tanks installed?
The choice of location for storage tanks depends on many factors that must be taken into account when planning installation work.
- You can provide backup water supply to a private home through a storage tank by installing the tank in a utility room under the ceiling.
- Install a water tank in the attic or loft. If necessary, the structure will have to be insulated.
- Place it directly on the floor surface or in the basement. Without a pumping station, of course, such a scheme will not work.
Features of choice
The choice depends on the volume, possibilities of its placement, required functions, and the owner’s budget.
If the house has several floors or there is an attic with enough space to accommodate a tank of the required volume, then you can install an open-type tank with a top connection. It will cost less than a hydraulic accumulator and will not require additional pumping equipment for water distribution. However, to create sufficient pressure for comfortable use, you need to raise the tank to a considerable height. To increase the pressure by 1 bar, you need to raise the container to a height of 10 meters. When placed in the attic, equipment will need to be insulated. If it is impossible to install the storage tank at a sufficient height, use a lower connection. The tank is usually located in a utility room or basement. A pump is installed to supply water to consumers.
Membrane-type expansion tanks are more expensive compared to open-design models. However, this equipment automatically regulates the pressure and pressure of water in the system. The installation height does not matter, no connection of pumping equipment is required.
The volume of the storage tank is selected based on the number of people living in the house. One person requires an average of 30-50 liters per day. When choosing by volume, the nature of the operation of the central or autonomous water supply is taken into account. If sufficiently long interruptions are possible, it is recommended to provide a reserve of 2-3 days.
Recommendations
When planning to purchase a storage tank and organize its operation in the house, it is worth enlisting the advice of experienced specialists:
- Combine the purchase of a water storage device with the purchase of a filtration device. This way you can get crystal clear drinking liquid. When considering offers on the market, you should pay attention to products. We manufacture and sell water treatment equipment and are ready to help you choose the option that suits you.
- When choosing a water storage tank, do not skimp on quality. If you buy a cheap product, you will probably spend more money on troubleshooting various problems.
- When doing the installation yourself, consider the possibility of dismantling the system for repairs or replacement.
- Be sure to consider grounding to prevent corrosion.
Water supply to a private house from a well and a well: pipe laying
Any of the described water supply schemes for a private house is implemented using a pump that supplies water to the house. In this case, a pipeline must be constructed connecting the well or borehole with a pumping station or storage tank. There are two options for laying pipes - only for summer use or for all-season (winter) use.
The section of the horizontal pipe may be located below the freezing depth of the soil or it needs to be insulated
When installing a summer water supply system (for a summer residence), pipes can be laid on top or in shallow ditches. At the same time, you need to remember to make a tap at the lowest point - drain the water before winter, so that frozen water does not break the system in cold weather. Or make a collapsible system - from pipes that can be rolled on threaded fittings - and these are HDPE pipes. Then in the fall everything can be disassembled, twisted and stored. Return everything in the spring.
Laying water supply pipes around the site for winter use requires a lot of time, effort and money. Even in the most severe frosts they should not freeze. And there are two solutions:
- lay them below the freezing depth of the soil;
- bury it shallowly, but be sure to heat it or insulate it (or you can do both).
Deep placement
It makes sense to bury water pipes deeply if it freezes no more than 1.8 m. You will have to dig another 20 cm deeper, and then pour sand onto the bottom, in which to lay the pipes in a protective shell: they will be subjected to a significant load, because on top almost two-meter layer of soil. Previously, asbestos pipes were used as a protective shell. Today there is also a plastic corrugated sleeve. It is cheaper and lighter, it is easier to lay pipes in it and give it the desired shape.
When laying a pipeline below the freezing depth, you have to dig a deep trench along the entire route. But the water supply to a private house from a well and a borehole will not freeze in winter
Although this method requires a lot of labor, it is used because it is reliable. In any case, they try to lay the section of the water supply between the well or borehole and the house exactly below the freezing depth. The pipe is brought out through the wall of the well below the freezing depth of the soil and is led into a trench under the house, where it is raised higher. The most problematic place is the exit from the ground into the house; it can be additionally heated with an electric heating cable. It works in automatic mode maintaining the set heating temperature - it only works if the temperature is below the set one.
When using a well and a pumping station as a water source, a caisson is installed. It is buried below the freezing depth of the soil, and equipment is installed in it - a pumping station. The casing pipe is cut so that it is above the bottom of the caisson, and the pipeline is led out through the wall of the caisson, also below the freezing depth.
Laying water supply pipes in a private house from a well when installing a caisson
A water pipeline buried in the ground is difficult to repair: you will have to dig it up. Therefore, try to lay a solid pipe without joints or welds: these are the ones that cause the most problems.
Close to the surface
If the excavation is shallow, there is less excavation work, but in this case it makes sense to make a full-fledged route: line the trench with bricks, thin concrete slabs, etc. At the construction stage, the costs are significant, but operation is convenient, repairs and modernization are without problems.
In this case, the water supply pipes for a private house from the well and borehole are raised to the level of the trench and discharged there. They are placed in thermal insulation to prevent them from freezing. To be on the safe side, you can also heat them - use heating cables.
One practical tip: if a power cable runs from a submersible or well pump to the house, it can be hidden in a protective sheath made of PVC or other material, and then attached to the pipe. Secure every meter with a piece of tape. This way you will be sure that your electrical part is safe, the cable will not fray or break: when the ground moves, the load will be on the pipe, and not on the cable.
Sealing the entrance to the well
When organizing water supply for a private house from a well with your own hands, pay attention to sealing the place where the water pipe exits the shaft. It is from here that dirty water most often gets inside.
It is important to seal the outlet of the water pipe from the well shaft well
If the hole in the shaft wall is not much larger than the diameter of the pipe, the gap can be sealed with sealant. If the gap is large, it is covered with a solution, and after drying, coated with a waterproofing compound (bitumen impregnation, for example, or a cement-based compound). It is advisable to lubricate both the outside and the inside.