Getting ready to build a ceiling for the cellar - preparatory work
Storage for grown crops is often arranged in a garage. When planning to build a basement in the garage with your own hands, it is important to take into account all the nuances:
- make sure that there are no utilities below the soil level at the work site. This requirement is especially relevant in urban areas, where various highways may be located. If it is possible to go deeper into the soil up to three meters, you can proceed to the next task;
- carry out survey activities aimed at determining the depth of aquifers and assessing soil quality. Professional surveyors will carry out research and provide an official conclusion. In case of increased moisture saturation, drainage and reliable protection of walls and floors should be provided;
- develop the optimal layout of the basement, taking into account all the features. You should pay attention to the shape and size of the basement, which should correspond in size to the contour of the garage space. It is important to choose the right material, as well as the technology for building the foundation.
A traditional cellar is designed so that its entire room is located below ground level.
To ensure a comfortable microclimate, it is important to pay attention to the following points:
- ensuring reliable moisture insulation. Under normal humidity conditions, dampness will not develop;
- implementation of effective thermal insulation. One of the main tasks in this case is the correct insulation of the ceiling in the cellar;
- construction of a ventilation system. Thanks to air circulation, comfortable conditions will be maintained.
Having comprehensively solved the listed problems, you can arrange the ceiling of the cellar in the garage.
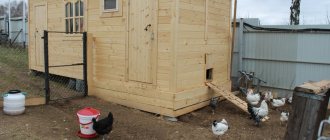
Construction of a cellar with a cellar
Construction of a cellar with a cellar.
The cellar is built on the ground and is designed to regulate the temperature regime (preventing summer overheating and winter freezing), and it also performs the protective function of the cellar (the negative impact of precipitation). Often, a cellar is used for household needs, such as storing entrenching tools and various materials; it can also be used for short-term storage of fruits and vegetables.
To build cellar walls, gardeners can use a wide variety of materials (concrete, natural stone, wood, brick, etc.).
Under the cellar there is a deep cellar, for the construction of which a pit is being dug. The bottom of the dug pit is leveled and compacted, after which it is covered with a layer of crushed stone (approximately 10 cm thick). Crumpled fatty clay is placed on top of the crushed stone in a small layer, which is leveled and compacted. Then concrete mortar is poured on top of the clay layer. After the concrete has completely hardened (at least 7 days), we make a cement-sand screed (5 cm thick).
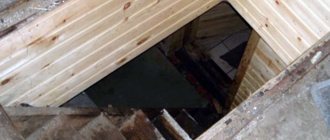
To construct the floor, beams are used, on top of which a ramp is constructed from boards, poles or slabs. After this, thermal insulation material is laid down. This can be done with expanded clay, sifted with crushed brick, moss, which is laid on a clay screed (about 3 cm thick). You should know that when constructing a cellar ceiling, you need to provide a hatch, under which, as a rule, an inclined wooden or metal ladder is installed.
This type of cellar uses a pitched roof made of roofing material or asbestos-cement sheets, which has large overhangs, which are necessary to ensure dry walls.
In such a cellar design, it is necessary to install a ventilation pipe, which is divided into 2 channels (inflow and outflow), this will allow you to achieve the necessary humidity and favorable temperature in the room.
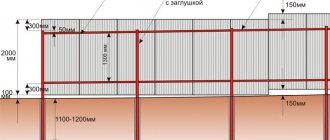
How to protect your cellar from moisture with your own hands
Waterproofing the basement prevents it from becoming saturated with moisture. It is produced according to the following algorithm:
- Plaster the wall surfaces with moisture-resistant cement mortar.
- Glue the roofing felt sheet to the surface of the plaster.
- Build the brickwork, pressing the waterproofing material.
To waterproof the floor, pour crushed stone-sand mixture onto the surface and compact it to a thickness of 15–20 cm.
This design has many advantages: stable temperature throughout the year
Application of rolled metal
Are you deciding what to cover your basement with? It is possible to use ordinary rails. I-beams are used as load-bearing beams and are highly durable.
The installation of railway profiles is carried out in special grooves provided in the walls of the building. This allows you to securely fix the structural elements. The length of the beams must correspond to the dimensions of the basement, the walls of which are the base for them.
Form the load-bearing surface using the following algorithm:
place steel reinforcement bars between the beams and secure them with wire;
- mount wooden formwork, lay a waterproofing coating on it;
- install a power frame under the formwork to support the concrete mass;
- fill the structure with solution, ensuring uniformity of the layer and continuity of work;
- lay the roofing material on the surface.
We are planning to cover the cellar - general tips
The construction of the basement ceiling is carried out after the walls have been erected, the base has been concreted and waterproofing work has been carried out. There are a number of points to consider:
- choose the material for making the ceiling;
- study the technology of performing work;
- calculate the amount of required building materials;
- determine the overall level of costs;
- prepare tools and building materials.
To maintain comfortable humidity, it is necessary to consider the design of the hood. Air exchange is carried out in various ways:
- natural. Ventilation is provided using a supply line and an exhaust pipe due to temperature differences;
- forced. To increase circulation efficiency, a small-sized fan unit is used.
By completing all the activities yourself, you can save a lot of money.
Before making any cellar, the groundwater level is taken into account
Earthen cellar
An earthen cellar, which provides excellent protection for potato tubers from drying out, is built on an elevated, dry place with fairly dense soil. The advantages of this type of cellar include excellent performance characteristics and simplicity of design, which does not require large expenditures of money due to the fact that scrap materials are used for its construction.
Semi-buried cellar.
In order to reduce soil shedding when constructing an earthen cellar, you need to dig a foundation pit so that its walls have a slight slope. If your plot of land has sandy soil, the walls of the pit must be strengthened by covering them with wattle fence, boards or slabs. With the help of lining, you will increase the service life of the cellar and create favorable conditions for long-term storage of vegetables. According to the recommendation of experts, in order to be able to dry the structure in the summer, it must be built collapsible.
As a rule, an earthen cellar is small in size, on average its height is 1.6 m. However, if groundwater passes close enough to your site, then the height of the structure may be less.
The base of the floor is made of crushed stone, which, after laying, is tightly compacted and covered with hot bitumen. This way you will prevent the formation of capillary moisture. The floor surface, which is approximately 10 cm thick, is often made of adobe by adding sifted crushed brick.
To cover the cellar, as a rule, poles are used, which, after laying them, are covered with a clay mixture and straw. Then the resulting surface is covered with a layer of soil. The thickness of such a thermal insulation backfill layer must be at least 30 cm.
The design of an earthen cellar, as a rule, involves the construction of a gable roof made of branches or a slab, the slopes of which reach the surface of the ground. To create a roof ridge, thick edged boards are used, under which a strip of roofing felt or roofing felt is placed. To prevent freezing in the cold winter, the ceiling is insulated with dry oak leaves or peat.
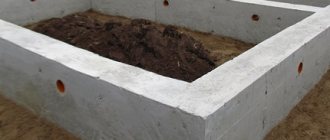
How to make a cellar ceiling in the form of a monolithic slab
When thinking about how to make a cellar with your own hands, it is important to ensure the reliability of the ceiling structure. Many people prefer a solid ceiling made of reinforced concrete.
Sequence of actions for forming a monolithic concrete surface:
- Decide on the dimensions of the solid block, cut the material for making the formwork.
- Assemble the panel formwork, securely strengthen it with strong vertical supports.
- Check the tightness of the wooden structure and, if necessary, seal the cracks.
- Tie the spatial reinforcement grid using steel rods with a diameter of 1–1.2 cm.
- Ensure that the frame is immovable, as well as a fixed distance to the edge of the formwork of 40–50 mm.
- Fill the assembled formwork with concrete solution without stopping until the volume is completely filled.
- Remove air bubbles from the liquid solution using special vibrators or reinforcing bars.
- Ensure that the hardening concrete remains motionless for a month, then dismantle the formwork.
As soon as the work on creating the formwork and reinforcing mesh is completed, you can begin the process of pouring concrete mortar.
To ensure the strength of the structures being erected, the following requirements must be met:
- ensure the distance between the horizontal formwork beams is 0.5–0.6 m;
- maintain a constant interval between vertical posts of 1–1.5 m;
- maintain a step of 15–20 cm between the reinforcing bars;
- form a solid reinforced concrete slab 18–20 cm thick.
To construct the panel frame, you can use moisture-resistant plywood, and the supporting structure can be made of steel telescopic racks. The formed reinforced concrete slab must rest on the walls of the basement by at least 15 cm.
Cellar under the summer building
Cellar waterproofing diagram.
This cellar design is very convenient to use because it allows you to save space in a suburban area. The entrance to the storage room is directly from the summer kitchen. It is similar in many respects to a garage cellar.
For this type of storage, the pit is built small so as not to complicate its work by filling the cavities, but still, each side of the pit should be 0.5 m larger than the design dimensions of the cellar, this is necessary for greater convenience in carrying out construction work.
In the constructed pit, the bottom is covered with a small layer of crushed stone (8-10 cm thick), after which it is compacted and covered with hot bitumen to protect the base from water penetration.
For the construction of walls (thickness 20-30 cm), dense concrete with mandatory reinforcement is used. Reinforcement or steel rods are excellent for these purposes. After the concrete walls are completely dry, their surface is finished with plaster (a solution of cement and sand) with a layer thickness of 1 to 2 cm.
The ceiling of such a cellar or the floor of a summer kitchen is made double, with insulation. To provide the cellar with the necessary waterproofing, the base of the summer kitchen foundation, and this will be the upper part of the storage walls, is finished with several layers of roofing felt.
We form the ceiling of the cellar in the garage from prefabricated panels
To form a flow, prefabricated monolithic technology can be used. It involves the use of standard reinforced concrete panels produced in industrial conditions.
Given the significant mass and size of the slabs, certain difficulties arise when performing the work:
- transportation requires lifting equipment and the involvement of professionals who will install the ceiling for the basement;
- The dimensions of the room must correspond to the dimensions of the slabs. Standard reinforced concrete panels are 9–12 meters long;
- slabs must be ordered in advance and delivered to the work site in a timely manner;
- The width of the basement should be a multiple of the width of the panel, taking into account gaps that must be carefully concreted.
A ceiling made of prefabricated monolithic slabs is suitable for various types of cellars.
Sequence of actions for installing a prefabricated monolithic structure:
- Lay the slabs with a minimum gap on the upper plane of the walls.
- Seal the joint areas with thermal insulation material.
- Fill the gaps between the panels with concrete mixture.
- Glue the roofing felt to the surface of the slabs using mastic.
The advantages of this method are low costs and the ability to reduce work completion time.
Cellar made of reinforced concrete rings
Cellar made of reinforced concrete rings.
This type of cellar is used by owners of summer cottages, the dimensions of which are not at all large, because the design of this type of storage for vegetables and fruits occupies a small area. To build a cellar from reinforced concrete rings, you should choose dry soil. The basis of this design is made up of wide and short concrete rings.
If the groundwater level in your suburban area is high enough, you will need to backfill the rings with soil or sand, this way you will raise the entire cellar structure.
Unlike building a cellar in the traditional way, where you need to fasten the ceiling and walls, carry out complex waterproofing work, etc., here you just need to dig a hole and lay a concrete ring in it. Of course, you can use ready-made reinforced concrete rings or pour them yourself.
First of all, using sheet metal, you need to make formwork. The semicircles of the constructed formwork are tightened using bolts and nuts, for which purpose small-diameter holes must be specially drilled at the ends of each semicircle.
After the formwork is installed, you can begin mixing the concrete. It is made from cement, gravel and sand in compliance with established proportions. Then we install reinforcement or thick wire between the walls of the formwork and fill it all with ready-made concrete mortar, compact it and keep the concrete in the formwork for a week.
To prevent moisture penetration, we use hot bitumen as a waterproofing material. This way you will have a great cellar. All that remains is to make a strong roof. For which you can use thick and durable boards, which are subsequently covered with roofing felt. It should be noted that it is imperative to make a small ventilation hole in the roof into which to insert a piece of metal or plastic pipe.
We make a ceiling in the basement from wood
Using a wooden beam structure is a proven method for arranging a basement floor.
Sequence of work:
- Saturate the wood with antiseptic.
- Waterproof the supporting planes of the beams with roofing felt.
- Install the beams on the end surface of the walls and secure them.
- Attach boards to the beams and lay insulating material.
- Cover the insulation with sheet roofing material.
- Fill the resulting structure with soil or fill it with a thin layer of screed.
To ensure structural rigidity, it is important to install the beams in pre-prepared grooves.
The ceiling that is obtained after using this method requires high-quality thermal insulation
Joining the joints between the bricks of the arched vault
After dismantling the formwork slats, it is necessary to remove small drips of mortar in the area of the seams, after which you can begin jointing. Some craftsmen advise using only a special tool for these purposes, but it is best to do everything the old fashioned way, using a two-hundredth nail. This technique has been tested by personal experience.
Joining is best done using a 200 nail
It is necessary to go over each seam with a two-hundred-piece hat several times, after which the appearance of the vault will be transformed. After all, a lot depends on the accuracy and uniformity of the seams. This work can take quite a long time.
The head of the nail will even out all the seams, making them identical