Selecting a drainage system by material
Task No. 1: correctly select and calculate drains. And the question of choice is decided not so much by the owner’s personal preferences as by other, more objective indicators:
- ➠ Climate in the region (maximum possible precipitation)
- ➠ Configuration, roof dimensions and slope angle
- ➠ Number of floors of the house, its age and endurance of the supporting system.
The choice of material is often dictated by expediency. Thus, gutters made of copper or titanium-zinc are not subject to corrosion and are resistant to aggressive environments, but are expensive.
Copper drain (photo No. 2)
Most often, steel is used to make metal drains:
- galvanized (recently less common - it is susceptible to corrosion and short-lived),
- covered with a protective polymer layer.
Steel gutter. (photo No. 3)
This system is durable, reliable, and suitable for multi-story buildings. But it has a number of nuances:
- Metal should not be used in coastal areas where there is a lot of salt in the air, as well as in areas with developed industry - the active substances will dissolve in water, react with the metal and shorten the service life of gutters.
- You should abandon the metal system if you have an old house, a weak supporting structure, foundation or rafter system.
- Metal gutters have low noise insulation. When it rains they will hum.
A popular alternative is plastic gutters.
Plastic drainage system. (photo No. 4)
They are not subject to corrosion and are resistant to aggressive environmental influences. Light in weight and easy to install - even an inexperienced homeowner can install a plastic drainage system. They are not suitable except for multi-storey buildings.
Gutter maintenance
To prevent blockages from occurring during the operation of the drainage system, in addition to installing catch nets and grates, regular cleaning is recommended. To do this, in spring and autumn, accumulated garbage is collected manually. If there is a compressor, the pipeline is purged with air. A good effect is obtained by washing under pressure with water without the use of abrasives.
Cleaning drains with water
To protect against ice, a set of measures is carried out:
- Snow guards are installed along the eaves on the roof;
- lay heating cables along the drain;
- during heavy snowfalls, clear the roof of snow;
- remove ice formations manually.
When working at height, safety precautions must be observed.
Drainage systems will last for many years if installed correctly and used carefully.
Selection of drains by parameters
The throughput of drains is determined by the diameter of the pipes and gutters. These parameters are usually indicated in the labeling. For example, there may be markings 100/75, 125/90, 150/110.
Different manufacturers have different parameters for drainage systems.
To connect them you cannot do without adapters. But in this case, the risk of leaks increases. Therefore, it is better that all elements are manufactured by one company. !
Do not try to connect elements of gutters from different manufacturers - they will not fit together.
To accurately calculate the required dimensions of gutters, you need to know the surface area of the roof slope.
Scheme 1. Calculation of the effective roof area.
If the roof is flat (slope angle less than 10 degrees), its entire area will be effective:
E1 = A x C
To select the sizes of pipes and gutters, use the table below.
Selecting the diameter of the gutter and pipe. (diagram No. 2)
The choice of location and quantity of drains is influenced by the length of the roof overhang. If it is less than 10 m, one drain is installed. If more than 10 m - two.
The number of drains depends on the length of the roof overhang. (diagram No. 3)
Installation stages
Before starting work on installing drainage systems, several preparatory steps should be completed.
- Drawing up a diagram of the location of drainage on the building. It is recommended to draw a diagram indicating all dimensions. When drawing, you should consider the specific locations of ebb tides, transitions, funnels, etc. The decision is made taking into account the characteristics of the rafter system, the location of areas for drainage of melt and rainwater, the presence of land reclamation, the number of buildings and material capabilities - you have to pay for everything.
- Counting the quantity and determining the nomenclature of the drainage system. This is a very important point; any mistake will definitely have negative consequences.
- Preparation of tools and devices, installation of a drain.
- Checking the functionality of all elements, fine-tuning adjustments and correcting detected errors.
There is no need to rush, each stage is important, and a careful approach to solving emerging issues is required.
To accurately calculate the required number of drainage elements, it is necessary to take into account the roof configuration. On our website you can familiarize yourself with the types of roofing for the roof of a private house. The most detailed information, photos + video.
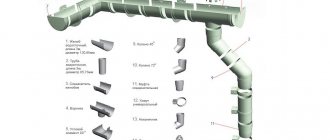
What does the drainage system consist of?
Before moving on to the installation description, let's take a closer look at the drainage system.
Elements of the drainage system. (diagram No. 4)
The drainage system is:
- gutter - to collect rainwater and melting snow from the roof;
- pipe - to drain water from the gutters into the sewer;
- funnels - so that water from the gutters flows into the pipes;
- plugs - to close the blind ends of the gutters;
- bends - to lay pipes along the protrusions of the building;
- brackets - to secure gutters;
- clamps - to secure pipes.
Corner elements, couplings, protective nets, etc. may also be useful. The kit may differ from one manufacturer to another.
For example, the adjustable gutter angle in gutters from Alta-Profile is an element with which you can connect gutters at different angles (from 125 to 145 degrees). It is in demand in houses with a complex roof configuration and allows owners to avoid difficulties with selecting or manufacturing different corner elements.
What is a gutter
The system consists of two main elements:
- Gutters (trays), which are mounted under the overhang of the eaves.
- Pipes that are attached to the walls of a building in a vertical position.
An example of a house roof drainage system.
Additionally, it includes:
- brackets supporting gutters;
- clamps – fastening for pipes;
- funnels are an intermediate element between gutters and pipes;
- drains - the lower part of the drainpipe, which gives direction to the drainage of water;
- various fittings (plugs, bends, tees).
Roof drainage diagram
How to fix gutters?
The material and design features of a particular system from a particular manufacturer determine its installation technology. For example, plastic gutters can be installed using adhesive or glueless methods (using sealing rubber bands).
Let's look at how to attach gutters to the roof using a glueless method.
To work you will need:
- building level,
- screws,
- screwdriver,
- drill,
- cord or rope,
- universal bimetallic crown for cutting holes,
- hacksaw for metal.
There are two ways to install the Alta-Profile drainage system:
- ➠ Horizontal: the system is first assembled at the bottom, and then transferred to the façade and inserted into pre-fixed brackets. This is convenient to do on small houses.
- ➠ Vertical method - from top to bottom. The drainage system is assembled step by step on the building. This method is used more often. Let's look at it in more detail.
Design
Roof drains are devices necessary for collecting water from roof slopes and delivering it to storm drains. The drainage system consists of a set of pipes. It includes the following elements:
Design of external roof drainage system
- Gutters. Gutters are semicircular or rectangular halves of pipes. They are installed around the perimeter of the building so that liquid from the slopes does not spoil the wall finishing material, but leaves the blind area of the house in an orderly manner. They are produced in different diameters to suit any slope area and amount of precipitation.
- Drain funnels. Drain funnels are devices that resemble a funnel in appearance. They are mounted on a gutter to redirect liquid to the storm drain.
- Gutters. Vertical pipes that are connected to the gutter through a water intake funnel are called drains. Through them, melt and rainwater enters the sewer system. Typically, when developing a roof drainage scheme, several drains are placed in different places in the house. Gutters are located above the storm drain grate so that the water flowing from them does not erode the soil or concrete area around the house.
- Brackets. Brackets are the hooks needed for fastening. With their help, drains and gutters are fixed on the walls and eaves of the building. The strength of these elements determines whether the gutter will withstand the weight of snow or collapse.
Note! The sizes of products for drainage equipment from different manufacturers differ in size and methods of fastening, so it makes no sense to try to select a complete set among the products of different companies. Remember, the main thing in organizing roof drainage is tightness, which is extremely difficult to achieve when I use different elements.
Metal gutters
Products for external drainage equipment made of metal are very popular. They are made by pressing from zinc alloy steel. As a rule, they have a semicircular shape, in rare cases rectangular. Self-installation of metal gutters is so common due to the following qualities:
- High resistance to corrosion. Galvanized steel does not react and therefore does not rust. Thanks to this, metal products to ensure water drainage from the roof have a long service life.
- Mechanical strength. The design of gutters, funnels and drains made of metal is strong enough to withstand significant snow loads. Branches falling from trees and falling debris do not cause harm or damage structural elements.
Metal gutter components - Resistant to temperature changes. The strength of steel does not decrease in either extreme heat or cold. Even a sharp change from positive to negative temperature does not affect its integrity.
- Fire resistance. The steel parts that make up the drainage system of the house do not burn and do not support combustion, and therefore comply with strict fire safety standards.
Important! If you decide to make a roof drain made of metal, be prepared for the fact that the price for these products is higher than for analogues made of polyvinyl chloride. This option is not suitable for roofs whose angles are greater or less than 90 degrees, since steel turning parts are made only with such a bend. Experienced builders claim that, given their significant weight, metal water drainage does not have high tightness, and therefore is an outdated construction solution.
Plastic gutters
To reduce the load on the roof rafter frame, manufacturers have developed additional elements for assembling the drain made of plastic or, as it is correctly called, polyvinyl chloride. It differs from metal models:
- A light weight. Plastic drains, gutters and funnels weigh several times less than the same galvanized parts. Therefore, the installation of plastic gutters is possible even on old roofs, where it is simply risky to increase the load on the rafters.
- Varied color palette of elements. Even the most budget manufacturers offer their customers a choice of 6-8 colors. If we talk about expensive products, the range of shades is not limited to a dozen items, so you can easily choose a color to match the roofing material or walls of the house.
- Complete tightness of connections. Plastic models of gutters, drains and funnels are connected into a single system more tightly, so leaks occur less frequently.
Polyvinyl chloride gutter components - Full selection of components. The range of elements for assembling a plastic gutter is a paradise for owners of non-standard roofs whose angles are not 90 degrees. This variety allows for many individual configurations.
- Affordable price. According to construction consultants, the price of plastic products is 1.5-2 times lower than that of high-quality metal products.
Important! If you are going to make a drain out of plastic, keep in mind that this material cannot withstand sudden temperature changes and may burst at the first frost. Plastic models cannot be repaired, so the damaged element will need to be replaced. It must be remembered that the device for draining water from plastic involves the use of a rubber seal, which requires periodic replacement.
Installation instructions for the drainage system
Step by step we will look at how to install gutters.
Stage 1. Attaching the brackets
Gutter brackets. (photo No. 5)
We can use metal and plastic brackets. The choice is determined by what the gutter is attached to.
Metal brackets
- if the gutters are attached to the rafters.
How to install them? First, we install the outer elements 15 cm from the end. A gap of at least 2 cm must be provided between the front board and the bracket.
We stretch the cord between the installed brackets. Along it, at a distance of 60 cm from each other, we fix all the other brackets. Important: there should be a slight slope towards the drain. It is optimal if it is 3-4 mm per 1 linear meter.
!
Optimal gutter slope: 3-4 mm per 1 linear meter. This ensures free movement of water towards the drain.
Plastic brackets
can be used if the gutter is attached to the front board. But first we check that it is installed vertically, evenly, without bending. In the same way, you need to double-check the brackets that will be attached to it. The quality of the entire system depends on this.
Like metal ones, we first fix the plastic brackets approximately 15 cm from the end of the gutter. We stretch the twine, along which, using self-tapping screws, we mount all other brackets in increments of 60 cm. It is also important to provide a slope for the natural movement of water towards the pipe.
Stage 2. Installation of gutters
Installation of a gutter. (photo No. 6)
We insert the gutter into the brackets one by one. In this case, you need to press until it clicks.
Stage 3. Attaching the funnel
Funnel fastening. (photo No. 7)
The hole for the funnel must be cut in a solid gutter (installation of a funnel in a fragment of the gutter is not allowed).
The funnel is installed in the right place. We mark its dimensions with a pencil. Then we cut the corresponding hole in the gutter. For this it is convenient to use a bimetallic crown. You need to work at low speeds.
Remove burrs from the edge. We hook the edge to the rear edge of the gutter and place it behind the front edge. A characteristic click will be heard.
The place where the funnel is installed must be strengthened on both sides with brackets.
Stage 4. Installation of metal mesh
The mesh is installed in the hole of the funnel. This is an optional, optional step.
Stage 5. Installation of gutter couplings
When the temperature changes, the plastic elements expand and contract. Therefore, they should not be connected too tightly. On the reverse side of the Alta-Profile coupling there is a special restriction for this purpose with the inscription “Stop”.
We hook the edge of the coupling to the rear edge of the gutter. Then we bring the front edge behind the edge in front. A characteristic click will be heard.
To give the system strength, we install additional brackets on both sides of the coupling.
Stage 6. Installation of the gutter corner
We install the brackets as close to the corners as possible. We insert the edge of one gutter into the corner element, then the second until it clicks.
!
If the angle is greater than 90 degrees, the following solution can be applied. We make a hole in one of the gutters. We insert the second gutter at the desired angle, and close the end with a plug.
An alternative option is to use an adjustable chute angle. The method of application is similar to how we used the universal 90 degree angle. First we insert the gutter, then we adjust the required angle and insert the second gutter until it clicks, but no further than the limiting mark with the inscription “Stop”.
Stage 7. Attaching the plug
Attaching the plug. (photo No. 8)
Inside the plug there are special antennae that firmly fix it to the gutter. With their help we secure the plug.
Stage 8. Installation of the pipe elbow
Pipe elbow. (photo No. 9)
We install the pipe elbows in the direction of the drain, so that the slope angle differs from the vertical position.
Stage 9. Pipe installation
Pipe installation. (photo No. 10)
We insert the upper edge of the pipe into the socket of the elbow. We fix the pipe to the wall using clamps, which we place 180 cm (or less) from each other.
To ensure that the pipes are positioned vertically, you need to make sure that the brackets that hold the gutters are also installed vertically, without deviation.
Only in the lower part can the pipe deviate slightly from the vertical, but in the direction opposite to the wall of the house.
Stage 10. Installation of clamps
We install the upper clamp under the drainpipe elbow.
To do this, we bend part of the clamp and thus open it. Insert the pipe until it clicks and fix it. We snap the clamp and secure it with a self-tapping screw.
Stage 11. Installation of the pipe coupling
To connect two pipes along the length, we use a coupling.
Stage 12. Installation of drain
We install the drain at the bottom of the pipe. We fix it with self-tapping screws.
The work is completed. Now you know how to install a plastic drain. The metal drainage system is installed in a similar way, but with some nuances.
Do-it-yourself gutter installation: step-by-step instructions using the example of a plastic gutter
Initially, a diagram of the drainage system is drawn up, calculations are carried out, and the appropriate material is purchased. Next, the actual installation begins - see the step-by-step instructions below:
- Brackets are installed.
The type of this fastening is selected depending on where it will be attached, to the rafter system or to the wall. When the rafter pitch is more than 50-60 cm, additional elements are attached to the sheathing. Install the fasteners with a slight slope of the center line, about 5 cm per 10 m of the gutter, which will make it possible to subsequently lay the gutter with the required slope to the drain pipe. The distance between the brackets is maintained from 50 to 60 cm.
- Funnels are installed.
Funnels receive water coming from the gutters and send it to the drain pipe. They are attached where the drain risers are attached. They often play the role of connectors for plastic gutters: a hole is cut out at the places where the gutters are attached, its edges are cleaned, and the funnels themselves are placed with glue. It is important to accurately determine the location of the funnel and its size to avoid leakage. After fixing, the funnel is equipped with a mesh for filtering debris.
- Gutters are installed.
Gutters can be in the shape of a rectangle or a circle; fasteners are selected accordingly to their shape. Unused edges are covered with plugs with rubber or silicone seals. If they are not available, you can easily make a seal yourself.
When the funnel is not used to mount the gutters, they can be connected with a special connector - an additional element, which is put on the ends and secured with a locking connection.
- Knees are placed.
It is put on the funnel from below and directs the drain pipe to the wall, where it is secured with special clamps. They consist of two arcs, which are placed on the part on both sides and secured with two bolts at the ends. For a brick wall, you need a clamp with a pin: a hole for the dowel is drilled in the wall, and the pin is inserted into it.
- Risers are being installed.
It is installed to the knee from below and secured with clamps. If the height of the pipe is not enough, a second one is attached to the installed one.
- A drain is installed.
The elbow-like drain is designed to turn the riser in the opposite direction of the wall. It is fixed with glue or attached with a flange to the pipe, the method depends on the design.
The main indicators of correct installation are the strength and reliable operation of the system. Precisely installed elements and complete sealing of the seams can protect your building from water in any weather.
Installation of a metal drainage system
We will not go through the entire algorithm step by step. It is the same as for plastic systems. Let's look at just a few features.
To cut a funnel in the gutter, use metal scissors. Sawing with a grinder can damage the protective layer - as a result, rust will appear and the service life of the gutters will be reduced.
For metal drainage systems we use only metal brackets. The slope of the gutters should be the same as for the plastic system - 4 mm per 1 linear meter. The distance between the brackets and the end edges of the gutters should also be about 15 cm. The installation step of the brackets is 60 cm. At all joints, the system must be reinforced with additional brackets.
Homemade drain pipes made of tin
To make a straight drain pipe from tin, measure a piece of galvanized sheet to the length and width and cut it with scissors along the marked lines.
Using a file, carefully clean the edges from burrs and process them until they are smooth. Along the long side, bend both edges of the sheet in one direction to a width of 10-15 mm.
Sequence of work in the process of creating a straight pipe for a drainage system made of galvanized steel (copper) with your own hands. The main tool is a wooden tinsmith's hammer
A galvanized sheet is tapped on a rigidly fixed pipe of a suitable diameter until it is given a round shape. Then the previously folded edges are placed on top of each other.
Using a wooden hammer and a metal rectangular block, “wrap” the edges into a lock. Carefully tap with a hammer along the seam until a securely pressed joint is obtained. Align the shape of the product on the blank pipe, trying to obtain a cylinder close to an ideal circle.
An example of making a straight drain pipe from galvanized metal sheet. Editing for a round shape is carried out using a regular metal pipe of suitable diameter
Having the skills to manufacture straight drain pipes from galvanized steel, it is not difficult to master the technology for producing inlet funnels and other parts of the system. With the same success, self-taught craftsmen make brackets for metal gutters and for attaching drainpipes.
Here the production technique is quite simple. For the job you will need a bench vice, a hammer, a file, a drill, a tape measure, a pencil and a strip of soft steel with a cross-section of 20x1.5 mm.
This is how they make brackets for metal drainage systems with their own hands. For round gutters and pipes, a metal strip thickness of 1.5 mm is sufficient. For square gutters 3-4 mm
Manufacturing technology of steel (copper) bracket:
- Cut a piece of steel strip 300 mm long.
- File the end parts.
- Step back 10 mm from either end and make a 90º bend.
- Consistently moving the strip and fixing it in a vice, bend it in an arc to the size of the radius of the gutter.
- On the remaining straight part of the strip, drill holes for the clamp and fasteners.
Brackets for drainpipes are made in the same way, but in the form of a clamp consisting of two oval-shaped strips, the curved end edges of which are supplemented with holes for tie bolts.
There are several articles on our website with detailed instructions on making roof gutters, we recommend that you read:
- Do-it-yourself roof gutters: instructions for making your own drainage system
- How to make roof drains: do-it-yourself recommendations for arranging drainage
Rules for installing a drainage system
Plastic drainage system. (photo No. 11)
In order for the drainage system to serve for a long time and efficiently, you must strictly follow the installation rules. Let's focus on a few of them.
1. Select the correct slope of the gutter.
➠ How should it be? 3-5 mm per 1 m of gutter.
If the slope is less or the brackets are not installed level, the system will become clogged and its efficiency will be significantly reduced.
If it is larger, the gutters will be too far away from the edge of the roof and water will not get into them.
2. Select the correct step for installing the brackets.
➠ How should it be? Installation of a plastic drainage system requires that the installation step of the brackets does not exceed 50 cm. For metal drains - 60 cm.
If the distance is greater, the system may become deformed or break due to significant precipitation.
3. Select the correct position of the gutters of the drainage system.
➠ How should it be? Mentally draw a line that continues the roof slope - it should be 2-2.5 cm above the edge of the gutter.
Otherwise, snow sliding from the roof can damage the gutters. Or during heavy rainfall the water will overflow over it.
!
We check the position of the gutters relative to the roof: so that water gets into the gutter, but snow coming off the roofs does not.
4. Carefully check the coupling connection.
➠ How should it be? During installation, efforts must be made to make the system airtight.
If you do not pay attention to this, leaks may occur.
Bending device
Problems may arise during the installation of brackets fixed to the sheathing of the rafter system. These brackets look like long metal strips with a semicircular gutter grip at one end.
Photo of brackets
Why are they difficult to attach?
- The elements must ensure a uniform slope of the gutter along the entire length of the slope; elevations or depressions are strictly prohibited.
- Each roof has a different slope, and the brackets must hold the gutters in a given position. Their upper edges must be strictly horizontal, the gutter must lie on the curved plates with its entire surface. Moreover, the bend angles must be made the same for all elements of one slope. On complex roofs, slopes may have different slopes; the drainage system must take this feature into account.
It is impossible to fulfill the listed conditions for manual bending; it is necessary to use special tools or make a basic device. The tool is bought by professional roofers; ordinary developers do not need it; it is much more profitable to prepare the device yourself.
Step 1. Lay the brackets on a flat surface, the number depends on the total length of the gutter, taking into account the maximum distances between the fixing points.
Brackets unfolded
Step 2. Mark the angle of the gutter. The first bracket is the highest, the last is the lowest. For example, if the length of the slope is five meters, then the difference in length between the first and last bracket is three to four centimeters.
Hook marking
Important. The longer the slope, the less you need to tilt the gutter, but the minimum tilt is 5 mm per linear meter. The fact is that on long slopes the gutter can go so far from the edge of the roof that rainwater will not fall into it. In such situations, two drain funnels should be placed on a long gutter.
Step 3. Draw a line between the extreme points. There will be an oblique line on each strip, but it must be folded in a straight line. To do this, draw a perpendicular one from the bottom point of the oblique line using a rectangle. Repeat the same operations with all brackets.
Step 4. Prepare a flat board approximately 4 cm thick, 30–40 cm long and 15–20 cm wide. Use a cutter to make a groove in the middle part of the board; the width and depth should be 1–2 mm greater than the dimensions of the metal strip of the holders. This is the most difficult part of making the jig, but if you have the right woodworking tools, preparing the board will take no more than five minutes.
Step 5. Cover the groove with metal strips, unnecessary pieces of factory holders will do. Install three or four of them in such a way that the metal part of the bracket easily fits into the gap.
Step 6. Fix the same metal strips on a stationary wooden surface. This can be a work table or any long board used as a temporary support. The device is ready, now you can bend the gutter holders exactly at a given angle and at the required distance.
Board with groove and metal strips
A factory tool costs about five to six thousand rubles; for that kind of money you can make it yourself. The technology for installing metal and plastic drainage systems is almost the same, but there are minor differences caused by the technical characteristics of the materials used to manufacture drainage systems.
Using the fixture
Prices for gutters
Gutters
The huge number of design models is divided into two large groups depending on what material they are made of.
System type Brief description of physical and technological characteristics
| Metal | Such systems can be made from very expensive copper and other non-ferrous alloys or relatively cheap galvanized sheet steel. In all respects, they occupy a leading position and are far ahead of plastic products. The only drawback is the high cost. Because of this, metal drainage systems can only be seen on prestigious houses; they can be installed on religious buildings and used for the reconstruction of historical buildings. |
| Plastic | Cheaper design, has a lot of original design and engineering solutions. Individual elements can be assembled using special locks or glued; each method has its pros and cons. Advantages: speed of assembly and comparative cheapness. Disadvantage: low mechanical strength. |
Wooden drain
We will focus on plastic systems in more detail. These gutters are used much more often than metal ones, have a pleasant appearance, and if the manufacturers' recommendations are followed, they can be used for at least ten years.
Plastic gutters can serve as facade decoration
But such performance properties can be expected only under one condition - the drainage system is manufactured by a well-known company that respects its customers.