Features of the house layout
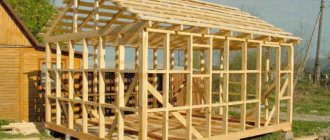
Through the efforts of two men, a cheap house for permanent residence with an attached garage was built. Initially, the project did not include a garage and was added after the house was completed.
finished frame house
attached garage
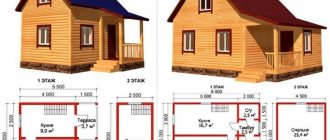
In general, the project changed as the discussion progressed on the advice of other builders and the requests of the wife. The original layout of the house included 6 rooms on two floors.
During construction, it was decided to equip two bathrooms, while on the ground floor the toilet and bathtub should be separate. The area of the living room and the location of the stairs have also changed. Compared to the initial project, the living room was too narrow and elongated. The stairs were also planned to be awkward and steep. After the changes, these shortcomings were eliminated.
house layout 6 by 6
The cost of building a house with your own hands
In May 2010, the father of a small family planned to build a cheap house with his own hands for the amount of 300 thousand rubles. This amount included costs not only for materials, but also for connecting gas and electricity. According to the estimate, the following expenses were incurred:
- Concrete - 20,700.
- Edged and unedged timber - 70,000.
- Foam plastic - 31,200.
- Plywood - 8023.
- Metal profile - 16,200.
- Siding - 22,052.
- Used windows - 4000.
- Nails, screws, etc. - 15,000.
- Delivery of material and excavator services - 5200.
- Septic tank - 10,000.
- Plumbing, radiators - 35,660.
- GKL and finishing costs - 21280.
- Design and installation of a gas pipeline, connection fee - 37,000.
- Gas equipment (stove, boiler) - 29,000.
- Electrical connection with materials - 3000.
- Water supply connection - 2000.
According to the builder himself, the estimate lacks a number of small items. However, this also requires additional costs. It should also be noted that some of the windows were received from friends and did not require financial expenses. In total, 327,315 rubles were spent on the construction of the house without any small details. This amount does not include the attached garage. It was added later according to a separate estimate. Additionally, the construction of the garage required an amount of about 34,000 rubles. Taking into account unspecified expenses, the house cost no more than 400 thousand rubles.
Insulation of ceiling and floor
Next, we insulate the ceiling (aka the floor of the second floor), photo from the second floor. All the insulation was done by hand, there is nothing complicated about it. The fish is already drying here)). In the photo below, you can see the vapor barrier of the ceiling, made before the OSB3 filing
The floor of the second floor of a frame house was insulated very tightly.
Since we do not plan to leave the completion of the second floor until next year, we protect the floor insulation with a membrane so that the cotton wool fibers do not blow out and do not get wet from snow and rain, which can blow into the gables and roof overhangs.
Installation of a shallow strip foundation
The foundation is pre-planned with a width of 35 cm and a height above the ground of 25 cm and 20 cm below the ground. A die-cut section of 2.5x100 mm was chosen as a reinforcing element. The reinforcement of the tape was planned in 2 layers, top and bottom, with three connected sheets of die-cutting in each.
On the advice of experienced builders, vertical elements were added, and the number of sheets to be connected was increased to 5 pieces. Additionally, the height of the foundation above the ground increased and amounted to 45 cm.
reinforcement with die-cutting - you can’t do that!
pseudo-reinforcement
the foundation is ready for pouring
After the foundation was poured into concrete, 20 anchor bolts were installed to install the lower frame.
the foundation is poured
mortgages
mortgages are mounted
Approval of the project to begin construction
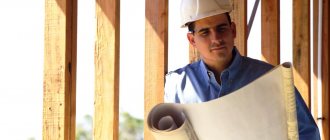
The need to adjust the project. Even if you yourself were able to depict the house of your dreams on paper, you will still need to consult with specialists before starting construction of the house - the opinion of a competent foreman or architect will not be superfluous. At a minimum, the following points will need to be agreed upon:
- Carrying out electrical work;
- Conducting your own sewerage system;
- Carrying out water supply;
It is necessary to understand that all the above issues are not an artistic or architectural part of the project. These are all the most routine issues, a competent approach to solving which is provided only by professionals in their field. As a last resort, any oversight in independently drawing up a house project, which was made by a person who does not have a specialized education, can be corrected by a competent foreman who understands the practical side of any idea much better. Although even if the project is drawn up by professional architects, purely practical shortcomings cannot be ruled out.
Independent work on a house project and its advantages
You can create the design of your house yourself - in order to develop drawings of the relative position of certain rooms, as well as determine the place of the house on the site, you do not need special knowledge. A competent and responsible approach to business will ensure the success of your event. However, in terms of communications, it will be necessary to consult with professionals. This way you can properly plan a house that will serve you faithfully.
Read about the following stages of construction:
Types of foundations used in construction
Which is better to choose a foundation for the soil and type of house
Water supply for a private home
Watch also the video on how to make a house project yourself
Read about the previous stages of construction:
Layout of land for building a house
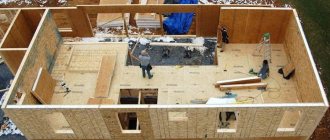
Construction of the first floor
Before installing the walls of the first floor, the platform was installed and insulated and pipes for the sewerage system were laid. The bottom of the platform is left open, the insulation is fixed by means of fixed cuttings of boards. 3 layers of foam plastic, 15 cm thick, were used as platform insulation. The subfloor is made of 150x50 mm boards.
insulation of the platform with foam plastic
subfloor is sewn
The walls were installed in a horizontal position. Foam plastic and 8 mm plywood protection are laid between the racks, and windows are also installed. The windows in the project were used second-hand. Installation of the assembled wall into a vertical position was carried out by two men. It was decided to abandon the installation of jibs in the construction of the walls. The builder assumed that the frame would be sufficiently rigid due to the plywood sheathing.
assembly of frame walls
insulation of external walls with foam plastic
wall frame
windows installed
wall on temporary braces
After assembling the walls of the first floor, the installation of internal partitions was carried out. Polystyrene foam was also used as insulation.
external walls are covered with plywood
assembly of internal walls
interior walls raised
first floor assembled
Frame house construction technologies in video tutorials and reviews
A frame house is a general concept that includes several similar, but significantly different technologies. Explore everything to compare and choose the best one for you.
Features of frame-panel construction
The fastest technology for constructing a residential building is based on the production of individual elements in a factory and subsequent assembly of the building on the site. A team of professionals can complete this type of work within a few days. You can also assemble a designer house with your own hands, strictly following the manufacturer’s instructions.
In this video about the construction of frame houses from SIP panels, you will see all the assembly steps in just a few minutes.
Land owners are wary of SIP panels, considering such houses to be short-lived. The reason for doubt is the construction was too fast and the price was low. However, practice shows that with the right approach, such buildings serve no less than any wooden ones, and living in them is comfortable and safe. Watch a video review of a man who lived in a SIP house for almost two years.
Assembling a frame house in a video tutorial
Frame houses are assembled directly on the construction site. First, the frame is erected, then the sheathing, insulation and finishing of the walls and facade are done. The step-by-step instructions in the video reveal all the secrets of assembling such a frame in a few minutes.
Below is shown in detail the assembly of walls with crossbars using Finnish technology .
And then there is the Scandinavian method of building a house frame.
The structure of frame walls is described in more detail in the following video lesson; this video also touches on floor insulation .
The next stage of insulating a frame house is the ceiling. Here, as a rule, the same thermal insulation materials are used as for walls. Be sure to do a vapor barrier, wind protection and waterproofing - for this there are easy-to-install membranes. It is more practical to choose materials that solve several problems simultaneously.
See instructions for ceiling insulation , taken directly at the construction site.
What is half-timbered timber: review in video
Half-timbered houses look expensive, but building a premium cottage is cheaper than buying an apartment of the same area. A distinctive feature of the technology is the visibility of the frame. A rigid frame can not only be filled with slabs or sandwich panels, but also glazed. Classic designs retain floor projections designed to protect walls from precipitation.
Useful: Internal wall insulation: how effective is it?
Find out how half-timbered frame houses are constructed from the video, study the pros and cons of the technology.
Frame rigidity - expert advice in video
The strength of a frame house depends on the rigidity of the frame . An experienced specialist shares his secrets and best practices in a video tutorial.
Roof of the house - installation and installation of the roof
The roof of the house is made immediately after the frame is assembled. You can choose any shape, but for DIY construction it is better to choose a single-pitch or gable roof. In a house with an attic, a sloping roof is practical. When entrusting the work to builders, it makes sense to look for more original projects.
The basis of the roof is the rafter system and attic cover. These elements must be correctly calculated and installed correctly.
It is recommended to choose lightweight materials for roofing. One of the suitable options is corrugated sheeting - it is easy to install, attractive in price and durable. A roofing materials manufacturer explains in this video how to make a roof simply and inexpensively.
A soft roof also has many advantages. There are different requirements and a different technology for installing and preparing the roof.
The principle of assembling the second floor
After installing the frame, a temporary floor from unedged boards was partially laid and the walls were assembled horizontally and installed vertically. Second-floor windows were also used.
installation of floors
assembly of second floor walls
raised gables
insulation of attic walls
attic walls raised
To increase sound insulation in the interfloor ceiling, non-woven cloth was laid on the floor joists under the boards. This allows you to partially dampen vibration from steps.
backing on joists to reduce vibration
Making the floor in the house
We make a subfloor from pallet boards, mineral wool will lie on these boards, no loads are expected on them, we attach them to the floor joists from below, with self-tapping screws, with gaps so that the insulation in the floor can breathe through ventilation holes in the foundation
During the construction of the frame house, do not forget about the cellar under the floor, it was also slightly trimmed with pallets, pouring crushed stone to the bottom, groundwater is far away from us, so everything is dry.
Connecting the bathroom floor to the wooden floor of the house.
Of course, all subfloor boards and joists must be treated at least against fungus and mold. I did this using a regular sprayer.
Installation of rafters and roofing
Upon completion of the assembly of the walls of the attic floor, the rafter system was installed. The rafter overhangs were not extended. An inch board was used as lathing. The roof was covered with corrugated sheets 4 m long.
rafter system assembly
rafters
profiled sheets on the roof
finished roof
Construction time for a house made of aerated concrete
The construction period consists of the duration of its individual stages:
- foundation installation - can take from 2 weeks to a year (when pouring a strip foundation, it is recommended to wait a year for the concrete to gain strength);
- box – construction of load-bearing walls and partitions – 2-5 weeks;
- roofing work – rafter system + laying of roofing material – 2-6 weeks;
- formation of a warm contour - 3-4 weeks will be spent on installing all windows, doors, flooring and insulation;
- exterior finishing – 3-6 weeks;
- wiring of communications – at least a month, including approval at all levels;
- interior decoration - ad infinitum.
On average, according to user reviews, the construction of a house made of aerated concrete takes 5-6 months. Craftsmen will complete this work faster, from 2 months, depending on the complexity of the project.
The duration of the work is significantly influenced by the complexity of the house design, the degree of mechanization of the work, the experience and number of performers involved in the construction.
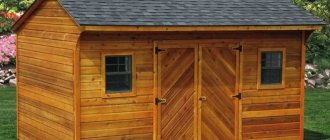
Exterior decoration of the building
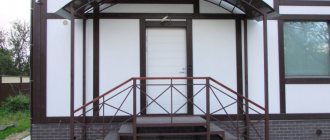
Siding was used for the exterior of the building. It was mounted with a ventilation gap of 25 mm. Also at the stage of exterior finishing, a vestibule was added. The foundation for the vestibule was not installed; the structure was installed on pieces of concrete laid on the ground and sidewalk curbs.
the house is covered with inexpensive siding
facade of a cheap house
built a vestibule
Features of the staircase and its installation
The location of the staircase in the project caused a lot of controversy. Initially, its location suggested excessive emphasis on the attic ceiling. After changing the location and design of the staircase, it was made without a platform with slight turns.
The staircase is made of boards 50x150 mm, the width of the steps is 30 cm. The staircase was installed after the rough finishing of the first floor. Under the upper span there is space left for installing a toilet there. According to personal feelings, the staircase turned out to be comfortable and compact.
DIY staircase to the second floor
the space under the stairs to the second floor is sewn up
installation of railings
ladder
Bottom harness
Construction of a house begins with the bottom frame - a structure made of boards or timber, fixed to the foundation. The purpose of the strapping is to fix the frame to the foundation and become the support of the house. How to properly make a frame from boards on a columnar foundation is described step by step in the video. This option is suitable for a small country house.
For more serious buildings, it is better to make the frame from timber. The following video discusses the installation technology for piles.
Useful: Frame attic
Interior decoration of the house
Before the finishing of the premises began, insulation of the interfloor ceiling and flooring of the second floor were completed. To increase the level of sound insulation, felt is nailed between the joists and floor boards. After this, rough finishing of the interior of both floors of the cheap house was completed.
The rough finishing included three points:
- Installation of fiberboard as a wind barrier.
- GVL installation.
- Puttying joints and chips of GVL.
In the finishing process, water-based paint was predominantly used. The living room, kitchen and bedrooms are painted in different colors. The floors in the rooms are covered with linoleum, the ceilings are decorated with expanded polystyrene tiles.
almost finished staircase
made a hatch into the underground
old sofa
The owner built a homemade cabinet into the wall in the kitchen, and painted the bedrooms different colors.
homemade shelves 1
homemade shelves 2
mounted gas boiler
renovation on the attic floor
the walls are simply painted
It would be better to install the radiator under the window
They didn’t hide the electrical wiring in the hay
another bedroom
interior door
The toilets and bathroom ceiling are lined with plastic panels. The floor and walls in the bathroom are tiled.
budget toilet
the toilet is lined with plastic panels
small sink in the toilet
tiled bath
the space under the bathtub is covered with plastic panels
Cladding and other works
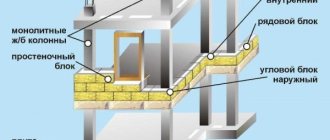
The remaining work on arranging a house made of foam blocks is no different from work in other buildings. The advantage is that you can use ordinary steel tools. Pipes and wires are easy to hide in the wall. The fasteners for door and window frames must fit at least 15 cm into the wall, and the distance between them should be no more than 65 cm. For example, for a single window you will additionally need 2 anchors on the long side.
External cladding should protect the house from the effects of the external environment, especially moisture. Its vapor permeability should be higher than that of foam concrete. The most common options are siding, blockhouse, metal siding. Mineral wool or ecowool is placed in the space of the sheathing, but not polystyrene foam.
The anchor plates must be made of steel with deformation bending and placed horizontally flat. Plastic anchors will become stiff and break after a few years, requiring the entire cladding to be replaced. Also, you should not wall them up in weak foam concrete, as the wall will begin to crack and crumble. The cladding should hang over the base by more than 3 cm. The shelf will become a source of condensation.
A house made of foam blocks will be a budget option for building new housing. The low cost of materials and the possibility of self-construction can reduce the cost per square meter several times.