Repair features
The following types of damage indicate the need for restoration work:
- cracks, crevices;
- subsidence and delamination of the coating;
- vegetation germination;
- swelling and small potholes;
- cracks or dips in corners;
- partial shedding and crumbling.
When examining areas around the house, the boundaries of damage and the causes of destruction are determined. Depending on the type of building materials used, blind areas are:
- concrete;
- tiled;
- cobblestone;
- asphalt.
To eliminate single defects on a concrete surface, building mixtures are used that quickly harden and completely fill the depth of the gap. Cracks are sealed with moisture-resistant foam or special polymer materials. Damaged corners are added and lubricated.
When repairing a tiled blind area, the cracked element is replaced. The old covering is removed, the empty space is covered with sand and new tiles are laid. If a large area is damaged, shotcrete is used. Thanks to this method, all cracks and pores are filled, and strength under stress and deformation increases. A dry mixture of sand and cement is applied to the surface, then it is moistened with water for 2 weeks.
Restoring a strip of cobblestones is done using a hammer and chisel. Deformed stones and crumbled parts are removed from damaged areas. To level the layer, gravel and sand are poured into the recess, compacted, filled with cement mortar and covered with a cleaned round boulder. The resulting seam is hidden using cement laitance. When repairing an asphalt strip, the damaged areas are dismantled to their full depth. The crumbling parts are removed from the pit, the bottom and sides are coated with liquid resin and filled with new asphalt. The new coating should be higher than the old one for better adhesion of the layers. Compact the new layer with a roller until the asphalt stops moving and the prints disappear.
What building materials are suitable for repairing damage?
Today in any supermarket you can see materials for sealing cracks; they are designed to work with various types of surfaces. Both universal mixtures and special ones for external or internal use are sold.
Several of the most used types of putties from different manufacturers:
- Neomid Professional - for eliminating both street and internal damage. This putty is distinguished by its versatility, it is suitable for various materials. The content of reinforcing fibers allows you to work with deep and wide cracks.
- Semin Fibrelastic is a universal putty with increased elasticity, can be used both indoors and outdoors. Withstands significant loads when “breathing” cracks expand and contract, and does not lose its qualities due to changes in temperature and humidity.
- Profix - easy to apply and has plasticity and high adhesion to most materials from which walls are built. The mounting-putty mixture works great outdoors and is suitable for self-repair of small cracks; it can be applied textured.
- Unis Glare-thick-layer is a gypsum putty; manufacturers provide a 15-year guarantee on Unis seams. Used to correct internal defects.
You can prepare a mixture for sealing cracks yourself.
Cement-sand mortar is made at the rate of 3 parts sand to 1 part cement; for large or through gaps in the walls, crushed stone can be added, and for plasticity, add liquid soap in the amount of 30 g per 15 liters of concrete or silicate glue (1 liter per 15 liters of solution) , or PVA (100 g per 15 liters of mixture). The properties of the finished putty can be improved by adding fiber reinforcing fibers and ready-made plasticizers.
It is used for external cracks in brickwork, concrete, and aerated concrete. The advantage of this material can be considered its strength, and the disadvantage is its low elasticity, even in the presence of plasticizing additives; moreover, the finished solution cannot be stored for a long time.
There is no need to make silicone sealant yourself; it is sold ready-made in special tubes and is applied using a glue gun with a thin tip, which is convenient for filling cracks. The advantages of silicone are fast drying and high elasticity of the seam, moisture resistance. Disadvantages include the fragility and softness of the material. Silicone is used inside the home to repair small cracks.
—
Polyurethane foam is used to fill internal voids in cracked structures made of aerated concrete or aerated concrete; its advantage is lightness and excellent thermal insulation. The downside of polyurethane foam is its softness and lack of strength; an additional coating of plaster is required on top.
Why do cracks and cracks appear on the blind area?
During operation, the top layer of the blind area may begin to collapse. This happens due to non-compliance with device technology, the use of low-quality materials, and untimely repair of defects that have formed. Reasons for cracking of the blind area:
- The coating is subject to thermal expansion during freezing and contraction during warm periods. As a result, heaving and movement of the soil occur, and the blind area cracks. Over time, microcracks expand more and more.
- Loose connection of the tape to the foundation. Excess moisture stagnant between the base and the blind area deforms and destroys the foundation.
- Poor compaction of the leveling layer causes soil subsidence.
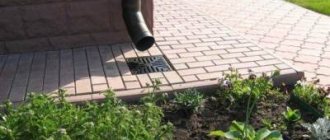
- Absence or incorrect calculation of gutter parameters. Streams of water flowing from the roof create potholes in the covering.
- Overgrowth of mosses and lichens. Plants destroy the leveling layer.
Typical mistakes when constructing blind areas
Arranging a permanent blind area helps keep the building dry and warm, as well as save money on structural repairs. Reducing costs for materials and the wrong choice of installation technology lead to deformation changes on the surface. Errors during construction:
- Width of the structure. A narrow blind area will not provide reliable protection against flooding. For loams of medium heaving, the size of the tape is 1.5 m, for highly heaving and soils with karst - up to 3.0 m. On normal soils, the width of the blind area is 0.8-1.2 m. When the drainage is located above the blind area, its size should be 0.2 m wider than the roof overhang.
- Insufficient thickness of the leveling layer. The leveling layer must be at least 0.3 m. The required thickness is measured after compaction.
- No sand layer. A sand cushion is used to stabilize the base. Laying the covering top layer on the ground without using bedding will lead to sagging of the slabs and the formation of level differences.
- Using fine sand. When forming the leveling layer, it is allowed to fill in coarse sand. It must be clean, sifted, without impurities. The use of a fine fraction will lead to large shrinkages and disruption of waterproofing.
- No slope. The transverse slope in the direction from the wall should be 3-5% for elements made of clay, concrete, asphalt, and 5% for cobblestones and paving slabs.
- Reducing the size along the outer edge. Thin edges of the tape (less than 100 mm) are quickly destroyed by the flow of water. To preserve the coating, drainage trays, boxes with metal gratings or curb paving stones are installed along the outer perimeter.
- No expansion joint. A waterproofing barrier is needed to protect the load-bearing structures of a building from cracking due to temperature changes and differences in shrinkage rates.
- Incorrect concrete mix composition. Violation of the weight ratio and sequence of mixing components leads to the formation of microcracks and cavities. If there is too much crushed stone and water in the solution, the concrete will delaminate.
- The blind area is not insulated. The insulation reduces the impact of low temperatures and protects the foundation from frost heaving of the soil. Freezing and thawing of individual areas occurs at different rates, which leads to distortion and destruction of the protective tape.
- Lack of waterproofing materials. The top finishing layer of the soft blind area does not protect the foundation from the penetration of precipitation. The waterproofing material is laid under the covering with an overlap on the wall of the house.
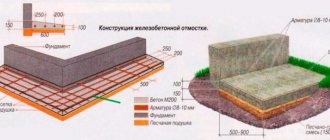
- The concrete strip was not reinforced. The reinforcing mesh gives strength to the concrete layers, since blind areas are movable structures (compression and tension). The lack of material reduces the service life of the blind area and its maintainability.
- Concreting areas without dividing into segments. Over time, solid tapes can tear into separate parts, and the blind area will collapse. Concrete divided into segments will not be damaged by annual soil fluctuations and temperature changes.
- Delamination of a concrete structure. The defect appears due to uneven hardening of the concrete solution or too thick a surface layer. The thickness of the blind area should not exceed 100-150 mm.
- Chips on the corners. Insufficiently compacted sand and a thin layer of gravel (less than 0.1 m) are washed away with water, causing corners to crack and collapse.
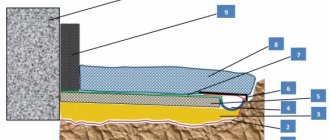
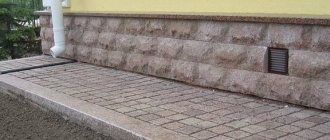
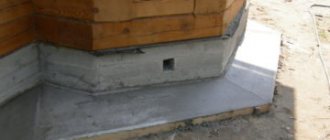
Blind area device
A blind area is a covering around a building with an average width of 80 to 150 cm, protecting the foundation from moisture and freezing . It is built with a certain slope to ensure that rainwater is drained away from the house. According to construction standards, the slope should be 5-10 cm for every meter of the blind area, while the edge adjacent to the wall of the house should be elevated, and the opposite one should be flush with the ground.
When repairing a blind area, lathing for pouring concrete begins from the lowest place, that is, from the point of water drainage.
Then they move to the opposite side of the house, constantly monitoring the level of the slope.
The materials used to construct a protective structure with your own hands are:
- concrete;
- cement;
- artificial and natural stone;
- paving stones;
- asphalt;
- tile.
Blind area device
When is a major overhaul needed?
The protective strip with restoration of more than 25% of the total area requires major repairs. Before starting work, you need to inspect the damaged areas, examine the condition of the base, sections of the tape located near the drainpipes. Major restoration includes the implementation of a large complex of construction work:
- repair or replacement of slabs;
- restoration of the drainage system;
- repair of reinforcement frame;
- restoration or renewal of waterproofing;
- replacing areas with peeling concrete;
- complete replacement of the blind area;
- treatment of cover from vegetation.
What structures can be lifted
For major repairs, only one-story buildings of the following types are raised: made of wooden beams; from rounded and other logs; panel wooden houses. Structures made from timber or hardwood, such as larch and oak, last for quite a long time. There are still houses built before the revolution, which are over 100 years old and have retained their almost original appearance.
Modern wooden buildings are not so durable. The reason for this is the quality of the timber, which became especially susceptible to various diseases after the beginning of the “atomic era” and the ongoing testing of nuclear bombs.
Necessary materials
To carry out DIY repair work, you will need the following tools and materials:
- tools for excavation work (crowbar, pickaxe, shovel);
- bulk materials (sand, clay, crushed stone, cement);
- construction tools (trowel, trowel, hammer, chisel);
- container for preparing the solution;
- components for preparing concrete mortar;
- insulation;
- piece elements for replacement (tiles, paving stones, cobblestones);
- tamping log, construction level.
Minor damage repair technology
minor damage to the blind area
damage to the blind area of the house
Current repairs involve the elimination of small cracks, chips and breaks in concrete. Repair methods depend on the depth of the damage. The technological process involves performing the following actions:
- Cracks up to 1 mm do not destroy the structure. Such defects may disappear during operation of the blind area. If the protective tape is not used as a path, surface cracks are sealed with a primer.
- If the damage depth is 1-3 mm, cracks are filled with a solution of cement and water.
- When peeling, the surface is cleaned, the areas are filled with a composition containing 75% bitumen mastic, 15% asbestos and 10% slag. After sealing, the coating is covered with a layer of sand.
- Crevices from 3 to 30 mm are preliminarily expanded to a cone-shaped shape, primed and filled with concrete. To form a hydroseal, putty is used.
- During delamination and crumbling, problem areas of the structure are removed; the edges are treated with a primer and filled with a solution of water, cement and liquid glass in proportions 1:1. The restored area is covered with film until completely dry.
- Splits with a depth of more than 30 mm are eliminated by pouring concrete.
Methods for eliminating cracks in the house
Different cracks can be fixed in certain ways - you must first determine the level of the problem.
Please note: if the control beacon shows a rapidly expanding crack, then no DIY methods for eliminating cracks will help - they will only have a short-term effect. Be sure to invite specialists to solve the problem, otherwise the consequences will be the most terrible - the collapse of the wall or the entire structure!
How to fix a crack in a house from the inside
If small cracks are found on the wall inside the house, then eliminating them is as easy as shelling pears. All you need is a primer and a special putty mesh. You need to act according to the instructions below:
- we clean the surface of building materials and finishing - the wall should be perfectly clean;
- we use a deep penetration primer (with exactly this marking!) - we cover the entire cleaned surface;
- glue the putty mesh onto the entire prepared surface;
Please note: a special mesh must be used to cover the entire area of damage on the wall - even small sections of cracks should not protrude beyond its boundaries. Apply a small layer of putty to the mesh and leave until completely dry.
Apply a small layer of putty to the mesh and leave until completely dry.
Only after the putty layer has completely dried can you begin to grout the surface and glue wallpaper or other finishing materials.
Repairing a crack in a house from the outside of a wall
If small cracks appear on the outside of the house, you should proceed according to the same principle as in the above option. Procedure:
- the crack site is cleared of plaster or debris;
- apply a layer of deep penetration primer and glue the putty mesh onto it;
- apply putty. But! In case of eliminating cracks on external walls, it is advisable to use a special reinforced putty - it is resistant to the negative effects of atmospheric changes.
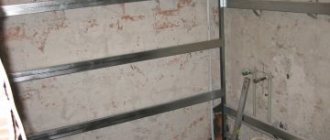
If the cracks on the outside of the walls of the house are not only in the plaster, but also extend to the brickwork, then you will have to put in much more effort. And in this case, the algorithm of actions will be as follows:
- the plaster is completely removed from the wall;
- a special metal mesh for plaster is screwed to the wall - this is done using bolts;
- a new layer of cement-sand mortar is applied to the mesh - the plaster must completely correspond to the thickness of the old layer, there should be no differences.
Please note: the metal mesh must cover the entire surface intended for applying a new layer of plaster. This way, the new plaster will not spread, which will allow you to flawlessly apply finishing materials.
DIY blind area repair
Restoration work is carried out in spring or early autumn. First of all, large defects that have reached the very foundation are eliminated.
Step-by-step instruction
Repair of severe damage begins after removing contaminants from the surface.
- If the blind area has moved away from the building, but the integrity of the coating has not been compromised, the empty space is expanded, and the base is treated with bitumen mastic. In case of large peeling, the depression is sealed with concrete, small cracks - with cement mortar.
- If the structure peels off and its edges are completely destroyed, repairs begin with finishing the base. The plaster is removed from the base and the cleaned area is dried. To protect against dampness and fungi, an antiseptic is applied. The basement is insulated and plastered. On the blind area, all peelings and collapsed parts are knocked down. The pit is filled with fill materials; When repairing large areas, a mesh of reinforcement is laid and filled with cement mortar.
- Repairing chips at corners begins with setting marks. The crumbling concrete is beaten with a hammer, and crushed stone or gravel is poured into the recess. To increase strength, a thick metal mesh is laid on the bedding. Half the area is filled with concrete, metal corners are installed along the edges and completely filled with mortar.
- If the blind area fails, the edges of the tape are broken down to a solid base and bedding is added. The broken edges are washed and treated with sand-cement mortar. Lay a layer of concrete and level it.
- When completely replacing the blind area, old materials are removed along the entire perimeter. 0.2 m of clay is laid at the bottom of the trench; everything is compacted. Layers of 0.1 m of sand and gravel are poured on top; put insulation and mesh. The formwork is being constructed; Using pegs and thread, the slope is marked. Crushed stone is poured along the markings (at an angle). The surface is poured with concrete.
Making a blind area without tilting to the outer perimeter
Rainwater can stagnate on flat surfaces. This causes damage to traditional cement surfaces and artificial stone.
And from the looks of it, she should be allowed to leave the area in peace. A slight slope of a few degrees away from the house allows water to drain naturally.
Spring melting of snow and night freezing of puddles leads to the formation of small cracks, and then to deeper cracks. We are talking about physics. As you know, water expands when it thaws.