A cellar at the dacha is a necessary element of arranging a garden plot, intended for storing the grown crop. In order for agricultural products to remain fresh for as long as possible, the optimal temperature and humidity conditions must be maintained in the room. This article will tell you how to make a cellar with your own hands and equip it with everything you need.
Types of cellars
Storage for supplies is organized taking into account the conditions of the site. The main task during construction is to protect the structure from groundwater and high water, so it is recommended to choose the highest place and use a construction option that provides better insulation from soil moisture.
Ground
Building a cellar on the surface of the ground is the best choice for a summer house located near a reservoir or on clay soils. As a rule, there is a high groundwater level and accumulation of water when snow melts.
Types of above-ground cellars:
- free-standing bulk;
- wall-mounted, adjacent to an existing building.
Features of the construction of above-ground storage:
- The pit is deepened no more than 50 cm.
- To prevent moisture from penetrating through the floor, a crushed stone-sand mixture is laid on the bottom, compacted, filled with bitumen, or rolled waterproofing materials are laid.
- The walls are erected from materials that can resist rotting - bricks, blocks, wood treated with antiseptics.
- The structures are protected with waterproofing from the outside and inside, gluing it in 2 layers.
- The necessary thermal insulation is provided by multi-layer insulation with clay, expanded polystyrene, expanded clay and a layer of earth 0.7-1.2 m thick.
- The structure is given the shape of a hill, which is most resistant to erosion during rains and floods.
- To enter the storage room, an insulated door is installed on the north side for minimal heating in summer.
Wall-mounted
This is the most economical and simple solution for high groundwater levels in the country. The cellar does not need to be deepened, and the walls of the house or barn act as a ready-made external structure.
Features of the technology for constructing wall storage:
- The pit is dug to a depth of no more than 0.5 m. In the immediate vicinity of the building, the soil near the foundation of the main building must not be weakened or loosened. This causes uneven deformation of the soil under the sole and provokes the formation of cracks in the structures of the house.
- Floors are made on a preparation made of sand, crushed stone, broken brick, which provides drainage and reduces the level of melt or rain water.
- The walls are laid out from rot-resistant foam blocks, bricks, or a wooden frame is constructed, filling the internal space between the sheathing with a heat insulator.
- The wall building is insulated with synthetic materials with additional earthen embankment. If you line the outside of the cellar with decorative finishing, it will not spoil the modern appearance of the country house.
Zemlyanoy
It is advisable to build a cellar completely buried in the ground at a low ground level, when the water does not rise above -3 m.
Features of underground structures:
- During construction, you need to select a sufficiently large volume of land.
- It is necessary to reinforce the masonry walls from blocks or bricks so that the structures do not lose stability under lateral soil pressure.
- Reliable thermal insulation of a buried building is created by a layer of earth.
- Even with low groundwater levels, it is advisable to provide drainage to protect against seasonal precipitation and melt water.
- To enter the basement, an insulated hatch and ladder are installed.
- Particular attention is required to the organization of a ventilation system, which, in addition to reducing air humidity, cleans it of harmful gases.
Semi-recessed
This type of storage differs from the above-ground storage depth - the structure is immersed in the ground to half or a third of its height. Free-standing cellars are covered with earth, built-in undergrounds are placed under the house or in the basement.
The semi-buried building combines two types of cellars—ground and earthen. Characterized by features:
- Unlike a completely buried basement, the volume of excavation work is smaller, but reliable insulation of the upper part is required.
- When laying a pit, the groundwater level should not be closer than 0.5 m to prevent the penetration of water due to capillary suction from the soil.
- To protect against accidental runoff, install drainage
- To enter, a door is installed at ground level and a staircase is installed.
Caisson
The most reliable cellar at high groundwater levels is a caisson. The design of the metal or plastic box has no joints from where water could leak inside.
The caisson is immersed in a pit and secured with anchors that prevent it from floating up when the groundwater level rises. A pump is installed to pump out excess liquid from under the bottom. The construction of such a storage facility is more expensive than traditional methods of constructing cellars, but the design has a very high degree of protection from moisture.
When do you need an underground cellar?
In-depth cellars are located entirely underground, so the composition of the soil (only clayey ones are suitable here) and the groundwater level (permissible depth - at least 2-2.5 meters) are of great importance for their construction. In a damp area with a close groundwater level and high water with a buried pit, you won’t have any troubles and will be exhausted in pumping out water - it will be right to choose above-ground structures.
ChapelenForumHouse Member
I have a cellar in the Moscow region under the kitchen floor 80 cm deep. It floods halfway during long rains and melting snow in winters with little snow. No amount of sealing helps.
The simplest option for a buried cellar is a structure with earthen walls and an adobe floor. The height from the base to the ceiling should be 1.8 m. It is allowed to add soil to raise the bottom.
The walls of the pit should not be strictly vertical, but inclined at a slight angle, then they will not crumble.
To protect against capillary moisture, it is recommended to pour a five-centimeter layer of crushed stone impregnated with hot bitumen on the bottom, and then make an adobe floor on top (about 10 cm) with the addition of small crushed stone.
Andrey506FORUMHOUSE user
Moist air always comes from the ground; moisture condenses on the cold parts of the underground. With all the ensuing consequences (dampness, mold, mildew, etc.).
How such a structure is made can be seen in the diagram.
The cellar is covered with a ceiling, insulated and covered with earth. Previously, a cellar was always placed on the pit - a building in the form of an insulated gable roof. There you can organize temporary summer storage of supplies and keep gardening tools, materials, etc. there.
In hard soils, earthen walls are sufficient for long-term use without any problems. This is a great option for a summer residence. If the soil is weak, then the walls need to be strengthened - in the Russian burial tradition, logs were used for this, now the walls are increasingly reinforced with concrete or red brick. An excellent cheap option for strengthening the walls of a cellar in a country house is sheets of used slate.
How to choose the right place
A cellar is an engineering structure, the construction of which must be approached responsibly. It is permissible to locate underground storage facilities on the site in accordance with SNiP 30-02-97, which provides recommendations on safe distances from sources of pollution:
- toilet with cesspool - 12 m;
- barn for livestock - 12 m;
- compost heap - 8 m;
- bathhouse, sauna or summer shower - 8 m.
If the dacha plot is not overloaded with buildings, the cellar is located at the highest point of the relief without any restrictions. To avoid unforeseen difficulties during operation, experienced summer residents advise:
- Underground storage facilities should be built no closer than 7 m to a private house - a source of heat transmitted through the ground.
- Take into account the location of potentially dangerous objects not only on your site, but also on neighboring ones.
- If you draw a diagram in advance and indicate the distances, choosing the optimal location for the cellar will be much easier.
How to arrange storage for vegetables in your home for the winter
This is what it looked like:
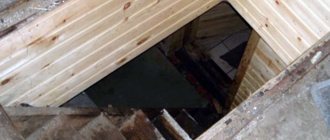
Well, in the end we had to go deeper by 50 cm, because when I marked the stairs and there were floor joists, it was clear that when descending we would rest our heads on the floor. Which wasn't very good. I think it’s better to do it well right away than to remember later - oh, it would be better to spend 1 hour of time and go deeper. In general, I immediately went deep...
You can lay the ceiling of the cellar, which in our case is the floors of the house. On the logs, as you remember, the timber is one hundred by two hundred. At 6 meters wide, there were 4 support points. From left to right - one on the plinth, the other on the beam, then the cellar span, and again on the beam, and at the end there is the floor beam of the right side of the house.
At first I thought that the span for a beam of 100 by 200 in the cellar area would be critically large (it turned out to be around 2.5 meters), but after reading the literature, for it, in principle, there will be no deflection at the points between the supports up to 4 meters. And if we are talking about covering, for example, a non-residential attic, then 6 meters can be done. But of course, I don’t see the point in doing everything to the hilt, so it’s better to have a good supply.
By the way! In reserve...
Even the ceiling of the second floor, a span of 6 meters, was decided to be covered with iron T-beams, which completely covered the entire house (the length is 10 meters. The load-bearing one divides the house in the area of 6 by 4 meters. That is, the tee lay on 3 points - a load-bearing wall, wall). By the way, this was visible in the video. And on the right, red pipes serve as a load-bearing wall, which supports the armored belt from above, along the entire perimeter, and from below there are pillars on a solid strip foundation.
Then it’s sewn up on both sides with plaster and that’s it. In fact, the T-beams on top were needed for a number of reasons. The first of which - the span turned out to be a little more than 6 meters, under the old house (after all, there was a house in this part), and the second - the top is also planned for residential use, and the extra vibrations from the tree for such a span will actually be critical.
In simple words, if the spans are 6 meters or more, then covering it with wood is worth thinking about. This can be critical. These are not the moments on which you need to save.
Okay, I’m moving away from the topic, and I propose to return to the construction of the cellar...
It is important here that the overlap is almost even. All the lags turned out to be zero. The error at 10 meters is literally 5 millimeters. Further work will depend on how smoothly the base is made. It can be either a lot or a little. For example, it will be possible to lay the main floors much faster if the ceiling is even. After all, you won’t have to plan or adjust anything.
I think it’s important that everything comes together like a kit, without any unnecessary work later...
To lay the logs evenly, 3 logs were laid along the edges - at the beginning and at the end, and then threads were stretched from each edge. Left, middle, and right. In any case, the beam will be crooked, and it will have to be planed somewhere.
The logs were brought in, all the wood was brought in - for the floors and ceilings. You can overlap!
The summer evening ended with barbecue. Please come to the table!
What to pay attention to when the groundwater level is high
High groundwater level is the main enemy of underground structures. Determine the depth of groundwater in the following ways:
- drilling a hole to a depth of 3 m;
- according to information from neighbors;
- in organizations engaged in hydrogeological research;
- observation of growing moisture-loving plants.
The latter method, although related to folk methods, is confirmed by botanical science. Willow and alder love water the most. Where they grow luxuriantly, the groundwater level lies no further than 1 m. Cultivated species of apple or plum trees do poorly on such soils and often get sick.
Building a simple cellar of 12 m2: materials and calculations
First, we will justify the choice of this particular cellar option. Pros of choice:
- Available for those who cannot afford to allocate extra meters of land for a non-functional mound.
- A “two-in-one” construction project – a cellar for workpieces and an above-ground building that can be used as a change house, barn or summer kitchen.
- If thieves raid a garden, it is not so easy to guess that there is a cellar with supplies under the building.
- Double protection, both the shed and the manhole cover are locked.
- Relatively cheap, costs are minimal, as it is built from the most inexpensive materials.
This list goes on; every gardener will find his own advantages of using such a cellar.
A simple version of the cellar is not difficult to make with your own hands, based on step-by-step instructions. It displays the general principles of constructing an underground structure. The main thing is to understand what mistakes should not be made.
The most common of them:
- Ignoring the installation of the ventilation system.
- Incorrect installation of electrical equipment.
- Poorly done markings.
- Errors in designing the depth of the cellar, incorrect calculation of the groundwater level.
- Poor waterproofing.
How many bricks you need for a cellar of 12 m2 can be calculated using a special online calculator by entering the necessary parameters.
Pit
The size of the cellar is 3 * 4 with a depth of 2 m with a groundwater level of 6 m. A hole is dug under it with the same parameters plus 20 cm on each side for maneuver and arrangement of a clay castle. It is better to immediately sort the sand into separate piles and the clay separately; they will be useful in the future in construction.
It is curious that according to SNiP 12-04-2002 , it is prohibited to work manually with loose soil. Therefore, it is better not to take risks and entrust this matter to an excavator.
First, markings are made on the ground with pegs and a rope; this will allow you to accurately maintain the dimensions of the hole and the evenness of its configuration. Next, a hole is dug and left for a day or two. This time is needed to monitor the behavior of the soil and water pressure. It is possible that the backwater will be significant and after 2 days the pit will slide and collapse. If there is even a small amount of water at the bottom, the hole is buried and the cellar is designed in another place.
Foundation installation
It is not recommended to build a cellar without a foundation. After the pit has been checked, crushed stone is placed on the bottom, compacted and filled with hot bitumen - the layer must be at least 5 cm. This is necessary to exclude capillary moisture. Next, an adobe floor is made with the addition of crushed brick or crushed stone; it should be at least 10 cm thick.
You can read how to calculate the proportions of concrete for the foundation HERE .
Another option is to lay 10-15 cm of drainage (crushed stone) over the sand, soft clay is placed on it, and there should be a reinforced tape on top for strength. All this is poured with concrete at a depth of 8-10 cm. This creates a reliable moisture-resistant foundation.
After 24-30 hours, install waterproofing (roll, self-leveling) and pour concrete to a depth of 10-15 cm.
Note! If the ground is heaving, it is better to make the masonry the width of the brick.
With dry soil, 2/3 consisting of sand and the absence of water, there will be no heaving, so the masonry can be done in half a brick.
Between the brick base and the earthen wall you need to leave 20 cm of free space for waterproofing. The height of the foundation also does not need to be filled in much, 15-20 cm is enough.
We buy bricks
For a cellar measuring 3*4 m, you will need 1,200 bricks (red, solid). These are 3 pallets of 400 pcs. 8.3 rubles per piece.
The amount of costs is almost 10,000 rubles. In terms of weight, the entire batch weighed 4.5 tons, so it makes sense to purchase all the large and heavy materials and deliver them at once if the car is hired.
The list included:
- Sewer pipes (2 pcs.) for ventilation.
- Ladder.
- Sand in bags (2 pcs.).
- Cement (5 bags).
- Ruberoid - roll.
The first expenses cost about 17,000 - 18,000 rubles. Plus - ordering a five-ton truck, prices vary from 3,000 to 6,000 rubles.
Waterproofing walls
Good waterproofing is expensive, it is a wall painted with bitumen mastic with laying of roofing material and laying clay. This, in the language of professionals, is called a “clay castle”, 20 cm wide.
This is a mandatory stage in the construction of a cellar. If condensation, dampness, or water appears on the floor during operation, this indicates poor waterproofing of the foundation and walls. Correcting errors is difficult and costly.
Of the traditional types used: roll, membrane, coating, all of them belong to barrier types of waterproofing. But they are short-lived and are damaged by soil movement or penetration of tree roots.
The highest quality option is penetrating waterproofing; it fills all the cracks and pores in the walls. It is applied from inside the cellar, forms a dense, waterproof layer in the form of a gel in brickwork, and gradually crystallizes in concrete.
If the pit is dry, then you can buy regular black double film of 150 microns. Two 50 m spools cost 1,200 rubles, a total of 1.5 spools were spent on the cellar. The film is overlapped by 10 cm and coated with bitumen mastic, it took 13 liters. (600-700 rub.).
Mortar and sand
If there is no difference between purchased sand and sand dug from the site, it is better to use “native” sand. To make the cement mixture plastic, use the usual “Fairy”, 2 bottles; store-bought plasticizers are much more expensive, but the result is the same.
To mix the mortar, it is better to rent a mini-concrete mixer; it is more convenient to work with than mixing by hand or using a hammer drill with an attachment. The cement-sand proportions are taken according to the standards (see table), water is added as needed, the solution should be plastic and not flow.
Table with mortar proportions for bricklaying
| Brand of mixture | Cement brand | Proportions of dry ingredients | ||
| cement | : | sand | ||
| 25 | 300 | 1 | : | 9,5 |
| 50 | 300 | 1 | : | 5,8 |
| 50 | 400 | 1 | : | 7,4 |
| 75 | 300 | 1 | : | 4,2 |
| 75 | 400 | 1 | : | 5,4 |
| 75 | 500 | 1 | : | 6,7 |
| 100 | 300 | 1 | : | 3,4 |
| 100 | 400 | 1 | : | 4,3 |
| 100 | 500 | 1 | : | 5,3 |
| 150 | 300 | 1 | : | 2,8 |
| 150 | 400 | 1 | : | 3,25 |
| 150 | 500 | 1 | : | 3,9 |
We build walls
It is better to lay them slowly, let each level of 25 cm dry and then throw clay into the gap and compact it tightly so that the earth along the contour of the cellar does not sag. The evenness of the walls is checked by the building level; it is considered “indestructible” and extremely accurate “Capro” (price up to 2,000 rubles per 60 cm).
The inside of the walls must be reinforced with cement-sand mortar prepared in a 1:1 ratio. Whiten the surface with lime, adding copper sulfate.
Video
Possible mistakes in brickwork and how to avoid them.
A barn is used as a cellar roof
The optimal solution is to build a frame shed over the pit. Along the four-meter walls, 2 beams, 200*200 mm, 6 m each, are placed. The third beam, 200*150 mm, 6 m, is laid in the center of the cellar. Their ends are thickly coated with an antiseptic, then with bitumen and wrapped with roofing felt in places where they will come into contact with the brick (waterproofing).
First, in the center of the cellar you need to make a hole 50 cm deep, cover it with black film and fill it 20 cm with cement. A transverse iron pipe with a plate welded on top is mounted into it and installed under the central beam. As soon as 20 cm of the solution dries, another 20 cm is added. Plus, you have to buy 3 more bags of dry cement mixture.
After the solution hardens, the middle transverse beam and the iron plate are fastened with self-tapping screws.
Vertical beam:
- On the rear beam – 3 pcs. 1.7 m each.
- On the central one - 3 pcs. 1.75 m each.
- On the front – 4 pcs. 1.80 m each (two of them are door).
The top trim on both sides is made of 150*150 mm timber. 4 m each.
Further, when constructing the walls of the barn, options are possible - you can take “inch” boards, you can use OSB or a metal profile. Roof - corrugated sheet.
It is optimal to take “fifty” (5 cm) as floorboards. Don’t forget to install a hatch in the floor through which you can get into the cellar.
You can read more about building a frame shed on your own HERE .
Staircase: construction technology
You can make the stairs to the cellar yourself, but it is preferable to order them. It is built with wide steps to make ascent or descent safe.
Optimal sizes:
- The height of the steps is no more than 200 mm.
- The optimal width is from 0.6 to 1 m.
- Tread no more than 100 mm.
- Passage height 2 m.
- The slope is approximately 30-45 degrees.
If the entrance is made of a side type, then brick, concrete, and cinder blocks are used for the stairs. They are laid on dense soil dug in advance at a slope. Be sure to make a railing.
If the entrance is made horizontally, then it would be more practical to install a metal or wooden staircase without risers. The angle of inclination here will be 60-70 degrees, so railings are also needed. To make the ascent easy, make a goose step staircase.
Ventilation pipes
Two pipes are installed at opposite ends of the cellar, one 20 cm above the floor, the other in the semi-ceiling of the barn with access to the street through the wall.
Assembling the structure is not difficult, just insert the pipes into each other and secure them to the walls with clamps.
“Mushrooms” are placed on top of each pipe to prevent rain and snow from getting into the pipe. You can equip the inside with dampers to regulate the flow and exhaust of air.
Video: how natural ventilation works
How to insulate a cellar roof
The roof, also known as the floor of the barn, is insulated with stone wool (2 packs for 1,500 rubles) plus a vapor barrier of 35 m2 (about 500 rubles). First, a vapor barrier is installed, then insulation; the main thing is to seal all the cracks in the floor with polyurethane foam, especially around the ventilation pipes. Don't forget to insulate the hatch too.
Construction of the pit
Excavation work is carried out in dry weather in the middle or end of summer, when the groundwater level reaches its lowest level. The minimum pit area is 8 m. An underground cellar is dug below the freezing level in a particular area. The optimal depth is 1.8-2.5 m.
If the soil holds its shape well, a hole is dug according to the size of the cellar. As a rule, the area of the structure does not exceed 6-18 m². If the walls are prone to crumbling, the pit is made wider and the side slopes are strengthened with shields with spacers.
A small cellar is dug by hand, loading soil into buckets and pulling it up. If the volume of excavation work is considerable, it is advisable to use an excavator, and after excavating the bulk of the soil, finish the last half meter with a shovel.
Interior arrangement
The door in the cellar can be made in the form of a hatch or an ordinary door. The staircase can be simple wooden, you can use a stepladder. If desired, concrete steps can be poured at the floor construction stage. But this is a rather labor-intensive process. The staircase can also be assembled from wood impregnated with an antiseptic.
The door must be insulated. It is done on the north side of the cellar, if possible. Thanks to this location, food can be stored here in the summer. The storage room will be cool even in hot weather.
There must be light in the cellar. Electrical work is carried out in an open way. You need to choose wires with high-quality insulation. It is best to give preference to self-extinguishing wires. You can install a motion sensor. In this case, the light will turn on automatically when you enter the storage room.
Construction of the foundation
It is simply impossible to support walls made of brick or concrete on the bottom of the pit. The foundation is prepared in two ways - pouring a monolithic strip foundation or slab.
On dry, dense soils with low groundwater level, it is enough to dig a groove measuring 20x30 cm around the perimeter of the cellar, pour a 10 cm layer of sand on the bottom, lay frames made of reinforcement with a diameter of 10 mm and fill it with concrete. After hardening, they begin laying the walls.
The foundation slab provides good waterproofing of the cellar floor in water-saturated soils. To install it, a cushion of sand and crushed stone is prepared at the bottom of the pit, thoroughly compacted, and thin concrete 50-100 mm thick is laid. After hardening, pour hot bitumen and glue 2 layers of roofing felt. A reinforcing mesh is installed and the top is concreted with a mortar of at least M250 grade.
Construction of a horse cellar
The cost of this design is quite low compared to the underground option. And it’s more convenient to use such storage - it is equipped with a regular door, and you won’t have to climb down the stairs. However, maintaining the optimal temperature without going deep into the ground is not easy. For this purpose, a special building design is provided.
Types of horse cellars
By type, horse cellars are divided into:
- storage sheds with embankment : simple structures made of boards or logs, reminiscent of a hut; to maintain a comfortable temperature, such buildings are covered with a sufficiently large layer of earth on top
- a horse cellar without embankment: its design is similar to that of a conventional outbuilding; To maintain a comfortable temperature, the walls of such a building are made double with a layer of thermal insulation laid between them
Types of cellars with bunds
Construction of a cellar with embankment
Unlike a deep-seated cellar, most of the upper cellar rises above the surface. To maintain the required temperature in the room, it will require additional thermal insulation.
1Such a structure is erected in the form of a hut, the roof of which rests on strong supports made of logs.
2At the first stage, a pit with a depth of 0.5-0.6 m is prepared. The excavated soil is left nearby - it will be useful for embanking. The floors are covered with crushed stone and compacted tightly. A clay castle is placed on top (more on this below).
3When choosing soil from a pit, it is better to immediately cut a staircase of several steps from the soil. Subsequently, it is finished with reinforced concrete, brick or a wide, durable board. It is advisable to install steel corners into the edges of concrete steps to prevent concrete from spilling out.
4Supports for the ceiling are installed in advance. To protect the tree from moisture, part of the logs that will go deeper into the ground are covered with bitumen or fired.
5After digging the log supports into the ground to a depth of 50-60 cm, they are tied at the top with long poles.
6At the stage of wall construction, it is necessary to take care of ventilation. The principle of its design is similar to ventilation installed in deep cellars. The exhaust duct is installed near the ceiling, and the supply duct is installed on the opposite wall just above the floor.
7The wall is sheathed at the end with two rows of boards, coated twice with bitumen and sandwiched with a layer of roofing material.
8The roof ridge is prepared from edged boards of sufficient thickness, covered with roofing felt. All cracks are caulked with moss.
9The ceiling covering must be as strong as possible so that it can withstand the earthen embankment. Do not forget that in addition to the pressure of the soil layer, the roof will also be subject to a significant snow load in winter.
10The entrance must be equipped with a small vestibule, which serves as additional protection against heat loss. The door leading to the vegetable storage area is carefully insulated.
11To drain water around such a storage facility, a ditch 0.5 m deep is made. Along the perimeter of the cellar, a blind area 1 m wide is also provided with a slope from the cellar.
If the water passes close to the surface of the earth, an above-ground cellar can be built on an area with topping.
Embankment
Preparatory process before bunding
1The earthen backfill (embankment) must reliably retain cold in summer and heat in winter. Its optimal thickness is 35-45 cm.
2Before bunding, the ceiling is covered with a 5-centimeter layer of clay-straw mixture. A thick film of polyethylene or roofing felt is laid on top of it.
3The soil, especially in the upper part of the floor, may settle over time. To avoid the need for additional embankment, it is necessary to provide a special fence to protect against soil sliding along the slopes.
4To strengthen the embankment, it must be immediately covered with turf or sown with low-growing grass, for example, lawn grass. The intertwined roots of the plants will prevent the soil from sliding down.
Ready storage
Like any other building, a horse cellar can be made visually attractive by decorating it to your liking. The design of the site will only benefit from this.
The main stages of building a cellar without embanking walls
Full-walled horse cellars take up too much space on the site. In recent years, land owners have found another solution. Instead of embankment, they began to build cellars with double walls.
Outwardly, they look like ordinary buildings. However, due to the massive walls lined with insulation, such a storage shed maintains a comfortable temperature for vegetables.
In the literature it is recommended to insulate the space between the walls with polystyrene foam, sawdust or expanded clay.
Building without embankment
Only the one- or two-slope roof of such a vegetable storage facility is insulated with earth using embankments . The thickness of the layer of backfilled soil is up to half a meter. Just as in the previous case, a vestibule is provided in such a storage shed.
The door leading to the storage room is carefully insulated.
When constructing such a vegetable storage facility:
1The earth is removed to a depth of 0.5 m.
2The floors are covered with crushed stone, covered with bitumen, and then a clay castle is prepared.
3Bricks are sunk into wet clay so that a minimum gap is formed between them.
4The lower part of the walls is also laid out with bricks. The masonry should rise above the surface to the height of the spade bayonet. Sand, clay and lime are used as masonry mortar. Its proportions are 3:1:0.3. Double walls can be made entirely of brick or stone.
5The ceiling and walls are sheathed with 2 rows of thick-walled 40- or 50-mm boards, and earth is poured into the space between them and compacted tightly.
6The walls are coated with bitumen twice. A layer of roofing material is fixed on top of them.
7The roof can be single or gable. Before backfilling, it is covered with roofing felt.
8 Ventilation must be provided in the cellar.
9A drainage ditch is laid around the cellar.
Semi-buried cellar
Such a structure goes into the ground to a depth of about a meter with a wall height of about 2 m. The entrance is through the vestibule, and the door is located at the same level with the ground. The second, insulated door provides passage directly into the cellar, where you go down the stairs.
Such structures are erected in areas where the groundwater level is no more than 1.5-2 m.
Semi-buried cellar
The procedure for performing the work is in many ways similar to the stages of building an above-ground cellar:
1To create a layer of thermal insulation, the roof of the building and the upper part of the walls rising above the surface are also covered with earth.
2The overlap is made from a slab aligned on the sides, which is covered with clay. Roofing material glued with hot bitumen is laid on top.
The walls are built from brick and concrete. It is not advisable to use cinder concrete in wet areas - it will quickly become unusable.
Cellar made of reinforced concrete rings
The maximum diameter of reinforced concrete rings is 2-2.5 m, so with their help you can build only a small vegetable storage. But for a small family such a room will be quite enough.
1To build a cellar, 2-3 rings will be enough, which are placed one on top of the other in the pit. The height of the rings can vary - it can be equal to 0.4 and 0.6 m, and higher ones are made with a height of 0.8 and 1 m. From these, 2-3 rings of the required height are selected so that after the construction of the storage facility an adult person will be in it was able to stand up to his full height, and there was little space left above his head.
2It is better to buy rings that have locks. Such a connection will be stronger, plus it will be easier to seal. It is also better to buy a ready-made cover made of reinforced concrete with a manhole.
3Before immersing the rings in the pit for waterproofing, they are treated twice on the outside with bitumen.
4To install them, it is better to use a loader or winch.
5After lowering the rings into the pit, all joints are coated with concrete and then waterproofed with bitumen mastic.
6Another option is gradual excavation of soil under the rings. After removing the earth, they will gradually sink down under their own weight.
7If groundwater is close, it is better to purchase one lower ring with a bottom or concrete the floor, having first filled and compacted a clay castle at the bottom of the pit to cover the perimeter of the walls.
8 A hole is prepared in the well cover for the ventilation pipes to come out.
9It would be wiser to make a small cellar above the storage - it will protect it from extreme heat and winds.
10To drain water around the perimeter of the cellar, a drainage is prepared - a ditch 0.4 m deep, filled with crushed stone.
Sealing joints in a concrete cellar
If groundwater passes close, a cellar made of concrete rings can be made shallow. That is, bury only part of the rings in the ground. The top and side walls of the storage facility, as in the case of high cellars, are covered with soil (banked).
Cellar in the garage. Built to last!
How to make a cellar in a private house or country house with your own hands: diagrams, step-by-step guide, proper ventilation (55+ Photos & Videos) + Reviews
Construction of walls
Wall materials are selected from the range available in a particular area. The most suitable materials for the construction of underground cellars are clay bricks, prefabricated or monolithic concrete, rubble stone, and concrete rings. Do not use fillers or structures with large pores that freeze due to high water absorption.
For above-ground storage facilities, blocks of foam, gas or slag concrete with low thermal conductivity are used. It is not recommended to use sand-lime brick. It is unstable to moisture and does not retain heat well.
Walls made from piece materials are laid with bandaged seams and must be reinforced. Monolithic structures are poured into panel formwork, after placing steel frames there.
Planning stage
At the initial stage, you need to determine what kind of cellar you need. It can be underground, above ground or semi-buried. It is important to know what kind of soil is on your site and how close groundwater can come to the surface. If in the spring they are almost at the surface, you need to build a ground cellar. Some owners will find a semi-recessed design suitable.
Therefore, the construction of a cellar begins with exploration work. Having determined what type of soil is on your site and how deep the groundwater lies, you can decide on the type of storage facility to choose. If there is a possibility of the building being flooded in the spring, it is better to build the cellar on a natural hill. If there is no hill on the site, you can make it yourself.
If the groundwater is deep, you can build an underground cellar. The storage can be built under the garage or under the house. It is important to assess the type of soil on the site. The choice of waterproofing and insulation depends on this. If a private house is built on clay soils, an optimal microclimate will be established in the storage facility. Such soil will not allow moisture into the cellar, and the preparations will be stored for as long as possible.
Sandy soils are loose, so the walls and bottom will have to be compacted. In this case, it is better to fill them with concrete.
Floor installation
For the ceiling, rot-treated lumber, monolithic or prefabricated reinforced concrete slabs are laid on the walls of the cellar. Wooden beams are sheathed with boards, and the joints between the panels are carefully sealed.
The top of the ceiling is coated with clay, bitumen mastic or covered with roll waterproofing. Install thermal insulation with a thickness of at least 300 mm. These can be slabs of polystyrene foam, expanded polystyrene, expanded clay, slag wool, peat, sawdust. The structure is covered with earth, giving a slight slope to the side to allow water to drain.
DIY floor
The floors in the cellar perform several functions - they serve as a base, a water barrier from soil moisture and a covering to maintain the hygiene of the room.
The most common flooring materials are:
- concrete;
- clay;
- bricks;
- tree.
On dry, dense soils, use an uncoated earthen floor.
Zemlyanoy
This option for floor installation requires almost no material and labor costs. The base is leveled, the mounds are cut off, covered with a layer of crushed stone and compacted. Despite its simplicity, this floor is not resistant to loads, is easily deformed, and does not protect against the penetration of moisture from the soil. During the rainy season or melting snow, water will freely flow into the cellar, causing spoilage of supplies, rusting of metal surfaces, and rotting of wood.
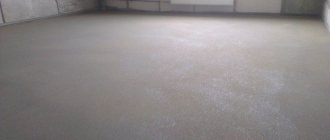
Concrete
This base can withstand heavy loads and is easy to care for. They are made of concrete laid on a bed of non-metallic materials. Waterproofing and reinforcing mesh are laid inside for strength and tightness. The coating protects well from water, especially when impregnated with penetrating compounds such as Penetron.
Clay
For such a floor, fatty clay is used, which is elastic when wet and durable after hardening. A layer of crushed stone with clay or bitumen 10-15 cm high is laid on a flat surface. Rolled waterproofing is placed on top with an overlap on the walls. The flooring is completed with a 5 cm thick coating of pure clay or clay mixed with crushed stone. After hardening, the cracks are sealed with lime-clay mortar.
Brick
Only red clay bricks are used for flooring. It is not destroyed by moisture and additionally protects the cellar from freezing. A mixture of gravel and sand is poured and compacted onto the leveled base. Liquid clay or bitumen is poured on top, and 2 layers of roll waterproofing are glued on. The brick is laid on cement or clay mortar and the seams are filled with it. Brick floors last a long time and maintain a favorable microclimate in the storage area.
Wood
If the cellar is dry and there is no risk of flooding, you can lay wooden floors. A protective layer of crushed stone with clay or bitumen, roll waterproofing, and a thick film are first installed. Logs are mounted from timber with a cross-section of 10x10 cm, boards are nailed onto them or screwed with self-tapping screws. Lumber must be treated with antiseptics.
How to make a cellar in your home with your own hands
Preparation for the construction of an underground storage facility under a residential building
At the stage of laying the foundation, it is necessary to mark the pit and dig it. Excavation work is carried out in compliance with rules and safety measures. The total depth of the pit should be about 2.7-3 m, and the diameter should be at least 2.5 m. The round shape for a buried structure is optimal and ensures its maximum strength. On the other hand, rounding a wall requires quite high qualifications from the mason.
Another option is the construction of monolithic walls made of concrete reinforced with steel or composite rods. This technology can ensure maximum resistance of underground structures to external mechanical loads. To make a cellar in a house correctly, you should evaluate your financial capabilities and practical skills in performing construction operations.
The choice of a specific technology for the construction of an underground structure will allow an assessment of the required amount of building materials. To build load-bearing walls we need red brick. The amount of material is calculated based on the minimum thickness of the wall, as they say among professional masons - one and a half bricks. When choosing a brick, special attention should be paid to its quality.
In this video you can see how to build cellar walls with your own hands from bricks
For underground structures, the use of bricks of heterogeneous composition, having deep cracks or inclusions is unacceptable. Construction material must be stored in proper conditions. Prolonged exposure of bricks to high humidity conditions can lead to a deterioration in its qualities and properties. When purchasing materials, you should ask the seller for certificates of conformity.
The walls of an underground storage facility must be built on a reliable foundation. Typically, the role of the base is performed by a reinforced reinforced concrete belt at the bottom of the structure. It is quite possible to build a cellar in a house with your own hands, especially if you strictly follow the construction technology.
Waterproofing floors and walls
Buried structures require high-quality protection from moisture penetration through building structures. The most likely ways for water to enter a cellar or basement are:
- the presence of through gaps;
- violations of technology during bricklaying;
- penetration of moisture through capillaries in an array of building materials;
- the formation of condensation on walls or other surfaces due to temperature changes or insufficient air exchange.
Typically, waterproofing of walls, floors and ceilings is done using roofing felt. It is recommended to lay this roll material in two layers. The overlap of the sheets should be at least 10-12 cm, and each subsequent row should be laid perpendicular to the previous one. Under the waterproofing it is necessary to pour a gravel-sand cushion with a thickness of at least 100-150 mm.
Scheme of the cellar waterproofing device
It is possible to correctly build a cellar under a house with high-quality waterproofing of the walls during the process of laying the foundation.
In this case, the work will not be interfered with by other structures and elements of the building. During the construction of walls, bitumen mastic is applied to their outer surface, onto which, in turn, roofing material is glued. When performing this operation, the sheets are arranged vertically with an overlap of 8-10 cm.
The floors in the cellar are poured with mandatory reinforcement with a two-layer steel coarse mesh. The screed is filled with a cement-sand mixture with the addition of a fine fraction of crushed stone as a filler. The mixture is prepared on site by hand or using a concrete mixer. It is possible to order concrete from a specialized enterprise with delivery to the work site by vehicle with the appropriate equipment.
Scheme of correct filling of the floor in the cellar
Overlapping device
As soon as the load-bearing structures of the walls and floor are ready, you can begin to build the ceiling above the cellar. Taking into account the fact that the structure is of a recessed type, the best material for the floor would be a reinforced concrete slab. The calculation of the required number is carried out taking into account the length and width of the structure. When laying floor slabs, heavy construction equipment is used - a crane on a vehicle chassis.
Ventilation system
To ensure normal storage conditions for vegetables, as well as to clear the air of radon and excess carbon dioxide, ventilation is installed in storage facilities. In rooms up to 50 m², a supply and exhaust system with natural induction is installed, over 50 m² - with a forced one. In specialized cellars, for example for aging wine, the regime is maintained using climate control equipment.
The simplest supply and exhaust ventilation consists of 2 channels located in different, preferably opposite, parts of the cellar. The supply air is placed near the floor at a height of 15-30 cm, the exhaust - under the ceiling. Asbestos-cement, polymer or galvanized pipes are used. To protect against precipitation, debris and rodents, nets and caps are installed. To prevent freezing, they are wrapped in glass wool or put on special insulating shells.
Cellar and basement: differences
It is important to understand that a cellar is significantly different from a basement. The second option is a room located in a residential building under its first floor. As a rule, its area is the same as the main building, so it can accommodate a couple of farm blocks. Storerooms, a laundry room, and even a swimming pool and garage can be located here.
The cellar has a specific purpose, which is to store various products. The room has many racks and shelves, a ventilation system, and thermal insulation to create the necessary conditions for storing various fruits and vegetables.
For a certain category of products, the cellar is equipped with a natural freezer. The cellar is located both in the basement of a residential building and in an above-ground special structure.
Building a modern cellar with your own hands is just as easy as building a bathhouse, especially if you have some experience and the required tools.
Stairs and doors
To go down to the cellar, the stairs must be safe. If space allows, it is advisable to make a stationary version from concrete, metal or wood. Otherwise, use sliding, folding or portable structures.
Diagram of a wooden staircase to the cellar.
Doors must reliably protect the interior of the storage space from cold air. The canvases are insulated with foam plastic, expanded polystyrene, and a sealing cord is laid along the contour of the box. If winters are frosty, it is optimal to install double structures.
Selection of materials
There are several options for creating walls and floors in the cellar:
- Earthen cellar. If the area has dense soil, you can compact the walls and floor. The hole is dug using a special technology. The walls should be made at a slight slope so that the soil does not crumble over time. The floor is compacted using a special construction tool, and then covered with a layer (12-16 mm) of crushed stone. The ceiling in this design is reinforced with supports. It is made from a clay mixture. In such storage, tubers and root vegetables remain fresh longer and do not wither.
- Brick or stone. The walls and floor can be made of blocks. This is the most durable design. But to build such walls and floors you need to have certain skills. It will be difficult for an untrained craftsman to create even masonry.
- Concrete walls and floor. This option is simpler than using brick. Concrete walls will not crumble. But for such a storage facility it is important to provide high-quality ventilation. Otherwise, it will be damp here, and the workpieces will deteriorate.
Hatches
The minimum dimensions of the hatch for descending into the cellar are 80x60 cm. The installation location and design of the hatch must comply with safety requirements during operation. You can buy it ready-made or make it yourself. Factory products are equipped with gas shock absorbers or electric drives for convenient lifting.
Main elements of the hatch:
- support frame;
- lid;
- loops;
- lifting mechanism;
- insulation;
- seal;
- external and internal finishing.
If the entrance to the cellar is located in the house, the hatch should be invisible or, conversely, designed in an original way. It is decorated with materials in accordance with the finishing of the floor and room.
Stages of construction of a warehouse
In order to understand how to build a cellar with your own hands, you should analyze the step-by-step construction of the most complex of the presented types of storage shed - in-depth. At the same time, materials and individual structural elements, depending on the owner’s preferences, can be changed, but the very essence of the construction will be the same.
Construction of a pit
The construction of a cellar should begin with the preparation of a pit, the size of which will depend on the dimensions of the future room. Additionally, approximately 0.5 meters are added to them on each side for the construction of walls.
To properly dig a pit, you must first set a marking. To do this, wooden stakes are driven into the corners of the future recess, onto which the cord is pulled.
After that, the top layer of turf is removed along the entire perimeter of the marking, which may later be useful for masking the storage shed, and a hole of the required depth is dug. Then all the sides of the pit should be leveled, and its bottom should be thoroughly compacted.
Laying the foundation
Bottom waterproofing.
Depending on how close the groundwater flows to the future building, the question of how to cover the bottom of the pit will be decided. If they are located much lower than the cellar, compacted sand or gravel can serve as the base of the room.
Attention! If the danger of flooding the storage shed still exists, it is necessary to cover the inner sides of the pit with a layer of waterproofing material, on top of which the foundation base is laid.
In order to make it, you need to knit a frame from reinforcement rods, which is raised with the help of bricks. Next, beacons are installed along the entire perimeter of the lower part of the pit, and its bottom is filled with cement mortar, the thickness of which should be approximately 0.04 meters. After which you should wait several weeks until the foundation is completely dry.
Construction of warehouse walls
After the foundation has hardened and the sides of the pit have been previously covered with a layer of waterproofing material, you can begin building the walls of the future cellar. Most often, brick, cinder blocks or concrete blocks are used for this.
The walls begin to fold from the corners to the sides. For fixation, cement mortar or clay is used, and the thickness of the seams should not exceed 12 mm. To ensure that the walls are smooth and strong, every 3 rows of material, steel rods are embedded in the solution and measurements are taken using a building level and a plumb line.
If the building provides for entry not through a hatch hole, but through a door, then space is left in one of the walls for a doorway.
Construction of the floor
One of the common flooring options for a country storage shed is a wooden frame. It can be assembled from boards (section 50x00 mm) and pieces of plywood (thickness 10 mm) so as to obtain a dome-shaped shape.
The finished frame is installed on the walls of the building and covered with plywood sheets. A mesh of reinforcement rods is knitted on top of them, which is raised with the help of small bars. After which the entire floor area is filled with concrete mortar, and no work is performed until it has completely hardened.
Arrangement of entrance and exit
To arrange the entrance to the storage facility, two brick walls are laid out from the doorway left during construction in such a way that they rise. The result should be a descent resembling a corridor. After this, you can begin building the stairs.
Important! Since the room must constantly maintain a high level of humidity, a wooden staircase is not entirely suitable for its intended use. In this case, it is better to give preference to metal structures or lay out concrete steps.
Most often, cellar doors are made from wooden boards, pre-treated with an antiseptic. They are installed on metal hinges, which are fixed to the frame built into the doorway.
Insulation and waterproofing from the outside
After the concrete on the shed floor has completely hardened, it is necessary to thoroughly insulate it. For this, sheet polystyrene foam is most suitable, but you can also choose a cheaper option, for example, clay with sawdust or straw.
Before insulating a concrete floor, it should be covered with sheets of waterproofing material. Then a layer of clay mixture is tightly applied to the entire surface of the roof, preferably at least 0.1 meters thick.
After the solution has hardened, the ceiling should be covered again with water-repellent materials - roofing felt or thick film - in several layers. Then the entire structure is covered with fertile turf on top, on which lawn grass or ornamental plants can be planted.
Interior decoration
A self-built cellar must be finished from the inside. The material for this should also be selected taking into account the location of groundwater. Most often, the walls and floor of the room remain untouched after construction, but it is necessary to ensure the circulation of fresh air and conduct electricity in the storage shed.
Ventilation in the cellar.
To ensure that there is always fresh air in the storage and no dampness, 2 pipes are installed - supply and exhaust. At the same time, in an above-ground cellar-house built with your own hands, the supply pipe is located at the bottom, and the exhaust pipe is at the top of the building. In a recessed storage facility, the entire ventilation system is installed at the top.
Regardless of the type of cellar, electricity is provided in the room with additional precautions.
Attention! All wiring must be wrapped in two layers of insulation, and light sources must be covered with special caps. At the same time, it is highly undesirable to install sockets inside the storage facility.
Wiring
Due to the high humidity, cellars are considered dangerous objects in terms of the degree of electric shock. There are special requirements for electrical wiring. Before starting work, it is recommended to complete a drawing and consult with a specialist.
It is recommended to place switches outside the cellar and use sealed lamps. The wiring is installed in an open way. If the structures are combustible, the cable is laid in corrugated tubes or plastic boxes, lined with asbestos. PUE rules prohibit the use of metal channels.
Waterproofing
Cellar waterproofing protects structures from moisture and seals the internal space.
Waterproofing compounds and materials are used:
- coating - bitumen mastics or pastes;
- liquid glass - sodium or calcium silicate;
- penetrating - MaSt, Hydrohit, Penetron;
- roll - TechnoNIKOL, Bikrost, Gidroizol, roofing felt;
- waterproofing dry mixtures;
- profiled membranes.
The most effective way is to install a hydraulic barrier on both sides of the enclosing structures - external and internal. If the cellar has already been built, the best results are achieved by using penetrating agents. When installing waterproofing, ensure the tightness of the joints, achieving their complete impermeability.
Cellar waterproofing device.
To eliminate possible contact of the walls and foundation with water, as well as to remove wastewater, drainage is installed. Perforated pipes are laid around the perimeter in a groove filled with crushed stone. Create a slope towards the well. When the liquid level rises, it is pumped out with a pump.
Video recommendations from experts on waterproofing cellars
How to arrange a descent into the cellar
Next, the most pleasant thing is the arrangement of the descent room, and the staircase itself. Here I decided to record several videos, since this was already done with my own hands. In the end, this is what happened:
The walls of the descent are entirely made of the same floorboard. Only already planed. First I made a wooden floor (there will be a video below), and then I marked out the walls and assembled it like a self-tapping construction kit. This is what the assembly itself looked like at the very beginning, and how everything was planned
Beginning of cladding the walls of the cellar:
Separately by gender, and how everything was prepared, I recorded a short video. There is such a thing that there is clay all around, and it was important to remove it from the boards so that there is a ventilation gap. So that the boards do not come into contact with the clay. At the same time, the cellar in my case is not so damp. And if your situation is a little different, then it probably won’t be possible to do this, but first you need to lay waterproofing along the walls to the clay and on the floor. One quick option is to lay roofing felt between the board and the clay. In this case, it is advisable to process the boards. I was in a little hurry, and only processed the logs and laid them on roofing felt (roofing felt). And the boards themselves are not processed from the inside. I also treated them externally with neomid.
There is also a video on how to lay the joists on the floor separately. In fact, it could have been completely covered with tar paper. Would be better. So that the board does not absorb moisture from the clay. But I think that for the next 5-7 years everything will definitely be fine. Or even longer. Who knows. It seems like there are good gaps, but I was confused by the fact that I didn’t treat it from the inside. I was in a hurry here I think...
Next I took hold of the walls. There is a moment when we mark the walls, you need to look both in relation to the brick wall of the cellar and in relation to the top, when descending…. How the opening is cut. The point is that the walls do not turn out to be offset relative to the opening. Everything should be smooth. Therefore, when we make wall studs, I would recommend using not a level, but a string with a weight - a plumb line. To give all 4 points on top in the corners, and then recede the size of the board from them so that in the end, when the walls are ready, everything will turn out smooth and neat.
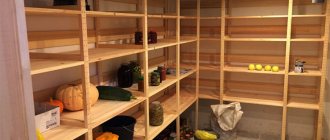
Shelves in the cellar
Racks for storing supplies are operated in conditions of high humidity. In addition to the destructive effect of water, they are subject to invasion by mold fungi. Therefore, the material of the shelves must be moisture-resistant and rot-resistant. To do this, it is treated with anti-corrosion or antiseptic compounds.
For the manufacture of racks the following is used:
- steel profile;
- timber, board;
- concrete;
- plastic.
To ensure that shelves last longer and are not a source of fungi, they are regularly dried, disinfected, and the protective coating is renewed.
Wall decoration
The traditional finishing method is to whitewash the walls with slaked lime. It has antiseptic and fire retardant properties, dries surfaces well, and destroys fungal spores. Chalk, which is sometimes used for coloring, does not have this effect.
To make the coating decorative, blue or pigment is added. The composition is applied with a paintbrush in 2 steps, drying each layer.
Basement walls can be covered with moisture-resistant plaster, lined with plastic panels and tiles. It is desirable that the surface be smooth, without pores in which fungi like to settle and multiply.
Cellar finishing
The cellar has one purpose - storage of any preparations. Therefore, to decorate such a “working” room, they choose materials that are not the same as those that decorate the living spaces of the house. Of course, if we are not talking about special storage facilities - about wine cellars. The finishing material should be inexpensive, practical, durable and moisture-resistant. The simplest options for decorating walls are painting or whitewashing.
Dye
In the case of an underground room, the best option would be acrylic moisture-resistant paint, which will provide additional protection for the walls. First, the plaster is cleaned of dust, then two layers of primer are applied. After the material has dried, the walls are painted with a roller. It is better to apply the second after the first layer has dried.
There is no consensus on paint color. Some people believe that dark shades are ideal for a cellar, because such walls will allow you to hide any stains well. Others don’t quite agree with this opinion, and they are also right: a small dark room will visually become even smaller, and a mini-storage will look rather gloomy.
Whitewash
This is the traditional option. For whitewashing they use “lime, known” for its antiseptic qualities and moisture resistance. After diluting the composition according to the instructions on the packaging, the material is applied to the walls with a regular brush or paint brush. You can use a roller for the job, but in this case you will have to make do with one layer, since this second tool can “pull off”. A spray bottle is another worthy contender, as it offers a chance to save solution.
The disadvantage of this finishing material is the need to update the finish annually. However, the disadvantages of any (even chalky) whitewash can be combated. To maintain the attractive appearance of surfaces for a long time, it is better to use one or more tips.
- If you add about 100 g of salt to 10 liters of lime solution, the coating will be more durable, and the walls will not leave “marks” on your hands and clothes.
- A little blue, diluted with boiling water, will make the whitewash dazzlingly white and will not allow it to turn yellow in a short time. For the same purpose, skim milk (1:1) is added to the solution.
- For greater wear resistance of the coating, latex paint or wallpaper glue is introduced into the material. These components will make the composition elastic and less susceptible to deformation.
To change the usual color of whitewash, you can add dyes that are resistant to alkaline conditions. These colors include aniline dye for wool, red lead, chromium oxide, ocher, soot, and umber. Experimenters say that even food dyes are suitable for this purpose.
Ceiling insulation
The cold enters the cellar from the street through the roof, doors or hatches. If the entrance area is reliably insulated, but the ceiling and corners are periodically covered with frost, then the thermal insulation is not doing its job.
To insulate internal surfaces, polystyrene foam, polystyrene foam, and sprayed polyurethane foam are used. The slabs are glued or fixed to the ceiling with dowel mushrooms; special equipment is used for spraying. To protect against rodents, it is recommended to lay a mesh with a mesh size of 0.5-0.8 cm.
Video about cellar insulation
Requirements for the cellar
The cellar must be dry, protected from the penetration of precipitation and groundwater. Therefore, the earthen cellar should be located on an elevated place - this will protect it from rain and melt water.
The roof should protect the cellar from precipitation. Although, when the cellar is located underground in a house, cottage or outbuilding, the issue with the roof is resolved naturally. And the bottom of the cellar should be at a distance of no less than 0.5 m to the level of seasonal high water or groundwater.
Note. The difference between perched water and groundwater (aquifers) lies in the nature of its manifestation. High water is seasonal in nature, and is most evident in the spring - during the period of snow melting. Then she disappears. Aquifers are always present. Under normal conditions, their level is at a depth of at least 8-10 m. But near reservoirs or wetlands, due to water infiltration, they can lie very close.
In addition to protection from water, it is important to maintain a constant temperature and optimal air humidity in the cellar. The first problem is solved by thermal insulation of the above-ground part of the cellar, the second by ventilation.
Things to remember
Everyone theoretically knows how to build a cellar. To avoid unforeseen circumstances, you should listen to the following advice:
- when choosing a location, pay attention to surrounding sources of possible flooding or pollution;
- It is advisable to draw up a project in advance indicating all the necessary elements;
- do not bury the structure below 0.5 m to the groundwater level;
- use moisture-resistant materials;
- do not neglect the drainage system;
- reinforce masonry walls;
- treat wooden elements with antiseptics and fire retardants;
- Electrical wiring must be carried out only in accordance with safety requirements.
Proper ventilation, reliable insulation of walls and ceilings, and durable waterproofing will help preserve vegetable supplies in the cellar.
Insulation of the cellar
Insulating the ceilings of the cellar will allow you to safely store various products; they will not be frozen even in winter. The most commonly used tile materials are polystyrene foam, polystyrene foam and their analogues. It is best to install panels with a density of 25 kg/m³ or higher.
This is interesting: what needs to be insulated in the cellar from freezing.
It is also possible to use mineral wool, but if the humidity is too high, it will lose its properties in 1-2 years, so good preliminary waterproofing will be required.
Spraying a layer of polyurethane foam is the most reliable method, since the resulting coating will be seamless, and the material itself does not absorb moisture at all and retains heat well. But its cost is quite high when compared with mineral wool and polystyrene foam.
The main method of insulation involves creating a frame from wooden blocks or a galvanized metal profile, which is attached to the walls and ceiling.
Insulation is placed in the cells of the sheathing, after which it is recommended to stretch polyethylene film, and lay sheet plywood, boards made of boards on top, or simply glue the mounting mesh if solid materials (foam plastic or analogues) were used as insulation. After this, the wall surfaces can be plastered.