Do-it-yourself drainage of the area around the house
If the site is located in a lowland or groundwater flows close to its surface, it is necessary to drain the area. It is optimal when the groundwater level is at a depth of more than 2.5 m from the surface.
If the distance is less than 1.5 m, then the bearing capacity of the soil decreases - it becomes waterlogged and saturated with water. This affects the settlement of the foundation and makes the construction of a basement or ground floor problematic.
To drain the area around the perimeter of the planned house, or better yet along the edges of the entire yard, they dig channels with a slight slope and organize drainage. The optimal width of such channels is 50-70 cm.
The depth is calculated in each case individually, since it depends on how much the groundwater level needs to be lowered. Drainage is laid as follows.
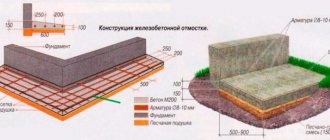
At a distance of 2-3 m from the house, dig a ditch with a depth equal to the base of the foundation. A 15-20 cm layer of clay is placed on its bottom, giving it the shape of a tray. Medium-sized stones are carefully laid on top, forming sides. Large stones are placed on top, forming a vault. Gravel or crushed stone 25-30 cm high is placed on it. Everything is covered with soil removed during excavation. Water will seep through the soil into the tray and flow in the desired direction.
Types
Several drainage placement systems relative to the blind area allow you to create the most effective drainage that is safe for the structure and building itself.
Under construction
Its second name is parietal . The main task: to reduce the influence of groundwater on the foundation.
Parameters that must be observed when creating drainage under the blind area:
- The pipes should be sloping towards the drain well. The degree is calculated when creating a project; it corresponds to the soil. The speed of water movement through the pipes is approximately 1 m/s.
The installation of the drainage system should be lower than the freezing depth of the soil. This value depends on how severe the frosts are in a particular area (otherwise the pipes may freeze with the onset of cold weather and cease to perform their functions). In central Russia 50-80 cm.- It is necessary to provide another drainage system in case of breakdown of the main option. For example, install a pump.
- The place where the water is drained should be either in the lowest part of the site or beyond its borders. Install a well or run a pipe to the nearest body of water.
It is recommended to coordinate the drainage system in the house design initially, when it is created.
Annular
It is used to drain water that appears due to precipitation . The systems can be combined and used both at once. The second name for drainage around the blind area is ring. There are 3 types of them:
Surface
In execution it looks like ditches located around the entire perimeter of the blind area. Their width usually does not exceed 20-30 cm, maximum depth 70 cm.
Advantages:
- easy to create with your own hands;
- with its help, errors during the construction of the blind area are corrected (for example, if, due to incorrect calculation of the slope, water accumulates at the side and forms puddles);
- inexpensive, quick installation.
Disadvantages: If the region experiences heavy rainfall, such a system will not be sufficient.
There are two types:
- Spot. They look like shallow wells with a bottom covered with rubble. They are placed under drainpipes so that precipitation from the roof flows directly into the drainage without violating the integrity of the blind area.
- Linear. Ditches are dug along the perimeter of the blind area, a sand cushion is created inside, drainage is carried out (using pipes cut lengthwise, special trays or concrete), and protected from above with a grate.
Digging a trench should be carried out in accordance with the project, geodesy of the site and take into account the locations of other communications.
Backfill
Similar to the previous option, the inside of the ditch is filled with gravel on top.
Advantages:
- simple installation;
- inexpensive option;
- looks aesthetically pleasing.
Disadvantages: Difficult to clean if clogged with debris or silt.
Drainage work around the blind area is carried out after the construction of the house is completed. This is one of the very last, final stages .
Deep
Suitable for areas where groundwater runs close to the surface and clay soil. It is considered mandatory if the house design includes a basement floor.
Advantages:
- inconspicuous;
- effective if there are frequent heavy rains or a lot of snow accumulates during the winter.
Flaws:
- labor-intensive creation process;
- expensive.
This option is the most effective; it is laid according to the principles of wall drainage, only at a greater distance from the foundation.
How to drain melt and storm water from the foundation
To protect the foundation of the house from rain and melt water, you can use a blind area. Water can be drained by installing surface drainage trays along the blind area. It is worth remembering that in the spring the trays will become clogged very quickly, because melt water will run freely across the frozen ground without being absorbed into it.
Foundation blind area
In addition, at night the temperature will drop, the water will freeze, its drainage will be impossible, and the trays will become useless. It is more advisable to use a device made from trays in the summer: storm water will freely flow from the lawns directly into the drainage device. In addition, you can drain water with your own hands almost free of charge and more efficiently. This method is called watershed creation and landscape modeling.
To create a watershed, all you need is a shovel, a rake and a wheelbarrow to transport the earth. First of all, the parameters of the watershed are calculated: shape, length and width. A direct watershed line is drawn in large areas: near a private house, cottage, parking lot.
Small objects are limited by an arc-shaped watershed, at a distance of about four meters from the beginning of the foundation. In this case, drainage is carried out into a ditch or a special drainage well.
After marking the watersheds, you can begin to create them.
Drainage system
The purpose of a roof drainage system is to collect rain and melt water from the roof of a building and redirect it to drainage points. If there are no gutters or they are not constructed correctly, then the water flowing from the roof moistens the walls (this is especially dangerous for wooden buildings and unfinished exteriors of sand-lime brick houses), destroys the blind area and undermines the foundation.
If the roof has a large area and the flow of water from it is strong enough, it breaks up the garden paths, and the building ends up splashed with soaked mud for almost half a meter
The main rule when installing gutters is to divert water as far as possible from the foundation of the house. After all, if you install water collectors immediately under the drainpipes, the moisture will go into the ground under the foundation, and only the walls and garden paths will be protected! In addition, the soil adjacent to the foundation is usually looser than usual, so water quickly absorbs into it and seeps to the concrete base. In winter, it freezes, expands and begins to “tear” concrete structures.
To prevent this from happening, a blind area up to one meter wide is made around the perimeter of the house and drainage trays or point storm inlets are installed, which direct water flows into storm drains, drainage wells, etc. depending on the general drainage system on the site.
Effective drainage methods
You can protect the foundation of your house from precipitation and groundwater in various ways:
- Installation of a blind area around the perimeter of the house.
- Creation of a storm drainage system in combination with a drainage system.
- Drainage system.
Blind area
Foundation blind area
A mandatory and effective way to drain rain and melt water is a blind area around the perimeter of the building. In a single system with a drain, this design is capable of protecting the house during light precipitation and deep groundwater. The blind area must have a mandatory slope to ensure the outflow of water from the walls of the house. The design can be made with or without an additional groove along the outer edge.
Storm drainage and drainage
When installing a drainage system, the main condition is correct installation. Otherwise, water will flow down the walls to the foundation, which leads to the destruction of both the walls and the foundation. To drain water from the drainage system, a storm sewer is used, which includes many devices. In particular, we are talking about rainwater inlets, gutters, wells and filters.
Drainage system
Drainage
Drainage is the most complex, but most effective option for draining water from the foundation. A complete drainage system must work in conjunction with storm sewerage, so the overall process requires responsibility and large investments.
Reliable ways to drain water from the foundation of a house
Korovin Sergey Dmitrievich
Master of Architecture, graduated from Samara State University of Architecture and Civil Engineering. 11 years of experience in design and construction.
The foundation is the basis, the support of the building; the life of the house depends on its quality, strength and integrity. The integrity of the foundation is compromised, first of all, under the influence of water that comes into contact with it during rains, runoff of melted snow, rising groundwater levels (or constant presence of groundwater at a high level), etc. As a result, the foundation walls become wet, damp, and overgrown with mold. , and moisture gradually collects around and approaches the upper floors.
All of the above problems demonstrate the importance of timely drainage from the foundation of a building. Moreover, foundation drainage must be carried out during the process of creating a residential structure in order to carefully consider the design of the drainage system, calculate the angle of inclination, select suitable materials for drainage and calculate the depth at which structural elements should be located
Protection of the foundation from melt and storm water
Protection against melt water
Seasonal formation of surface water is also a big problem. It can be solved with the help of comprehensive protection, which includes a drainage system, blind area and drainage system.
Drainage system
The design is designed to collect rain or melt water from the roof of a house. Water flows through special gutters into funnels and is carried away from the foundation of the building through pipes.
Ring drainage helps drain stormwater away from the foundation. It works like this:
Pipes are laid in an open trench that lead to a general sewer system. The pipes are laid on a compacted bed of sand and crushed stone.
It is very important that the diameter of the drainage and downspout pipes be the same. Wells are installed that receive water from drains. All water is collected in a common well, from which it is removed by pumping, direct drainage into an open reservoir, or absorbed into the soil through a drainage field.
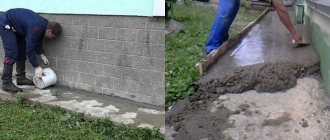
Blind area
Water that accumulates on the surface is drained from the foundation using a blind area. Its arrangement looks like this:
- Marking in progress.
- A layer of soil is removed to a depth of 25 cm.
- The formwork is being installed.
- The soil is covered with a layer of clay and thoroughly compacted.
- This is followed by a 10 cm layer of sand, which is also compacted well.
- Fine gravel is poured on top of the sand in a layer of 5 cm.
- At the junction of the blind area with the wall of the house, an expansion joint of 2 cm must be formed.
- The blind area is filled with concrete.
Drainage
Water is removed from the drainage system and blind area through surface drainage. Its arrangement is carried out according to the following scheme:
- On the outside of the blind area, they dig a shallow ditch with a slight slope.
- The bottom of the trench is covered with sand and gravel, creating a sand and gravel cushion.
- Next, special trays are laid and covered with gratings.
Types of structures
Before you make drainage around the house with your own hands, you should decide on the desired option. There are several ways to do this. If drainage is done correctly, then any of the methods will be effective. But everyone requires time and financial resources differently.
The following types of systems can be installed:
- Open drainage. This method is quite simple and consists of creating open trenches (ditches) around the house where water will drain and then soak into the soil. Despite the simplicity of constructing such a drainage system, it looks unpresentable in appearance and quickly becomes unusable - the trenches crumble and break.
- Closed drainage. This method involves laying perforated pipes in trenches in the ground. Moisture gets into them and is removed from the house. This method is the most effective, but relatively complex in terms of execution.
- Backfill drainage. Here you should dig ditches around the object, as with the open method, and then fill them with crushed brick, crushed stone or rubble. The trenches are covered with turf. This drainage method is durable, but has a low degree of moisture transmission. Backfill drainage is almost impossible to maintain.
Protection of the foundation from groundwater
Groundwater has a constant impact on the foundation, so it is important to create reliable protection for the foundation from this negative factor.
Very often, for greater efficiency, complex protection is used: trench drainage and foundation waterproofing. The drainage system is designed to drain water from the foundation, and waterproofing provides protection against moisture penetration into concrete structures.
Trench drainage
The drainage system can be open or closed.
Open drainage consists of ditches 50 cm wide and up to 1 m deep. The walls of the ditch are made with a slope of 30 degrees to ensure maximum accumulation of water. The length of the ditch must also have a slope for arbitrary water flow.
You can make closed trench drainage with your own hands according to the following scheme:
- A trench about 30 cm wide is dug along the perimeter of the base of the house; the depth should be slightly below the base of the foundation.
- Sand is poured onto the bottom in a layer of up to 10 cm, providing a slope.
- The sand is covered with geological textiles, fixed to the walls of the trench.
- Gravel is poured on top in a layer of 10 cm.
- Next, drainage pipes are laid. Many holes are drilled in them, thanks to which water will seep into the pipe and be directed to specially prepared places. The pipes must have a slope of 1 cm per linear meter.
- The pipes are covered with gravel, the layer of which above the pipe can reach 10 cm.
- The gravel is covered with geotextiles, the ends of which are sewn together.
- The end of the drainage pipe should be taken away from the base of the house at a distance of at least 5 m.
- The drainage system ends with a water intake, which can be an artificial or natural reservoir.
Foundation waterproofing
Waterproofing work protects the foundation of the house not only from groundwater, but also from soil moisture. Waterproofing can be horizontal and vertical. In the first case, the upper part of the base receives protection at the points of contact with the walls. In the second - the side surfaces of the foundation.
https://youtube.com/watch?v=a-26-EskN90
For vertical waterproofing, you can use several options:
- Protect the foundation with a layer of cement-sand mortar.
- Create insulation using bitumen mastic.
- Lay several layers of roofing felt or roofing felt.
Types of drainage pipes
There are many types of drainage pipes on sale that can be used to create a high-quality drainage system. When installing drainage around the house with your own hands, you need to study the characteristics of such products.
You can choose from the following options:
- Porous. Made from expanded clay glass or plastic concrete, they do not require perforation. But this is quite expensive material. For good drainage, it is worth taking pipes of large diameter.
- Asbestos-cement. The most reliable, but quite heavy and require holes to be made in them.
- Polymer. Made from plastic, they are comfortable and lightweight, and easy to use. Nowadays, these pipes .
- Ceramic. Functional, but fragile, require perforation. Due to additional grooves, moisture is collected more effectively.
What kind of water interferes with the life of a developer and a country homeowner?
A whole book could be written about the types of surface and ground water, as well as drainage and storm sewer systems. Therefore, we will leave beyond the scope of this article a detailed listing of the types and causes of groundwater occurrence, and will concentrate on practice. But without minimal theoretical knowledge, starting to independently arrange drainage and storm sewer systems is throwing money away.
The fact is that even an incorrectly designed drainage system functions for the first few years. Then, due to clogging (siltation) of the drainage pipe, wrapped in geotextile, which was placed in clayey, loamy, etc. soil, drainage stops working. But money has already been spent on drainage construction and, most importantly, drainage construction involves a large amount of excavation work involving equipment.
Therefore, simply digging up and relaying a drainage pipe 3-5 years after it was laid is difficult and costly. The site has already been inhabited, landscaping has been done, a blind area has been arranged, a gazebo, a bathhouse, etc. have been installed.
You will have to rack your brains on how to redo the drainage so as not to ruin the entire area.
Hence, the construction of drainage should always be based on data from a geological study of the soil (which will help to find a waterproof layer in the form of clay at a depth of 1.5-2 m), hydrogeological surveys and clear knowledge of what kind of water leads to flooding of a house or waterlogging of an area.
Surface waters are seasonal in nature, associated with the period of snowmelt and abundance of rain. Groundwater is divided into three main groups:
- Capillary water.
- Ground water.
- Verkhovodka.
Moreover, if surface water is not drained in time, it turns into underground water when infiltrated (absorbed) into the ground.
Conclusion: surface runoff should be drained away by storm (rain) sewerage, and not try to create surface drainage!
Storm drainage is a system consisting of trays, pipes or ditches dug in the ground, discharging water from drains outside the site + competent organization of the relief on the personal territory. This will allow you to avoid stagnant zones on the site (lenses, pools), where water will accumulate, which simply has nowhere to go, and further waterlogging.
The main mistakes that are made when installing drainage yourself:
Failure to maintain the correct slope of laid drainage pipes. If we take an average, then the slope is maintained in the range from 0.005 to 0.007, i.e. 5-7 mm per 1 running meter of drainage pipe.
Using a drainage pipe in a geotextile wrap on “wrong” soil. To avoid siltation, pipes in geotextiles are used on soils consisting of clean medium- and coarse-grained sands.
- Using cheaper crushed limestone instead of granite, which is washed away by water over time.
- Saving on high-quality geotextiles, which must have certain hydraulic properties that affect the quality of drainage. This is an effective pore size of 175 microns, i.e. 0.175 mm, as well as transverse Kf, which should be at least 300 m/day (with a single pressure gradient).
Main stages of installation
The first step is to draw a site plan on paper and decide exactly how the drainage will take place. Remember that water should drain to the lowest point - there must be a water tank. To determine such an area, you can use a theodolite device. Based on the plan, the required amount of materials is calculated.
Step-by-step instructions for performing the work:
- In accordance with the project, it is worth marking the area on paper on the ground.
- After this, trenches are dug, the size of which must take into account the pipe and gravel that will be buried there.
- For digging, it is better to take a bayonet shovel - it will increase the speed of work.
- The width of the ditch should be approximately half a meter.
- The next step is to create a ditch slope for the system.
- In this case, differences in height, which are marked with poles, are taken into account.
- To ensure that the bottom forms the desired slope, we use sand.
- Geotextile material is laid at the base of the trench, which should have a good odor at the joints.
- Next, it is filled with gravel taking into account the slope.
- In the fine fraction we make a trench into which the pipe should fit.
- Next, we lay the drainage products, connect them in accordance with the technology, and check that the required slope remains.
- You can control the direction using a stretched thread.
- The pipe joints are connected using a special tape.
- The next stage is the installation of inspection wells.
- If drainage products do not have a filter layer, then it is worth wrapping them in geotextiles and securing them with rope.
- After this, gravel is poured on top in a layer of up to 18 cm and on top, on both sides, we cover the system with the edges of the lower geotextile.
- The final step will be to fill the drainage with coarse river sand.
Before closing the pipes, pour water into them and see how correctly it flows through the system. While the structure is not buried, everything can still be fixed.
This way we get a good and functional system. Now excessive precipitation and moisture accumulation are no longer a problem for your buildings. Drainage should be installed not only around residential buildings, but also along the perimeter of utility buildings.
Some tips for arranging drainage:
- If the system runs under a road that is frequently used by vehicles, then the pipes along the route must be metal. Next, they must be tightly connected to the rest of the structure.
- When the trench is ready, you should first compact the bottom, and only then begin to fill it with components.
- Drainage products should be filled with gravel to a depth of 18-30 cm.
- Geotextiles are used to prevent contamination of the system. For the same purposes, you can wrap the components with filter material.
- When installing the structure, the possibility of its maintenance should be taken into account. For this purpose, inspection wells are created. The best places for them are bends and joints.
- It is important that drains do not touch or block existing communications in the ground - wires, pipes.
- You need to start digging a trench from the highest point of the ground.
- You should not skimp on the amount of geotextile, since this material is designed to protect the drainage pipe from silting.
- The easiest way to attach a metal welded box as a water sump.
Deep drainage system
If the groundwater level on the site is high, and the house has a basement or underground garage, then you will have to install a deep drainage system.
Signs that it is necessary include:
— Increased humidity in the basement; — Flooding of the basement; — Rapid filling of the septic tank (cesspool).
It is advisable to equip an underground drainage system for the foundation during the construction of a house. This will be much cheaper than removing moisture from a finished foundation built without taking into account the real groundwater level.
The water is discharged directly into the storm or mixed sewer system (by gravity - if the site slopes, it does not
The slope can be either natural or artificial - for example, through the use of special concrete pipe-channels with an internal slope or multi-level stepped gutters.
Water collected by surface drainage can also be drained into the collector, and from there it will flow into a municipal storm drain or be absorbed into the soil (through a drainage field - a layer of crushed stone).
Arrangement of a simple drainage system
Drainage trench around the house (ring drainage)
The simplest way to drain water and neutralize the effects of ground moisture on the ground floor and foundation is to install a fairly wide drainage gutter around the perimeter of the building at a distance of one and a half to two meters from it. Its depth should be below the level of the foundation; its bottom is given a slope and filled with cement mortar.
A drainage ditch effectively removes moisture from the foundation of the house, but water from downspouts should not flow into it.
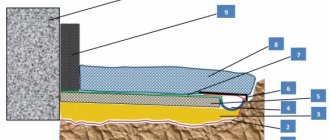
Closed wall drainage
The blind area is not only about draining water. but also protection of the foundation
The purpose of this soil drainage system is to remove groundwater, rainwater, or meltwater from the foundation and prevent groundwater from rising during snow melt or heavy rainfall. It is a closed loop of perforated (perforated) pipes or gutters with the convex side up, laid at a depth of one to one and a half meters.
Unlike ring drainage, wall drainage pipes are laid above the level of the foundation base. The trench is paved with broken bricks or large crushed stone of several fractions; the drains are also covered with crushed stone and, together with it, wrapped in a filter material - for example, geotextiles or fiberglass. The filter prevents the drain holes from becoming clogged with silt, and the top of the trench is covered with gratings and covered with soil.
“Rotary wells” are installed at the corners of the building - they set the direction of the discharged water. The wells are made of PVC, their diameter is less than half a meter, and their height is from one to three meters.
The ditch with pipes should slope down the slope (and away from the building) and discharge water flows below the level of the basement floor. Such a drainage trench pulls towards itself, absorbs and removes moisture from approximately an area at a distance of 15-25 meters around itself.
Where should the water be drained?
If the building is on a slope, as a rule, the drainage trench goes around it like a horseshoe from the side of the hill and has an exit on the opposite side. If there is such a possibility, water can be drained into a small “technical” reservoir, from where it will be used for household needs - watering the garden, construction and repairs, etc.
In other cases, water is either immediately discharged into a public or individual sewer system, or enters a storage collector well, where it is absorbed into the soil and transported by gravity or pump to the site.
The installation of simple drainage trenches is not difficult, but the arrangement of a full-fledged soil drainage system, connecting both the drying of the site itself and the drainage of water from the house located on it, requires special calculations and professional installation. It is better to entrust it to professionals, since losses from malfunctions, repairs and alterations will be greater than the cost of specialist services.
home
Types of drainage systems according to construction method
To create a system for removing excess moisture, you can use the services of specialists, or do all the work yourself. You just need to choose the right drainage, and there are several types. They differ in the complexity of arrangement, appearance and other parameters.
One of the most common classifications of drainage is based on how complex it is. In accordance with this parameter, there are 3 types of drainage systems .
- Open or surface drainage consists of one or more ravines. The depth of each is about 0.7 m and the width is 0.5 m. This option is the easiest to arrange, but externally it is unattractive.
- The backfill or deep view looks much better. For this species, a trench is also first dug. Geotextile is laid in it, and then a drainage backfill is poured in, which will accumulate and remove excess moisture. For these purposes , broken brick, crushed stone, expanded clay , etc. The drainage layer is wrapped in geotextile and covered with soil. But such a system has one significant drawback: it can only be cleaned after opening.
- The most complex, but at the same time the most advanced system for draining water from a site is closed drainage. In the center of the backfill there is a drain, which is a perforated pipe. Water is collected in the pipeline and discharged by gravity into the drainage well.
It is the third method that has become traditional in recent years when creating a drainage system.
Types of drainage
There are three types of drainage: closed, open and backfill. The easiest and simplest is an open type of drainage, or, to put it simply, a ditch.
A similar action is carried out like this:
- According to the circumference of the entire site, they dig ditches with a depth of up to one meter and a width of fifty centimeters;
- the angle of inclination of the ditch walls must be at least thirty degrees - this will facilitate maximum collection and removal of excess moisture;
- In order for drainage to be truly effective, the site must have a slight slope.
The pipes must be laid on a well-compacted sand layer and wrapped in a specially designed filter resource called geotextile. After the sand is added, the soil is filled in and the turf is laid.
The backfill drainage method, or, as it is also called, the gravel method, is used extremely rarely. But, no matter what drainage method is used, there is still a need for a collector or natural water intake where water collects.
Inexpensive do-it-yourself storm drain
The first thing that comes to mind in order to equip a budget option for storm drainage on a site is to lay special trays.
Trays can be made of concrete or plastic, but they are expensive. This forces users of our portal to look for cheaper options for installing storm drainage and drainage systems from the site.
I need to make an inexpensive storm drain, about 48 m long, along the edge of the fence, to drain the melt water that comes from the neighbor. The water must be drained into a ditch. I was wondering how to drain the water. At first it occurred to me to buy and install special trays, but then they would be left with “extra” grates, and I don’t need any special aesthetics for the storm drain. I decided to buy asbestos-cement pipes and saw them lengthwise with a grinder, thereby getting a homemade tray.
Despite the budgetary nature of this idea, the user was not attracted to the need to cut asbestos-cement pipes on his own. The second option is the opportunity to buy gutters (plastic or metal) and lay them on a prepared base in a concrete layer of about 100 mm.
Users of the portal dissuaded Denis1235 from this idea in favor of the first option, which is more durable.
Having latched on to the idea of an inexpensive storm drain, but not wanting to deal with cutting pipes on his own, Denis1235 found a factory that produces asbestos-cement pipes, where they will immediately be sawed into pieces 2 m long (so that the 4-meter one does not crack during transportation) and ready-made trays will be delivered to the site . All that remains is to develop a scheme for laying the trays.
The result is the following “pie”:
- Soil base in the form of a bed.
- A layer of sand or ASG about 5 cm thick.
- Concrete about 7 cm.
- Tray made of asbestos-cement pipe.
As a result, I made a budget rain shower at the dacha. It took 2 days to dig the trench, another two days to pour concreting and install the route. I spent 10 thousand rubles on trays.
Practice has shown that the route “overwintered” well, did not crack and intercepts water from its neighbor, leaving the area dry. Also interesting is the option of a rainwater drainage system for a portal user with the nickname yury_by.
Because The crisis doesn’t seem to be ending, then I started thinking about how to install a storm drain to drain rainwater away from the house. I want to solve the problem, save money, and do everything efficiently.
After some thought, the user decided to make a storm drain for water drainage based on flexible double-walled corrugated pipes (they cost 2 times less than “red” sewer pipes), which are used for laying power cables underground. But, because The depth of the drainage route is planned to be only 200-300 mm with a pipe diameter of 110 mm, yury_by was afraid that the corrugated pipe might break in the winter if water gets between the two layers.
As a result, yury_by decided to take a budget “gray” pipe, which is used when installing internal sewerage. Although he had concerns that the pipes, which were not as rigid as the “red” ones, would break in the ground, practice has shown that nothing happened to them.
If you step on the “gray” pipe, it turns into an oval, but there are no significant loads in the place where I buried it. The lawn has just been laid and there is foot traffic. Having laid the pipe in the trench and sprinkled it with soil, I made sure that they kept their shape and the storm drain was working.
The user liked the option of installing an inexpensive storm drain based on “gray” sewer pipes so much that he decided to repeat it. All the nuances of the process are clearly demonstrated by the following photographs.
We dig a hole for a drainage well to collect water.
Level the base.
We install a concrete ring.
The next stage is to fill the bottom of the well with gravel of fraction 5-20.
We cast a homemade well cover from concrete.
Determining direction
First you need to decide on the direction of drainage of stormwater. This could be a slope going down into a ravine or towards a river. In this case, there will be no problems with the volume of excavation work.
If this is a ravine located behind a hill, then it is necessary to determine the height of the bottom of the ravine or ditch relative to the surface of your site. The simplest geodetic instrument, a “level,” will help with this.
Various fittings for receiving storm drains
With its help, you can calculate the depth of all wells and the required slope yourself. But such calculations are needed only over large areas and distances. Usually, owners of private plots do not face such problems - and so everyone can see where the water flows and where the nearest ditch is.
Surface drainage
This water drainage system is designed to drain storm and melt water from the site (overflow) and is called surface drainage.
It’s easy to protect yourself from melt and storm water:
- It is necessary to dig ditches half a meter deep along the perimeter of the site with walls sloping at an angle - they will discharge water into a common drainage ditch behind the lowest point of the site. Their bottom is covered with crushed stone, broken bricks, straw, poles, and the top is covered with earth;
- A more rational and reliable way to prevent your site from turning into a swamp and the foundation from “floating” is to install a more serious surface drainage system, which involves laying plastic channels or rectangular polymer concrete gutters around the perimeter (linear drainage). Plastic ducts are inexpensive and come in several varieties, but they all resemble halves of a pipe cut lengthwise. They allow you to quickly install a branch over large areas using special fasteners and adapters. The channels are covered from above with protective grilles;
- Polymer concrete gutters are more expensive, but the quality of this material is much higher than that of plastic. They are just as light, but more durable, abrasion resistant and waterproof;
- Storm water inlets. These adapter tanks are used to collect rain and melt water from the roof of a building (with a vertical drain) or are installed at the “point of intersection of slopes”, collecting water flowing from the entire site (with a side drain). To protect against debris and leaves, cast iron, steel or plastic grilles are mounted above them.
When installing surface drainage for an area, you must remember that it cannot be connected to the drainage of the foundation, otherwise storm water flows may flow under the base of the house and undermine it.
Why is drainage needed around the house?
Drainage is a system of interconnected hydraulic devices for removing moisture from the soil near the base of a structure.
In most cases, this is a set of pipes connected to the receiving well. All of them are slightly inclined and have special holes to collect moisture from the adjacent soil layers. As water seeps and accumulates, it flows down them into a drainage collector located at the lowest point of the drainage area.
The drainage system around the house eliminates the following number of negative factors:
- Stagnation of water in soil layers in contact with the foundation.
- Impregnation of the base and wall material with moisture and their subsequent destruction.
- Damp seepage through cracks into the underground room.
- Creating a favorable environment for the development of fungi, mold and other harmful microorganisms.
A drainage system is necessary not only in places with high groundwater levels, but also on ordinary dry soils.
Seasonal flooding due to snow melting leads to extremely unfavorable consequences for the foundation - cyclical freezing and thawing of its material. As a result, microcracks form in its mass, which subsequently, under the influence of the same factor, only increase and inevitably lead to the destruction of the foundation of the house.
In what cases is drainage installation required?
You can install drainage around the foundation of a house at any stage of construction and even when it has been in use for many years.
Its installation is necessary especially if one or more of the following factors are present:
- The site is located in an area with low relief. As a result, all wastewater and groundwater from higher elevations will constantly saturate the soil near the foundation.
- Natural properties of the soil that do not allow water to be quickly absorbed. Soil with a high content of clay and loam retains moisture for a long time.
- High average monthly precipitation. Even with good ability to pass water, the soil with the base will be constantly damp.
- Shallow groundwater.
- The presence of nearby structures with low-lying foundations. A natural obstacle will be created for the water, trapping it and preventing it from going lower.
- Surfaces located near the house that do not allow water to pass through - asphalt paths, concrete platforms, tiled areas.
No matter how well the blind area is made, it is not capable of 100% protecting the foundation and walls from dampness. Therefore, with a competent design option for a drainage system, it must be supplemented with drainage.
Types of drainage systems
There are three types of drainage systems:
- Open. It is formed in the form of an open shallow trench with a base width and wall height of about 50 cm. It is made without pipes or any special devices. It is the cheapest drainage modification available to any home owner. However, it has significant disadvantages - without reinforcements it constantly crumbles, is not visually attractive and poses a threat to others - you can simply fall into a ditch.
- Closed. It is made using special pipes with moisture-absorbing small holes across the entire surface. The installation uses a special technology - a cushion of crushed stone or sand is placed at the bottom of the trench, then a special fabric in which the pipe is wrapped, after which it is laid with crushed stone, sand and turf. It is characterized by maximum efficiency and durability, but at the same time it is quite expensive and requires strict adherence to installation rules.
- Backfill. It is an improved version of the first system of the first type. However, in contrast to this, large crushed stone, gravel, and broken brick are placed at the bottom of the trench, and then covered with soil. To increase service life, the backfill material can be wrapped in geotextiles. The method is more affordable compared to the 2nd option, but does not have high throughput.
An open drainage system can be improved with simple additions. To do this, reinforcing trays are inserted inside the ditch, and gratings are laid on top. This creates some modification of the storm drain around the base of the house, adapted for drainage needs.
Creating a watershed
There is another way to direct storm and melt water away from the foundation of the house - by creating a watershed. In this case, costs will be minimal and efficiency will be high. The main purpose of a watershed is to direct overhead water away from a structure, collect it in ditches, and drain it away from the site.
There are two options for creating a watershed:
- The boundaries of the future watershed are determined and a canal of a certain depth is dug along its bottom so that there is a slope from the canal towards a ditch for collecting water. Next, additional channels are dug from the blind area to the channel and the soil between them is removed.
- From the blind area to the watershed boundary, bypassing work on the formation of additional channels, the soil is removed so that a slight slope from the building is obtained, ensuring the outflow of water. A kind of parapet is made from the excavated soil, sloping away from the house.
As a result of the actions performed, the building ends up on an artificial hill, thanks to which precipitation and melt water flow in the direction from the house.
To prevent softening of the soil adjacent to the structure, it is necessary to create an additional protective layer. You can make a concrete or stone platform, but this requires significant investment. An excellent solution is to use a grass lawn. It prevents water from penetrating into the lower layers of the soil, directing it in the desired direction.
Draining water from the foundation of a house is a necessity, but it is important to organize this process correctly. The result of the work will be comfortable living in the house, increasing the service life of the foundation of the house and its reliability
In what cases is it necessary to build a drainage system?
Not all owners of private houses and plots are aware of the need to develop a drainage system, relying on natural mechanisms for regulating groundwater levels. However, nature rarely takes into account human needs, leaving him to solve this important task on his own.
Of course, a drainage system on a site is not always necessary. Accordingly, it is necessary to know what factors are taken into account when deciding on its construction.
These include:
- terrain and site topography - in the lowlands the groundwater level is located closer to the surface, accordingly, the danger of flooding increases;
- the nature of the soil - on clays and loams, the decrease in water level due to natural filtration occurs much more slowly; artificial drainage is required to intensify drainage;
- the average annual precipitation level is characteristic of the area - with its increase, the need to develop a drainage system increases;
- the depth of location of aquifers (groundwater level) and seasonal fluctuations - when the maximum elevation is close to the surface, the relevance of drainage increases;
- deepening the underground parts of buildings - they create obstacles to natural drainage, as a result of which artificial drainage may be required;
- the presence of structures with low water permeability (concrete paths, asphalt areas, etc.) - they can play both a positive role, preventing water from penetrating into the soil, and a negative one, becoming an obstacle to natural drainage routes.
Experts, builders and designers, argue that in most of the territory of Russia (with the exception of some southern regions), the arrangement of drainage systems is mandatory.
How to organize water drainage on the site
This task is complex; it includes systems that complement each other:
- drainage system;
- surface drainage system;
- drainage system.
Using the first two systems, rain and melt water can be drained away. These types of groundwater are seasonal and pose a significant problem for houses with a basement. In addition, they can instantly fill a cesspool during floods.
If there is a roofing system, rainwater quickly accumulates and is drained to the catchment area. If there is no drainage, then very soon the rains will simply break the steps, blind area and all the paths near the building. The remaining melt and storm water is eliminated using surface drainage.
If the basement is flooded with water, and at the same time the cesspool needs to be pumped out weekly, then deep drainage will have to be performed.
Types of drainage systems and their features
Depending on the features of the structure, terrain conditions, location of groundwater and precipitation, several types of drainage are used. Let's consider the device, design, installation rules and purpose of each of them.
Surface
The main purpose of a surface drainage system is to collect water accumulated in the near-surface layer at the base of a house as a result of precipitation. Therefore, it works according to the storm drainage scheme.
Depending on the spatial arrangement of the pipes, there are three main modifications:
- Wall-mounted. Purpose – moisture removal from the outer walls of the base. Installation of the system, as a rule, begins at the stage of foundation construction - when the trench has not yet been backfilled. Otherwise, you will have to carry out excavation work again, wasting effort, time and money. Drains are laid in close proximity to the structure to a depth of 0.3 to 0.5 m below its level. In this case, the entire pipe system must have a slope towards the inspection well - about 1-2 cm per meter.
- Plastovaya. The goal is to drain water from the ground under the foundation in cases where the house is built directly above an underlying layer of groundwater, or above an aquifer, or the groundwater is squeezed out with force, and also when other methods are ineffective. The design of the system is a layer of sand under the foundation with a thickness of 0.3 m with gravel or crushed stone inclusions in the form of prisms. Gravel, crushed stone and perlite are laid on top of it to waterproof the concrete. The perimeter of such a pillow exceeds the perimeter of the house foundation. The system itself does not work - it must be connected to a ring or wall drainage.
- Ring. Used to lower the top point of groundwater. Unlike the above versions, this drainage system is located at a distance from the foundation - about 2-3, sometimes 5 meters. At the same time, it lies only 30-70 cm deep. The installation is based on the rules characteristic of a wall modification. However, its main advantage is that its installation is available when the house has already been built.
All types of surface drainage are effective only for removing rain and melt water. To prevent the impact of ground flows, the installation of deep drainage systems will be required.
Deep
Deep-type drainage is installed on watery, clayey soils, in low-lying areas of the terrain, as well as in the floodplain area of rivers, streams, lakes and swamps. The system can have several levels and is designed to drain groundwater below the freezing level.
In private housing construction, the following three variations are used:
- Horizontal. The structure includes linearly laid drains connected to inspection wells. The latter are located in places where the system turns sharply (corners), as well as at the lowest point. Their main function is periodic cleaning of contaminants (silt, soil). Water from the system flows into special reception areas - from there it is distributed into the lower layers of the soil. If necessary, pumps can be used to pump it out. Horizontal drainage is also carried out by analogy with surface drainage - in the form of wall, ring and layer. Moreover, they are located at a depth of 0.3 m under the foundation of the house.
- Vertical. The basis of the system is water collection wells. In them, water flows naturally from the overlying layers and goes below. However, depending on the situation and climate conditions, pumping may be necessary.
- Combined. It is a combination of both versions of drainage. Used in areas with high water content in the soil.
To avoid the main consequences of interseasonal ground fluctuations - heaving under the influence of freezing-thaw cycles - modern construction technologies suggest building a house on stilts.
However, this does not prevent flooding and damp penetration into the basement and basements. Therefore, the need for drainage still exists.