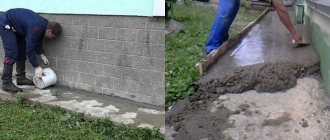
To construct a blind area around a house with your own hands, concrete, asphalt, paving slabs, ceramic materials or paving stones are most often used. This coating guarantees high-quality drainage of storm and melt water from the walls of the building.
Thanks to the presence of a protective coating, soil swelling does not occur even in the most severe frosts, and moisture does not penetrate into the concrete foundation. Well, in addition, such a tile coating improves the overall design of the house and adds completeness to the entire structure as a whole.
Why choose paving slabs?
Despite the fact that concrete protective covering is cheaper, many homeowners lay paving slabs. This happens because the tiles:
- long service life while maintaining the original appearance;
- it is possible to construct a blind area without the use of special construction equipment;
- the technology eliminates the laying of a reinforcing frame;
- ease of repair, dismantling and reassembly without extra costs;
- beautiful appearance and the ability to choose the desired color shade of the surface.
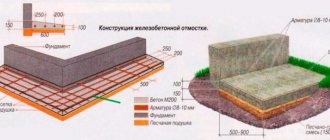
Schematic illustration of a concrete blind area.
In addition, the technology for constructing such a blind area allows you to complete all the work yourself, without involving additional assistants.
This way you can reduce costs and do this coating in your free time. Our step-by-step instructions given later in the article will tell you how to perform such work.
Purpose of the blind area
First of all, a well-built blind area solves the problem of excess moisture near the foundation. It will deteriorate more slowly if the waterproofing is damaged. There will be no problems with soil heaving in the spring. Properly selected tiles will add attractiveness and elegance to the home, making the appearance complete.
The main task of the blind area is to remove moisture from the foundation
It is important that, if necessary, the blind area can be easily dismantled, for example, when repairing communications, and then laid back - there will be no serious damage, as when pouring a concrete blind area. And of course, a paving area can be done with your own hands - it is not necessary to involve specialists, whose services are very expensive. To do this, you do not need to have special skills or expensive equipment.
What does it take to get the job done?
To work on constructing a blind area from paving slabs, you will need the following materials:
- colored or gray tiles, equal in total area to the surface of the blind area, which will first need to be measured and calculated;
- roll waterproofing or thick polyethylene film to cover one and a half area of the blind area;
- geotextiles with an area equal to the size of the waterproofing;
- curb stone along the entire perimeter of the outer edge of the blind area;
- sand, quarry or river;
- cement grade of at least M300;
- crushed stone;
- ordinary clay;
- drainage collectors.
If you do the work yourself, you will need a set of tools, which includes:
- measuring tape at least 5 meters long;
- pegs and nylon cord;
- building level;
- bayonet and shovel shovels;
- rubber hammer;
- Master OK;
- container for mixing mortar and concrete.
After you have purchased all the necessary materials and prepared the tools, you can begin work. You can watch the progress of work and a description of its stages in the attached video at the end of the material.
How to make a blind area from paving slabs with your own hands
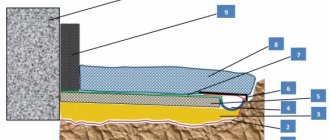
The design of the blind area consists of two layers: the inner one, which craftsmen call the base, bedding or pillow. And also externally, in our case paving slabs will be used. In order for each layer to perform its assigned functions, they must be done according to the rules.
Materials for the blind area of the house
- paving slabs (or paving stones). The choice depends on the desired pattern. But for novice craftsmen, it is better to take regular “brick” type tiles. There is an opinion that the larger the tile, the easier and faster the installation process will be (in practice, it happens quite the opposite; large tiles are more difficult to level and lay). The dimensions of “brick” paving slabs (paving stones) vary between: thickness 40-60 mm, width 60-120 mm, length 100-280 mm. Suitable for blind areas are tiles with a thickness of up to 40 mm (pedestrian area) or up to 60 mm (car passage area). You can make paving slabs yourself;
- border. When laying out with a curb, there is no need for a curb;
- waterproofing film, PVC film or roofing felt;
- insulation (if necessary);
- clay.
Necessary to make a hydraulic lock. Note. Experts advise taking fatty clay (with a minimum content of sand and impurities); it is denser, which means it drains water better.
- sand, it is advisable to sift some of it;
- crushed stone
The gravel is responsible for keeping the pad directly under the tile dry. Crushed stone with a fraction of 20-30 mm is suitable for constructing a cushion; Note. The larger the fraction of crushed stone (the larger it is), the more sand you will need.
- cement;
- pipe for communications, as well as pipes and collectors if drainage is planned.
Tool:
Shovel, trowel, rubber hammer, level, container for preparing mixtures, grinder with diamond blade (for cutting tiles to size).
According to user reviews, laying the blind area takes a little time (depending on the area). Moreover, most of it is allocated for preparing the base and compacting.
We recommend! Instructions for laying paving slabs, describing the entire step-by-step process. Below we focus on the features of installing blind area tiles.
Preparatory work
Marking with pegs.
For quality installation, it is very important to properly prepare the base. To do this, first of all, you need to remove the surface soil over the entire area occupied by the blind area of the house, which means that it is necessary to mark out the area of the future protective coating.
The width of the covering should be at least 60 cm, but it is recommended to make the flooring from one meter to one and a half. The fact is that the wider the strip, the more convenient it is to walk along it, and the effectiveness of protection from water is proportional to the width of the blind area. But you need to remember that excessive width will lead to additional financial costs.
Blind area dimensions
Marking the future blind area with pegs.
In order for the blind area to perform its main function and reliably drain water, it must be sufficiently waterproof and have a slight slope. The degree of water resistance of paving stones directly depends on the installation technology used.
When choosing the width of the blind area, you should proceed from the type of soil on which the coating will be laid. So, for sandy and slightly swelling soils, a width of 1 meter is sufficient, and for loams and heaving soils it is necessary to make a blind area at least 2 meters wide.
The thickness of the top covering layer of paving stones depends on the size of the material. The optimal thickness is considered to be a layer of 40-60 mm.
Excavation of soil for the blind area.
The slope of the coating should be directed away from the house at an angle of 1.5-2%, i.e. per 1 meter of width, the level should decrease by 1.5-2 cm. A smaller slope may not provide good water drainage, and a larger slope will contribute to the erosion of the soil adjacent to the blind area.
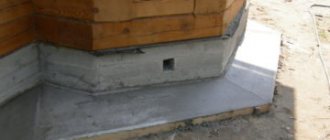
It is necessary to leave a gap between the foundation of the building and the blind area so that in winter, when the soil moves, the coating material does not damage the waterproofing of the foundation. This gap, after finishing the work, should be filled with sand or other soft material, such as roofing felt or waterproofing, should be inserted into it.
Excavation
After marking, it is necessary to remove the soil from the work site. The depth of the excavation consists of the thickness of the tiles and 30 centimeters for arranging the base for laying. As a result, it turns out that you actually need to remove the soil almost to the bayonet of a shovel.
The first layer in the dug trench is a layer of clay, 8-10 cm thick.
When laying it, it is advisable to make a slope away from the house. This will ensure better water drainage to the side. The clay must be compacted well. This can be done using a special construction mechanism or manually - with a tamper or shovel.
A layer of sand at least 5 cm thick is poured on top of the clay and compacted in the same way as clay - at a slope from the building.
Design of the blind area
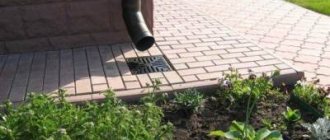
Those who appreciate beauty should take care of creating an original design. To do this, you can plant a flower garden on the blind area. To create full-fledged flower beds, you can limit the tiles using borders. Soil should be filled into the existing recesses, and various plants should be planted.
It is important that water from flower beds is effectively drained away from the foundation. Otherwise the base may be damaged. Each recess must be equipped with water drainage. To avoid problems with plant growth, the recesses for flower beds are selected of the appropriate size.
It is worth remembering the different watering needs of plants. If there is no quality drainage from the flower beds, they should be covered during prolonged rain. In addition, it is necessary to feed different bushes. Plants planted in this way cannot obtain nutrients from open soil. You can create a beautiful design using climbing plants.
Waterproofing works
The installation of the waterproofing layer itself does not take much time.
As a waterproofing material, you can lay roofing material, gilroizol or durable polyethylene film. Waterproofing and roofing felt are durable and reliable, but polyethylene costs less and is easier to install. But, despite the cheapness of polyethylene and the fact that many people use it, a choice must be made between good quality, durability and low price. You just need to roll out the rolls over the surface, cutting off the required length. The edge adjacent to the wall is bent with a slight rise along the surface.
Installing a curb
After waterproofing work, you need to install a curb in such a way that the blind area around the house made of paving slabs is strictly limited and does not have horizontal movements. The line for its installation is determined by the width of the tile and must be a multiple of its size. The trench for installing the curb stone should be 20 cm wider than it.
Table of proportions of concrete components.
Now you need to mix the cement mortar with crushed stone at the rate of 1 part cement, 3 parts sand and 4 parts crushed stone. Lay part of the concrete in the trench and place a curb on it, and throw the rest of the concrete into the empty space between the ground and the curb stone.
When installing a curb stone, you must constantly measure the height of its position using a level or level.
Base for blind area
When figuring out how to make a blind area from paving slabs, it is necessary to provide a good foundation for the future structure. It is laid in several layers, following installation technology.
In cross-section, the bed looks like a layer cake, which is due to its design. To achieve savings on materials, it is recommended to reduce the layer thickness.
Creating a hydraulic lock
When arranging the blind area, you should maintain a slight slope along which excess liquid will drain. It can be done while pouring clay or when laying the last layer. After thoroughly compacting the bottom, it is covered with a 5-centimeter layer of clay. Sometimes it is replaced with concrete mixture. In this case, the thickness is increased to 15 cm. This layer drains water well.
To reduce the lateral load on the foundation, it is recommended to leave a gap between the base and the blind area. Then it is covered with sand or laid out with roofing felt. It is also possible to use polystyrene foam, which also compensates for the load and provides good insulation.
The hydraulic lock is created on the basis of PVC film, geotextile and roofing felt. When laying the canvas, it must not be stretched. Otherwise, there will be a risk of film rupture when the soil freezes.
When setting up a stormwater system, you need to place a pipe on the edge of the film and cover it with a layer of crushed stone. Such a measure is necessary to protect the structure from clogging with all kinds of debris. It is also necessary to provide for the presence of a storm drain and a storm drain pipe. The technology is in demand due to its extreme simplicity and minimal costs.
Backfilling with sand
The optimal thickness of the sand layer is 5 cm. When compacting the surface, it should be watered with liquid using special nozzles. They are used as tips from watering cans for watering a garden or vegetable garden, as well as special sprayers.
Watering continues until small puddles form. It is important to wait until they dry and start compacting. Such a base will provide good protection for the blind area from moisture penetration and damage from crushed stone.
Installing a curb
When arranging a blind area around the house with your own hands, it is important to pay attention to the installation of the border. It is fixed along a stretched cord using pegs and leveled with a building level. The outer side is covered with cement, which is an important standard for protecting the tiles from spreading. As an alternative to the classic concrete curb, you can use a plastic option.
Crushed stone
The optimal thickness of gravel backfill is 50-100 mm. The exact indicators are determined by the level of precipitation in your area.
After placing the crushed stone, it is allowed to remove the wooden pegs holding the curb. Then you should tamp the gravel and fill it with sand.
If the room has a ground floor or basement, the blind area is subject to additional insulation. To do this, lay out a sand layer 50 mm thick and compact it. Only after completing the above steps can the finishing layer be laid.
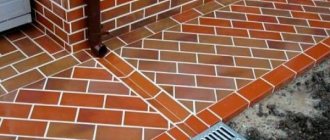
Laying tiles
To understand how to lay paving stones correctly, you should study the step-by-step instructions and technology for laying tiles for the blind area. Experts recommend starting work from the foundation side, fixing the tiles away from you to prevent destruction of the cushion layer. Each structure must be placed in the selected location and hammered with a rubber hammer.
To level the surface, a building level is used, and any blows to the paving stones are carried out only with the help of a plank. In this case, you will be able to avoid deformation of the tiles.
A distance of 2 mm is maintained between each tile. Such a gap is formed due to the presence of a special lock, which is present on different types of tile products. If there is no border, it is important to take care of the edging tiles.
Sealing seams
To seal the seams, the same composition is used as for the final layer of the blind area. When arranging a cement-sand cushion, use a dry mixture, maintaining a 4:1 ratio. It is placed on the tile and distributed using a broom. Next, the surface is watered so that the cement sets and provides optimal reinforcement.
Base structure
A layer of sand about five centimeters thick should be poured onto the waterproofing layer. This layer must be carefully leveled and compacted. If the sand is dry, then you need to moisten it, otherwise you simply will not be able to lay and compact it well. To level the sand, you can use a simple piece of plywood with a straight edge.
The next layer (see photo), 8-10 cm thick, should be compacted crushed stone. A layer of sand up to five centimeters thick is again poured over the crushed stone.
After this, all layers must be simultaneously spilled with water and compacted well.
Scheme of blind area with waterproofing.
At this point, the preparatory work with the foundation structure is considered complete.
Tile laying
It is best to start laying from the corner of the house. When laying, try to fit the individual tiles as closely as possible to each other. If this does not work, then determine for yourself the permissible gap and insert plastic crosses or simply wooden chips between the tiles. The gaps will allow you to make the masonry even, regardless of the quality of the material.
Laying paving slabs.
After all the paving slabs for the blind area around the house have been laid, mix the solution in a proportion of one part cement to three parts sand for subsequent fixation of the tile covering. The solution must be made thick, since the liquid mixture will quickly release water and the quality of the solution will decrease.
Blind area on a hard cushion
The technology for laying tiles on a solid pad involves the use of a concrete base. If it is already old, then after minor repairs you can lay paving stones on top. The absence of a concrete pad will require appropriate concreting work.
Laying on a finished pillow
Using a ready-made concrete base will simplify the work. Only minor repairs will be required. The step-by-step instructions are as follows:
- First you need to make an assessment of the concrete surface. All existing cracks are sealed with cement mortar or sealant. If there is delamination of concrete along the blind area, it must be coated with a special compound. You can make the mixture yourself from liquid glass, cement and water in equal proportions. Areas with large pieces of concrete peeling off are filled with screed.
- The finished blind area usually protrudes above the ground, so installing a curb will be mandatory. It is laid 100 mm above the blind area. The protrusion is necessary for filling 40 mm of finishing mixture plus 60 mm thickness of paving stones.
The dried, repaired surface is primed, covered with a finishing layer, after which they begin laying paving stones using the same method.
Making a pillow
Step-by-step instructions for making a concrete pad for paving stones involve the following work:
- All work from digging a trench to filling the crushed stone layer is identical, as in the manufacture of a soft pillow, only all layers are poured into pre-installed formwork. Next, a reinforcing mesh is laid on the crushed stone, and a wooden board is placed every 6 m, at the corners and bends. Such a gasket device will serve to compensate for the expansion joint.
- Next, the formwork is filled with concrete and left until it hardens completely.
The proportions of the concrete mixture for pouring can be found in the table:
After complete hardening, the formwork is removed from the blind area, a border is installed and the surface is primed. Filling the finishing mixture, laying paving stones, and sealing joints occurs in a familiar sequence.
Timing after installation
When you have laid paving slabs on a sand-cement base, they need to be given at least two days to cure. At this time, you should not step on it or place heavy objects on it. The complete setting time of the cement mortar occurs on average in two weeks, depending on the outside temperature and humidity.
If it starts to rain, it is recommended to cover the blind area with plastic film, which will prevent its base from washing away.
Technology for laying sidewalks
Laying paving slabs on a concrete blind area can be done in several ways, depending on the base on which the material will be attached. Each method has its own nuances that must be taken into account in order to obtain a high-quality result.
What tool will you need?
The arrangement of the blind area begins with the preparation of the necessary devices. To install the tiles you will need:
- shovel;
- trowel for applying the mixture and leveling;
- grinder for cutting tile parts;
- a hammer, preferably a rubber one, to place the tiles in the correct position;
- a board that will prevent damage to the material when struck with a hammer;
- container for diluting the mixture.
Having prepared all the necessary tools for installing paving slabs and the material itself, you can begin the main work.
Laying paving slabs
Laying paving slabs on a blind area can be done dry or wet. It all depends on the material on which the fastening will be carried out. You can use mixtures made with your own hands, or purchased in a store. In the first case, the blind area will be more economical, but in the second, the quality and compliance of the mixture with the necessary characteristics are guaranteed.
For cement-sand mixture
It is possible to lay the sidewalk on sand or paving stone.
The instructions for these options are identical. Gartsovka is a two-component mixture consisting of sand and cement. The elements should be laid away from the wall. After placing the tiles in the correct position, it is important to check their level. If there are inconsistencies, then you need to add more dry mixture. The edging is placed last if there is no border. On mortar If the sidewalk is attached to mortar, then it is necessary to lay it out around the perimeter in advance, and then start mixing the mixture. It is prepared from sand and cement in a ratio of 3:1. It is not necessary to prepare the entire solution, since the material will begin to thicken and harden, which will complicate the work. Next, several rows of tiles are removed from the base, where the prepared mixture of layers of 3 cm or more is applied. The tiles are then laid over the mortar.
Sealing seams
When all the rows of tiles are laid in place, the joints are grouted with cement mortar. The prepared mixture is applied to the spaces between the tiles and distributed evenly. This option allows you to create a monolith and minimize the harmful effects of moisture. It is also possible to fill the seams with sand, but this method is less reliable.
Grouting joints
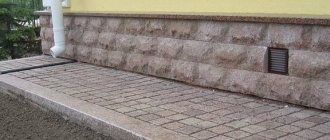
The blind area made of paving slabs is characterized by excellent strength and high aesthetic characteristics.
The use of shaped elements allows you to create a stylish edging for your home, protecting the foundation from moisture.
The process of constructing such a blind area is extremely simple. Following the technology and recommendations of specialists, you can organize it yourself without much effort.