A good alternative to the usual, but not without drawbacks, concrete blind areas is a blind area made of paving slabs or paving stones. Easy to install and affordable tiles make it possible to do the work yourself, without the involvement of specialists.
A blind area around a house made of paving slabs, in addition to protecting the foundation from water, allows you to create a beautiful and comfortable path around the entire perimeter of a private house or cottage. Let's consider the technology of constructing the correct blind area in the form of step-by-step instructions.
How to make a blind area from paving slabs with your own hands
The design of the blind area consists of two layers: the inner one, which craftsmen call the base, bedding or pillow. And also externally, in our case paving slabs will be used. In order for each layer to perform its assigned functions, they must be done according to the rules.
Materials for the blind area of the house
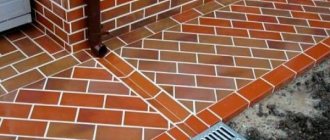
- paving slabs (or paving stones). The choice depends on the desired pattern. But for novice craftsmen, it is better to take regular “brick” type tiles. There is an opinion that the larger the tile, the easier and faster the installation process will be (in practice, it happens quite the opposite; large tiles are more difficult to level and lay). The dimensions of “brick” paving slabs (paving stones) vary between: thickness 40-60 mm, width 60-120 mm, length 100-280 mm. Suitable for blind areas are tiles with a thickness of up to 40 mm (pedestrian area) or up to 60 mm (car passage area). You can make paving slabs yourself;
- border. When laying out with a curb, there is no need for a curb;
- waterproofing film, PVC film or roofing felt;
- insulation (if necessary);
- clay.
Necessary to make a hydraulic lock. Note. Experts advise taking fatty clay (with a minimum content of sand and impurities); it is denser, which means it drains water better.
- sand, it is advisable to sift some of it;
- crushed stone
The gravel is responsible for keeping the pad directly under the tile dry. Crushed stone with a fraction of 20-30 mm is suitable for constructing a cushion; Note. The larger the fraction of crushed stone (the larger it is), the more sand you will need.
- cement;
- pipe for communications, as well as pipes and collectors if drainage is planned.
Tool:
Shovel, trowel, rubber hammer, level, container for preparing mixtures, grinder with diamond blade (for cutting tiles to size).
According to user reviews, laying the blind area takes a little time (depending on the area). Moreover, most of it is allocated for preparing the base and compacting.
We recommend! Instructions for laying paving slabs, describing the entire step-by-step process. Below we focus on the features of installing blind area tiles.
Advantages and disadvantages
The list of advantages of using a blind area made of paving slabs is impressive:
- High-quality foundation waterproofing. Thermal insulation. These factors are ensured by the multi-layer structure;
- Long service life. This type of blind area is superior in durability to cement-sand blind area. Throughout the entire service life, the surface does not crack and lose its appearance;
- A variety of execution options due to the variety of designs;
- No special heavy equipment is required for installation. The construction of the border can be done with your own hands;
- Simple assembly and restoration of the curb. If it is necessary to remove the coating, simply disassemble it and install it again;
- Does not require a reinforcing frame.
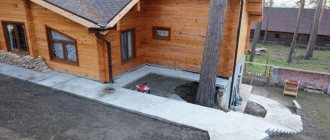
Do-it-yourself blind area from paving slabs
The only drawback of the border is its price, which depends on the amount of material, its shape, and pattern. A blind area made from paving slabs will cost more than a simple one made from a mixture of cement and sand. But in this case, it is possible to save money by installing it yourself.
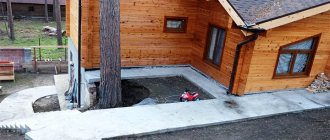
Paving slabs on a concrete blind area
Despite its reliability, the concrete blind area does not last forever; it can collapse due to violation of the pouring technology. It may simply crumble or become covered with small cracks. Repairing the blind area will be frequent and will cost more than installing a new one. In the end, tiling the blind area with tiles is an effective way to decorate the yard and area in an original way.
How to lay paving slabs on a concrete blind area
Option 1 – Laying paving slabs on a concrete base
Concrete is used as a new sub-base.
This method involves the use of concrete mortar to form a hydraulic lock and strengthen the blind area. For example, to use it to drive a car.
Sequence of work:
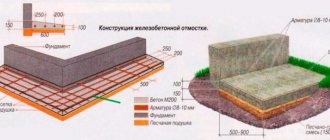
- excavation of soil to the required depth;
- installation of formwork;
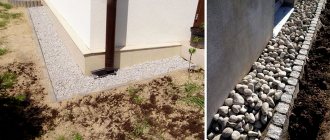
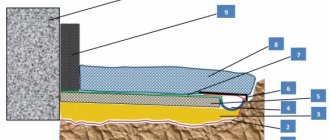
- installation of expanded polystyrene (or penoplex) on the surface of the foundation (basement of the house), it will serve as insulation and a compensation gap between the foundation and the concrete base;
- backfilling with sand. Many people lay geotextiles or film under concrete. Then the film should be between two layers of sand 30-50 mm thick. This thickness is sufficient so that gravel or crushed stone does not tear the waterproofing film. It should be remembered that the laid film does not need to be stretched. The formed folds will allow it to change configuration under the influence of ground movement;
- backfilling of crushed stone;
Note. Do not forget that all layers are well compacted.
- installation of reinforcement. For high-quality distribution of concrete over the surface, the reinforcement must be raised above the level of crushed stone by 20-30 mm (spacers are used).
- installation of wooden spacers to compensate for the expansion joint. Unlike the finished version, such gaskets can be installed at a distance of up to 6 meters from each other. But a prerequisite is installation in the corners and at the bend;
- pouring concrete mortar. When pouring concrete, you should make a slope, because... its installation at the stage of formation of the finishing layer will no longer have the desired effect. If concrete is mixed during work, it is important to maintain the proportions of cement to obtain a solution of the required strength;
The proportions of concrete components are indicated in the table
- removal of formwork. If the formwork is not high, you can leave it, or you can remove it and make a drainage layer in its place;
- install a curb if necessary;
- formation of the finishing layer after the concrete has completely dried. In this case, you should use only a dry cement-sand mixture for installation;
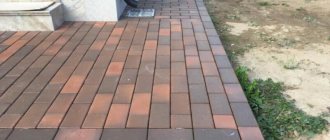
- laying paving slabs on concrete and sealing joints.
Option 2 – Laying paving slabs on an existing concrete blind area
Before starting work, do the following:
- assessment of the condition of the existing (old) concrete blind area;
- elimination of all defects:
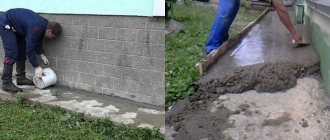
– sealing cracks in the blind area. For cracks up to 3 mm deep, cement paste is suitable (proportions: 1 part cement to 1 part water. More than 3 mm - you need to prepare a new concrete solution or use a sealant, for example, TEKTOR 103 (225 rubles / piece), ISOSEAL P-40 (280 rub/piece);– elimination of delamination of the blind area. For this purpose, minor areas of delamination are covered with a composition that contains liquid glass (solution proportions: cement, water and liquid glass - 1: 1: 1). Significant damage is removed and a new blind area is poured in its place.
- installing a curb. In this case, this is a mandatory step. Because the old blind area is already above ground level, and subsequent backfilling of the finishing layer and laying tiles will raise it even higher. At least 100 mm. (40 mm layer + 60 mm tiles). That is, in order to eliminate the possibility of the tile spreading, it needs to be secured with something. As an alternative, we can suggest pouring an additional, higher blind area. It will act as a limiter. But, this is a rather long and labor-intensive process;
- applying a primer solution to the restored surface of the blind area. AURA Unigrund KRAFT (90 rubles) or Ceresit ST-17 (450-500 rubles/10 l) will do;
- forming the finishing layer, laying paving slabs on concrete and sealing joints.
Blind area around a house made of paving slabs - video
Design of the blind area of the house
For connoisseurs of beauty, we point out that you can create a beautiful design for a blind area from paving slabs by making a full-fledged flower garden.
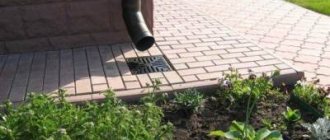
Flowerbed for blind area To install flowerbeds, you need to limit the tiles to borders. And fill the resulting depressions with soil and plant plants.
It is important here to drain water from the recesses (flower beds), because... it can damage the foundation. For each recess, drainage and water drainage to the side are provided.
When planting plants, remember that the plants being planted may have different root systems. Therefore, you need to provide in advance the required size of the recess for the flower bed. In addition, flowers need different amounts of watering. Therefore, in rainy weather, such containers need to be covered so as not to damage the root system of plants (this problem will not arise if the water drainage system is properly installed).
You should also feed the bushes on time, because they do not have access to open soil. Climbing plants can be directed along the wall to the window, which will provide a beautiful view outside the window and create shade in the warm season.
Cost of work on constructing a blind area from paving slabs per m2, excluding material
In conclusion, a few words about the savings achieved when doing the work yourself. Let's calculate how much it will cost to install paving slabs around the house if you hire professionals.
The table shows approximate prices for 2021 for the services of the team, this will help determine profitability and draw up the correct estimate
| Work on the blind area of a private house | Doing the work yourself | The cost of a master’s work per sq. m. |
| Material price | We do not take into account, because the cost will be the same | We do not take into account, because the cost will be the same |
| Removing the old blind area (dismantling) | 0 | 65 |
| Marking and excavation (depth 300 mm) | 0 | 150 |
| Hydraulic lock made of clay | 0 | 100 |
| Laying film or geotextile | 0 | 40 |
| Formation of a sand layer + tamping (5 mm) | 0 | 80 |
| Backfilling of crushed stone cushion (100 mm) | 0 | 80 |
| Installation of finishing layer + tamper (5 mm.) | 0 | 80 |
| Installing a border (depending on size and type) | 0 | 70-250 |
| Curb installation | 0 | 70-200 |
| Installation of a storm drain | 0 | 250 |
| Pipe laying (per m.p.) | 0 | 50 |
| Laying tiles/pavers (varies depending on tile size and configuration) | 0 | 400-1500 |
| Total | Saving | About 2,000 rub. |
Grouting the joints of the blind area
After the concrete glue has completely hardened, you can proceed to processing the seams. Sand is often used for this, for reasons that water will easily seep through it and puddles will not form on the blind area. On the one hand, this method is cheap and simple; moreover, the water will only reach the waterproofing layer and roll off due to the slope. However, it is worth considering that sand is washed out, which is why such grouting will have to be done every 5-6 years.
A more reliable and durable grout is a mixture of sand and cement in a ratio of 1:3. The solution should be liquid enough so that it can be applied using a brush or roller. After filling the cracks with concrete, it is enough to moisten the surface of the blind area with cold water from a hose to clean the tiles. After this, the seams dry for about 2 days, after which you can safely begin to use the finished walkway around the house.
Features of laying on old concrete
masonry on old concrete
Laying blocks on an old concrete surface is allowed in compliance with technical requirements. The surface must be smooth, without chips.
The installation process is carried out in stages:
- surface inspection;
- cleaning the coating from dust, chipped particles, sand;
- removing stains from machine oil using a solvent;
- the openings are filled with cement mortar;
- irregularities are cleaned off, the surface is leveled and the presence of the required slope is checked;
- The slabs are laid using a technology similar to the installation of blocks on a new concrete base;
- tiles laid on old concrete are treated with protective compounds.
In case of large deformations, the previous foundation must be dismantled.
Installation technology
You can install the border yourself, without the help of specialists, if you follow the basic rules:
- Marking and defining boundaries. A fishing line is stretched along the entire perimeter, which is fixed at the desired level using pegs (taking into account the slope). The line should be positioned so that the curb completely touches one of its sides.
- Digging trenches.
Concrete elements cannot be installed on fertile soil, so it must be removed so that there are no plants or roots left that could germinate again. The depth should be such that it is possible to make a backfill layer, install a curb, and the top of the curb after installation is not higher than the surface of the blind area. The width of the trench should be approximately 2 times the width of the curb so that the product can move and fix easily. The greater the depth of the trench, the better the curb will act as a barrier for the blind area. But its depth should not be greater than the height of the curb. - The bottom of the trench is filled with sand (10-12 cm), which is then carefully compacted.
- Concrete mortar is laid out on the underlying layer with a shovel or trowel.
- Individual elements are placed on the solution, which are aligned along the fishing line and level by tapping with a rubber hammer. Curbs are mounted end to end. If the blind area is made with a smooth radius, then individual elements must be placed without trimming the end edges. If there is a sharp turn, then the ends are trimmed so that when the elements are placed, their edges are adjacent to each other.
- After placing the items, you need to carefully apply the solution to the bottom of the material about 5-7 cm in height to fix it in place. The concrete mixture is carefully smoothed so as not to knock down the set level.
More detailed instructions for installing curbs are shown in the video: