Natural raw materials never go out of fashion, but on the contrary, they become more and more in demand every year. There are many options for using wood as the main material for fencing construction. Craftsmen can even make a unique fence from wood left over from construction work, thereby keeping costs to a minimum.
Pros and cons of wooden fencing
In addition to naturalness and environmental friendliness, it is worth mentioning other advantages:
- Easy installation. You can do all the work yourself.
- Availability of materials. You can buy wood in all regions of the country.
- Simple repair. Old elements can be easily replaced with new ones without harm to the entire structure.
- The light weight of a wooden fence allows you to avoid making a massive foundation. Excavation work is simplified.
- Convenient transportation.
- There is no need to use special equipment or rent equipment.
- Reliability and long service life. Treated wood will last 10–20 years without requiring repairs.
- Choice of shapes, types of lumber, sizes.
- The tree looks beautiful even without additional decoration.
Among the disadvantages of a wooden fence:
- Exposure to moisture. When there is an excess of it, the tree begins to rot.
- Damage by insects.
- Flammability of raw materials.
- The need for periodic care. If this is not done, the service life of the fence will be reduced significantly.
But all these disadvantages are eliminated with the help of protective equipment.
Wood is impregnated with antiseptics to remove moisture, and fire resistance can be increased using fire retardants.
Step-by-step instructions for installing a wooden fence
If you have already decided on the material, choose the proportions: shape, height of the wooden fence. Only after this will it be possible to begin construction directly. How to make a wooden fence with your own hands, drawings and detailed instructions, see below.
- The first step is marking the territory.
- Next, you need to calculate the number of wooden pillars, picket fences and veins.
- The ground part of the timber must be treated with tar.
- Then marking is done along a pre-tensioned cord under the beam (recommended distance is 3 meters).
- Holes are being dug out. The depth of the holes should be equal to the depth of the soil - this is about 1.5 meters. Holes can be dug with a drill.
- Think carefully about one nuance: if you are planning to make a high and heavy wooden fence, then in this case be sure to attach a metal plate to the base of the support. This is necessary for stability and to prevent the fence from twisting under the influence of gravity.
- Wooden supports are installed vertically on a 12 cm sand cushion, after which the hole is filled with small portions of soil and sand. Compact thoroughly. To make the structure more durable, the hole can be filled with concrete.
- After installing the supports, you need to calculate and determine the attachment points for the wood veins at the top and bottom.
- The picket fence is selected according to a pre-selected template, but you can make it even by cutting it along a stretched cord.
To simplify the work, you can purchase a ready-made picket fence with or without drawings.
We invite you to watch a short video with a selection of beautiful wooden fences:
Suitable material for construction
For the fence, not only new elements are taken, but also any available wooden parts.
Board (edged, unedged)
The most popular and affordable type of lumber. An unedged board costs less and is not cleared of bark on the sides. To make the structure last longer, it is recommended to remove the bark and sand it thoroughly before fastening it.
Edged boards are sold cleaned, with a smooth surface, sometimes already treated with protective agents.
The designs are more accurate. It’s easy to make a fence from these boards yourself.
Ready-made fences are installed around country houses, in villages, and in dachas.
Construction costs are minimal; there is no need to build a massive foundation.
Users often search for:
- Construction of a fence made of Euro picket fence
- Wrought iron fence
Fence
This name was given to polished planks of the same width and height. They are nailed to the joists vertically or horizontally. The top of the picket can be different (regular cut, carved). Depends on the preferences of the owners and their budget. This type of fence is inexpensive.
The distance between the pickets is selected individually. To fence private houses and summer cottages, the fence is often made solid. If you need to make zoning of the estate, then create a low fence of up to 0.5 m.
A structure made of slats painted white, with flowers, shrubs or flower beds planted around the perimeter, looks beautiful.
An unusual version of the fence with elements of artistic forging is shown in the photo above.
timber
Timber is a durable raw material. Obtained from hard rocks. Under such sectional material you need strong racks made of logs, bricks, and metal.
The beam happens:
- profiled;
- whole;
- glued;
- double;
- spliced.
Reiki
A type of lumber. They are thin strips. They make simple but original hedges.
Slat fences are created with gaps, so they are well suited for garden zoning and decorative fencing around the front garden.
The disadvantage is that such a fence does not protect the site, but is made for decorative purposes.
Log
Cleaned and sanded tree trunk. The material is durable and lasts a long time. It weighs a lot, which complicates installation and transportation.
The logs are laid horizontally or dug in vertically.
The finished fence looks original and performs its protective function well.
Pallets
Budget-friendly raw materials for fencing at the dacha. They are bought new or used second-hand. They can be mounted assembled or disassembled into planks.
Pallets are used for fencing beds, zoning areas, and on the border of two estates.
Such fences look original. They are decorated with pots of flowers and painted in contrasting colors.
tree branches
A fence made from branches is called a wicker fence. It looks more like a partition than a fence. Used for decorative purposes.
Wicker will fit well into a rustic style.
Wooden stakes are driven into the ground, and twigs are alternately intertwined between them. The raw materials are hazel branches or vines. You can take other rocks, but the strength will be much lower.
Before weaving, the material must be soaked in water for a day.
The fence can be placed both inside the estate and on the street side.
Disadvantage: short service life.
Gorbyl
It is considered a waste from the wood processing industry.
Croaker - side cut of a log. One side is sawn off, the other is covered with bark.
To prevent insect pests from infesting the bark, before creating the fence, the material is cleaned, sanded, and treated with antiseptics.
To make a slab fence look beautiful, it is recommended to use a commercial slab. It is sold polished, of the same size, impregnated with antiseptics.
An antique fence looks unusual. Externally, it complements houses made of stone and logs well.
The method of installation of elements is selected individually.
What types of fences are there?
Any territory that has an owner must be marked or fenced. The main feature of such an area is the fence.
It differs in materials of manufacture:
Wooden fence.- Fence made of steel lattice.
- Stone fence.
- Brick fence.
- Concrete slab fence
- Fence made of metal sheet.
- Mesh fence.
How to buy quality raw materials
When choosing, pay attention to the following points:
- The material must be wrapped in transparent polyethylene or other packaging. It's not worth taking in a beautiful but dark wrapper. Otherwise, there is a high risk of buying a low-quality product.
- Knotted wood with chips is not suitable. It has a limited service life.
- If drops of water are visible under the polyethylene, then the material is damp. It is not advisable to take one like this, because when it dries, it will begin to deform.
- The color should be natural, without stains on the surface.
- The smell is woody and fresh. If you feel damp, this is a sign that the boards are beginning to rot.
- Larch is considered the most durable species. but it costs a lot, less strong ones are pine, spruce, but they are cheaper. For decorative hedges, it is better to take birch, beech, and ash.
- Planed boards have a smooth surface without roughness.
- Look at the rooms where materials were stored. It should be dry and warm there.
- Take boards from the same batch so that they do not differ in surface color.
Clearly calculate the consumption of raw materials, buy with a 10% margin. Carefully evaluate the type, storage conditions and quality of packaging.
Advantages of picket fences
Compared to other types of fencing, a wooden picket fence prevails in dachas or private buildings because it is easy to install and unpretentious in further use.
Front garden
Advantages:
- The ability to build beautiful fences using cheap, affordable, practical materials that are easy to process using simple means and tools.
- The best eco-friendly option that creates an atmosphere of coziness and a feeling of comfort.
- Universal, allowing you to build various structures and implement design ideas.
- The pieces are easy to make and quick to install. Even a beginner can handle this kind of work.
- Easy to maintain: you just need to periodically renew the protective paint layer.
- In case of damage, there is no need to replace the entire fragment of the fence; it is enough to replace a few slats.
- Treated with antiseptics can have a fairly long service life in good condition.
Decorative fences
Ways to protect wood
Natural raw materials used outdoors are subject to constant exposure to moisture and therefore require mandatory care.
On the building materials market there are a lot of impregnations, primers, and antiseptics that penetrate deep into the structure or create a protective film on the surface. It is important to treat wood against damage by insects and exposure to fire.
The procedure must be repeated every 2-3 years in dry, sunny weather. Drying time is a day.
About wooden fences
Wooden fences vary in height, translucency, section design, and type of construction. Sections are made with a height of 1.5 to 2.2 m; depending on the filling of the spans, the translucency of the fence ranges from 0% to 50%.
Fences are built on wooden or metal supports, on screw piles, or less often on a concrete foundation with brick or stone pillars. The type of foundation depends on the wind load in the building area, the type and characteristics of the soil, and the construction budget. If a classic picket fence can be installed on posts with driving or concreting, then a high solid fence, which will have a large windage, will require a more solid foundation. In areas with subsiding or wet soil prone to frost heaving, it is recommended to install sections on a pile foundation.
For a private home, a high solid wooden fence on metal posts is more suitable. Blind sections can only be placed on the front side of the yard; between the sections you will have to build a picket fence or other fence, the translucency of which is at least 30%. However, if you obtain the written consent of your neighbors, you can also install a solid fence along the boundary.
At the dacha, it is better to install translucent fences that freely transmit sunlight and do not interfere with natural air circulation.
Advantages of wooden fences
Wood is one of the most accessible materials. Compared to fences made of metal, brick, concrete or natural stone, wooden fences will be the most inexpensive. In addition to the affordable cost, a fence made of boards has a number of advantages.
Advantages of wooden fences:
- Simple and quick installation. To install such a fence, you only need a basic set of tools and the ability to use them. It takes 1-3 days to install a fence at your dacha.
- Environmental friendliness. Wooden fences do not emit toxic compounds, do not affect the condition of the soil in any way, and do not heat up in direct sunlight, which is very important if flowers or berry bushes grow next to the fence.
- Large selection of design options. A country cottage or country house can be fenced with a picket fence, lattice or solid fence with wrought iron decorations.
- Maintainability. A wooden fence is easy to repair; you just need to remove the damaged boards and put new ones in their place.
- Saving. A lightweight wooden structure does not need a massive foundation like a brick or concrete fence, which means you can save on foundation materials, reduce the labor intensity of the work, and reduce construction time.
Disadvantages of wooden fences:
- Wood has a short service life. Rain, wind, snow. gradually destroy the structure of the tree. The average service life of wooden fences is 10-12 years.
- Structures made from natural materials require regular treatment with antiseptics and fire retardants. To protect the fence from wood-boring beetles, mold and mildew, it must be treated with protective compounds at least once every 3 years.
- Poorly dried and treated wood becomes deformed over time - it “leads” and twists from direct rays of the sun and high humidity. Therefore, you need to choose the material for the fence very carefully.
Types and methods of installation
There are many options. It all depends on the capabilities, imagination of the owners, and the chosen design direction.
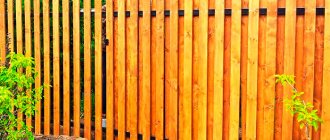
Vertical
Boards and a picket fence are attached to the horizontal joists with self-tapping screws or nails in a vertical position. The fence can be solid or with gaps.
To give the structure an unusual look, the upper part of the material is made round, beveled on the sides or carved.
Horizontal
To strengthen the fence, a vertical log made of timber is installed between the posts. After that, the boards are fixed in a horizontal position with self-tapping screws.
One of the varieties of such fasteners is a ladder fence.
Chess
Planks are nailed alternately to the transverse beams from the outer and inner sides in a checkerboard pattern. The structure turns out to be voluminous.
From the street, what is happening in the yard is not visible, but ventilation of the area is maintained.
If desired, you can get a modern fence of varying degrees of transparency. It all depends on the size of the overlap of one plank over another.
The disadvantage is the high consumption of raw materials, but the fences are elegant and neat. The composition is perfectly complemented by pillars made of stone, brick, and carved figured tops of the planks.
Herringbone (American)
Horizontal method of installing boards. But unlike standard fasteners, the boards are fixed tightly here with an overlap over each other. It resembles a Christmas tree when you look at the structure in profile.
The fence is erected in combination with metal, brick supports, and a concrete base. For gates and wickets, choose metal or corrugated sheets.
Blinds
Refers to the horizontal installation method.
The planks are not adjacent to each other, but are fixed at an angle with a small gap. They look like blinds.
The estate is well ventilated. The degree of transparency of the fence depends on the angle of inclination of the slats. A lot of material is wasted.
It is recommended to install in areas with high humidity.
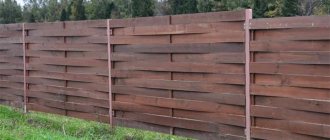
Wicker from boards
An interesting fence made of boards bent between posts. Similar to a fence made of branches.
It is performed in a horizontal position to make bending easier and result in fewer joints.
Vertical braiding is less common. It is complemented by horizontal strips nailed to the top and bottom of the section.
The photo above is an example of horizontal weaving of boards.
Ranch
Fence of American origin. Not used for street fencing.
They are erected for zoning a garden, vegetable garden, and as a barrier for farm animals.
The ranch is made low, up to 1 m. Several boards are nailed to pillars made of timber, logs, or stone at a distance from each other.
For security, a metal mesh is nailed to the fence from the inside of the yard to prevent small animals from entering the estate.
Palisade
The fence is of ancient origin. Territories were fenced off like this back in Ancient Rus'.
The logs are made pointed on one side so that they look like stakes, and they are dug or driven into the ground close to each other with the sharp edge up.
Such a fence will not be cheap, but it will be reliable and will last a long time.
It is recommended to pre-treat the lower part of the logs, which will be in the ground, with bitumen mastic to protect them from moisture.
Carved
Wood carving happens:
- Contour. Performed manually. A drawing is drawn on the board with a pencil. The outline is knocked out with a chisel. To add volume, the recesses are painted in one color, the rest of the planks in another.
- Lace. The easiest way. It is carried out manually. A floral or other pattern is applied to the workpiece with a pencil. Drill an opening so that the jigsaw knife can fit into it. Use a jigsaw to cut out the design.
- Geometric. Used by craftsmen. You need to work with a chisel and a special knife.
At home, without experience, it will be easiest to cope with contour carving. First create a thread diagram on paper. Having a wooden template will speed up the process.
If you do not want to waste time learning carving, then it is better to order ready-made sections or individual carved strips from craftsmen.
Combined
This is the name of a fence where wood is combined with other materials.
Concrete pillars with board spans look great. Metal supports with forging, which gradually transitions to spans, are also suitable.
In new design projects, a combination of gabion (a metal mesh filled with stones) and sections of boards in the form of a checkerboard or wicker pattern is increasingly common. This design is suitable for street fencing and estate zoning.
Decorative
Acts as a decoration of the territory, an element of landscape design composition. The fence is created low, light, with gaps. It is assembled independently from picket fences, boards, slats or purchased in ready-made sections.
Such fences will complement a chalet-style estate well.
The wood is aged, painted in the color you like or varnished.
Lattice
This method of installing planks serves as decoration and not as protection of the area. For construction, you need to stock up on picket fences or slats of the same width.
The planks cross each other at right angles or diagonally from the outside and inside of the fence. The construction is light but durable.
Lattice spans are sold in finished form. The most popular colors are white, brown (natural).
Solid
Good for street fencing. A solid wooden wall will protect from excess noise, dust, and prying eyes.
It is created from edged boards or picket fence. The planks are fixed to the joists close to each other, leaving no gaps.
The average height of such a fence is 1.5-2 m. It is recommended to place the boards 3-5 cm above the ground to reduce the risk of excess moisture being absorbed by the raw material.
Types of wooden fences
There are several types of wooden fencing:
- palisade;
- blinds;
- plank;
- fence.
Variety of models
All varieties have their own subspecies. Thus, a board fence can be made from edged or unedged boards, continuous or with intervals. These wooden fences are the strongest and, as a rule, are used to enclose the facade of a house.
Fencing made of unedged material
A picket fence is the easiest way to build a fence with your own hands. This is a series of stakes buried in the ground with gaps or installed closely. As a rule, a palisade is installed for decorative purposes to fence flower beds and flower beds, to decorate paths in the garden or vegetable garden.
Palisade type
The picket fence is mounted on transverse slats secured to the support posts. The structure, as a rule, is used to fence the dacha area from neighboring plots, as well as for decoration.
Wooden picket fence
A jalousie fence is a horizontal board fence. As a rule, a wooden fence is used as a stylish element when decorating a summer cottage. Moreover, sections of this fence can be purchased either ready-made or made with your own hands.
Louvre type design
Decorating the fence
Lovers of natural shades prefer to leave the wood in its original form, emphasizing the beauty with varnishing and brushing.
To make the fence a bright element of the site, it is painted in the color you like. Elements of artistic forging are used as auxiliary decor. Climbing plants are planted around the perimeter.
Fence "Herringbone"
Another type of horizontal fence is called a “herringbone”. It is named so because the boards are laid close to one another, and with an overlap on the one located below. In profile it looks like a Christmas tree, as children draw it.
Wooden herringbone fences create a continuous covering
It is more difficult to climb up such a fence. Please note that there is a protective visor on top. It protects the most vulnerable part of the fence, greatly extending its service life, and also delaying the time for the next painting. After all, usually the coating at the top and bottom is the most damaged. This fence is protected from below by a plinth and from above by a canopy.
Photo reports on the construction of fences are here.
Building a wooden fence with your own hands
It involves the development of a project for a future structure, indicating all dimensions, material consumption, and estimates.
Already at this stage it is important to determine the type of foundation.
If wooden sections will be combined with brick, stone pillars and a plinth, then it is better to go with a strip base.
If the sections will not bear a large load, and the racks will be made of profile pipes or logs, it is enough to equip a columnar base.
Sequence of concreting fence posts.
When purchasing material for poles, it is important to pay attention to the quality of the raw materials.
Logs are mounted to the fixed racks, to which boards or a picket fence are fixed with self-tapping screws.
Wooden fencing on metal posts is considered the most durable and durable.
How to make a checkerboard fence with your own hands
The next type: do-it-yourself wooden fences, checkered in the photo, you can clearly see the difference with the previous one.
Compared to the previous one, the wooden chessboard looks more decorative. The main feature of installation is that you can do it in any design: dense or with gaps.
The pillars are installed similarly to the option described above. After installation, you need to attach the beams. You can cut grooves in wooden pillars; in metal ones, you need to weld the corners on which the beams will be located.
Decide in what position you want to make the checkerboard: horizontal or vertical, set the guides. With a vertical checkerboard they are made horizontal and, conversely, with a horizontal checkerboard they are made vertical.
Next, after installing the guides, you can begin installing the boards. Place them in a checkerboard pattern as shown in the picture above (one on each side). They can be secured either with nails or self-tapping screws.
Very important! Clearly measure and mark the attachment points, because small irregularities will create gaps, and this will significantly spoil the appearance of your fence.
Photo gallery: fencing ideas
Even with a limited budget, you can make an interesting fence, and if you have the money, you can make a modern, beautiful and durable protective structure.
There are many options for wooden fencing, so from any source material you can make a unique composition that will effectively decorate your estate and become reliable protection from unwanted guests.
Drawings of a stone fence
A stone fence is distinguished by its massiveness, reliability and durability. Typically, such a fence is erected for houses of more than one floor. It should organically emphasize the style of the site. To build such a fence, you need to think carefully about every detail.
First you need to draw up a drawing in which to calculate the length of the future fence and the amount of necessary materials.
The drawing also takes into account the levels of all sides of the site and the height of the fence.
Building a stone fence with your own hands includes the following steps:
- Construction begins with marking the territory and determining the parameters of the future fence. If the terrain has differences, then the fence can be stepped. The obtained data is entered into the drawing for further calculations. Device diagram and drawing of a stone fence
- Next you need to pour the foundation. Drawings at this stage will help save time and money by calculating the required amount of materials. The drawings reflect parameters such as the depth, width and length of the foundation.
- When constructing formwork, pillars, plinths and spans, drawings are important for the correct positioning of the structure.
- At the last stage, caps for the pillars are made and the stone is laid.
DIY unedged board fence
Unedged board fence, photo.
Everyone needs a fence. For some, it’s simply to isolate themselves from prying eyes. Someone wants to emphasize their status with a fence. Others want to do something original with their own hands. The user of our site with the nickname Dembelek2007, who decided to independently build a horizontal fence from an unedged board, belongs to the third category. We will talk about his practical experience, as well as all stages of this construction in this material.
How it all began
The history of this construction began with the purchase of a plot. One of the requirements that guided the forum member when choosing “his land” was that there should be a forest, a river and wild nature nearby.
The result of an active search was the purchase of a plot next to a pond and a forest. It was then that Dembelek2007 came up with the idea that the fence should be in maximum harmony with the surrounding landscape. While various options for arranging the structure were “cooking” in my head, the forum member decided not to waste time and started clearing the site.
Dembelek2007User FOUMHOUSE
I mowed all the grass, cleared the area of debris and anthills. I used a tractor to level a small hill along the border with the road.
Having thus prepared a “springboard” for future work, the forum member got busy choosing the appropriate type of fence.
Dembelek2007
My site, as they say, “went into winter,” and I had time to properly prepare for construction. I looked through a lot of photographs of original fences collected on our website. Most of all I liked the fence made of unedged boards, built by a member of our forum - Spartak. The design is working and quite inexpensive. Taking this fence as a basis, I decided to repeat it, making some changes and improvements.
It is not surprising that the forum member settled on this particular design. It’s enough to look at the photograph showing Spartak’s fence to understand the reason for the popularity of a fence made of unedged boards.
Do-it-yourself fence made of boards, photo.
In addition to the fence fabric, you can use unedged boards to decorate the façade of the house.
Making a fence from corrugated sheets is easier and faster than making it from wood, but it is the manifested texture of the wood that gives the fence its spectacular appearance.
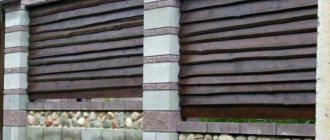
Fence made of horizontal unedged boards
Stages of building a fence from unedged boards
1. Calculation of quantity and purchase of necessary materials
The length of the perimeter that needed to be fenced is 120 meters. Based on this, the following materials were purchased:
- Edged board, which was subsequently treated with an antiseptic - 150x25 mm - 2 cubic meters;
- The canvas was used for an unedged board (such a board was obtained as a result of the initial cutting of a tree trunk, hence the uneven raw edges with bark), with a width of 20 to 35 cm and a thickness of 2.5 cm - 6 cubic meters;
- For the pillars, a 6x4 cm square pipe was purchased;
- The entrance pillars carry the maximum load, supporting the gate and gate. Therefore, a 6x6 cm profile pipe with a wall thickness of 2 mm and a round pipe with a diameter of 85 mm and a wall thickness of 4.5 mm were used here;
- The gate material is a square pipe 4x4 cm and a corner 45x45 mm.
The forum member also decided to cover the homemade gate and gate with boards, and then cover the pillars of the entrance area with hyper-pressed brick with a “wild stone” texture.
Also required for construction:
- crushed stone;
- PGS;
- sand;
- cement.
2. Preparatory stage
Because If an unedged board is used as a fence material, not a corrugated sheet, it must be properly prepared before use.
Dembelek2007
It took me the whole winter to prepare the unedged board, because... the boards had to be cleared of wane and planed.
To make peeling the bark easier, the forum member made a special device that made it possible to fix the board by placing it on its edge.
To remove the bark, a homemade scraper, shown in this photo, was used.
According to Dembelek2007, stripping the bark is a simple process, but it is very tedious and monotonous, and time-consuming.
The forum member had to plan about 7 cubic meters of boards on both sides with an electric planer, which is approximately 560 pieces.
In parallel with preparing the boards, the forum member welded a metal frame for the gate and wicket. Dimensions of gates and wickets:
- gate height – 2 m;
- the span of one leaf is 1.8 m;
- entrance opening width – 3.6 m;
- wicket height – 2 m;
- wicket width – 0.9 m.
3. Construction
After the preparatory stage we move on to construction. install the outer poles at the four corners , and stretch the marking cord between them. Don’t forget to check that the divergence angle between the two sides is equal to 90 degrees, for which you can use the rule: 3+4=5 .
The essence of the rule is as follows: if you measure 3 meters on one side of a stretched cord, and 4 on the other, then at an angle of 90 degrees, the diagonal between them should be 5 meters.
We also measure and compare the diagonals, width and length of all sides of the future fence. If you do not maintain a right angle or do not check all the values, then the sides of the fence may not be parallel to each other, or you may end up with a parallelogram. Dembelek2007 installed fence posts in pre-drilled holes with a homemade garden auger, 1.1 m deep. The length of the auger is 1.3 m, the diameter of the knife is 15 cm.
To minimize the forces of frost heaving that can push the pillars out of the ground, the forum member did not completely concrete them, but used the following technique:
- Two short reinforcement pins are welded to the lower end of the fence post, perpendicular to each other. These pins become the "anchor";
- Crushed stone of fraction 20-40 is poured into the drilled hole. The bedding layer is 10 cm.
- Then a fence post is installed in the hole. Next, its lower part is concreted. The concrete layer is approximately 25-30 cm. The reinforcement pins - the “anchor” - must be in the concrete;
- The column is leveled, and the remaining space is filled with ASG and crushed stone of fraction 20-40, with careful layer-by-layer compaction. You can compact the backfill with the blunt end of a crowbar.
Thanks to this technique - backfilling and a concrete “anchor”, we get something like a TISE foundation, without the need to drill a hole with an expansion in its lower part.
Looking ahead, let's say that fence posts installed using this method successfully survived the harsh winter. They weren't kicked out or knocked down.
More details about how to install a fence so that it does not get pulled out in the spring are described in the article on how to build a fence on heaving soil.
Another important nuance that you need to pay attention to is when aligning the post - the post should not pull/protrude to the side with the marking cord. Otherwise, due to the summation of errors, over large lengths, the geometry of one row of pillars may “run away”. Therefore, all pillars should deviate from the marking cord by approximately 3-5 mm.
During the installation of the fence, a forum member came up with a template to simplify his task when digging holes. The device is made like this: a wooden square is nailed to a block, the sides of the square are equal to the width of the bayonet of the shovel. The length of the bar is selected so that its length, plus the distance to the geometric center of the square, is equal to the distance between the pillars.
The template is used as follows: the end of the block rests against an already installed post, the opposite end is placed on the ground and aligned along the axis of the fence using a plumb line released from a stretched cord along the axis of the length of one of the sides of the fence. Next, we excavate the soil from inside the square with a shovel to a depth of 25-30 cm, then we begin to drill a hole with a garden drill.
The height of the above-ground part of the fence is 2 m, the length of the vertical board that covers the metal post is 1.9 m.
Horizontal boards are attached to vertical boards from the inside using self-tapping screws. When choosing this method of fastening, special attention should be paid to the corners. How this knot is made can be clearly seen in this photo.
After installing the fencing canvas, we move on to arranging the entrance group. Because When opening and closing wickets and swing gates, the pillars bear an increased load; a strip foundation is made as a base for them.
Its design is shown in this drawing.
Trench dimensions:
- length - 5.4 m;
- width - 0.4 m;
- depth - 0.4 m.
Before pouring concrete, the bottom of the trench is lined with geotextile, then crushed stone is filled with a layer of 10 cm.
After compacting the crushed stone, a plastic film is laid on top of it and a reinforcement frame is knitted.
The foundation was poured at the level of the ground surface. The mixture is “self-mixing”, from a 160 liter concrete mixer. The mixture proportions are:
- 4 buckets of screenings;
- bucket of cement;
- 1.5 buckets of crushed stone fraction 20-40;
- water consistency.
After gaining the necessary strength, the pillars of the entrance group are lined with hyper-pressed brick, and all internal free space is concreted.
To reduce friction, balls from bearings with additional lubrication are inserted into the gate hinges.
To preserve its appearance and protect it from adverse weather conditions, brick can be treated with moisture-repellent impregnation.
And at the end of construction, lanterns were installed on the poles. The lanterns were attached to dowel nails with a diameter of 6 mm. The electricity supply goes through a 3x1.5 PVA wire, laid inside the pillar at the stage of laying the brick.
The total cost of this construction was about 85 thousand rubles.
A photo gallery of wooden fences will help you choose the best fence. At FORUMHOUSE you will learn how to build a fence yourself from unedged boards, and how to make a beautiful wooden fence. We also recommend studying the topic of how to make wooden gates with a service life of 50 years.
Our article presents a selection of the most beautiful and unusual fences. Handymen will be interested in reading this article that tells you how to make a concrete fence post yourself.
From the video you will learn what a fence in the style of Russian wooden architecture is.
Wicker from a board - a beautiful fence
A fence made of boards bent between posts looks unusual. They are intertwined between the pillars like a traditional wattle fence. They just make it from long boards.
Wicker fence made from boards
Most often they are found in a horizontal design. There are fewer joints and it is easier to bend long spans.
Horizontal mesh of fence boards
There are also vertical braids. To give them a finished look, strips are nailed at the top and bottom - they both hold the edges of the boards and protect them from bad weather.
Read how to make a real wattle fence here, and how to grow a hedge here.
Vertically made Austrian braid
How to make such beauty, watch the video. It's really not difficult, but it requires a lot of strength.
Construction stages
Having prepared the necessary tools, you can begin installing the fence. The whole process takes several stages.
Preparation of material
First, the wood is selected and prepared. Since wood is of varying quality, preliminary preparation will be required. So, the croaker must first be cleared of bark. It is necessary to clean, sand, treat the wood with an antiseptic, fire-resistant impregnations and dry. The best types of wood suitable for constructing a fence are oak, larch, pine, cedar, alder, and aspen.
Site marking
At this stage, first, pegs are installed at the corner ends of the area, and a cord is stretched between them. Then, at an equal distance along the cord, the places for the pillars are marked with pegs. The distance between the pillars is 2-3 meters.
Expert opinion
Vladimir Ulyanov
I have been involved in fences for over 10 years, answering questions and helping people cope with the installation task on their own.
Ask a question to an expert
It is worth noting that increasing the distance leads to an increase in the windage of the fence and, accordingly, an increase in the load on the boards.
Installation of pillars
There are three types of poles: concrete, metal and wood. Depending on the type, installation is carried out.
- Concrete supports are dug into the ground.
- Metal ones are either driven into the ground or concreted in dug holes.
- Wooden poles are coated with liquid bitumen, wrapped with roofing felt and placed in a dug hole. Cover with broken bricks or crushed stone. Then the holes are compacted.
Useful Construction of a fence from a wooden or metal picket fence to look like a tree with your own hands
Installation of logs
Logs are supports for fence slats. As a rule, edged or unedged boards are used for them. The logs are attached to the posts, and the number of logs is calculated depending on the height and type of fence. For a classic picket fence 2 meters high, you will need to install 2 logs.
Fastening boards
The last stage consists of installing the boards. Ready-made and sawn boards are attached to the joists with nails or self-tapping screws. It is better to take galvanized nails and screws. To ensure reliable fastening, the boards are attached to the joists in at least two places. If the fence does not require any foundation, then a gap of about 5 centimeters is left between the ground and the lower slats. The bottom boards are also treated with additional protective agents.
Previous
WoodenHow to create a wicker fence with your own hands - a fence from branches, boards or twigs in the country
Next
WoodenTypes and installation of horizontal wooden fences