How to make a fence from unedged boards is a question that many summer residents ask. And this is understandable. A fence, often the most fancy one, such as a rough board fence, will always attract attention. The unusual nature of this decision only emphasizes the uniqueness of the estate. But at the same time, you can build such a fence yourself. At the same time, the reliability of unedged boards, ease of processing and price of the material make them one of the best materials for building a fence.
Such a fence can decorate the territory of both a dacha and a private house.
Features of the material
In individual construction, almost all types of unedged boards are used when constructing fences.
The industrial production of commercial lumber offers three main types of lumber for construction, the price of which is very affordable:
- slab - boards that have a semicircular shape on one side and a flat surface on the other side;
- double-sided unedged board - lumber of the same thickness, in which two sides are flat, and the sides have a natural shape before processing;
- one-sided edged board is a material in which only one side has a natural appearance, and the remaining sides are processed on a machine.
Thus, unedged boards, except for slabs, are semi-finished wood processing products.
The photo shows the material before the start of preparatory work.
Preparation of material for fencing from unedged boards
Purchasing materials
The work began with search queries on the Internet. A project was found, the features of the technology for constructing such a fence were determined, all the main necessary expenses were calculated and an estimate was drawn up. The purchase of materials began with profile pipes for the poles, then wood was purchased. The whole day was spent stacking the boards to dry them in natural conditions.
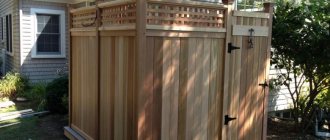
We decided to make a fence from a budget unedged board in the form of a beautiful horizontal checkerboard. In this case, there are two main methods of wood processing: complete stripping of lumber to a smooth surface, followed by treatment with an antiseptic and decorative impregnation, or partial processing (removal of bark) followed by painting with oil or homemade paint. Our path turned out to be not easy, because it was decided to make a beautiful fence, which means clearing everything and everywhere.
For the future fencing, unedged and edged lumber, wooden planks, profile pipe, and cement were needed. Additionally, I had to purchase a grinder and grinding flap wheels for it, a protective antiseptic and decorative impregnation, brushes, a lot of hardware, furniture bolts, etc.
Basic elements of fences made of non-standard material
Like regular fences, fencing made from non-standard lumber includes the following elements in its design:
- racks or posts for fastening spans, gates and gates;
- cross bars for installing span strips;
- auxiliary elements - visors, trim, trim strips;
- depending on the size of the spans, auxiliary columns or supporting elements can be used.
Fencing at the dacha
Separately, it is worth mentioning the decorative elements of such a fence. These can be metal overlays, fasteners with forging elements, stylized decorative cutouts, holes, carvings.
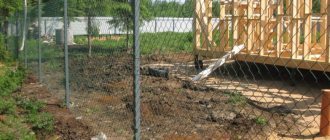
Second stage: foundation
The second stage, after drawing up the project and work plan, is pouring the foundation. Since the foundation is the foundation and one of the most important parts of any building, fences are no exception; it must be done with high quality so that the fence serves you for many years.
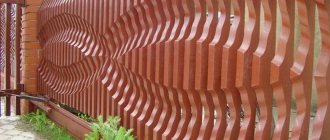
A very beautiful and functional fence with a checkerboard arrangement of unedged boards
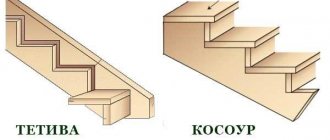
A wooden structure (fence) is a heavy structure, so pouring the foundation with cement is mandatory if, of course, you plan to use the fence for a long time. The foundation is used either nested or stationary strip. Both options are high quality and can withstand the weight of almost any fence. The first type is more economical and easier to implement, so let’s look at it first.
Nest foundation
Step 1
To get started you will need some thread and a few wooden pegs. Pegs must be driven in along the location of the future fence, starting from the place where the gate will be located, and a thread must be pulled between them, which will serve as a marking line. This will prevent uneven placement of supports.
For your information! If the fence is built around a house, then it is enough to mark the pegs at the corners of the perimeter.
Step 2
Starting from one of the corners, it is necessary to make holes with a shovel or drill with a depth of 1/3 of the height of the support (if it is metal or wooden, because such a depth is not required for stone or brick supports) at a distance of, on average, 2-3 meters from each other (depending on the length of the boards), the closer, the stronger and more stable the structure will be.
Step 3
We insert channels into the finished holes. They are the supporting structure to which the support beam will be attached, so it is important to pre-drill or cut, in the case of a wooden support, holes for fastening. The supports must be installed strictly vertically; a magnetic level will help control this process.
Healthy! Another option for attaching supporting beams is not to drill holes in the pillars themselves, but to attach metal strips with pre-made holes to them.
Step 4
Next, into the holes with installed supports, you need to pour a solution, which consists of M-400 cement, crushed stone and sand in a ratio of 1x3x1.5, followed by suppression of water. Mix well until a homogeneous consistency is obtained.
For your information! To make the structure stronger, if wooden poles are used, you can pour this solution to 1/3 of the height of that part of the support that is below ground level, and fill the remaining space with crushed stone after complete drying.
Buy crushed stone washed, without any impurities.
Step 5
After pouring, until the solution dries, the supporting structures are leveled and left to allow the concrete to set and cure.
It is important to know! If wooden blocks are used as supporting structures, then the lower part of the column, which will be lowered underground, must be treated, in addition to antiseptic, with bitumen (a black resin-like substance made from oil; a mixture of hydrocarbons and their nitrogenous, oxygen and sulfur derivatives; protects wood fibers from rotting, moisture and insects), and also be lined with roofing felt (black rolled material used for waterproofing).
Strip foundation
Strip foundations are usually used when massive stone, brick or concrete supports are used. The service life and strength of such a foundation are many times higher, as is the price.
Step 1
To begin, you need to dig a small trench about 200mm wide and 400-500mm deep (may vary depending on the height of the fence, its weight and the distance between the supports). If bricks are to be used further as a base, then the width of the foundation should be such as to safely support the proposed superstructure.
Step 2
The next step will again be to prepare recesses to the same depth for the supporting structures. Use the same method as when building a nesting foundation.
Step 3
We install the pillars in the prepared holes. Also at this stage, scrap metal is placed in the trench; broken slate is a very effective material. It is best if the metal does not just fall into the ditch itself, but is suspended on a single frame or connected by welding.
Step 4
The penultimate step will be the installation of additional supporting structures, so-called metal or wood formwork. The same unedged board can be used as formwork. There are no rules that would determine the required height; it depends on the financial capabilities and personal requirements of the owner.
Step 5
Finally, pour in the solution.
Fence shapes and types of material
There is nothing unusual in the fact that each individual project has its own characteristics and specific forms of implementation. So, using only vertical sections, you can process the upper part, cut out shapes or design the top in the form of a smooth line.
Creating such forms is not unusual. On the contrary, the play of light and shadow between the slats and the presence of a small space allow you to escape from everyday life and go beyond the usual pattern.
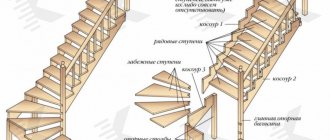
Installation diagram of a fence made of unedged boards
You can make a fence from an unedged board with your own hands in different forms of span structures:
- horizontal arrangement of overlapping planks;
- horizontal arrangement of planks on both sides of the pillars with indentation;
- vertical arrangement with overlap;
- vertical sparse arrangement on both sides;
- creating symmetry or cyclicity of span forms;
- inclined, angular, sparse methods of attaching boards that create the illusion of open space.
In construction practice, the horizontal method of installing spans is most often used. Less often - vertical and very rarely - other methods.
The photo below shows a fence made of unedged boards.
Horizontal method of installing fence spans
Material selection
An unedged board is wood with unsawed side edges, or with partially sawn edges. Usually, when cutting the extreme surfaces, a slab is obtained.
A board cut from a surface close to the edge of the trunk, but not the outermost one, is considered a class higher than slab, although it belongs to the same category of low-grade substandard wood.
Unedged boards from both coniferous and deciduous trees are used for fences. But it is best to purchase larch - this is what the professionals advise.
But you should not use birch saw cuts - this is the most unstable option to environmental influences and is not durable.
Before purchasing, pay attention to the appearance of the material . It should not have knots, cracks or other similar defects. The cut - the upper surface - should be even, smooth, without jagged edges.
Selection of material for construction
A beautiful wooden fence made of unedged boards is erected from high-quality dry hardwood or softwood boards. Among conifers, it is not recommended to use spruce as a building material, and among deciduous trees, birch is not recommended. For the crossbars, high-quality, knot-free beams with a cross-section of 50x50 mm are selected. For wooden support pillars, it is better to use larch beams with a cross section of 100x100 mm.
Before installation, slabs and unedged boards must be cleared of bark residues. This is a prerequisite for the durability of the building. Uncleaned areas gradually become a source of spread of wood pests and rot.
It is better to select materials for a specific project with a ready-made sketch and calculations. For work, material of approximately the same thickness and width is usually taken. The price of such material will be more expensive, but it will be easier to work with.
Advantages and disadvantages
Like any building material, unedged boards have their pros and cons.
Advantages:
- Easy manufacturing and installation process.
- The material is cheap, suitable for implementing even the most budget options.
- The appearance is attractive and distinctive.
- The material is harmless and natural.
- The service life is quite long.
Flaws:
- Construction will require patience and time - assembling such a structure with your own hands will take longer than fixing ready-made sections or installing blocks.
- Wood will require preliminary preparation and careful subsequent processing.
- The finished structure will have to be painted or varnished and maintained during operation.
Despite an almost equal number of pros and cons, wooden fences made from irregular boards are still very popular and widespread.
Lumber processing
When preparing the material, pre-treatment with protective equipment is carried out.
This makes it possible to increase the service life of the building to 10-12 years. The processing is based on the technology of preserving wood fibers using chemical impregnations. Subsequently, the outer layer is treated with protective solutions.
Fence installation diagram
Do-it-yourself processing is carried out in three stages:
- Preparing the surface, cleaning it from bark residues, grinding the surface. Treatment of all sides of lumber with wood impregnation with bactericidal properties.
- Application of paint and varnish coating, treatment with wax or oil compositions.
- The last stage is recommended to be carried out after the fence spans have been installed and fixed in place.
The video explains how to make wood protection yourself.
First stage
Before you go to the construction market or a specialized store to buy material, you need to carry out several initial manipulations, namely: study the characteristics and features of high-quality unedged boards, prepare special tools and take measurements.
To measure the area of the plot, you can use documents on the purchase of the territory or Google map
- First, measure the area of the area where you plan to build the fence;
- Conduct a soil analysis (for this purpose, you may need the help of a specialist) and topography;
- Create a project for your future fence, including parameters such as appearance, dimensions, design features, advantages and disadvantages.
Warehouse of unedged boards
The next thing you need to do is understand which board can be used when constructing a fence and which cannot.
Qualities that a good board should have:
- To avoid cracks and other deformations during processing, it is recommended to use boards whose width exceeds 15-20 centimeters;
- To extend service life and increase structural strength, the thickness of the board should exceed 2 centimeters;
- The length of the boards can be any; for reliability, 2-2.5 meters is recommended. The main thing is that all the boards are approximately equal to each other, especially for a vertical fence;
- The most important rule when choosing boards is the choice of dry material. Raw wood cannot be treated with antiseptic substances, it is difficult to saw, and you will still have to dry the raw material before use, and this will take extra time.
Interesting slab fence, more beautiful than functional
Tools and materials you will need during construction:
- Saw (grinder) and drill (screwdriver);
- For marking - ruler, construction meter, level;
- Cement, sand, crushed stone;
- Concrete mixer;
- Shovel;
- Antiseptic and paint;
Note! Before purchasing, if you decide to use a slab or a material that is not the most expensive and not of the highest quality, it is better to stock up on excess and buy one-fifth more. If you buy higher quality raw materials, then at least add another 10-15%.
After purchasing the boards, they will undergo subsequent processing. First you need to clear the edges of the bark, because under it there may be beetles and other insects that will slowly but surely destroy your fence. Next, we cover the dry boards with a layer of antiseptic, primer or stain; the durability of the fence directly depends on this. Such protection will preserve the structure from fading, rotting, corrosion and destruction caused by parasites for many years.
We cover with an antiseptic, stain or primer to avoid the destruction of fibers by insects
Interesting to know! Modern craftsmen have come up with a huge number of varieties of fences made from unedged boards. There are fences using pure wood, wooden boards and metal supports, boards and brick, stone or concrete. The main options for the arrangement of boards are horizontal and vertical fences.
Let's move on to installing the fence.
DIY unedged board fence
The wooden fence is installed in 2 stages. Performed:
- Installation of posts and guides.
- Set of fence spans.
Installation of posts and cross guides
Do-it-yourself installation of poles is carried out along the marking line. For areas with the correct relief and shape, the pillars are installed evenly. For areas of complex shape, the perimeter is divided into several segments. In areas of complex terrain, height differences between adjacent pillars should be no more than 50 cm.
Fence post installation diagram
Holes measuring 20x20 cm are dug under the pillars. The depth depends on the height of the fence - the higher the fence, the deeper the pit. For pillars 1.5 meters high, a pit with a depth of 60-80 cm is sufficient, and for a pillar height of 2-2.5 meters, the size should be increased to 30x30 cm with a depth of 1.2-1.5 meters.
The lower part of wooden supports is treated with a protective agent - bitumen primer or construction bitumen. The end of the pillar is processed especially carefully. The height of the treated part should be 10-15 cm greater than the depth of the pit.
Video on how to properly process wooden fence posts.
The crossbars are installed as follows: the lower tier is at a height of 20 cm from the ground, the upper tier is 20 cm lower from the top point of the column, and the middle one is in the middle, between the upper and lower tiers.
For horizontal arrangement of boards, the distance between the support pillars is chosen to be no more than 3 meters. In this case, an additional support pillar is provided in the middle. During the installation process, it is necessary to check the verticality of the installed poles.
Necessary materials
The optimal width of an unedged board for constructing a fence structure is 20-25cm, which minimizes the risk of chipping or splitting the element during installation. The easiest way to work is with lumber that is at least 20mm thick.
The length of the board can be arbitrary, but for the construction of a horizontal type of fence, you should select the most even and identical boards.
In addition to unedged boards, the materials and tools necessary to complete the work are presented:
- gravel, seeded sand and cement;
- boards for formwork;
- cinder blocks;
- cement masonry mortar;
- primer for concrete;
- metal corners 50 cm long, for installation in support posts and fastening bars;
- wooden blocks 50x50mm;
- wood paint;
- M-8 bolts with nuts;
- wood screws.
During the work, you will need to use a concrete mixer, a bayonet and shovel, a building level and trowel, an angle grinder, a drill and a screwdriver.
When choosing an unedged board for self-construction of a fence, you must remember that the lumber cannot be damp, with screw distortions, or signs of rot or pests.
Technology for constructing a vertical sparse fence
The technology for building a fence with a vertical arrangement of slats in a checkerboard pattern on both sides looks like this:
- The installation of supports is being marked.
- The foundation pit is torn out and the pillars are treated with primer.
- The outer supports are installed, and a marker thread is stretched between them.
- Intermediate pillars are being installed.
- Using a cord, the level of installation of the crossbars is marked.
- Cutouts are made in the pillars and cross beams are installed.
- The boards are cleared of bark and treated with a protective agent.
- Before installation, the planks are laid out and selected in width and shape for each span.
- Installation of the slats is carried out first on the front side of the fence, and then on the inside.
- During installation, the distance between the planks should be approximately the same.
- After the installation of the picket fence is completed, the top of the flights is processed on both sides.
- Then, if necessary, the surface is coated with a protective varnish or painted.
Drawing for installing a picket fence
A DIY fence made from unedged boards is shown in the photo below.
Vertical filling of fence spans
Boards can be attached to posts with nails, self-tapping screws or furniture bolts.
Options for board fencing
In the construction of plank fencing, the following types of boards are used - slab, lining, edged and unedged board. The most common fences are:
- Slab fence. The croaker is the side of the log. The outer side can be either convex or sawn. In fact, croaker is considered waste and is inexpensive. At the same time, it is in no way inferior to other types of lumber and, with proper processing, can turn into an original fence.
Before installing the fence, it is worth sanding the boards, impregnating them with protective materials, tinting them if desired, and finally varnishing them, which will make the fence aesthetically attractive and durable. Then it will combine and look advantageous with a wooden house and buildings.
Useful Fence made of terrace boards or WPC - its types, installation and cost
If desired, the planks are nailed at a certain distance from each other, and sometimes they are overlapped. To protect the tree from rain, the fence is often supplemented with canopies - made of wooden planks or other elements.
This type of fence can be horizontal, vertical or double-sided. With the double-sided type, the boards are placed on both sides, which greatly increases the cost and consumption of material.
- Fence with imitation croaker. Here it is not the slab itself that is used, but boards that are cut at the edges to create a puzzle pattern.
- Fence - blinds and ladder. As a rule, an edged board or slab is used. For the “blinds” option, the slats are attached at an angle and at a distance, forming a gap between them, which allows air to circulate freely, despite the fact that the fence looks blank from the side.
This arrangement partially allows sunlight to pass through and becomes the basis for climbing plants. A ladder fence consists of slats located at a slight angle and overlapping each other. Unlike the first option, there are no large gaps between the slats.
- Classic picket fence. Level, vertically and evenly spaced slats attached to horizontal slats. The classic version assumes their location at some distance. The surface is varnished and can be tinted or painted as desired. This fence looks good painted dark brown.
- Blind fence. Edged boards are used most often; they are attached horizontally or vertically, overlapping on both sides, or simply as a continuous fence. Since this design looks massive and heavy, additional elements are used, for example, wicker arches, which visually lighten it.
- Fence using decking boards. Terrace board is a colored wood-polymer composite. Although this type is not a cheap material, a fence made from them will last, with proper care, 50 years, which is much longer than the service life of a conventional fence, which does not exceed 10 years. Plus it doesn't need painting.
- Ranch style fence. As the name suggests, this species came from America. This is a low fence made of pillars with intersecting bars attached to them.
Normal installation
Probably everyone has encountered the most ordinary picket fence. Creating one using lining is practically the same technologically. But there are also a number of nuances that you must know.
The procedure consists of initially cutting the lamellas to length. Then everything is done in the following sequence:
The land plot where the pillars will be located is being marked. The distance between them should be no more than 3 meters, since in the future the entire fence may be damaged by a strong gust of wind.
- At the marked places, holes are dug with a depth of at least 50 cm. Pre-processed pillars are installed in them and filled with concrete.
- The treated beams are fastened between the pillars.
- Prepared picket fences are fixed onto the beams, primed and painted.
Preparation of material
Since the fence is an external structure, and first of all, it must provide protection from invasion - not so much by people as by animals, the material and the structure itself must have sufficient mechanical strength. The second requirement is resistance to weather factors: moisture, low and high temperatures, ultraviolet radiation.
To increase the service life of the fence, some measures should be taken.
Before installation, wooden poles must be treated with a primer with a deep impregnation effect. These elements are in contact with the soil and are more exposed to moisture. One more nuance should be taken into account: in winter, when the soil freezes, it expands, and when the temperature rises, it thaws. The support column will constantly experience additional compression and weakening, and as a result loses stability. Therefore, when building a fence with your own hands, it is recommended to fill the support pillars with concrete, and not just dig them into the ground.
A selection of ideas, photos of board fencing
A fence made from a wide, unedged board looks very original, although a little rough. It is tinted with stain and artificially aged in certain places. Structures made from smooth planks are sometimes painted by hand, or each detail is made in a different color.
The design looks beautiful, the upper edge of which resembles “waves” or “pyramids”. A very original fence, made up of pre-assembled modules in the form of “Christmas trees” and “suns”, painted in the appropriate colors, alternating with each other. Volumetric 3D fences decorated with plant patterns usually surround luxury houses, as they are expensive. If there are children in the house, instead of individual fence posts, “wooden grandfathers” or “gnomes” are cut out, which can also be painted.
Natural material harmonizes with the environment.
Peculiarities
A fence made of wooden boards has many advantages over other materials. It will not only protect the territory from the prying glances of neighbors, but will also last for more than twenty years with proper care. Moreover, such a fence will cost less than a brick or stone one. It is made of wood, which is not only an environmentally friendly option, but also looks aesthetically beautiful.
By the way, in addition to real wood, people often use artificial material that imitates a wooden board, which from a distance cannot be distinguished from the real thing. It has its advantages and disadvantages. This material is cheaper, which means you can save money.
Such fences can be very different: high and low, tightly knit or elegant, used only for protection or performing a decorative function. Choosing the ideal fence, as a rule, depends on the style in which the house is built and the design of the site.
True, in addition to all these advantages, fences made of boards also have their disadvantages. Wood is not the most reliable material. Bad weather conditions often have a negative impact on the condition of the fence. For example, under heavy rains, boards can rot, and in the sun they can fade.
Stage four: Post-installation processing
The board is a natural material, which means that various insects, bacteria and fungi love it. If you want to extend the life of the fence, then you should think about painting the boards with special paints. In addition to its protective properties, the paint will give you a cheerful mood, and will charge you with positivity every morning.
For particularly talented individuals, such a fence is a great way to experiment, creating incredible patterns from boards.
And the corners along the perimeter of the fence can be used as walls for some household needs, for example, a pen for some animals.
Only upon completion of all these manipulations can we say that the fence is ready for use.
Types of fences: facade, decorative, simple
Fences are divided into three main types:
- Facade - designed to protect the internal territory from prying eyes and unauthorized entry. These are vertical lattice structures or picket fences, “ranch” (with horizontal cladding), staircase options, where the boards are overlapped, checkerboard ones, in which the parts are mounted in two rows offset, “picket fence” created from pointed pegs, as well as options where the planks are intertwined with strong rope;
- Decorative - usually serve exclusively as decoration, are arranged around flower beds, and have a small height. Such fences are made of small boards coated with lime and are complemented with various decorations
- The simplest ones are usually a fence consisting of logs or stakes stuck into the ground, secured in the middle or on top with boards. The design is not durable and is used as a temporary fence