Is it possible to make metal doors with your own hands?
Reliable metal doors have long won the sympathy of consumers. They are used wherever additional protection is needed: in houses, garages, apartments, warehouses. According to the demand, the supply market has also grown; a great variety of ready-made steel doors can be found on the pages of newspapers and Internet resources.
There are various types of metal doors on the market.
However, many craftsmen prefer home-made doors to purchased products. Their advantages include lower financial costs and independent choice of design and materials. These factors allow you to assemble a door of any shape, including non-standard options, and also give confidence in the quality of the finished product.
Thin steel on the front surface of finished metal doors is cut without much effort
Self-assembly of a metal door requires not only special equipment, but also certain skills. This is especially true for welding joints. To apply a seam of the required quality, you need skill and a certain dexterity. The cost compared to a factory door will be 30–35% lower, but the quality may be higher.
Advantages of a homemade door
Making a metal structure with your own hands has a number of advantages over purchasing finished products. At a minimum cost, you can get an entrance door to your apartment without altering the doorways. When making metal doors yourself, you must follow safe work rules and perform all operations carefully and accurately at every stage. Advantages:
- by choosing the material for production yourself, you can be confident in its quality;
- can be made with an individual finishing option;
- You can make an iron door on a budget.
Doing it yourself can save a lot of time.
Metal door manufacturing technology
When making metal doors, the main emphasis is on reliability. This factor depends on:
- door leaf and frame designs;
- materials used;
- installation quality.
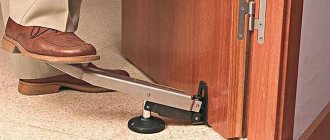
Reliability also implies the strength and durability of the doors. Additional devices - closers and electronic eyes - make the operation of the structure more comfortable.
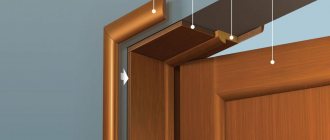
Varieties of door hinges and locking devices allow you to select the necessary components depending on the specific situation
All these innovations are also used for self-made doors. First of all, when drawing up a project, it is important to think through in detail all the elements included in the future design and select the necessary materials. In this case, it is necessary to take into account the technological sequence, the order of assembly, installation and finishing of the door block.
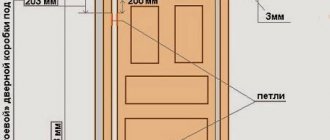
Drawings for making a metal door with your own hands
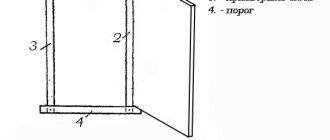
To create a working drawing, you need to take measurements of the doorway. The sketch is drawn on paper at the selected scale. Using a tape measure, the width, height and depth of the opening are measured.
Doorway parameters: W-width, H-height, T-depth
There is a certain standard for metal doors. It is undesirable to make the dimensions of the door leaf more than 200x90 cm. This is due to the fact that the weight of the structure increases and, accordingly, the requirements for the quality (or quantity) of hinges increase. If the doorway is larger, it is more advisable to install an additional top or side block. The top block is often equipped with glass inserts for additional lighting. The side can be hinged or blind.
The drawing must reflect in detail the design features of the door
All these nuances are reflected in the drawing. The dimensions of the box are usually taken into account the installation gap, which allows you to align the structure in the horizontal axis. It is subsequently filled with foam. To adjust the door position and eliminate distortions, a gap of 2.5–3 cm is sufficient.
To evenly distribute the weight of the door leaf onto the frame, 2 to 4 hinges are used. Awnings can be of indoor or outdoor design. External loops are used more often. The distance from the edge of the leaf to the hinges at the top and bottom is 15–20 cm. If the door is heavy and there is a need for additional suspension, one or two auxiliary hinges are installed between the main hinges. The exact location of the canopies is noted on the drawing, taking into account their own dimensions.
The support ball inside the sleeve softens the working stroke of the hinges
Any door is equipped with stiffening ribs. They are metal corners or pipes with a tetrahedral cross-section, located along, across or diagonally to the canvas. When placing them, two factors are taken into account:
- location of the lock and door handle (for ease of installation, the stiffening ribs do not intersect with the location of the locks);
- a method of insulating a door (since the heat-insulating material is attached in the recesses between the ribs).
The insulation is located between the door stiffeners
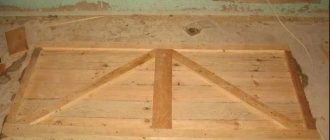
The drawing needs to show the exterior decoration of the door and the structural components necessary for this. For example, if one of the sides is planned to be covered with clapboard, wooden blocks are placed inside the canvas, to which the cladding is subsequently attached. If the sash is covered with paint or laminated film, there is no need to install bars, but more attention is paid to the plane of the canvas. The surface is thoroughly polished, eliminating metal leaks that form during welding.
Stages of steel door assembly
Assembling the entrance group begins with preparing the opening. After dismantling the old structure, the walls need to be cleared of debris and unstable fragments removed. If necessary, the edges of the opening are reinforced with a corner or internal reinforcement with steel rods with preliminary filling of the holes with liquid glass.
Further work on making a door from a corner and steel sheets is carried out in the following sequence:
- Cutting blanks for loot. Installation and fastening of the frame in the opening.
- Preparing sections for assembling the canvas frame. Cleaning the joints from rust and dirt.
- Welding doors. First, the frame is made, then its side posts are connected with reinforcing cross members.
- Attaching loops.
- Installation of locks.
- Fastening steel sheets.
- Cleaning the product from scale and rust, degreasing surfaces.
- External finishing of the canvas.
- Lubricating the hinges and installing the blade in the opening. At this stage, the participation of an assistant will be required, since the iron structure can weigh up to 200 kg.
In order not to get confused in the abundance of pre-prepared parts, it is advisable to cut the workpieces as needed. If this has already been done, then they should be marked and laid separately, rewound with masking tape.
We weld the door frame
Welding metal doors begins with the manufacture of the frame. At this stage, it is necessary to accurately maintain right angles and an even horizontal position of the profiles.
The work is performed in the following sequence:
- The outline of the box is drawn on the desktop. An iron sheet with precise angles and dimensions can be used as a template. Then the drawing is adjusted to the size of the loot.
- Markings are made on the pipes. Using a grinder, the racks and cross members are cut out. The joints are polished.
- The blanks are placed on the pattern, aligned and fixed. For this, clamps, magnets or hardware are used, secured along the outer perimeter of the box.
- Using a welding machine, spot seams are made at the outer corners of the structure. After checking the angles and matching the diagonal distances, full seams are made along the entire length of the joints.
- The frame is turned over and the joints are welded on the other side.
- Holes for anchor bolts are drilled in the box.
- A grinder with a grinding disc cleans scale and deposits.
The final stage is the treatment of the canvas with an anti-corrosion compound.
Frame for door leaf
In order to make an iron door smooth, without distortions and unevenness, you need to make a frame, all angles of which correspond to 90º. Again, the steel sheathing sheet is used as a template. This time you don't need to draw the pattern on the table. The assembly will take place directly on the sheet.
You need to act in the following sequence:
- Lay the sheathing on a flat surface. Fix it in a stationary position. Double-sided tape, glue or external stops will do.
- In accordance with the diagram, cut the profile into blanks and clean the welding areas.
- Lay out the parts on the sheet with a 1 cm indentation from its edges. Fix the frame using one of the available methods.
- Connect the profile to the sheet by spot welding.
- Grab all corners of the structure one by one. Check the 90° angles using a square.
- Weld all the joints on one side and the other side of the frame one by one.
- Take measurements, mark and cut crossbars. Weld them between the vertical posts in accordance with the drawing.
- Weld the steel sheet to the frame. This should be done pointwise at intervals of 10 cm. A continuous seam can cause deformation of the material and the appearance of irregularities.
Finally, the frame is cleaned of sagging and rust and covered with acrylic paint. If spikes are provided against removal from the hinges, then pieces of reinforcement are welded to the frame and corresponding holes are made in the box.
Sheet fastening
Since one sheet is already attached to the frame, which will be located inside, all that remains is to weld the outer sheet. Its length and width must exceed the dimensions of the frame so that the canvas covers the gap between the sash and the frame.
The sheet is fastened in the following sequence:
- The material is laid on a flat surface. It is cleaned from dirt and factory grease.
- Markings are applied. To avoid deviation from a right angle, the excess must be cut off on both sides of the workpiece.
- Sawing off excess material. To simplify this process and make it more accurate, you need to attach a profile to the line, press it with a clamp and cut along the edge, as if using a pattern.
- Laying the frame on tin. Alignment in width and height. Fixing parts with clamps.
- Perform spot welding with tack every 10 cm. To prevent the metal from leading, this must be done alternately, applying the electrode to the frame from different sides in a symmetrical order.
After welding is completed, you need to clean off streaks and drops of metal, round the edges of the sheet so as not to get hurt on sharp edges.
How to weld hinges?
Welded doors are heavy. In order for them to stay firmly on the box, it is necessary to use hinges with a sufficient margin of strength. It is better to attach a heavy canvas to 3 points to reduce the load on the product.
To weld the canopies evenly and accurately, you should proceed in the following sequence:
- Place the box on the table, place the canvas in it, align the products vertically and horizontally.
- Insert the hinges in the connected state into the gap between the parts, make markings for subsequent fastening. The optimal distance is 25 cm from the top and bottom. If an additional loop is placed, then a distance of 50-60 cm is taken from the bottom cut.
- At the fastening points, make cuts in the sheet and frame to fix the part on the profile.
- Strengthen the upper part of the canopy with a steel plate so that it matches the width of the profile.
- Seal the canopies by welding at several points. Hang the canvas and check that the hinges are working correctly.
- Weld the parts completely, clean off the scale and paint.
Silicone must be applied to the groove of the canopies so that after connecting the parts, the excess protrudes from the remaining gap.
We cut into the lock
The assembly of metal doors ends with the installation of locking devices.
This procedure is performed in the following sequence:
- Place the canvas on the side end of the canvas and firmly fix it in this position.
- Attach the lock to the end and use a core to draw its outline. Mark holes for drilling.
- Drill holes whose diameter corresponds to the width of the lock body.
- Connect the edges of the holes with cuts using a grinder. To prevent the cut piece of metal from falling inside, apply a magnet to the cutting area.
- Drill holes for fastening. Make threads in them for the available bolts (M5 or M6).
- Drill holes for the handle and cylinder. Dimensions are in the product instructions.
- Lubricate and insert the lock into the hole, screw it to the profile. Install decorative strips, handles and cylinder.
- Make markings on the box, make holes for the tongue and bolt.
The final stage is to check the functionality of the design and finalize small parts.
We do cladding or painting and insulation
The insulation of the canvas is carried out using the following materials:
- Foam rubber 10-20 mm thick and artificial leather. First, foam rubber is glued to the canvas, the edges are left free by 20-30 mm. Then the fabric is glued to the insulation. Its edges are folded inward and glued.
- OSB, chipboard or solid wood. These materials have low thermal conductivity; after gluing, they are painted or covered with film.
Facing can be done in the following ways:
- A simple metal door is covered with inexpensive film or acrylic paint.
- Plastic panels, MDF, clinker tiles.
- Ready-made kit for cladding internal and external surfaces.
Thermal insulation of a metal door
During the cold period, ice, drops of water or frost sometimes appear on metal doors. This indicates that the structure is freezing. Warm air inside the room hits the metal surface and cools sharply. As a result, condensation forms, which either drains or freezes and turns into ice. To prevent this from happening, the door leaf is insulated. Previously, they used synthetic winterizer or dermantin, but this did not bring effective results. Today the arsenal of insulation materials includes:
- Styrofoam;
- mineral and basalt wool;
- polyurethane.
Styrofoam
It is considered a very good insulation material, since it contains 98% air, “sealed” in plastic bubbles. The advantages include ease of installation, low price and absolute resistance to corrosion. Most industrially manufactured doors are equipped with foam plastic or its modification - penoplex. In addition to thermal insulation properties, the material has good sound absorption. Disadvantages include low fusibility and the release of large amounts of toxic gases during combustion and heating. Therefore, it is not recommended for installation directly in residential premises. The ideal location is the entrance doors of garages, warehouses, multi-story buildings.
Polystyrene foam reduces the thermal conductivity of metal doors in garages and utility rooms
Video: insulating a garage door with foam plastic
Mineral wool
This category includes basalt and glass wool. They differ in the source raw materials - basalt is made from rocks, and glass wool is made from sand and glass, stretched into thin long fibers. There is no noticeable difference in thermal insulation properties, but glass wool is more environmentally friendly. Both materials are characterized by high fire safety and ease of installation.
When laying mineral wool inside metal doors, certain rules must be followed. For example, you cannot crumple mats between the stiffening ribs - this reduces the thermal insulation characteristics. The material must be cut with an accuracy of 1–2 mm.
Mineral insulation is available both in the form of mats and in the form of rolls of various thicknesses
A significant disadvantage of mineral wool for insulating a metal door is its hygroscopicity. The fact is that with a large difference in air temperatures on both sides of the door, the dew point shifts into the inner space of the door leaf. This leads to the fact that condensed excess moisture is immediately absorbed by the fibers. Over time, water accumulates and the thermal insulation characteristics decrease to 80%. This scenario can be avoided by using an additional vapor barrier film, which is attached over the entire area of the sash. A hydrobarrier neutralizes the effect of moisture accumulation, but there is no complete guarantee. It is for this reason that mineral wool insulation is recommended for doors that are not exposed to significant temperature changes. For example, at the entrance to an apartment.
Video: insulating a metal door with mineral wool
Polyurethane, or inflatable insulation
Quite expensive, but effective technology. The internal cavity of the door leaf is filled with polyurethane foam. Cured polyurethane is a synthetic substance that is not subject to corrosion and is an excellent heat insulator. The difficulty is that for inflation you need special industrial equipment that combines a diffuser and a compressor. But using foam from household spray cans is too expensive.
The polyurethane coating is not afraid of water and is a hard, sealed layer
Regardless of the chosen material, preparation for insulation consists of planning the locations of the stiffeners. Experts recommend placing them in such a way that the insulation is securely held inside the sash without additional fastening. That is, the crossbars are placed not only vertically or horizontally, but they are also combined so that the insulation does not sag over time.
The cotton wool is placed tightly between the stiffening ribs inside the door leaf
Stages of installing insulation on the door leaf
Experts advise installing insulation in doors that are in a horizontal position - on a table or trestle. The key to successful thermal insulation is careful laying of the entire surface and minimization of gaps. The process is performed before sewing up the inside of the fabric:
- The dimensions of the frame cell are measured.
- Insulation blanks are cut out with an error of maximum 2 mm (in the larger direction).
- The material is placed in the sash:
- if polystyrene foam is used as insulation, several points (4–5) of liquid nails are applied to the surface of the workpiece, the resulting cracks are leveled with polyurethane foam;
- when insulating with mineral wool, a waterproofing film is first laid over the entire area of the door, with a release (reserve), then the insulation is laid out and covered with another layer of film, the edges of which are rolled up into a single “cocoon”, only after that the door is sewn up from the outside (to enhance the impermeability air, the edges of the membrane are carefully taped).
Video: how to insulate a metal door with foam plastic
Insulation of the door frame
For good insulation, it is necessary to insulate the door frame. The method depends on the design of the frame, which may consist of an all-metal frame or a hollow profile. This is not difficult to do. Polyurethane foam from a household spray can is poured into the profile. If necessary, holes are drilled on the surface along the diameter of the tube into which polyurethane is blown. It fills all free space.
The internal cavity of the frame is filled with foam
It will not be possible to insulate an all-metal frame in this way, so you need to carefully treat the gap between the frame and the doorway with foam.
An innovative means of insulating a metal door is the insulating paint of the “Akterm” series, produced on the basis of modern nanotechnology. The composition includes microscopic ceramic balls (several microns in size). A 1 mm layer of paint is equivalent in its thermal insulation characteristics to 5 cm of polystyrene foam. The disadvantage is the rather high price and difficult application of the composition to the metal surface.
Video: insulating door frames with mineral wool
Preparation and measurements
So, the standard size of a doorway in most apartments is 2000x800 or 2000x900 mm. If the existing opening is smaller or larger, then the canvas can be made to a special size. When taking measurements, you should make sure that it is the wall that is being measured, and not concrete or plaster.
If the height of the box is slightly more than 2000 mm, then it is necessary to provide an additional frame on top, or in the side of the opening if its width is more than 900 mm. In addition, you should remember about a gap of several tens of millimeters on each side of the box. This gap is necessary for blowing in seams.
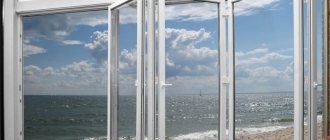
If the opening width is more than 1500 mm, then experts recommend making a collapsible box rather than a solid one. In cottages, in addition to the door leaf, two or more modules with glass are installed in wide openings, which make the structure more reliable and durable and perform a decorative function.
Click to open in full size.
During the preparation process, it is also worth starting to develop a drawing of a metal door. If the door leaf is unique and exclusive, then the drawing is made with your own hands. If the opening is standard, and the door structure will be a standard solution, then standard drawings can be used.
Soundproofing a metal door
An important property of an entrance door is its ability to contain noise from outside. Metal doesn't help in this regard. On the contrary, it enhances sounds. Therefore, the door is supplemented with special internal and external coatings that reduce the level of penetrating noise.
External covering
This is done using sound-absorbing and vibration-proofing materials. These include:
- polystyrene;
- vibroplast;
- bitoplast;
- bimast.
These are synthetic coatings, they are a canvas that actively dampens any sounds and vibrations.
Sound-absorbing materials consist of several layers of different densities
The work order is as follows:
- The material must be spread over the surface to be insulated and smoothed. Some types are equipped with an adhesive layer; it is enough to remove them from the protective film and press them against the plane of the door.
- For others, you need to first clean and degrease the canvas. Then evenly distribute the waterproof glue, cover the surface with the material and wait until it dries completely. It is advisable to paste both from the outside and from the inside.
Installation of seal
The product is simple but effective. Previously, felt was used as a sealant; today there is a wide range of ready-made rubber and caoutchouc products. There are no installation difficulties, you just need to remove the protective covering and carefully stick the profiled strip along the perimeter of the sash. Its width should not be more than 25% of the size of the door frame support strip. The thickness is chosen so that when compressed (with the doors closed) the seal is reduced by half.
The seal consists of rubber tubes of a special section
Door frame insulation
Cold air in some cases penetrates into the cracks between the frame and the door. Special tapes help to cope with this situation. It is recommended to purchase sealing material commensurate with the size of the gaps.
If you have no experience, you can ask the store consultants about methods of attaching tapes to the doorway. The surface is first cleaned and degreased with solvent or white spirit. If this is not done, the service life of the protective strip will be reduced.
After completing the preparatory work, begin fixing the seal. To do this, remove the protective layer from the surface of the insulating tape and place it around the entire perimeter of the box, including the threshold. Corner joints are made at an angle of 45°C. It is recommended to connect the edges of the joints and cut them at the desired angle.
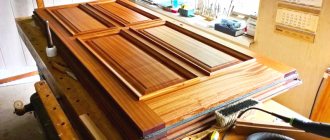
Metal door finishing
The exterior decoration of the door performs two important tasks. Hides the unsightly appearance of bare metal and protects the canvas from exposure to adverse factors. It is especially important to protect the steel surface from excessive moisture, as this can cause corrosion.
The choice of finishing materials is huge. But the most popular are:
- MDF panels;
- leather vinyl;
- solid wood.
Microwood fiber (MDF) is a mixture of wood and carbide chips compressed under high temperature and pressure. The material retains the color, texture and tactility of wood, but is not inferior to plastic in strength and elasticity. The big advantage of MDF panels is their low price. However, this type of finishing belongs to the “premium” class and, from an aesthetic point of view, is not inferior to natural solid wood.
An entrance door finished with MDF is difficult to distinguish from natural wood
Professionals also note a number of other advantages of MDF:
- high heat and sound insulation;
- increased fire resistance, fire safety;
- combination of high strength and ease of processing;
- resistance to the influence of biological factors: mold, mildew, dampness;
- environmentally friendly, the boards do not contain toxic and harmful chemicals.
In retail chains you can find four types of MDF panels:
- painted with RAL dye;
- coated with a polymer-based composition;
- laminated panels;
- veneered products.
In addition to products in the form of sheets, there is a wide range of additional decorative door elements - platbands, extensions, etc.
Leather vinyl is a type of exterior finishing made from artificial materials that imitate natural leather. This group also includes vinyl artificial leather and dermantine. If the covering technology and operation are followed, the cladding retains its properties for a long time. Kozhvinil is a champion among inexpensive ways to protect doors from noise and hypothermia. Easy to clean with regular cleaning products.
With proper care, vinyl leather coating can last for many years.
Disadvantages include the flammability of the material and vulnerability to vandalism. It is customary to drape a door in this way in interior spaces. Contact with open air and direct sunlight quickly leads to loss of color and gloss of the coating.
One of the solutions for finishing a metal door in the middle price range is covering the door with anti-vandal film. This wonderful product is not produced in Russia, so its price is high. The most popular is the film from Israel from Vinorit. PVC coating has a variety of colors, textures and thicknesses. Resistant to ultraviolet radiation, mechanical damage and fire.
Natural solid wood is the most expensive type of finish for iron doors. The overlay panel is made by gluing lumber and further processing it: sanding, milling, polishing, etc. Expensive wood species are used for production - oak, beech, mahogany, alder, ash. As a rule, the form of release of a solid wood panel is an 18 mm thick overlay. This allows you to inlay the surface with various “subjects”. Often the outer metal cladding imitates the paneled structure of the sash. It is possible to apply ornaments, drawings and other decorative elements. In the factory, wood is not only coated with paint or varnish, but also impregnated with special compounds, thanks to which the material becomes resistant to the adverse effects of the atmosphere, does not dry out and almost does not burn.
Solid wood compares favorably with other finishing materials:
- elegance of appearance;
- absolute naturalness and environmental friendliness;
- durability;
- increased performance in terms of thermal insulation and sound absorption;
- possibility of restoration.
Oak flooring only becomes more beautiful over the years
The entrance metal door, lined with natural wood, is a symbol of respectability. Most often found in expensive restaurants, five-star hotels, reputable organizations and offices of large companies.
Video: interior decoration of a metal door
Materials for work
To insulate an iron door with your own hands, you will need to prepare the necessary tools and consumables. Among the main equipment are:
- screwdriver;
- screwdriver;
- metal drills and drill;
- cutter or sharp knife;
- small hacksaw for wood;
- awl;
- fine-grained sandpaper;
- insulation;
- laminated fiberboard sheet;
- polyurethane foam;
- glue;
- sealant;
- acetone (for degreasing the surface);
- self-tapping screws
The door owner will have to choose the type of insulation independently. The heat preservation functions will depend on its quality.