Natural raw materials never go out of fashion, but on the contrary, they become more and more in demand every year. There are many options for using wood as the main material for fencing construction. Craftsmen can even make a unique fence from wood left over from construction work, thereby keeping costs to a minimum.
Pros and cons of wooden fencing
In addition to naturalness and environmental friendliness, it is worth mentioning other advantages:
- Easy installation. You can do all the work yourself.
- Availability of materials. You can buy wood in all regions of the country.
- Simple repair. Old elements can be easily replaced with new ones without harm to the entire structure.
- The light weight of a wooden fence allows you to avoid making a massive foundation. Excavation work is simplified.
- Convenient transportation.
- There is no need to use special equipment or rent equipment.
- Reliability and long service life. Treated wood will last 10–20 years without requiring repairs.
- Choice of shapes, types of lumber, sizes.
- The tree looks beautiful even without additional decoration.
Among the disadvantages of a wooden fence:
- Exposure to moisture. When there is an excess of it, the tree begins to rot.
- Damage by insects.
- Flammability of raw materials.
- The need for periodic care. If this is not done, the service life of the fence will be reduced significantly.
But all these disadvantages are eliminated with the help of protective equipment.
Wood is impregnated with antiseptics to remove moisture, and fire resistance can be increased using fire retardants.
Fence made of corrugated sheets (euro picket fence)
A fence around the perimeter of a land plot made of corrugated sheets will ennoble and decorate any land property. Even novice builders can make an inexpensive, but reliable and attractive fence with their own hands. This type of fence can be erected quickly and looks aesthetically pleasing. It harmonizes perfectly with any style direction. Corrugated sheeting is a durable and unpretentious material and does not require constant care and treatment.
Return to contents
Material advantages
Advantages of rack corrugated sheeting:
- Affordable prices;
- Wide range of colors;
- Lets in the sun's rays and breeze thanks to the gaps between the slats;
- Combines with other building materials;
- Convenient to transport;
- Does not require installers to have special knowledge.
Return to contents
Installation
The design of a fence made from slatted sections of corrugated sheets consists of the following elements:
- Pillars;
- Crossbars for transverse fastening;
- Fastening elements, including corner ones;
- Sectional planks.
If the components are supplied disassembled, the sections should be assembled strictly according to the instructions. On average, fastening corrugated board slats involves fixing them at a distance of no more than 7 cm from each other. If necessary, you can always find the necessary fasteners on sale, such as special screws, clamps, brackets or rivets.
An original version of the design of a fence made of slats.
Installation of a European picket fence made of corrugated sheets implies a standard installation procedure. Particular attention is paid to the construction of supports, which must be correctly fixed and leveled. On the finished supports, in accordance with the design features of the corrugated picket fence, crossbars and sections assembled from slats are attached.
Working with this material implies maintaining its integrity, since deformation of the upper protective layers can cause the fence to lose its beauty due to corrosion.
Compared to a solid sheet of canvas, a slatted fence is more cost effective. Fence slats can be assembled both vertically and horizontally. They can have the same or different heights and be single-wave or double-wave. The variety of options will allow you to choose an individual design for the fence in each case.
Return to contents
How to buy quality raw materials
When choosing, pay attention to the following points:
- The material must be wrapped in transparent polyethylene or other packaging. It's not worth taking in a beautiful but dark wrapper. Otherwise, there is a high risk of buying a low-quality product.
- Knotted wood with chips is not suitable. It has a limited service life.
- If drops of water are visible under the polyethylene, then the material is damp. It is not advisable to take one like this, because when it dries, it will begin to deform.
- The color should be natural, without stains on the surface.
- The smell is woody and fresh. If you feel damp, this is a sign that the boards are beginning to rot.
- Larch is considered the most durable species. but it costs a lot, less strong ones are pine, spruce, but they are cheaper. For decorative hedges, it is better to take birch, beech, and ash.
- Planed boards have a smooth surface without roughness.
- Look at the rooms where materials were stored. It should be dry and warm there.
- Take boards from the same batch so that they do not differ in surface color.
Clearly calculate the consumption of raw materials, buy with a 10% margin. Carefully evaluate the type, storage conditions and quality of packaging.
Wicker fences
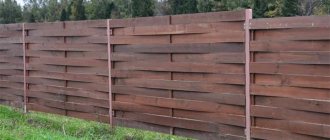
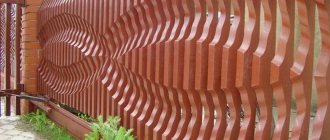
Another rather unusual type is braided. This fence looks beautiful and original. For weaving, boards no more than 25 mm thick and within 10 cm wide are required. There are several options for weaving them:
- Classic braid. The wooden slats intersect and fasten to each other, forming a diamond-shaped grid pattern, reminiscent of the walls of a gazebo, and are attached to the supporting posts.
- Austrian wicker is a popular type of wicker fence that came from Europe. It is easy to install and looks great. The ends of the boards, arranged in a checkerboard pattern, are attached alternately to one side and the other of the rack. The bend is formed and fixed by a rail installed in the span.
Useful How to make a fence for your dacha from a wooden picket fence with your own hands
Depending on the weaving pattern, one or more slats are installed. And the weaving itself is made either horizontal or vertical.
Which option will you choose?
From gobyl From imitation gobyl Blinds or ladder Picket fence Blind fence From terrace board Ranch Wicker
Ways to protect wood
Natural raw materials used outdoors are subject to constant exposure to moisture and therefore require mandatory care.
On the building materials market there are a lot of impregnations, primers, and antiseptics that penetrate deep into the structure or create a protective film on the surface. It is important to treat wood against damage by insects and exposure to fire.
Tips for choosing and the procedure for applying the product can be found in the article: “Protecting wood from rotting and moisture.”
The procedure must be repeated every 2-3 years in dry, sunny weather. Drying time is a day.
Required materials for installation
- Planed boards, and it is a mistake to assume that the narrower the plank is, the easier the installation. The height is regulated by the customer’s wishes, but the length is usually three or six meters.
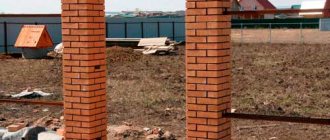
- Support pillars. Metal pipes, beams, brickwork, logs. Here are those holding structures suitable for supporting a fence.
- Partitions. Wooden beams are a suitable option, horizontal or vertical guides, the choice is determined by the method of mounting the structure.
- Treatment of the finished structure with antiseptic components.
Useful Construction of a fence from a wooden or metal picket fence to look like a tree with your own hands
The purpose of antiseptic mixtures is to prevent the product from rotting for the allotted period of use.
- Cement, gravel and sand.
- Nails, self-tapping screws for fastening and giving the final appearance to structural elements.
- Tools.
Types and methods of installation
There are many options. It all depends on the capabilities, imagination of the owners, and the chosen design direction.
Vertical
Boards and a picket fence are attached to the horizontal joists with self-tapping screws or nails in a vertical position. The fence can be solid or with gaps.
To give the structure an unusual look, the upper part of the material is made round, beveled on the sides or carved.
Horizontal
To strengthen the fence, a vertical log made of timber is installed between the posts. After that, the boards are fixed in a horizontal position with self-tapping screws.
One of the varieties of such fasteners is a ladder fence.
Chess
Planks are nailed alternately to the transverse beams from the outer and inner sides in a checkerboard pattern. The structure turns out to be voluminous.
From the street, what is happening in the yard is not visible, but ventilation of the area is maintained.
If desired, you can get a modern fence of varying degrees of transparency. It all depends on the size of the overlap of one plank over another.
The disadvantage is the high consumption of raw materials, but the fences are elegant and neat. The composition is perfectly complemented by pillars made of stone, brick, and carved figured tops of the planks.
Herringbone (American)
Horizontal method of installing boards. But unlike standard fasteners, the boards are fixed tightly here with an overlap over each other. It resembles a Christmas tree when you look at the structure in profile.
The fence is erected in combination with metal, brick supports, and a concrete base. For gates and wickets, choose metal or corrugated sheets.
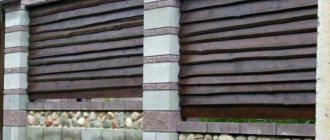
Blinds
Refers to the horizontal installation method.
The planks are not adjacent to each other, but are fixed at an angle with a small gap. They look like blinds.
The estate is well ventilated. The degree of transparency of the fence depends on the angle of inclination of the slats. A lot of material is wasted.
It is recommended to install in areas with high humidity.
Detailed description: “Erection of a shutter fence.”
Wicker from boards
An interesting fence made of boards bent between posts. Similar to a fence made of branches.
It is performed in a horizontal position to make bending easier and result in fewer joints.
Vertical braiding is less common. It is complemented by horizontal strips nailed to the top and bottom of the section.
The photo above is an example of horizontal weaving of boards.
Ranch
Fence of American origin. Not used for street fencing.
They are erected for zoning a garden, vegetable garden, and as a barrier for farm animals.
The ranch is made low, up to 1 m. Several boards are nailed to pillars made of timber, logs, or stone at a distance from each other.
For security, a metal mesh is nailed to the fence from the inside of the yard to prevent small animals from entering the estate.
Palisade
The fence is of ancient origin. Territories were fenced off like this back in Ancient Rus'.
The logs are made pointed on one side so that they look like stakes, and they are dug or driven into the ground close to each other with the sharp edge up.
Such a fence will not be cheap, but it will be reliable and will last a long time.
It is recommended to pre-treat the lower part of the logs, which will be in the ground, with bitumen mastic to protect them from moisture.
Carved
Wood carving happens:
- Contour. Performed manually. A drawing is drawn on the board with a pencil. The outline is knocked out with a chisel. To add volume, the recesses are painted in one color, the rest of the planks in another.
- Lace. The easiest way. It is carried out manually. A floral or other pattern is applied to the workpiece with a pencil. Drill an opening so that the jigsaw knife can fit into it. Use a jigsaw to cut out the design.
- Geometric. Used by craftsmen. You need to work with a chisel and a special knife.
At home, without experience, it will be easiest to cope with contour carving. First create a thread diagram on paper. Having a wooden template will speed up the process.
If you do not want to waste time learning carving, then it is better to order ready-made sections or individual carved strips from craftsmen.
We recommend reading the article: “Creating a carved wooden fence.”
Combined
This is the name of a fence where wood is combined with other materials.
Concrete pillars with board spans look great. Metal supports with forging, which gradually transitions to spans, are also suitable.
In new design projects, a combination of gabion (a metal mesh filled with stones) and sections of boards in the form of a checkerboard or wicker pattern is increasingly common. This design is suitable for street fencing and estate zoning.
Decorative
Acts as a decoration of the territory, an element of landscape design composition. The fence is created low, light, with gaps. It is assembled independently from picket fences, boards, slats or purchased in ready-made sections.
Such fences will complement a chalet-style estate well.
The wood is aged, painted in the color you like or varnished.
Material on the topic: “How to build a decorative wooden fence.”
Lattice
This method of installing planks serves as decoration and not as protection of the area. For construction, you need to stock up on picket fences or slats of the same width.
The planks cross each other at right angles or diagonally from the outside and inside of the fence. The construction is light but durable.
Lattice spans are sold in finished form. The most popular colors are white, brown (natural).
Solid
Good for street fencing. A solid wooden wall will protect from excess noise, dust, and prying eyes.
It is created from edged boards or picket fence. The planks are fixed to the joists close to each other, leaving no gaps.
The average height of such a fence is 1.5-2 m. It is recommended to place the boards 3-5 cm above the ground to reduce the risk of excess moisture being absorbed by the raw material.
How to build a wooden fence with your own hands?
Wood fencing is the most popular type used for wooden houses . It is fairly easy to construct, although like all outdoor timber structures it will require ongoing maintenance over the years.
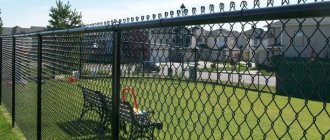
Here we'll look at how to install a panel timber fence, however these tips and instructions can be adapted for metal fencing or more decorative hedges in your garden.
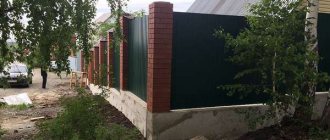
From corrugated sheets with bricks
There are several different ways to install panel fencing, requiring different tools and materials. Our example is a panel fencing that has:
- wooden poles;
- stakes fixed in the ground using concrete;
- wooden panels that are attached to posts using nails;
- without using gravel.
First of all, you need to determine how to build the fence so that it is sufficient, but not excessively long. Consider how high the fence should be to ensure privacy. Have a helper walk the perimeter with a cardboard sample showing the height of the proposed fence . Whether sitting or standing, keep an eye on the view above the cardboard as it moves to determine the amount of privacy your fence will actually provide.
Aesthetic and security function
This way you can quickly decide where you want it to be taller, or make it equally tall right away to cover the entire yard. Then consider alternatives such as fast-growing trees or shrubs that are not subject to height restrictions.
Required tools and materials
It is believed that the best time of year to erect a fence is early spring or late autumn, to allow plants disturbed by the intervention to recover in the summer.
Beautiful hedge decorated with flowers
Before starting work, it is important to carry out some necessary actions:
- discuss plans with neighbors if construction will take place next to their property;
- check the exact boundary line as the fence may not have been built to exact lines that fit the property;
- Make sure you own the fence before removing it. If it belongs to a neighbor, you may have to build next to your side of the border.
There is an unwritten rule that a good neighbor puts up a fence with a post and barriers facing their own property, but this is not a legal obligation. (The location of the posts will help you find out who owns the fence if the builder is unknown).
This option can be made by hand
Is planning permission required?
Generally, planning permission is not required for fencing less than 2 meters in height. However, it will be necessary if the boundary line is on a highway or highway footpath and you want to install a fence under 2m or add a fence over 1m high.
Tip It's a good idea to register with your local authority to find out if you need planning permission.
An idea that can be easily implemented
Safety first
Check electrical cables before using a metal support or digging holes. To do this, rent a cable locating tool to check for any pipes or cables underneath the proposed fencing area. Proper electrical cable installation will show the electrical route above any hidden electrical cable underground.
If cables are exposed but you are using a fence over a hard floor (such as pavers or an asphalt path), consider using a support that is used on top of the concrete and bolted to the floor. The fence posts are then simply inserted into the holders.
Simple but tasteful
If cables are located but the proposed fencing area is not covered with hard flooring, the design will have to be reconsidered. Use the help of friends for any fence project. Always wear protective equipment when necessary.
Tip When using cement, always wash your hands after use as wet cement can cause burns.
Don't let the concrete dry on your tools - clean them with a stiff brush.
Set posts 6 feet apart or less when you plan to build to prevent the fence from tilting. Fewer poles means less labor to install them, but in the long run, wind and gravity will probably make you pay twice.
Creative idea
The more posts you have, the more stable the structure will be. If you stick to the rule of thumb of 2.5 meters, your fence will most likely not sag. It will also be stable enough to withstand strong winds . Another installation rule is to bury 1/3 of the length of the fence in the ground to ensure optimal stability.
Decorating the fence
Lovers of natural shades prefer to leave the wood in its original form, emphasizing the beauty with varnishing and brushing.
To make the fence a bright element of the site, it is painted in the color you like. Elements of artistic forging are used as auxiliary decor. Climbing plants are planted around the perimeter.
Building a wooden fence with your own hands
It involves the development of a project for a future structure, indicating all dimensions, material consumption, and estimates.
Already at this stage it is important to determine the type of foundation.
If wooden sections will be combined with brick, stone pillars and a plinth, then it is better to go with a strip base.
If the sections will not bear a large load, and the racks will be made of profile pipes or logs, it is enough to equip a columnar base.
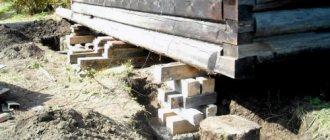
Sequence of concreting fence posts.
When purchasing material for poles, it is important to pay attention to the quality of the raw materials.
Related material:
- Installation of wooden fence posts
- Installation of metal fence posts
Logs are mounted to the fixed racks, to which boards or a picket fence are fixed with self-tapping screws.
Wooden fencing on metal posts is considered the most durable and durable.
Photo report 3: wooden wicker fence
Another option is performed almost “solo”. The wicker wooden fence was assembled with your own hands almost without outside participation. Sometimes the wife worked as an assistant, painting the poles, and the second assistant was the dog.
The result is a plank fence))
For a horizontal fence made of bent boards, which is also called wicker, sometimes Austrian wicker, the following materials were used:
- for poles, profile pipe 60*60 mm, installation pitch 2.7 m;
- edged board, planed 100*20 mm, length 6 m;
- intermediate beam 50*50 mm, but it is better to take less - it is more convenient to bend;
It was decided to paint the boards with an antiseptic with a dark pigment, and the pillars with light gray. From a distance on a dark background like stitches. If you don't like it, paint it to match the boards.
Painted posts and the first three boards, braided between the two outer ones
Most of the time is spent painting and drying the boards. If they are ready, everything is assembled quite quickly: the fasteners are minimal, only the first board is attached to the level, the rest are placed on it. The boards are six meters long and braided around three pillars. The distance between the pillars is about 5.4 -5.5 m, the rest sticks out, but the result looks original.
It is more convenient to assemble a wicker fence made of boards not with purlins, but horizontally - weaving several boards along the entire length
The main trick is to weave the first three boards. Without intermediate bars, they are simply laid: two on one side on the edge, one on the other. Then they need to be positioned so that they are one above the other. If there are two assistants, they hold the boards at the two nearest posts, and the third person bends the boards and inserts the intermediate beam. After the first three boards are installed, the bottom one is leveled and screwed to the posts (light the hole, then screw in the self-tapping screw).
What it looks like up close and from an angle
If you are making a wicker wooden fence from boards with your own hands, when assembling it is more convenient not to fold it in spans, but to go horizontally. First, we braided the entire length of the bottom three boards, set the level and secured them. Then they collected the rest as the paint dried.
This is the front view. “Tails” are visible where the boards end and begin, but they do not spoil the picture, but add zest
A simpler option - only three posts and shorter boards - is shown in the video. Here the pillars are made of wood, the technology for their installation is shown. Not a bad video - the whole editing process is clear.
Photo gallery: fencing ideas
Even with a limited budget, you can make an interesting fence, and if you have the money, you can make a modern, beautiful and durable protective structure.
Practical recommendations for installing a fence made of boards
The advice that we gave throughout the article should be supplemented with the parameters of the main elements of the board fencing:
- The cross-sectional size of the wooden posts is 10x10 cm.
- If a steel profile is used for racks, its cross-section must be no less than 40x40 mm (wall 2 mm).
- Horizontal crossbars (purlins) must have a cross-section of at least 30x50 mm with a strut spacing of 2 meters.
- For ease of installation of wooden purlins, fastening plates “ears” with holes drilled in them for self-tapping screws must be welded to the steel posts.
At the stage of purchasing materials, the question arises of how to calculate how many boards are needed for the fence. The solution is simple. If the fence is solid, then its total length must be multiplied by the height and thickness of the purchased board.
For a lattice picket fence, the calculation is done differently. Taking into account the selected spacing of the slats, their number per 1 linear meter of fencing is determined. The resulting pieces are multiplied by the total length of the fence, and, if necessary, converted to cubic meters, multiplying the total area by the thickness of one plank.
Another important point - how to paint a fence made of boards? If you save on the quality of paint, the fence will have to be updated more often. Therefore, we recommend buying expensive paint for exterior use. Before applying it, treat the board with hot drying oil or antiseptic impregnation. The consumption of paint and impregnation will be minimal when applied to a planed board. Consider this nuance when choosing a material.
Given the large area of the board fencing, it needs to be painted with a roller or spray gun. Omissions and errors made during work are corrected with a paint brush.