How we built a house with our own hands. From foundation to ridge
I wrote a lot of texts describing the process of building my new house, but I completely forgot to make a single one in which the whole process would be visible at once. In order not to “drive” the reader through the texts, but to give the opportunity to see the entire process at once, I decided to fill this gap. For those who want to read in more detail, the text will contain links to descriptions of individual stages.
The walls were assembled from dry blocks, then reinforced and filled with concrete mixture, which was mixed in a concrete mixer. They carried it in buckets and poured it out. Many thousands of buckets were carried and raised onto the wall. The walls gradually grew.
We went on and on, the walls grew and grew. Construction, like the show, must continue! Beams and concrete stairs were poured. How the staircase was built is described in more detail here.
Gradually we grew to a height of three meters and it was time to build a ceiling. Covered with concrete slabs. Of course, a crane was called for installation.
The season ended with the ceiling of the first floor and the second floor began only the next year. They brought the blocks again and managed to unload them onto the ceiling, which made the task much easier.
The walls were completed fairly quickly. Not easy, I note, but fast.
To be honest, we were very exhausted. But the house began to look like a house, and not like a pile of building materials.
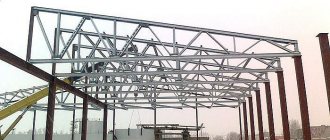
Gradually the roof became covered with rafters. There were a lot of them and I put them on alone. Each board was brought from the garage, cut according to a template, dragged onto the roof and installed.
I fiddled around for a long time. You can't do it quickly alone. As a result, the power part of the roof was completely ready and filled with sheathing.
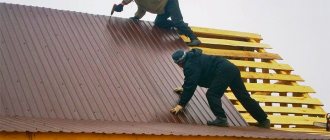
Having finished the power part of the roof, we began to think about what we will cover our beautiful roof with? We thought for a long time, discussed, argued, asked prices, but settled on soft tiles. An important role in the choice was played by the fact that I had to build alone and I could not have done it with metal tiles. I would fly off the roof like a hang glider. In general, I built it alone and it was super interesting for me.
First of all, I covered the entire roof with OSB sheets and laid the underlayment. The rain has stopped drenching us. This was the first result.
After laying the carpet, it's time for the actual shingles. Installation did not cause any difficulties. The hardest part was laying the tiles on the mezzanine slopes. They are tall and cool. We had to buy climbing equipment and lay shingles by weight.
As a result of all the torment, the roof was ready and the house became just like a real one.
Having finished with the frame and roof, we installed windows, doors and overhead gates to the garage. I will describe all these works and work with interiors in the following articles. Sorry, but even this one turned out huge. Subscribe and I will definitely tell you about everything related to our house, as well as all my thoughts about construction from the point of view of not a builder, but a physicist. Sometimes we see things differently.
Subscribe
to the channel. I find it interesting. Write comments and like . My gratitude will have no limits. I'll try. I promise
Source
One-story frame house
Before you start building your own house, you need to carefully study the designs of one-story frame houses. Decide on construction and finishing materials, cost and timing of work.
To build a one-story frame structure with your own hands, you need to lay a foundation, erect walls, cover the building with a roof, install windows and doors, and perform interior decoration. And also lay utilities - provide the future construction with water, drainage, electricity and heating.
Let's consider in detail how to equip the foundation slab and roof, and then how to assemble the wall pie in order to provide the building with high heat capacity. Let's look at how to build a one-story frame house of 100 sq.m. on a foundation slab with a hip roof.
Frame house: how to build it yourself, step-by-step assembly instructions
Frame construction is gaining momentum in our country more and more quickly. Many private developers solve the housing problem by constructing a building using Canadian technology. It is worth noting that in Canada this is a government program to provide the population with housing.
Any future owner can build such a house, even if he has no construction education or experience in building housing. A private developer only needs to understand the technology, be patient and make every effort. As a result, for little money you can get individual housing, built taking into account the wishes of all family members.
Let's look at the main nuances of this construction and provide step-by-step instructions that will help you build a high-quality frame house with your own hands.
Where can I get the project?
Many private developers with engineering skills draw up projects themselves, often using computer programs developed for this purpose. Independent architects can be helped by a photo of the layout of a one-story house taken from the Internet.
There you can also download ready-made projects of one-story houses with layouts. But still, often the best solution is to purchase a ready-made project or order an individual one from a construction company.
The list of advantages is something like this:
- design is carried out by a specialist architect, who, together with the management of the organization, is legally responsible for the quality of his work;
- the buyer will receive a ready-made set of drawings where all elements will be carefully and clearly described and diagrams drawn;
- the price of the project is not that high.
Instructions for constructing a frame frame
First of all, let’s look at the main stages, the sequence of which must be followed so that you have an idea of the construction of this type:
1. Design is one of the main stages that cannot be avoided. It is necessary to think over the design of the building, the location of the main and utility rooms. Design the location of openings, both door and window. Plan the sewer system and water supply, heating and electricity. Only by drawing in detail where everything will be located can you calculate the amount of material and avoid making mistakes during construction.
2. Excavation work - preparation of the site and trenches or holes for the foundation, depending on the type of foundation.
3. Arrangement of the base.
4. Assembly of the main frame and roof.
5. Wall cladding and subfloor installation.
6. Arrangement of doors, windows and partitions.
7. Clean interior decoration of premises.
Now we can look at each stage in more detail.
Preparation
It doesn’t matter whether you designed the building yourself or bought a ready-made project, it is important to tie the structure to the specific topography of the site. No construction is complete without the preparation stage; even a simple country house cannot be built without preparation.
Plot
To build a frame house yourself, the following work is carried out on the site:
· clear the area of debris, stumps or old buildings, if any;
· prepare the access road in such a way that the vehicle delivering construction material has room to turn around;
· prepare a place for storing building materials, they should not get wet;
· if the terrain is not smooth, then the area needs to be given a horizon;
· It is also worth thinking about barriers to prevent theft of material.
Marking
This is a transfer to the location of the future frame house, which is carried out using wooden pegs and construction twine. Pegs are installed in the corners and string is pulled along the perimeter, which marks the outer walls.
There is one very important nuance in the marking - all angles must be 90 degrees. To align them correctly, diagonal cords are pulled, the length of which must be strictly the same.
If this is not done, then the design of the frame structure will not be reliable, since it will be impossible to correctly distribute the load.
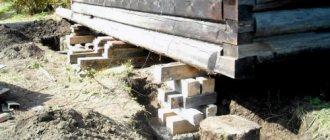
How to build a foundation?
The construction of any house begins with the construction of a foundation on which the entire frame structure will rest. The foundation can be made of a monolith, or assembled from frame blocks. But often small houses built using frame technology are built with columnar or pile-screw construction.
Due to the fact that the structure is lightweight, it is not necessary to build powerful deep foundations - a shallow foundation will suffice, which significantly saves money.
Important! If the soil on the site is mobile or prone to heaving, then deep foundations or pile-screw foundations with a grillage are used.
Let's consider all types of foundations that are used in construction.
Tape base
This is a monolithic reinforced concrete strip located along the perimeter of the building, under all load-bearing structures and partitions. The laying depth varies from 100 to 500 mm, while at least 30 cm should rise above the ground surface.
On a note! A strip foundation is a fairly common and popular type of foundation when building a private house, as it allows you to equip a basement or ground floor.
For a strip foundation, a trench is constructed with a width equal to the cross-section of the walls plus 10 cm. A sand cushion is poured onto the bottom of the ditch, and formwork is installed above the ground surface. Then reinforcement is carried out using reinforcement, the cross-section of which should not be less than 12 mm.
Monolithic slab
The most reliable and durable of all types of foundations that are built on heaving and floating soils - it sinks and rises depending on the movements of the soil.
The floating foundation is poured from reinforced concrete, and reinforcement is done by tying rods with reinforcement.
For a frame structure, the slab foundation can be buried just 20 cm or installed on a gravel-sand bed without deepening.
Pile-screw
To construct this type of foundation, ready-made structures (piles with a threaded tip) or large-section asbestos pipes are used, into which concrete is subsequently poured.
It is necessary to prepare holes for the pipes; the finished piles are screwed in without removing the soil.
Wall strapping
On the finished piles, the surface of which must be leveled to a level horizon, wooden planks are laid, which serve as a grillage, and the bottom frame of the frame - the racks will be attached to it.
It is worth understanding that the grillage is a load-bearing element that will hold the entire structure together with the roof on the net, so the timber used for it is of a large section of 15-18 cm.
The corner fastenings of the beams can be made into a paw or half a tree. After joining, the corners are additionally strengthened with dowels or metal staples. Next comes fastening to the foundation with metal anchors and treatment with an antiseptic.
Cycle of interior works
The interior work stage involves:
- Installation of interior partitions;
- Layout of functional and living spaces in the house;
- Installation of plumbing and lighting fixtures;
- Leveling the surface of load-bearing elements;
- Floor and ceiling construction.
At the same time, at this stage, installation work can be carried out to complete the internal wiring of communications.
Also, the stage of interior work may include the installation of skirting boards, cornices, window sills, trim on doors and windows, and installation of some household equipment.
Subfloor
Not a single home is complete without flooring. In frame construction technology, the floor laying process is divided into 3 stages:
· subfloor flooring;
· arrangement of a clean floor covering.
The subfloor can be made of wood or concrete, and the finishing coating is laid based on the owner’s preferences - it can be ceramic tiles, parquet, laminate, and so on.
Let's look at how to arrange a subfloor in one way or another.
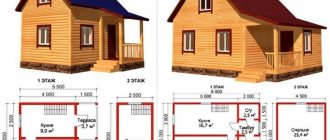
Layout of a small house 6X6
In this case, the typical situation is when there is a vestibule at the entrance, and to the right of it there is a sanitary unit.
Note!
Attic floor: advantages and disadvantages of the attic. Features of the arrangement of the attic floor. Wall decoration and furniture selection (photo + video)Layout of a two-story house: TOP-180 photos and videos of layout options for a two-story house. Features of the foundation and external conditions
Layout of a house with a garage: TOP-180 photos and videos of ideas for planning a house with a garage. Creating a foundation. Construction materials
The vestibule leads to the living room combined with the kitchen. It is the largest room in the house. From the living room you can access two equal-sized bedrooms.
Both bedrooms have separate entrances. The bedrooms are separated from each other and from the living room by capital internal partitions.
Concrete floor
This is a multi-layer cake consisting of:
· prepare the surface - level the ground and compact it well, creating a horizon;
· pour a sand cushion, the layer of which should be at least 10 cm;
· arrange thermal insulation - this can be expanded clay, expanded polystyrene, polystyrene foam, and so on;
· lay waterproofing, or order concrete with special additives, it all depends on the construction budget;
· mesh made of reinforcement, with a cross-section of at least 12 mm;
· install formwork, the height of which should be 5 cm greater than the thickness of the concrete coating;
Wood flooring
It is worth warning immediately that a wooden floor cannot be laid on the ground; there must be a space between these surfaces of at least 10-20 cm. At the same time, vents are installed in the foundation for ventilation.
So, let's look at the step-by-step installation of a rough wooden floor:
· lay wooden logs on top of the bottom trim - timber 15x15 cm;
· if the logs are not far from the ground surface, then it is necessary to mount 5x5 bars on the lower edge of each element on both sides. There is a lot of space, you can simply nail the boards from below;
· cut the boards into the required lengths and lay them on the bars between the joists; they don’t need to be fixed; there will be virtually no load on the subfloor.
House installation
This issue must be approached with all responsibility, choose the right rack beams, boards and install them securely. So let's begin:
· using a measuring device, measure the location of the racks and mark them with a pencil;
· it is important that the racks are in a strictly vertical position, and the angle between the harness and the element is 90 degrees;
· nails and metal corners or staples are used to fasten elements together;
· the walls are installed on the ground, it’s easier, and then they are raised, supported with beams obliquely, measured vertically and fastened.
Advice! If the wall assembled according to the template is more than 6 meters long, then a team of 3-4 people will be required to lift it. If the walls are longer, then it is necessary to assemble several templates and secure them with special threaded fasteners.
Ukosiny
Installed to give rigidity to the structure - these are 150x5 boards that are nailed to the risers obliquely
Rigel
This is a special board that is installed above the top trim; it can be secured during the assembly of the template, or mounted before installing the roof elements.
In order for the corner to be strong and rigid, it is assembled from several rack-mount elements; it is worth understanding that the corners bear the maximum load, so the work must be done very carefully and efficiently.
Internal walls
Internal walls are assembled in the same way as load-bearing walls. they can be mounted from boards of smaller cross-section, since the load on them will be minimal.
The main requirement for partitions is insulation; it is not necessary to insulate them.
One-story mini-cottage 10X10
The layout of a one-story house made of foam blocks of the above size is often like this. To the right of the vestibule is the boiler room.
From the vestibule you can go into a small hall, to the right of the entrance to which there is a combined bathroom. On the left is a row of three rooms, separated from the hall by a load-bearing wall.
The kitchen on the left is adjacent to the bathroom and is separated from it by a partition. The living room is located directly off the hall. It is separated from the kitchen by a partition. This house is designed to accommodate a family of 4-5 people.
Note!
Balusters for stairs: TOP-140 photos and videos. Types of balusters for stairs. Manufacturing materials. DIY installation instructionsWindow shutters: purpose and types of window shutters. Features of the material of manufacture. Shutter sizes for different windows (photo + video)
Veranda Design - Uses and Benefits of Veranda. Interior veranda design styles. Materials for finishing the terrace (photo and video reviews)
Insulation of the building
It's time to insulate the walls of the house so that on winter evenings you don't spend a lot of resources on heating the room. In this case, you should not save on insulation; it must be of high quality with the highest characteristics. What kind of insulation can be used:
· polystyrene foam or expanded polystyrene;
· stone or basalt wool;
The most optimal would be to use special mats made of mineral wool; it is environmentally friendly, practical, breathable, and does not lose its quality characteristics over time, so we will consider this option for insulation:
· let's start with the fact that cotton wool is not a moisture-resistant material and can lose 30% of its insulating properties when wet. Therefore, before laying it, a vapor barrier layer is installed;
· lay a heat insulator. All gaps between the plates are well sealed. You can use polyurethane foam;
· then install the second layer of vapor barrier;
· Now you can line the walls from the inside with rough finishing material.
Important! Do not use polyethylene as a vapor barrier; it does not perform its functions well in this case, forming condensation; it is better to buy a special membrane sheet.
The final stage will be the interior decoration of the room, but this is a topic for a separate article.
Source
Building a house with your own hands: step-by-step demonstration
If you decide to build a house with your own hands, then at each stage you may have many questions, the answers to which you can find in our article. For a private developer who has decided to carry out all the work with his own hands, it is important not only to understand the sequence of work and know the intricacies of their implementation, but also to correctly determine the choice of materials, wall design and type of foundation. If you build your house yourself, then choose a simple project, a simple configuration in plan and with a regular gable roof. It is much easier to build such a building with your own hands, and you can save on materials. From our article you will learn about building a house from A to Z.
Why do you need to plan construction stages?
It would be strange to start construction without having a clear idea of the future object. The same applies to planning construction stages. Strict adherence to the sequence of construction work, the same precise execution from the beginning to the end of each stage serves as the basis for giving the house the required design characteristics:
- Durability of operation;
- Reliability of the design;
- Ensuring comfortable living;
- Operational safety;
- Possibility of changing facade design and interior style.
At the same time, even during the construction process, the benefits of following the planned actions become noticeable. For example, strict adherence to the established plan allows at each stage of the construction of a one-story residential building:
- Minimize costs according to the estimate;
- Significantly reduce the duration of the construction process;
- Reduce the labor intensity of building a house;
- Rational use of material and financial resources;
- Prevent the risk of emergency situations;
- Increase the degree of safety during construction and during further operation of the house;
- Avoid possible corrections in planning, communication wiring and finishing work;
- Achieve favorable economic profitability of the construction process.
So, the importance of planning the entire structure of the construction process is obvious. Moreover, it is important to carefully consider each stage of the construction of a one-story residential building.
And for this purpose, experienced builders from the InnovaStroy company recommend adhering to consistent actions that have been tested by time and their own practice. Next, it is proposed to consider all the important stages of such a construction process and focus on the key points of each stage.
Subtleties of choosing materials
If you decide to build a house yourself from the foundation to the roof, then before you decide on the layout, you should decide what you will make the walls from, since this may affect the planning decision and the project as a whole.
A residential building can be built from the following materials:
Important: if we build a house ourselves, then the weight of the wall material is very important. Thus, lighter aerated blocks are much more profitable to use than heavy bricks. You can save on transporting material and arranging a lighter foundation.
Even if we build a house with our own hands, it is necessary to follow the construction stages, the first of which will be associated with the construction of the foundation. Before you independently choose the type, design and material of the foundation, you need to study the geological features of the area, find out the groundwater level and the freezing mark of the soil. Depending on the material of the walls and the characteristics of the soil, you can use one of the following materials for arranging the foundation:
Planting on the site
When choosing a place for a house on a site, it is worth observing the standards that regulate distances from neighboring buildings:
Having decided on the planting on the site, selected the optimal layout and selected materials, you can begin construction, observing the order of work. Since there should be no problems with making brick or aerated concrete masonry, we will describe step by step how to build a frame house, because this type of structure is often used in private construction in every region of our country.
One-story houses (90 photos): projects and ideas
Having decided to build their own house, many people think about what material to choose, because both the cost of construction and the durability, reliability of the building, its ability to retain heat and be a comfortable home depend on it. The construction market offers a large selection of raw materials for construction, among which the most relevant are:
Foam and aerated concrete are materials that are highly environmentally friendly, as they are made from a mixture of cement, sand and water. During the production process, air spaces are formed inside the blocks, due to which the materials become light and perfectly breathable. They are fireproof, temperature resistant and have high thermal insulation characteristics. Houses made from this material can significantly save on the foundation, but require additional finishing;
Brick can be called the most “ancient” material. It has been used as a raw material for the construction of houses for many years, but today it is inferior in its thermal conductivity to new standards, therefore it is more often used as cladding;
Ceramic blocks are an excellent alternative to brick. The material has high strength and frost resistance, but is much more expensive. It is worth noting that building buildings from blocks is much faster, since one unit replaces about 7 bricks in size;
Monolith - makes it possible to erect a building in the shortest possible time, while the walls have high strength and thermal insulation qualities;
Stone makes it possible to build houses with an optimal microclimate, which are warm in winter and cool in summer. Stone structures have the highest durability, but the cost is much higher than all previous options;
Wood is a warm, environmentally friendly material for construction. Most often, profiled timber is used for one-story houses, which, in addition to high quality, has excellent external properties. There are also beautiful “fairytale” houses made of rounded logs;
A wooden frame ensures quick construction of a house, but the question of its durability is quite controversial. Such buildings are relatively cheap, but the disadvantages are low vapor permeability and sound insulation. However, additional building materials can help eliminate these design disadvantages.