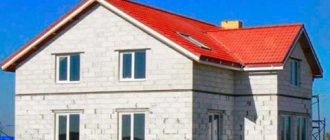
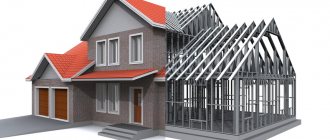
Nowadays, given the high cost of building materials, private country houses are being built using more advanced technologies. One of these technologies is the construction of a country house using the Canadian-Finnish “Platform” technology. Finnish engineer Mikko Viljakainen outlined in detail the essence of this technology in his book “Platform Individual House”. Directory. Design and construction". In this article, we will focus specifically on the technology itself, omitting the indentation for background information, and step by step consider how to build a country frame house yourself using platform technology, what materials will be required for this, and the main nuances of construction.
Installation of cross braces
After manufacturing the strip foundation, its entire surface is checked for horizontal evenness. The maximum permissible deviation in the surface level of the foundation strip can be +/- 3 mm per 1 linear meter. If there is a greater difference or unevenness of the surface of the tape, its surface is leveled with cement-sand mortar. The flat surface of the foundation strip is very important, since cross braces will be mounted on it.
After making sure that the surface of the foundation strip is even, waterproofing is applied to its plane. The waterproofing can be bitumen coating, or a cut strip of roofing material can also be fused onto the surface of the tape. Read more about various methods of foundation waterproofing in the article: waterproofing foundation structures.
Cross braces are laid on top of the foundation waterproofing and secured to it with anchors.
Having completed the waterproofing, control threads are pulled along the outer axes of the foundation strip, which will serve as a guide when installing cross ties. Along the trajectory of the control threads, a wooden beam 50x150 mm is laid on a plane and fixed to the foundation strip. I install the cross braces using threaded rods that were previously released from the concrete strip. If the rods were not installed in the tape, then the cross ties are fixed using driven anchors. Also, rods with a 12 mm thread for a nut can be installed using chemical anchors.
Construction stages. Instructions
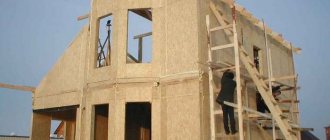
The construction of frame houses using the “Platform” technology can be done with your own hands. If finances allow, you can use the help of professionals. If you decide to build the structure yourself, then you should be prepared for the fact that the work may take a long time.
The instructions include the construction of the necessary components - foundation, walls, roof. In order for the product to be of high quality and wear-resistant, it is important to follow all the necessary steps and principles. The frame house must contain all the necessary communications, supports, insulating elements and other components.
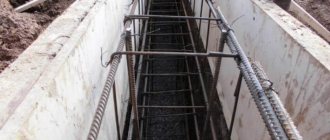
Foundation arrangement
The light weight of the “frame”, the “Platform” technology allows the use of a simple foundation. An excellent option would be to install a shallow strip base. A columnar foundation can also be used. The choice depends on the type of soil on the site, the depth of groundwater, the level of soil freezing, and the type of relief.
It is recommended to pour the foundation in warm weather; the mixture flows easier and hardens evenly. But sometimes work can be carried out in winter - special additives are added to the concrete composition.
The simplest solution would be to build a foundation on piles. The technology for constructing the foundation involves screwing piles into the ground, and then filling their inner part with a concrete mixture. In addition, this foundation is constantly blown, this prevents the wood from rotting.
Features of installing cross braces
For cross braces you will need a 50x150 mm beam. It must be laid on the surface of the base. The installation of transverse connections should be carried out using threaded hoses. To carry out the installation, the hoses are released from the strip foundation in advance. If there are no hoses in the tape, drive-in anchors are used instead.
After the surface of the base is leveled, a layer of waterproofing materials must be applied to it. They can be coating, bitumen or roofing material. If the latter are used, then a sheet of roofing felt is cut out, and then it is fused onto the foundation surface.
After the foundation waterproofing is installed, the control threads are tensioned and fixed along the outer axes of the base. Thanks to them, it will be possible to lay the crossbars evenly.
Features of installing cross braces:
- For cross braces you will need a 50x150 mm beam. It must be laid on the surface of the base;
- The installation of transverse connections should be carried out using hoses that have a thread;
- To make the installation, the hoses are pre-released from a concrete tape;
- If there are no hoses in the tape, then installation can be done using drive-in anchors.
The base of the lower floor on internal supports
Installation of internal rafter support structures is carried out after the cross beams are installed. Rafter supports are required to prevent sagging of the floor, which can occur due to various loads. It is recommended to use wooden beams for supporting elements; sometimes metal I-beams can be used.
The process of installing the internal supports of the lower floor is carried out in compliance with the following recommendations:
- These elements are installed on special poles that are pre-screwed into the ground;
- If the base has a square shape, then its surface should be divided into several parts. Each part must be equal to each other;
- The extreme points of the parts will be the area for installing the support pillar;
- Then wooden beams or metal I-beams are installed on the pillars.
Floor installation: preparation of beams, cladding, insulation
In order for this process to be correct, it is worth remembering a few recommendations:
- To begin with, beams with the required length are prepared;
- Next, the beam is turned over onto the rib area, and a 22 mm edged board is laid on top. The width of this element should be slightly larger than the rib of the beam. Attaching the board is done with nails;
- The location of the beam during installation should be such that “wings” are formed under this element. The padded board faces the transverse floors;
- The beams are installed with a “step” corresponding to the size of the insulation and the perimeter of the floor. Usually from 4 to 6 cm;
- The slabs are cut after installing the beams, in accordance with the “step” of the beam floors;
- Shields are laid on the beam wings;
- The grooves in the space between the beams are filled with insulation. Usually mineral wool is used;
- Finally, a subfloor is laid on the surface of the beams; a moisture-resistant plywood board should be used for it.
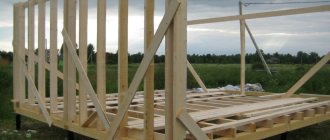
Frame walls and features of their manufacture
It is worth starting the construction of wall frames only after transverse strapping, to enhance their stability. These connecting elements are made from a pair of transverse boards. They should be long and knitted. The board on top protrudes its width above the bottom. After strapping, you can assemble the frame:
- The lower part of the ties is installed along the edge of the floor slab. The upper connecting element is laid parallel to it. The distance between them should be about 270 cm;
- Construction racks are being prepared. For them, it is recommended to use a 150x50 mm board. The stand should also have a length of 270 cm;
- The number of racks depends on the wall area. The distance between these elements should be from 40 to 60 cm;
- Wall frames can be installed. They are installed horizontally and fastened with screws to vertical beams.
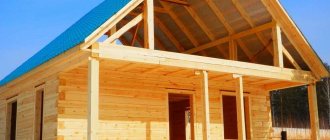
Roof arrangement
If the house is one-story, then the ceiling must be made together with the roof. Trusses and timber beams are used for the work. The shape of the truss looks like a flattened triangle. This component consists of two beams that diverge to the sides, they are connected at the bottom using a long beam.
The truss inside is strengthened by a special supporting element or spacer. All connections are secured with ties. To assemble the truss, you will need to make some calculations, and you may also need special diagrams and drawings. The first assembled element can be used as a template.
Load-bearing walls are marked, their evenness and angles of 90 degrees are checked. You can raise farms. The outermost of them is fixed with nails driven at an angle. You can use staples instead of nails.
Nails must be driven in at an angle. The next step is nailing the roof ridge. Then they raise the second truss and perform the same actions. After installing all the trusses, moisture-resistant plywood is stuffed on top and the roof sheathing is made.
Internal supports of the lower floor
Internal supports and support beams.
Floor beams are laid on cross braces and support beams. After installing the cross braces on the foundation strip, the internal supports are installed. These supports are necessary to ensure that the floor beams do not sag under load. As a rule, a massive wooden beam or metal I-beam is used as internal supports. Internal supports are mounted inside the perimeter of the strip foundation on pillars installed in the ground. That is, let’s say the foundation has the shape of a square. Cross braces were installed on its surface, on which the floor beams will rest.
This means that the square shape of the foundation is divided into 2 or more equal parts and, according to the found points of the future internal supports, pillars are installed parallel to each other in the ground. Massive wooden beams or I-beams will subsequently be mounted on these pillars. That is, the entire perimeter square is divided by parallel running internal supports. The easiest way to make the vertical pillars for the supports is according to the principle of manufacturing the pillars of a columnar foundation. You can also use concrete bored or iron screw piles as pillars.
Dry theory of shallow strip foundation (MSLF) – Second place
Don't bury the foundations deep, V.S.
Sazhin, Moscow 2003, 47 pages For me, a frame house and a shallow strip foundation are two inseparable things. In 90% of cases, MZLF can be a reliable and sufficient basis for a standard frame structure with 1-2 floors. The remaining 10% of cases are swampy areas of land where it is impossible to make effective drainage and areas with sharp changes in elevation, where it is more economically profitable to make a pile (columnar) foundation.
The book “Don’t Bury the Foundations Deep”, with its format and content, is more like a manual than a full-fledged publication.
The information in the book is presented briefly and dryly. At the same time, it is definitely the main and only complete theoretical basis for shallow strip foundations today. Other books on this topic only complement it.
Despite the abundance of text, a large number of formulas and tables and a minimal amount of explanatory graphics (what you wanted from a book of 47 pages), this book will allow you to find out the type of soil on your site in a simple and accessible way, justify the possibility of building an MZLF on the site and calculate its parameters.
And this is the main advantage of the book! Everything that is written in it can be implemented in practice.
Preparation of floor beams, their installation, insulation and covering
Be very careful here. Floor beams are not installed immediately; they are pre-prepared. The bottom line is that in order to obtain floor insulation, that is, laying mineral wool between beams, there must be a support or foundation under the beams. In the case of installing a ceiling, covering the load-bearing beams from the inside with plywood or chipboard does not cause any problems, since the beams will be accessible. It will no longer be possible to get close to the floor beams in order to cover them from below. Therefore, the beams are pre-prepared.
First, the beams are prepared to the required length. After this, the beam is installed on the edge. A 20 mm edged board, 2 times wider than the beam’s edge, is laid flat on its edge and installed with nails so that the beam looks like the letter “T” in profile. During the installation of the floor beam, it is positioned so that “wings” are formed under it, that is, with the board stuffed onto it down towards the cross braces. The distance between the floor beams varies depending on the total floor area and the width of the insulation. On average, the distance is 40-60 cm.
Floor installation using “Platform” technology.
After installing all parallel floor beams, boards with a width equal to the distance between the beams are cut out of 10 mm plywood or chipboard using a hand-held circular saw. Next, the panels are laid on the “wings” pre-provided at the bottom of the beams. After this, the entire space between the beams is filled with mineral wool in the form of slabs and a subfloor is installed over the beams with moisture-resistant plywood. Only after making the entire lower floor do they proceed to the installation of frame load-bearing walls.
Flooring
After the logs were installed, the boards were marked and sawn, which in the future will be the lower frames of the walls. These boards were laid in place on the framing beams and temporarily secured.
I received a perimeter inside which counter logs need to be installed. Logs 40x100mm with a pitch of 400mm
The counter joists are also sawn to size and laid in place but flat. And on top there was made a 18 mm pox3 flooring according to the plan. And all this is temporarily fixed
Why were the counter joists laid flat and everything secured temporarily?
This is due to the design features and stages of construction of the house.
And the stages are as follows
- We assemble farms on the resulting platform.
- Assembling external walls
- We put up walls.
- We set up farms
- We complete the roof on a turnkey basis
- We sew up the outside of the wall.
We get a box completely closed from the outside without internal walls. After which you can remove the temporarily fixed OSB and counter joists, make a subfloor, install counter joists on the edge, insulate the floor and properly fix the OSB.
That is, all the insulation of the platform and the installation of internal walls will already be under the roof.
Making wall frames
The installation of walls begins with the manufacture of cross braces, which will form the upper frame of the walls. Transverse top ties are made from two long, knocked down solid boards. In this case, the top board should protrude above the bottom board at a distance equal to the width of the board; on the contrary, perpendicular to the adjacent wall - the top board is shorter by the width of the board. You should not make the top trim from different pieces, as this can significantly weaken the wall structure. In general, they begin to assemble frame walls only after the upper connections for the entire perimeter of the walls have been prepared.
Wall frame using “Platform” technology. Assembly is carried out on the floor. The upper trim has cross braces.
When the wall connections are ready, the assembly of the frame begins. The connection that will be at the bottom of the wall is laid longitudinally along the edge of the already installed flooring. Parallel to it, at a distance of 270 cm, an upper tie is laid on the flooring. In fact, it should be a “mirror” of the lower connection. Next, the racks, 270 cm long, are prepared from a 150x50 mm board. The number of racks depends on the total length of the wall, taking into account that there will be a distance of 40-60 cm between the vertical racks.
The very distance between the vertical posts is calculated based on whether the second floor will be erected. That is, if there is a second floor, then the load on the walls will be greater and, therefore, the distance between the racks should be 40 cm. Having prepared the vertical racks and marking the two links, the frame is assembled in a lying position. The connections between the posts and braces are made in half a tree, secured with screws. In this case, be sure to check the outer corners of the frame assembled in this way.
Design features of houses
The finished frame parts have precise dimensions and fit together perfectly. The deviations from those elements that need to be adjusted are small.
The main frame details include:
- racks - standard height is 2630 mm, section 48x147 mm - for external walls, 48x97 mm - for internal walls;
- strands - of various lengths, you can choose from standard lumber;
- beams - designed for constructing floors and interfloor ceilings, section 48x220 or 48x172 mm, length depends on the features of the project;
- building boards (coniferous plywood, gypsum board) - impart rigidity to the structure, serve as wind protection, dimensions correspond to the size and pitch of the posts.
Unified nail connections provide sufficient strength and rigidity of the structure.
Useful: American frame houses
Note! When designing a residential frame house using the “platform” technology, there is no need to change the size of the main parts. It is enough just to adjust their number or location.
The height of the building is determined taking into account the standard height of the vertical posts. When calculating horizontal dimensions, the size of the building slabs for the subfloor is taken into account.
Support lines are of particular importance for the safety and reliability of an individual residential building . Their correct location ensures even distribution of the load on each part of the structure. To avoid mistakes at the design stage, it is better to contact engineers.
Frame covering and installation
After assembling the wall frame, its lower connection is temporarily fixed with nails to the edge of the floor base. Next, using a tape measure, check the diagonals of the frame that has not yet been sheathed, since after sheathing it will no longer be possible to correct its curvature. If everything is in order, then the entire knocked-down frame is sheathed with 10 mm moisture-resistant plywood or OSB. Self-tapping screws are used as installation material. The sheathing itself serves not only as the rough surface of the outer wall, but also serves as a ligament for the entire frame.
You can learn more about how to properly attach OSB sheets to a frame from the article: covering walls with OSB boards.
After completing the sheathing before raising the frame, you can even make window or door openings in it with a jigsaw. When the framing of the frame is finished, they begin to lift it and install it in a vertical position. As a rule, sheathed finished frames are lifted in pairs so that it is possible to fix their perpendicular upper connections to each other. That is, the frames are lifted from the corners. After lifting and securing all the wall frames, they proceed to the manufacture of the upper floor.
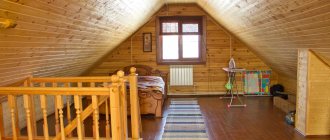
Ceiling and roofing
If a two-story country frame house is being built, then a beam floor is mounted on top of the installed and leveled frame walls according to the principle of making a floor covering. After installing the ceiling, the walls of the second floor are assembled in the same way as the first floor.
If a one-story house is being built, then its floor covering is installed simultaneously with the manufacture of the roof. Simultaneous installation of the floor and roof is carried out using trusses made of wooden beams assembled according to a single template. The truss itself resembles an oblate triangle: 2 diverging logs, connected at the bottom by a long beam. Inside the truss itself there are reinforcing supports or struts, while all connection points in the truss are made with ties. The required wooden trusses are calculated in advance. Next, one truss is assembled, and all the other trusses are assembled, using the first one as a template.
roof trusses
Before starting to install the trusses, markings are made on the load-bearing walls of the frame house. The installation of trusses is carried out according to the principle of wall installation. The walls are checked for evenness, that is, the angles must be 90 degrees, and the walls themselves must not have a slope. After completing the check, the entire set of assembled wooden trusses is lifted onto the surface of the walls. At the same time, during the lifting of the trusses, they are laid at an angle one on top of the other. Next, the outermost truss is fixed in place with staples or long nails. In this case, the nails are driven in at an angle. They will not be the final fastening element at all, but will temporarily keep the first truss from falling during its vertical lifting.
Next, the first truss is lifted, leveled and secured with spacers. A temporary ridge made of a single long board is nailed to the top of the truss. After this, the next neighboring truss is raised to a vertical position. It is also placed in a level position and fixed with a temporary ridge. Using this principle, all remaining trusses are raised, temporarily fixing each one to each other. When all the trusses are installed, moisture-resistant plywood or sheathing is placed on top of them for the final installation of the roof covering.
Introduction to the technology of building frame houses - First place
Individual house “PLATFORM”, Handbook of design and construction, Mikko Viljakainen, Puuinfo 1999, 136 pages
Many call this book the bible of frame house building, the basis of the basics, and so on. I won’t be so categorical, I’ll say it less colorfully, in simple words: you should really start your acquaintance with the theory and practice of building a frame house with this book.
There is an explanation for this:
- the book was written by a Finnish author, with the support of the Finnish non-profit organization Puuinfo, and the Finnish traditions of building frame houses have a long history and can be trusted,
- frame house construction technology The platform is based on basic, easy-to-learn and master structures and components - they must be known and understood,
- The book is written in clear language, contains a large number of black and white drawings and diagrams describing all stages of building a frame house, from design, preparation for construction of the frame and ending with rough finishing of the interior of the frame house.
Be sure to read this book and... move on.
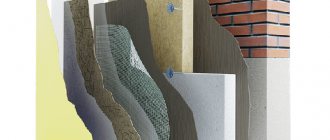
Insulation device for a frame house
Before thermal insulation of the walls is carried out, electrical wiring is installed in the voids between the racks in a special fireproof pipe. After finishing the roof, they move on to insulating the frame walls. Initially, the walls must be vapor-insulated. To do this, the entire inner surface of the walls is covered with a vapor barrier roofing film.
During installation, I wrap the film around each rack, while the film is fixed to the inner surface and racks with special brackets. When a vapor barrier film has been installed on the entire surface of the walls, proceed to filling the entire space between the racks with mineral wool slabs. The slabs are installed without fixation, simply by surprise. If small gaps remain, they are filled with polyurethane foam. Having completed the final insulation of the external walls from the inside, a second vapor barrier film is mounted on top of the mineral wool with staples, after which the internal walls of the frame house are sheathed with sheets of chipboard or plywood.
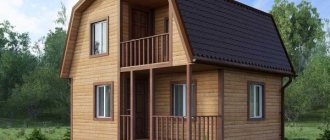
Projects of frame houses using Platform technology
Before starting to build a house using the Platform system, it is worth preparing a project. You can do this yourself using special programs on your computer. The SketchUp program will help in this matter; using this application, you can create a diagram of your future home with the location of all the rooms.
s projects can be found on the Internet. Below is an approximate diagram that can be used when constructing a structure using the “Platform” system.
But still, if you do not want to draw up a project yourself, then you can use the services of professionals. They will offer several options, among which you can choose a suitable construction scheme. In addition, they will calculate the volume of required materials and draw up an estimate.
Node diagrams
To draw up diagrams correctly, you should pay attention to several important features:
- The lower frame is considered the main area for fixing the beams to the base. Docking is carried out through the use of bolts, clamps and other fasteners;
- A structural unit is made in the lower trim - the joint of the beams with each other in the corner area;
- Vertical supports must be installed first, followed by intermediate ones.
Below is a diagram of the roof components of a frame house.