Floor slab reinforcement is used to create reliable reinforcement for reinforced concrete slabs and provide structural strength when exposed to bending loads. Thanks to this hardening method, it is possible to ensure uniform distribution of pressure on the foundation and reduce the cost of building a building, since there is no need to use special equipment during the work process, and it is quite possible to perform all calculations independently, based on the formulas of regulatory documentation.
Types of floors
Floors can be made of wood or reinforced concrete, which depends on the operating conditions of the structure and calculations. The most popular is reinforced concrete, which has good strength characteristics, resistance to various loads, affordable cost and ease of creation and installation.
By type of construction there are:
- Standard – represented by ready-made reinforced concrete slabs of different configurations (size, shape, thickness)
- Monolithic ceiling, the reinforcement of which is carried out directly on site
According to the purpose of the plates there are:
1. Basement – separate the walls of the basement from the lower floors
2. Interfloor – delimit floors
3. Attics - demarcate living spaces and under-roof space
A monolithic floor slab, correctly manufactured in accordance with all standards and parameters, the reinforcement of which is carried out in accordance with the established requirements of SNiP, has the main advantage - weight reduction due to the presence of cavities formed during pouring.
According to the shape and number of voids, the slab can be:
- Multi-hollow - with longitudinal round cavities
- Hollow - shaped narrow panels, which are most often used as inserts
- Ribbed - complex profile with special characteristics
Ready-made structures are relevant for large-scale construction - usually multi-story high-rise buildings and large structures are built from them. Disadvantages include: the presence of joints, the need to use special lifting equipment, the ability to create only rooms of standard sizes, the inability to design openings for hoods, shaped ceilings and other shapes.
It is also important that the installation of monolithic floor slabs significantly increases the total cost of the work in the estimate. Therefore, in individual construction, floors are usually manufactured on site, pouring reinforced mesh with concrete directly on the site.
Laying reinforced concrete floors on walls
The technology for laying floor slabs on the wall is selected taking into account the characteristics of the material from which the wall structures are constructed.
Aerated concrete walls
It is necessary to erect a concrete armored belt along the contour of the building made of aerated concrete blocks. A monolithic structure is installed on external load-bearing walls, as well as on internal ones if they stand on a foundation.
Key Requirements:
- for a reinforced monolithic belt, concrete B15 or a higher strength class is used;
- the width of the belt should correspond to the width of the wall, but for walls more than 500 mm wide it is allowed to reduce this indicator of the armored belt by 100-150 mm;
- The plates and the belt are additionally connected by welding embedded parts.
The depth of support when laying slabs on aerated concrete blocks must comply with the following standards:
- from 40 mm when supported along the contour:
- from 50 mm for reinforced concrete products up to 4200 mm long when supported on two sides;
- from 70 mm for reinforced concrete products with a length of more than 4200 mm when supported on two sides.
Brick walls
Brick walls are built to their full thickness up to the designed ceiling height. Next, the masonry is carried out only on the outside of the building, due to which a niche is formed where the edge of the floor slab will be laid.
The minimum permissible support depth according to the standards is 90 mm. But when designing, they usually provide for a support depth of 120 mm (half a brick) and form a niche 130 mm deep to leave a thermal insulation gap, otherwise the ceiling will serve as a cold bridge.
To lay floor slabs on a brick wall, use the same mortar that was used for laying bricks.
Advantages and disadvantages of continuous reinforced floors
Reinforced concrete flooring is made from two main materials - cement mortar and metal rods (reinforcing metal mesh). Due to the fact that concrete is hard, but brittle and susceptible to deformation, it easily crumbles from impacts. The metal is softer, but resistant to deformation, torsion and bending. Therefore, the tandem of these two materials provides the best result.
Floor reinforcement is carried out in buildings constructed from cellular concrete blocks and bricks. This option allows you to complete the work yourself, saving on the involvement of professionals and special equipment.
The main advantages of reinforcing monolithic floor slabs:
- The ability to implement any non-standard project, where the support can be both load-bearing walls and decorative columns
- Construction of a floor of any size, configuration - no restrictions
- No joints or seams
- Carrying out all installation and other work on site
- This slab arrangement is used where it is not possible to attract special transport
- The structure with a rigid base is created perfectly flat, without any deflections
- High level of strength, resistance to force stress, mechanical loads, temperature, moisture
- Uniform distribution of heavy loads on the foundation
- Ease of making different communication wells, openings between floors for staircases
- A chance to protect attics and attics from frost with transverse and longitudinal structures
- High fire resistance
Among the disadvantages, it is worth highlighting the duration and labor intensity of the process, the need to involve at least three people in the work, to provide tools and equipment, constant monitoring and care of the monolith at first, higher cost in comparison with wooden construction.
Construction of houses
93 votes
+
Vote for!
—
Vote against!
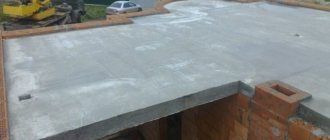
In houses made of brick, concrete or concrete blocks, the floors are usually made of reinforced concrete. They provide exceptional strength and earthquake resistance to the structure, and are also very durable and do not burn, which is important. There are several ways to construct reinforced concrete floors. The most common and universal is laying factory-made floor slabs. Such slabs are ordered from concrete factories and then installed using a crane and a team of workers. In cases where using a crane on a construction site is difficult, or when the house has a non-standard layout and it is difficult to lay out finished slabs, a monolithic floor slab is installed. In fact, you can fill a monolithic slab not only when there is evidence for it, but also simply because you consider it more appropriate. In this article we will tell you how to lay floor slabs and how to pour a monolithic slab. Not all work can be done independently, but it is still worth familiarizing yourself with the technology, if only to control the process on the construction site.
- DIY monolithic floor slab
- Technology for installing monolithic floor slabs
- Installation of formwork for a monolithic floor slab
- Reinforcement of a monolithic floor slab
- Pouring concrete
- How to lay floor slabs correctly
- Rules for laying floor slabs
- Floor slab laying technology
- Preparatory work before laying floor slabs
- Installation of hollow core slabs using a crane
- Anchoring of floor slabs
- Sealing joints between floor slabs
- Sealing voids at the ends of floor slabs
- Laying floor slabs: video example
DIY monolithic floor slab
Monolithic flooring has a number of advantages compared to flooring made from ready-made reinforced concrete slabs. Firstly, the structure is strong and monolithic without a single seam, which ensures an even load on the walls and foundation. Secondly, monolithic filling allows you to make the layout of the house more free, since it can rest on columns. Also, the layout can involve any number of corners and crannies for which it would be difficult to select floor slabs of standard sizes. Thirdly, it is possible to safely equip a balcony without an additional support plate, since the structure is monolithic.
You can install a monolithic floor slab yourself; you don’t need a crane or a large team of workers. The main thing is to follow the technology and not skimp on materials.
Technology for installing monolithic floor slabs
Like everything related to construction, monolithic flooring begins with a project. It is advisable to order the calculation of a monolithic floor slab from a design office and not save on it. It usually involves calculating the cross-section of the slab for the bending moment at maximum load. As a result, you will receive the optimal dimensions for the floor slab specifically in your home, instructions on what reinforcement to use and what class of concrete. If you want to try to perform the calculations yourself, an example of calculating a monolithic floor slab can be found on the Internet. We will not focus on this. Let's consider the option of building an ordinary country house with a span of no more than 7 m, so we will make a monolithic floor slab of the most popular recommended size: from 180 to 200 mm thick.
Materials for the manufacture of monolithic floor slabs:
- Formwork.
- Supports for supporting the formwork at the rate of 1 support per 1 m2.
- Steel reinforcement with a diameter of 10 mm or 12 mm.
- Concrete grade M 350 or separately cement, sand and crushed stone.
- Bending device for reinforcement.
- Plastic supports for fittings (clamps).
The technology for pouring a monolithic floor slab includes the following steps:
- Calculation of the floor slab if the span is more than 7 m, or the project involves supporting the slab on a column/columns.
- Installation of deck type formwork.
- Reinforcement of the slab with steel rods.
- Pouring concrete.
- Compacting concrete.
So, after the walls have been driven to the required height, and their level is almost perfectly leveled, you can begin to install a monolithic floor slab.
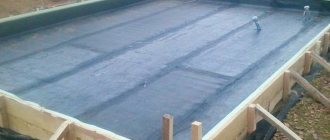
Installation of formwork for a monolithic floor slab
The construction of a monolithic floor slab assumes that concrete will be poured into horizontal formwork. Sometimes horizontal formwork is also called “deck”. There are several options for its arrangement. The first is renting ready-made removable formwork made of metal or plastic. The second is to produce formwork on site using wooden boards or sheets of moisture-resistant plywood. Of course, the first option is simpler and preferable. Firstly, the formwork is collapsible. Secondly, it offers telescopic supports, which are needed to support the formwork at the same level.
If you prefer to make the formwork yourself, then keep in mind that the thickness of the plywood sheets should be 20 mm, and the thickness of the edged boards 25 - 35 mm. If you knock down panels from edged boards, then they need to be tightly adjusted to each other. If gaps are visible between the boards, then the surface of the formwork should be covered with waterproofing film.
Installation of formwork is carried out in this way:
- Vertical support posts are installed. These can be telescopic metal stands, the height of which can be adjusted. But you can also use wooden logs with a diameter of 8 - 15 cm. The step between the racks should be 1 m. The racks closest to the wall should be located at least 20 cm from the wall.
- Crossbars are placed on top of the racks (a longitudinal beam that will hold the formwork, an I-beam, a channel).
- Horizontal formwork is laid on the crossbars. If not ready-made formwork is used, but home-made one, then transverse beams are laid on top of the longitudinal beams, on which sheets of moisture-resistant plywood are placed on top. The dimensions of the horizontal formwork must be adjusted perfectly so that its edges rest against the wall without leaving gaps.
- The height of the pillar supports is adjusted so that the upper edge of the horizontal formwork coincides with the upper edge of the wall masonry.
- Vertical formwork elements are installed. Taking into account the fact that the dimensions of a monolithic floor slab must be such that its edges extend 150 mm onto the walls, it is necessary to construct a vertical fence exactly at this distance from the inner edge of the wall.
- The last time the horizontal and even position of the formwork is checked using a level.
Sometimes, for the convenience of further work, the surface of the formwork is covered with a waterproofing film or, if it is made of metal, lubricated with machine oil. In this case, the formwork can be easily removed, and the surface of the concrete slab will be perfectly flat. The use of telescopic racks for formwork is preferable to wooden supports, since they are reliable, each of them can withstand a weight of up to 2 tons, and microcracks do not form on their surface, as can happen with a wooden log or timber. Renting such racks will cost approximately 2.5 – 3 USD. per 1 m2 of area.
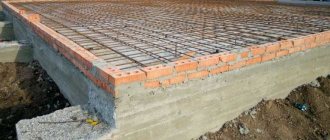
Reinforcement of a monolithic floor slab
After arranging the formwork, a reinforcement frame made of two meshes is installed in it. For the manufacture of the reinforcement frame, steel reinforcement A-500C with a diameter of 10 - 12 mm is used. These rods are used to knit a mesh with a mesh size of 200 mm. To connect the longitudinal and transverse rods, a 1.2 - 1.5 mm knitting wire is used. Most often, the length of one reinforcing rod is not enough to cover the entire span, so the rods will have to be connected to each other lengthwise. To make the structure strong, the rods must be connected with an overlap of 40 cm.
The reinforcing mesh should extend onto the walls by at least 150 mm if the walls are made of brick, and by 250 mm if the walls are made of aerated concrete. The ends of the rods should not reach the vertical formwork along the perimeter by 25 mm.
Reinforcement of a monolithic floor slab is carried out using two reinforcing meshes. One of them - the bottom one - should be located at a height of 20 - 25 mm from the bottom edge of the slab. The second - the top - should be located 20 - 25 mm below the top edge of the slab.
To ensure that the lower mesh is located at the required distance, special plastic clamps . They are installed in increments of 1 - 1.2 m at the intersection of the rods.
The thickness of the monolithic floor slab is taken at the rate of 1:30, where 1 is the thickness of the slab, and 30 is the span length. For example, if the span is 6 m, then the slab thickness will be 200 mm. Considering that the grids should be located at a distance from the edges of the slab, the distance between the grids should be 120 - 125 mm (from a slab thickness of 200 mm, subtract two gaps of 20 mm and subtract 4 thicknesses of reinforcing rods).
special clamps are made from 10 mm reinforcing rod using a special bending tool , as in the photo. The upper and lower flanges of the clamp are 350 mm. The vertical size of the clamp is 120 mm. The installation step of the vertical clamps is 1 m, the rows should be staggered.
The next step is the end clamp . It is installed in increments of 400 mm at the ends of the reinforcement cage. Serves to strengthen the support of the slab on the wall.
Another important element is the connector of the upper and lower mesh . You can see what it looks like in the photo. It is necessary so that the spaced grids perceive the load as one whole. The installation step of this connector is 400 mm, and in the area of support on the wall, within 700 mm from it, in steps of 200 mm.
Pouring concrete
It is better to order concrete directly from the factory. This makes the task much easier. In addition, pouring the mortar from a mixer in an even layer will ensure exceptional strength of the slab. The same cannot be said about the slab, which was poured manually with breaks to prepare a new portion of the solution. So it is better to pour concrete immediately in a layer of 200 mm, without interruptions. Before pouring concrete into the formwork, it is necessary to install a frame or box for technological openings, for example, a chimney or ventilation duct. After pouring, it must be vibrated with a deep vibrator. Then leave to dry and gain strength for 28 days. During the first week, the surface must be moistened with water, only moistened, and not filled with water. After a month, the formwork can be removed. The monolithic floor slab is ready. For installation of floor slabs, the price includes the cost of reinforcement, concrete, rental of formwork and ordering a mixer machine, as well as a concrete pump. In fact, it comes out to about 50 – 55 USD. per m2 of flooring. You can see how the floor slab is poured with concrete in the video demonstrating the installation of floor slabs.
How to lay floor slabs correctly
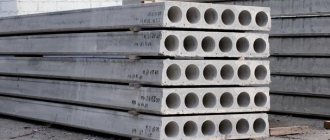
The use of factory-made monolithic reinforced concrete floor slabs is considered more traditional. The most popular are PC slabs – slabs with round voids. The weight of such slabs starts from 1.5 tons, so laying floor slabs with your own hands is impossible. A crane is required. Despite the apparent simplicity of the task, there are a number of nuances and rules that must be followed when working with floor slabs.
Rules for laying floor slabs
The prefabricated floor slab is already reinforced at the factory and does not require additional reinforcement or formwork. They are simply laid in a span supported on the walls, following some rules:
- The span should not be more than 9 m. This is the length of the slabs that are the largest.
- Unloading and lifting of slabs is carried out using special equipment provided by the project. For this purpose, the slabs have mounting loops to which the mounting slings are hooked.
- Before laying floor slabs, the surface of the walls on which they will be laid must be leveled. Large height differences and distortions are not allowed.
- The slabs should rest on the walls by 90 - 150 mm.
- The slabs must not be laid dry; all cracks and technological seams must be sealed with mortar.
- The location of the slabs must be constantly monitored in relation to the walls and supporting surfaces.
- The slabs are laid only on load-bearing walls, all partitions are installed only after the installation of the floors.
- If you need to cut a hatch in the ceiling, then it must be cut at the junction of two slabs, and not in one slab.
- The plates should be located as close to each other as possible, but with a gap of 2 - 3 cm. This will ensure earthquake resistance.
If there are not enough floor slabs to cover the entire span, and there remains, for example, 500 mm, then there are different ways to lay floor slabs in this case. The first is to lay the slabs end to end, leaving gaps at the edges of the room, then seal the gaps with concrete or cinder blocks. The second is laying slabs with uniform gaps, which are then sealed with concrete mortar. To prevent the solution from falling down, formwork is installed under the gap (a board is tied up).
Floor slab laying technology
During the process of laying floor slabs, there must be clear coordination of actions between the crane operator and the team receiving the slab. To avoid injuries at the construction site, as well as to comply with the entire technological process and rules described in SNiPs, the construction foreman must have a technological map for installing floor slabs. It indicates the sequence of work, the quantity and location of equipment, special equipment and tools.
It is necessary to start laying floor slabs from the flight of stairs. After laying the slabs, their position is checked. The slabs are laid well if:
- The difference between the lower surfaces of the plates does not exceed 2 mm.
- The height difference between the upper surfaces of the slabs does not exceed 4 mm.
- The height difference within the site should not exceed 10 mm.
As the installation diagram for floor slabs demonstrates, after laying the slabs, they must be connected to each other and to the walls using metal connecting parts. Work on connecting embedded parts and connecting parts is carried out by welding.
Scheme for laying floor slabs
Don't forget to follow safety precautions. It is not allowed to carry out work using a crane in an open area with a wind of 15 m/s, as well as during ice, thunderstorms and fog. When moving the slab using a crane, the installation team should be away from the path along which the slab will move, on the opposite side of the feed. Despite the fact that using the services of a professional foreman and a team of installers significantly increases the cost of installing floor slabs, this is still not the case when you can save money. The foreman must provide the project.
Before ordering slabs from the factory, it is necessary to carry out preparatory work. It is better to coordinate the delivery time of the machine with slabs and the crane at the same time, so as not to overpay for downtime of special equipment. In this case, the installation of the slabs can be carried out without unloading, directly from the vehicle.
Preparatory work before laying floor slabs
The first is a flat supporting surface . The horizon must be almost ideal; a height difference of 4–5 cm is unacceptable. First of all, we check the surface of the walls, then, if necessary, level it with concrete mortar. Subsequent work can be carried out only after the concrete has acquired maximum strength.
The second is to ensure the strength of the support zone . If the walls are built from brick, concrete or concrete blocks, then no additional measures need to be taken. If the walls are built from foam blocks or gas blocks, then before laying the slabs it is necessary to fill in the reinforced belt. Correct laying of floor slabs requires that the supporting surface must be strong enough to support the weight of the slab and not deform along the abutment line. Neither aerated concrete nor foam concrete have the necessary strength. Therefore, formwork is installed along the entire perimeter of the building, a reinforcement frame made of 8-12 mm rod is installed in it, and then everything is filled with concrete with a layer of 15-20 mm. Further work can be continued only after the concrete has dried.
Third, install mounting towers . Telescopic supports, as described in the section on installing a monolithic floor slab, are installed in increments of 1.5 m. They are designed to take on the weight of the slab if it suddenly slips out of its place. After installation, these towers are removed.
Installation of hollow core slabs using a crane
After the freshly poured concrete has acquired sufficient strength and has dried, the installation of the floor slabs can begin. For this, a crane is used, the lifting capacity of which depends on the size and weight of the slab; cranes of 3 - 7 tons are most often useful.
Stages of work:
- Concrete mortar is applied to the supporting surface in a layer of 2–3 cm. The depth of application of the mortar is equal to the depth of support of the slab, i.e. 150 mm. If the slab rests on two opposite walls, then the solution is applied only to two walls. If the slab rests on three walls, then on the surface of three walls. The actual laying of the slabs can begin when the mortar reaches 50% of its strength.
- While the solution dries, the crane operator can hook the slings to the slab fasteners.
- When the crane operator is given a signal that the slab can be moved, the team of workers must move away from the place where the slab is moving. When the slab is very close, the workers hook it with hooks and turn it around, thereby dampening the oscillatory movements.
- The stove is directed to the right place, one person should stand on one wall, and the other on the opposite. The slab is laid so that its edges rest on the wall at least 120 mm, preferably 150 mm. After installation, the slab will squeeze out excess mortar and evenly distribute the load.
- If there is a need to move the slab, you can use a crowbar. Its position can only be aligned along the laying area; the slab cannot be moved across the walls, otherwise the walls may collapse. The slings are then removed and a signal is given to the crane operator to pick them up.
- The procedure is repeated for all slabs without exception. The rules for installing floor slabs suggest that the slabs should be aligned along the bottom edge, since it is the bottom surface that will be the ceiling in the room. Therefore, the slab is laid with the wider side down and the narrower side up.
You may come across a recommendation that reinforcement must be placed in the area where the slab is supported. Proponents of this method say that it is more convenient and easier to move the stove. In fact, placing anything other than concrete mortar under the slab is prohibited by the technical map. Otherwise, the slab can easily move out of the support area, as it will slide along the reinforcement. In addition, the load will be distributed unevenly.
Laying floor slabs on the foundation is practically no different from laying interfloor slabs. The technology is exactly the same. Only the surface of the foundation must be thoroughly waterproofed before laying the slabs. If the project provides for non-standard support of floor slabs, then special steel elements are used for this. Such work should not be carried out without a specialist.
Anchoring of floor slabs
Anchoring - tying the slabs together - can be done in two ways, depending on the project.
The first is tying the slabs with reinforcement . Reinforcing rods with a diameter of 12 mm are welded to the fastening embedded elements on the slab. For slabs from different manufacturers, the location of these elements may be different: in the longitudinal end of the slab or on its surface. The strongest connection is considered to be a diagonal connection, when the plates are connected to each other with an offset.
The slab must also be connected to the wall. Why is reinforcement built into the wall?
The second method is a ring anchor . In fact, it looks like an armored belt. Formwork is installed around the perimeter of the slab, reinforcement is installed into it and concrete is poured. This method slightly increases the cost of laying floor slabs. But it’s worth it - the slabs end up clamped on all sides.
Sealing joints between floor slabs
After anchoring, you can begin to seal the cracks. The gaps between the floor slabs are called rustications. They are filled with concrete grade M150. If the gaps are large, then a board is tied from below, which serves as formwork. If the gaps are small, then the floor slab will be able to withstand the maximum load the very next day. Otherwise you need to wait a week.
Sealing voids at the ends of floor slabs
All modern slabs with round voids are produced with the ends already filled. If you purchased slabs with open holes, then they need to be filled with something 25 - 30 cm deep. Otherwise the slab will freeze. You can fill the voids with mineral wool, concrete plugs, or simply fill them with concrete mortar. A similar procedure must be performed not only on those ends that face the street, but also on those that rest on the internal walls.
The price for laying floor slabs depends on the amount of work, the area of the house and the cost of materials. For example, the cost of PC floor slabs alone is approximately 27 - 30 USD. per m2. The rest is related materials, renting a crane and hiring workers, as well as the cost of delivering the slabs. Professional teams have very different prices for installation of floor slabs, from 10 to 25 USD. per m2, maybe more depending on the region. As a result, the cost will be the same as for pouring a monolithic floor slab.
Laying floor slabs: video example
Calculation of slab thickness and number of rows of reinforcement
Before reinforcing the floor slab, it is necessary to correctly perform all calculations, taking into account SNiP. The calculations take into account only load-bearing walls and columns installed on the foundation; partitions cannot act as supports. Add 30% to the calculated strength dimensions by multiplying the obtained values by a safety factor of 1.3.
Floor thickness
When calculating the reinforcement of a floor slab, first calculate the thickness, which should correlate with the distance between the walls in the proportion of 1:30 (here slab thickness: span length). The reference literature offers the following example: if the width of the room is 6 meters = 6000 millimeters, then the ceiling should be at least 200 millimeters thick.
If the distance between the walls is 400 millimeters, then the slab should be at least 120 millimeters. But experts advise in practice to add a certain percentage of strength, remembering that the premises will contain furniture, appliances, etc. Reference examples and calculations are relevant only for attics and empty rooms; in other cases, it is advisable to play it safe and, where according to calculations it turned out to be 120, do at least 150 millimeters.
Savings are possible only on the second row, where you can install the rod 8 millimeters and make the step in the slab twice as large. If the span is more than 6 meters, it is advisable to leave the calculations to professionals, since this requires the installation of special crossbars, deflections and other loads increase significantly, which will be difficult for a person without experience to take into account.
The size of the grip must be taken into account - that part of the slab that rests on the walls. For buildings made of foam concrete and gas silicate, the grip size should be 25-30 centimeters, for buildings made of brick - 15-20 centimeters. The reinforcing bars are cut so that they are filled with concrete from the end to at least 25 centimeters.
If the thickness of the reinforced concrete structure is 150 millimeters, it is allowed to perform a single-tier ceiling; if more, it must be made in two levels.
Reinforcing mesh
SNiP states that for residential buildings it is advisable to make not one layer, but two rows of reinforcing mesh. For the top row, transverse reinforcement with a cross-section of smaller and larger cells can be used. Typically, the diameter of the reinforcement of the upper and lower rows averages 8-12 millimeters. By connecting the rods, they form a lattice with square cells measuring 20-40 centimeters.
More precisely, the diameter of the span bars of 4 and 6 meters, taking into account the usual loads of residential buildings, are indicated in the table:
All calculations are carried out taking into account the maximum distance from wall to wall. The same thickness of covering is built over all rooms on the floor, calculating everything based on the largest room, rounding the values up.
Bar joints
The reinforcing frame is made of hot-rolled round low-carbon steel. The metal is ductile, flexible, holds loads well, withstands vibrations, is suitable for working on soft ground, and is not afraid of heavy equipment, earthquakes, etc.
The selection of reinforcement in the floor slab is carried out taking into account the need to make joints (since the length of the rod may not be enough) by overlap. All materials must meet physical characteristics and be free from corrosion and rust.
The rods are placed side by side at a distance equal to 10 diameters and tied with wire. If the thickness of the rod is 8 millimeters, the double connection will be 80 millimeters. The same applies to rolled F12, the joint is 480 millimeters. The joints of the rods should be offset so as not to be located on a single line. To make connections, welding is also used, laying longitudinal seams, but this has a detrimental effect on the flexibility of the entire structure.
Mesh installation
The rods are tied with wire with a diameter of 1.5-2 millimeters, firmly twisting the intersections. The distance between the meshes is about 8 centimeters, it is provided by 8 millimeter rods cut to size. The tying is performed on the lower grid at the intersection points.
A gap is left under the lower reinforcement mesh for pouring mortar with a thickness of 2 centimeters - special conical plastic clamps are placed on the formwork at meter intervals.
Trim and holes for hoods and stairs
To connect the floors to the walls, formwork is installed around the perimeter; it is done vertically and limits the spreading of concrete. The perimeter banding runs along the box, and the corners are reinforced. Only after the solution has completely hardened is the box removed, leaving a straight end in its place.
The formwork is placed at a distance of 2 centimeters from the longitudinal rods and ends after the longitudinal and transverse reinforcement have been assembled into the frame. The distance from the wall is 20 centimeters for aerated concrete and 15 centimeters for cinder block and brick. This distance on the wall before pouring is treated with a special compound to increase the strength of the building against vibrations.
The same formwork is performed where it is necessary to leave openings for structural elements (pipe outlets, interfloor stairs, communication wires, ventilation, etc.). They are covered with a mesh and not filled.
Material selection
Depending on the complexity and main characteristics, there are several types of reinforcement. You need to know which one to use in a particular case. There are rigid and flexible fittings. The cross section distinguishes between heavy and light. It can be smooth or ribbed. The latter is usually used with large quantities of concrete to create a solid monolithic slab.
The fittings are produced by large metalworking enterprises. The first stage is the acceptance of steel, which is then processed by deformation, rolling or drawing. The last method is the most labor-intensive. Rolling is more economical, since the waste here is minimal. After cleaning, the reinforcement is cut on special machines.
Reinforcement is mainly intended to strengthen concrete structures. The rigid type of reinforcement is used in the construction of frames and corners. Flexible is used for the manufacture of various meshes, rods, frames. With the help of reinforcement, the structure takes on shape and integrity, and the service life increases if the selection is carried out correctly.
Today, with the active development of private construction, the popularity of reinforcement for floors and flat monolithic slabs is increasingly growing. When using such building materials, it is important to correctly calculate the parameters of the slab and the diameter of the reinforcement, and draw a diagram of the reinforcement of the floor slab. The size of the span affects the thickness of the slab. For example, if the span between load-bearing walls is 6 meters, you need to use a slab with a thickness of at least 20 cm. If you reduce the concrete layer, the consumption of rolled metal will increase.
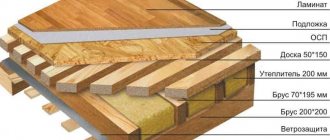
Requirements for floors
Floors are one of the main structural elements of buildings, dividing them into floors. Their purpose is to perceive and transmit permanent and temporary loads on walls and columns, as well as to isolate rooms from each other and from the external environment. Floors are classified according to:
- Location: interfloor, attic, above-basement.
- Structures: beam (the main load-bearing element is beams), slab (load-bearing slabs and decking).
- Load-bearing elements: reinforced concrete, wood, steel.
- Method of construction: monolithic, ribbed and hollow.
READ Do-it-yourself aerated concrete laying technology
Prefabricated floors are used in frame construction systems.
Reinforcement of hollow and multi-hollow slabs can be done without constructing formwork, since they are very light. Reinforcement of a monolithic floor, due to its heaviness, requires a two-layer bond. They will need formwork and methods of additional reinforcement.
Floor slab reinforcement drawing:
Reinforcement of a ribbed floor slab is carried out only on one side, taking into account the characteristics of the building. When reinforcing a floor in a private house, you need to strengthen the side that will be the ceiling or floor. Store-bought products always have markings that indicate the permissible load.
The structure of the floors consists of load-bearing and insulating elements, floor and ceiling. Each of the floors is subject to force: its own weight, the mass of partitions and various engineering systems. These impacts create deformation and stress, which manifest themselves in deflections. Non-force influences also exist. These are people walking, objects falling, loud conversations, radio, TV, etc.
The following requirements apply to floors:
- Floors must be consistent with the durability of the building.
- Possess a high degree of fire resistance.
- Must be easy to use.
- Don't miss the cold.
- Provide sufficient sound insulation.
- Have architectural expressiveness.
- Comply with economic feasibility.
Depending on what the building is intended for, it must be subject to separate requirements. The type of structure and the height of the structure depend on the size of the interfloor spans and the degree of load. The architect's goal is to limit the amount of deflection of the floor. Floors of residential buildings should be designed with a height of about 300 mm.
READ How to build a concrete pool with your own hands
Construction of formwork
In some cases, developers reinforce floor slabs on their own.
Similar decisions are made when a construction project has incorrect geometry. This makes it possible to bypass standards and approach certain types of work in your own way. Reinforcement is done according to special rules. All materials are purchased only from reliable companies, since a marriage here can cost people’s lives. When drawing up a slab reinforcement scheme, it is necessary to take into account the auxiliary reinforcement that will be needed to strengthen individual sections:
- in the central part of the slab;
- in places where the slab will come into contact with columns or walls;
- where the loads are most concentrated (installation of a fireplace, heavy furniture or household appliances).
Before installing the formwork, it is a good idea to make calculations using a special computer program. Accurate calculation is needed to distribute pressure evenly across the supports. The longitudinal pitch for the racks must be at least two meters with a laying pitch of 62 cm. The cross beam lies vertically. The distance from the wall to the stand must be at least 25 cm. First, removable formwork is made where the working reinforcement will be located.
For its construction, materials are usually used that can then be used for other purposes. To do this, use ordinary edged boards. If you need to ensure a perfectly flat surface, use sheets of laminated plywood with a thickness of at least 25 mm. But it won't be cheap. This method is much more accessible: first the same boards, and then lay regular plywood on top.
All this is done around the entire perimeter of the object. If the future slab will be used as a ceiling, then it is better to replace the side boards with bricks or foam blocks, the height of which should correspond to the thickness of the concrete. After the concrete hardens, the formwork does not break, but is carefully dismantled in parts so as not to damage the slab.
There is another technology for constructing a floor using corrugated sheets, which is used as permanent formwork. Less reinforcement is required and concrete is saved. This filling increases the strength of the structure several times.
Drawings and diagrams of reinforcement of a monolithic floor slab
The drawing of the slabs performs an important function - it allows everything to be calculated, planned and done correctly in advance. Using the diagram and drawing, they calculate the consumption of materials, decide which reinforcement to use for the ceiling, determine all the values and indicators, and plan the estimate.
Stages of drawing up:
- Carrying out measurements of all rooms, the external perimeter of the house (if there is a project, transferring data from it)
- Fixing on the diagram all the holes that are not planned to be filled
- Transfer of the contours of all load-bearing walls, parts of intermediate ones, implementation of a detailed scheme of strapping, mesh, strengthening with parameters of rod thickness, linking and joining points
- Determining the size of the cells, the installation locations of the longitudinal outer rod to the edge of the fill
- Calculation of profiled sheet dimensions for the bottom plane of the slab
- When floor slabs are planned in a drawing, the cells are immediately distributed: usually their number does not have an integer number. And the reinforcement is shifted in such a way as to obtain the same dimensions of the reduced cells near the walls
- Calculation of consumption and characteristics of materials: multiplying the length of the rod by the quantity, adding a margin for joints (about 2%), rounding up. Calculation of the required diameter for arranging the lower and upper layers
- Calculation of plastic clamps and rolled products for making inserts between meshes
- Determining the volume of cement composition - based on the area of the room and the thickness of the floor: the top and bottom of the reinforcement for the floor slab must be covered with at least 20 millimeters of mortar in order to completely protect the metal from external influences and corrosion. If the total thickness of the floor is more than 15 centimeters, the reinforcement for the floor is laid in 2 layers, with most of the mortar placed on top
- The drawing also indicates the number of support columns, formwork, wooden beams for the platform for pouring the floor, etc.
Laying floor slabs on the foundation: installation rules
When constructing buildings made of brick, foam concrete or aerated concrete blocks, floor slabs are usually laid on the foundation or walls of the basement.
If the foundation base or plinth is made of foundation blocks and is not a monolith, it is necessary to strengthen the structure with a monolithic concrete reinforced belt. Thereby:
- the load from the ceiling will be distributed evenly;
- the strip foundation will have increased bending strength;
- the edge of the foundation will be leveled, which will allow the slabs to be positioned correctly;
- the rigidity of the building and its resistance to small ground movements will increase.
Foundation blocks are made without reinforcement, so they lose strength under bending loads. It is precisely these loads that arise when floor slabs are laid on a structure made of blocks, since not the entire width of the block serves as support, but only the strip on the inside.
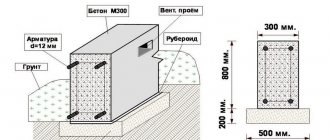
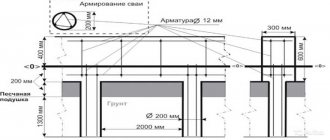
Reinforcing a monolithic concrete belt helps to avoid the risk of destruction of the foundation or basement walls. According to the standards, its thickness should be 200 mm; the material used is B20 concrete. The spatial reinforcement frame consists of four rods laid along the wall and interconnected vertically and horizontally by steel rods.
Preparation for installation
According to the rules for laying floor slabs on the foundation and plinth, the minimum amount of support is:
- for a concrete base – 60 mm;
- for a brick plinth:
- 70 mm for slabs up to 4000 mm long;
- 90 mm for slabs longer than 4000 mm.
It is recommended in all cases to increase the support value to 120 mm in order to increase the strength of the building. This approach allows us to provide the necessary margin in case the slabs are laid with a slight offset.
When laying floor slabs on a plinth or foundation, they should rest only on their short sides. The use of intermediate supports will not allow the reinforced concrete slab to work normally under loads, and the structure will collapse at the additional point of support.
The ends of the slabs must be thermally insulated to prevent the occurrence of cold bridges - this can lead to condensation, high heat loss from the building and high heating costs in the cold season. Mineral wool and polystyrene foam must be wrapped in plastic film to protect them from moisture; extruded polystyrene foam does not need waterproofing.
Before starting installation work, it is necessary to determine a place for installing lifting equipment - the soil must not be allowed to shift under its weight and put pressure on the wall of the foundation or plinth with the risk of destroying it. The installation itself is carried out according to the general rules described above.
Design features
Reinforced concrete products have the properties of two materials at once - metal and concrete, which makes them an ideal building structure used in a variety of fields. Concrete takes on compressive loads, metal can easily withstand tension. In construction, the load on floors acts in a vertical downward direction and is usually distributed evenly over the area. The load is determined by its own weight and all structures, objects, people staying in the room.
The reinforcement of the floor slab, the design of which can be very different, works in bending and is carried out to absorb this load. Usually, two meshes of reinforcement are laid (bottom layer and top layer), placing the rods across and along the span. The minimum pitch of the rods (the distance between parallel rods) is determined in the drawing; usually for individual residential construction it is 15-20 centimeters.
In thick concrete, the mesh should be located at a distance of 20-25 millimeters from the surface. The rods are tied together at all intersections with knitting wire, and sometimes a ready-made mesh is used for structures. They are rarely welded, as there is a possibility of ruptures at the joints.
Vertical clamps are installed between the lower and upper layers of the mesh, which help maintain a uniform distance between the meshes. Separators can be different, their pitch should be the same over the entire area.
The edges of the ceiling are reinforced with additional reinforcement - L and U-shaped elements, especially in places of support. If the slab is supported along the entire contour, reinforcement is made, accordingly, along the entire perimeter. The upper part of the reinforcement works in compression, the lower part in tension, taking on the main load. Therefore, for arranging the bottom layer of the mesh, thick rods are chosen, but for the top layer, the minimum diameter of the reinforcement in the floor slab is suitable.
Much in the calculations depends on the size of the spans - it is not recommended to make them more than 6 meters. If the distance between the supports is greater, the top layer of mesh is reinforced above the support itself, and the bottom layer of reinforcement is reinforced between the supports in the middle.
The reinforcement bars must be continuous: the overlap must be at least 40 x the diameter of the reinforcement: so, if the diameter of the rod is 15 millimeters, the overlap is 60 centimeters. Floor slabs are made using hot-rolled steel reinforcement class A3, with a diameter of 8-14 millimeters.
The general rules are as follows: for a living space with a span of no more than 6 meters, regardless of the aspect ratio, it is recommended to make the slab 20 centimeters thick, the reinforcement spacing is 20 by 20 centimeters, the diameter of the rods in the bottom layer is 12 millimeters, and the top layer is 8.
Reinforcement scheme
An example of a diagram (drawing) of reinforcement for a slab foundation.
Reinforcement of a reinforced concrete slab is carried out unevenly: additional reinforcement is required in places where walls or columns support. Such areas are called squeeze zones. The reinforcement is laid in one layer with a slab thickness of 150 mm or less. If the value is more than 150 mm, reinforcement is performed with frames. As an example, it is necessary to consider the main components of the structure.
Basic slab width
Here the scheme is a grid with a constant cell size. The pitch of the rods in both directions should be the same. Depending on the design load, it is taken within the range of 200-400 mm. For brick houses, a reinforcement pitch of 200 mm is suitable; for lighter frame houses, rods can be laid less frequently. It is important to take into account that according to the joint venture “Concrete and reinforced concrete structures”, the distance between the rods should not exceed the thickness of the slab by more than 1.5 times.
Slab reinforcement diagram.
Most often, the rods are laid in two rows: upper and lower. Their joint work is ensured by the installation of vertical rods. The pitch of such rods can be equal to the pitch of the main reinforcement or taken twice as large.
The slab is reinforced at the ends with U-shaped clamps.
According to SP 63.13330.2012 (clause 10.4.9), at the ends the slab must be reinforced with U-shaped reinforcement bars, the length of these bars must be equal to 2 times the thickness of the slab or more. The rods connect the upper and lower rows of reinforcement and provide the perception of torques at the edge of the slab and the anchoring of the ends of the longitudinal reinforcement.
Attention! The reinforcement should be recessed into the concrete by 20-30 mm on all sides: from below, from above, from the ends. Otherwise, accelerated corrosion of the reinforcement and structural destruction are possible.
Punching zones
In places where load-bearing vertical structures are supported, the layout changes - the reinforcement pitch is reduced. For example, if along the main width of the slab the rods were laid every 200 mm, then under the walls it is recommended to use a step of 100 mm. This will avoid excessive pushing and cracking.
Interface area with a monolithic basement wall
The design of the slab allows it to be made flush with the ground surface, but if a basement is planned for the building, its laying depth will depend on the height of the room. In this case, it is necessary to ensure that the base and walls work together.
Reinforcement outlets in the slab for mating with monolithic walls.
To properly reinforce the foundation, it is necessary to tie together the frames of the monolithic wall and the slab. When pouring the foundation, outlets are left in the form of vertical rods; they will be the connecting link. The ends of the outlets are launched into the body of the slab (they are bent at the end to 2 heights of the slab and knitted to the main frame).
For convenience and accurate calculation of materials, a drawing is made that shows a reinforcement diagram, including data on the distance between the rods and their diameters.
Selection of fittings
When manufacturing steel reinforcement, we are guided by GOST 5781-82*. For a reinforced concrete monolithic slab, rods of class A400 and A500 are used (or in the outdated version All). To avoid mistakes, you need to know how to distinguish rods of different classes visually:
- A240 (Al) has a smooth surface;
- A300 (All) is characterized by a periodic profile with a ring pattern;
- A400, A500 (Alll), the one that is needed, has a periodic profile that forms a “herringbone” (crescent).
A500 fittings are manufactured in accordance with GOST 52544-06.
Important! The use of fittings of lower classes is not allowed.
We recommend: What reinforcement is needed for the foundation.
Instructions for floor reinforcement
To understand how to properly reinforce a floor slab, you need to consider several important rules. The main materials for completing the task are steel rods with a corrugated surface made of A4 steel and a concrete mixture based on M300 cement, medium-fraction crushed stone and fine sand.
The following will be useful at work:
- For formwork - moisture-resistant plywood or boards
- For dressing - annealed wire and a special tool
- Equipment for bending rebar workpieces
- Special nippers or grinder for cutting rods
- Everything you need to create a solution: measuring instruments, tools, containers, etc.
Preparation for the work is simple and includes the following stages: performing calculations, drawing up a drawing and reinforcement diagram, calculating and purchasing building materials, tools, cutting blanks from rods, preparing panels for formwork.
Brief operation algorithm:
- Cutting blanks from reinforcement, bundling the first layer of mesh
- Position the mesh with a gap of 3-4 centimeters to the surface of the formwork, secured with vertical rods
- Grid binding of the second layer, installation on site
- Pouring concrete
Slab reinforcement: main stages
Reinforcement can be performed in several stages:
- Creation and installation of formwork.
- Reinforcement.
- Pouring concrete.
So the most important step in reinforcement is the installation of formwork, which can be made of wood, but it is important that the racks are properly secured, since the weight of concrete poured into it can exceed 300 kg per square meter.
The installed formwork must also have a special protective layer made of reinforcement with a diameter of about 20 mm. After installing the formwork, special supports must be placed under the reinforcing mesh.
When the reinforcing mesh is laid, concrete is poured. When pouring concrete, it is very important to compact it well and eliminate the possibility of air voids forming. To do this, it is compacted using a special construction vibrator. When the concrete is completely poured, its surface is leveled, after which it is left until completely dry, which can take up to 4 weeks.
Only after the concrete has completely hardened can the structure be used for its intended purpose with the loads that were calculated.
In the photo below you can clearly see a drawing of the reinforcement of a monolithic floor slab:
Reinforcement scheme for monolithic floors without beams
Scheme of reinforcement of multi-span beam slabs
In conclusion, it must be said that you can reinforce a monolithic floor slab yourself, but it is important not to neglect load calculations and perform them correctly. That is why it is recommended to involve specialists who will determine all the loads and determine the reinforcement scheme. I would also like to note that in this way it is possible to reinforce not only monolithic slabs, but also ready-made reinforced concrete floor slabs.
Order of reinforcement and filling
Formwork installation
The formwork must be able to easily withstand the weight of the raw mortar without visually deforming - and this is about 500 kilograms of load per square meter, provided that the concrete thickness is 20 centimeters. To create panels, choose plywood with a thickness of 18-20 millimeters; for racks, crossbars, and beams, timber with a section of 10 by 10 centimeters is suitable. The professional formwork performed well.
After collecting the formwork, it is checked with a level.
Installation of fittings
Weaving a frame in one layer is done very rarely; usually two layers are made (this is the norm for both ordinary and ribbed floor slabs). First, plastic clamps are installed (special supports 25-30 millimeters high, necessary for pouring the protective layer), the bottom row of reinforcement is laid out on them, then rods are mounted in parallel with the same pitch, the next row is placed on them at an angle of 90 degrees and tied with wire.
Next comes the installation of layer separators, which are folded and knitted at the same pitch. The edges need reinforcement with longitudinal U-shaped elements. The top layer should be 25-30 millimeters below the formwork. The prefabricated reinforcement should be in the format of a rigid frame that can easily support the weight of workers.
Next, pouring is carried out using a concrete pump and compacting the mixture with a special deep vibrator. It is poured in one go, then the surface is moistened with water for 2-3 days so that it dries longer and microcracks are avoided. In general, everything dries for 30 days, only after which the formwork is removed.
General information about precast floor slabs
Houses made from prefabricated reinforced concrete slabs have standard dimensions, but differ in type.
Prefabricated buildings have a number of advantages compared to a monolith:
- high installation speed;
- laying the slabs can be carried out regardless of the conditions: frost, heat, rain, etc. will not be a problem;
- low price, you can save up to 15% of the cost of the monolith.
Reinforced concrete slabs together with the concrete floor of the first floor lead to the main disadvantage of the structure - large mass. Due to their high weight, the slabs have a limited area of use and require the installation of a high-strength foundation. By increasing the depth of foundations for internal and load-bearing walls, the construction estimate increases. Even taking into account additional costs, reinforced concrete slabs are cheaper than a monolith.
Numerous comparisons have proven that slab floors are 50-70% cheaper than monolithic floors and hollow core slabs
The thickness of the external and internal walls of the building differs; the load-bearing slabs are 140-220 mm thick and up to 9 m long, depending on the span. The thickness of the internal walls is about 8-12 mm. When working with panels, it is important to consider the layout and type of construction.
In total there are 3 main types:
- full-bodied. Without voids, they have the greatest weight. They are distinguished by the greatest strength. They are included in the plan, drawing of the floors of exclusively multi-storey buildings. They are used to create interfloor slabs. Due to their solid structure, the slabs have reduced heat and sound insulation properties;
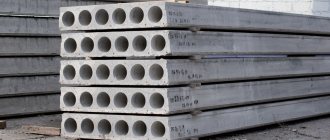
- empty. Inside there are longitudinal voids, usually round in shape. The addition of air tanks resulted in an increase in thickness - 220 mm. They are the most common prefabricated elements. They are distinguished by high insulating characteristics. Due to the presence of voids, in comparison with monolithic floors, hollow blocks create less load on the base and walls. An additional advantage is the ability to cover large spans and load-bearing walls, since the length of the slabs reaches 12 m;
- tent They are a tray with ribs pointing down or up. The thickness of the slabs ranges from 140 to 160 mm.
When working with roofs and external walls, monolithic floors are often used due to their advantages compared to prefabricated slabs:
- distribute the load evenly;
- construction does not require the use of special equipment;
- can be laid not only on walls, but also on columns;
- the monolith can be prepared in any size, including non-standard.
The ceiling retains its monolithic-reinforced structure.
Monolithic panels have 3 main disadvantages:
- labor intensity of construction;
- the need for a complex process of strengthening the structure, which is unlikely to be possible without the help of highly qualified builders;
- The formation of formwork is required; the process is labor-intensive and requires a lot of materials.
When drawing up a plan and considering the layout of floor slabs, it is worth taking into account the features of each type of floor.
Reinforcement of a hollow-core floor slab: step-by-step instructions
The easiest way to reinforce hollow-core floor slabs is to do it yourself instead of using ready-made reinforced concrete structures in construction.
Advantages of reinforcement:
- Possibility of making smooth and durable surfaces
- Long service life
- Relatively light weight while maintaining strength, which reduces the load on the foundation
- Strength – the ability to create floors even for heavily loaded structures and large spans
- Reliability – resistance to multidirectional loads, weight 500-800 kilograms per square meter
- Excellent fire resistance
- The price of the issue is approximately equal to the cost of a finished reinforced concrete slab
What is slab reinforcement?
In the process of manufacturing reinforced floor elements, it is possible to realize any idea regarding the layout and obtain a reliable and durable structure. The work is carried out in compliance with technology, materials are purchased from trusted suppliers. Metal rods are connected to each other, rods with a diameter of 8-12 millimeters are used to make reinforced floor elements, formwork is installed and everything is filled with concrete, covering the frame completely.
It is necessary to lay reinforced rods in the following areas: in the center of the structure, in places where the monolith comes into contact with arches, internal walls, columns, when installing heavy equipment, a fireplace, near openings for stairs, chimneys, ventilation elements, etc.
Reinforcement tips:
- The thickness of the reinforcement is calculated based on the length, using a ratio of 1 to 30, but a minimum of 150 millimeters (if the supports are located at a distance of 5 meters, the thickness of the floor should be 170 millimeters).
- The elements are stacked in two layers.
- Concrete M200, M300 with a compressive strength class of 150 kgf/cm2 is used for the solution.
- The diameter of the rods is 8-14 millimeters, depending on the loads and the number of rows of reinforcement: with two-layer reinforcement, the bottom row is made with rods of larger diameter. A solid ribbed base is required for better adhesion to concrete.
- The formwork is made of moisture-resistant plywood or boards.
How to properly reinforce slabs with your own hands:
- The process is quite labor-intensive, but it’s quite possible to do everything yourself. First, formwork is made around the perimeter of the room from edged boards 150 by 25 millimeters or plywood 22 millimeters thick (more expensive, but the surface is perfectly flat). The transverse bars are fastened in increments of 60-80 centimeters, strictly level under them by installing telescopic posts or vertical supports. Boards and sheets of plywood, if necessary, are laid on top of the frame. There should be no gaps between plywood panels or boards - maximum tightness is required.
- If the slab becomes the basis for the roof, not the side boards are laid, but the sides made of cellular blocks and bricks. Afterwards, the formwork is carefully removed, so initially the fasteners must be placed on the outside of the structure.
- The reinforcement is knitted with wire. The rods must be laid out without breaks or overlap by at least 50 centimeters at the joints. The transverse reinforcement in the floor slab is fastened with wire using a special hook. The process can be facilitated by metal cards, which can be overlapped into 2 cells and also secured with wire.
- The metal frame is installed on clamps or broken tiles, stones at a height of 4-5 centimeters. The second layer is knitted with transverse separators, located at a short distance from the first layer. The arrangement of the rods in concrete requires complete coverage of the metal elements with mortar. Areas with high loads are reinforced with additional rods connected as usual.
- It is worth preparing twists from knitting wire in advance - first the coil is fastened with tape at 3-5 points at an equal distance, then it is cut into pieces with a grinder.
- It is easier to prepare concrete mortar in a concrete mixer; if necessary, you can add fiber and plasticizers. Mix in the following proportions: 5 parts gravel or crushed stone, 3 parts sifted sand, 20% of the total volume of bulk materials water. First, all the dry ingredients are mixed, then water is poured in, stirred, and the solution is ready for use.
- Pouring must be carried out using a vibrator or a hammer, which can be used to tap on the open mesh and formwork elements.
- As the solution dries, it is moistened with water by spraying. They wait 4 weeks, check for complete drying as follows: place a sheet of waterproofing material on the area overnight - if there are no stains by morning and the concrete does not stick to the surface, everything is ready.
If everything is done in accordance with the standards and calculations, it is quite possible to independently reinforce a monolithic floor slab, ensuring the foundation is reliable, durable, and resistant to various loads. It is important to carry out all work in the correct sequence, choose high-quality materials and not deviate from the values indicated in the diagrams and drawings.
Basic rules of reinforcement
Before working on reinforcement, you need to get acquainted with some important rules that you need to know:
- Reinforcement is installed using removable formwork. A reinforcement cage is laid in it, and everything is filled with liquid concrete.
- For pouring it is necessary to use concrete grade M200.
- To create a frame, you need to use steel reinforcement with a cross-section from 8 to 14 mm.
- The formwork can be constructed from ordinary plywood and boards. But you need to purchase telescopic stands ; they can withstand a load of up to 2 tons; it will not be possible to build such a structure with improvised means. In order not to buy, it can be purchased for rent from a construction company.
- The thickness of the floor slab depends on the width of the span being covered. Their ratio is 1 to 30 , and the thickness should be from 150 mm. With a minimum thickness, a single-layer slab reinforcement is constructed. If the width of the slab is 6 m, then its thickness should be at least 200 mm. If the span is even wider, then you need to make a two-layer frame and further strengthen it with stiffeners.
- In the reinforcement diagram, it is necessary to make reinforcements at the center , points of connection with supports, areas of increased load on the slabs and places with holes.