Basic requirements for the inspection pit
Since it is considered normal to work at full height, with arms raised, the depth of the pit usually exceeds the person’s height.
The following elements are not mandatory, but very useful:
- high-quality reinforced edge of the recess. Since the garage floor is usually concrete, it is better to use a metal corner for reinforcement. It can be installed at the concreting stage;
- lighting. The light should not blind the eyes, and the rays are directed not downwards, but upwards, to the bottom of the car being repaired. Therefore, models with directional soft light are usually used as lamps;
- shelf/shelves or niches for tools. Niches are more convenient because there is less risk of touching them with your hand or shoulder in a limited space, getting injured, or simply dropping everything you need on the floor;
- a deck or cover that covers the pit outside of use.
The dimensions of the inspection pit largely depend on what kind of vehicle is serviced in the garage/workshop. The diagram below shows the approximate dimensions of the recess and the position of the wheel guards (if installed).
The width of the inspection pit for passenger cars is rarely more than 1 m, and more often – 80 cm. This is due to the relatively small distance between the wheels of the car, but there should be at least 20 cm from the inner edge of the wheel to the edge of the pit!
If the size of the garage or workshop allows, it makes sense to make one edge of the ditch with steps, as shown in the drawing below. It should be borne in mind that it should be possible to get out of the recess even when the machine is standing on it. Therefore, the length of the ditch must be at least 1 m longer than the total length of the vehicle (steps are not taken into account).
If there is not enough space for a full staircase, you can arrange a metal or wooden staircase.
The exact dimensions of the inspection pit are not regulated by GOSTs; most of the parameters are left to the discretion of the designer in a particular case, taking into account the class and characteristics of the equipment being repaired. However, a number of parameters of a garage or workshop related to the arrangement of a ditch are determined by SNiP 02/21/99:
- there must be at least 0.8 m between the wall of the building and the wall of the machine;
- columns, pilasters, any other internal and wall structural elements must be at least 0.5 m away from the side of the car;
- sufficient strength of the floor and edges, as well as the internal structure (concrete or brick/block walls) of the inspection ditch is required.
Arrangement
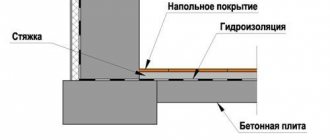
For the normal arrangement of the inspection pit, several conditions must be met. To create normal conditions, ensure the integrity of building structures and prevent freezing, waterproofing is performed. For convenience of work, a stationary lighting should be installed in the pit.
The staircase is made by masonry, metal elements or wood. The choice of materials depends on the capabilities and preferences of the owner. But the structure must be securely fastened.
Waterproofing
Waterproofing is achieved by laying polymer film or roofing felt in a dug and prepared pit. If groundwater lies much further than the maximum depth of the hole, waterproofing is not necessary, but it is better to play it safe and fulfill this condition to ensure dryness inside.
If it is not possible to completely isolate the pit from water, a pit and a drainage system are made on one side to remove the accumulated water into the sewer system. If this problem exists, to ensure maximum ease of use of the drainage, install sensors and a pump that automatically turns on when a certain water level in the pit is reached. An alternative, but expensive option is to make a caisson from an all-metal welded box according to the dimensions of the pit.
Normalization of the humidity level is achieved by a ventilation device; for this purpose, nylon sewer pipes are used, previously laid from the bottom of the wall with outlet from the room to the outside.
Insulation
Insulation is carried out using roofing felt and polystyrene foam boards. Ruberoid is laid overlapping on the walls and floor, then the structures are covered with insulation boards, fixed with special glue. As a result, freezing of elements and accumulation of condensation in winter is prevented.
Backlight
To provide lighting, when cladding walls, electrical wiring is laid, then lighting lamps are installed. To ensure safety, lighting elements are made with closed shades and protection from mechanical damage.
DIY inspection hole in the garage: main stages of work
For different materials and structures, the details of creating a structure vary, but the main stages are similar.
- Selecting the position of the ditch. Some of the requirements are set out in the previous paragraph; it is also necessary to take into account the convenience of entry and the likelihood that the vehicle will be towed to the garage.
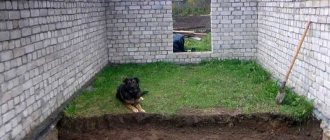
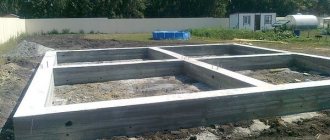
- Preparing the pit. If the floor is not concreted (the pit is installed during the construction of the garage or the screed has not been previously performed), this stage does not cause any particular difficulties. Excavation of the pit is carried out taking into account the internal dimensions of the ditch, the thickness of the walls and the reserve for reverse compaction of the soil after the construction of the walls. So, if the dimensions of the pit (along the internal planes) are 0.8 x 4.5 x 1.9 m and the walls are laid out of single red brick, you will need a pit with dimensions of at least 1.3 x 5 x 2.4 m. Taking into account the need to compact the soil under the bottom of the ditch with crushed stone and sand, it is better to deepen the pit is 20...30 cm in relation to the calculated size and expanded upward. It is advisable to strengthen the already dug pit in several places with boards and spacers so that the soil does not crumble.
- After excavating the soil, tamp the bottom with crushed stone and sand.
- Next, waterproofing is carried out and the laying or filling of the walls begins. For waterproofing, you can use special membranes or regular thick polyethylene film. The edges of the film outside the pit are pressed, laying the film in folds. Particular attention is paid to the corners. If it is necessary to use several panels, it is necessary to overlap at least 20 cm and glue the joints.
- The completed structure (monolithic concrete walls and bottom or fences made of bricks/blocks) can be additionally waterproofed from the inside using coating, roll, penetrating or combined waterproofing.
- Interior finishing is not required, but its presence makes the work more pleasant and comfortable. In parallel with the finishing, electricity is installed (an obligatory stage), lamps are installed, a niche for tools and a staircase are arranged.
Additionally, the edge of the recess is shaped (and strengthened), and a flooring or cover is installed.
Difficulties you may encounter
The car owner needs to take into account the following problems that sometimes accompany the installation of an inspection hole:
- shallow groundwater - you will need to carry out thorough waterproofing, and if the problem cannot be completely eliminated, arrange a pit and drainage for accumulating moisture;
- insufficient area of the room where the pit is installed - in this case, construction should be carried out in another place. In no case should the excavation damage the foundation of existing structures;
- inadequate quality of materials – when purchasing cement and other compounds, you should contact trusted retail outlets, since if the quality is insufficient, the work will be significantly delayed and will result in cost overruns.
The work must be pre-organized, the required volume of materials must be calculated, and tools and equipment must be prepared. Construction should be completed as quickly as possible to meet the appropriate temperature conditions of the season and ensure the quality of the work.
An inspection pit is a necessary element of any car enthusiast’s garage, but during its construction it is necessary to ensure that all requirements are met in terms of the selection of materials and project development.
This will ensure ease of maintenance and repair of the vehicle, while complying with safety requirements.
DIY concrete inspection pit
This is one of the most popular arrangement options. The process is described in detail in the video below.
When choosing dimensions for a pit, it is necessary to take into account the planned thickness of the walls and increase the depth of the inspection hole by the thickness of the sand and gravel cushion.
The pit expands slightly (or quite strongly, with an angle of up to 30 degrees for loose soil).
After obtaining a hole of the required dimensions in loose soil, it makes sense to coat the walls with clay - this will prevent them from crumbling during further work.
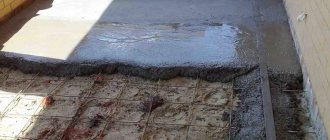
6...10 cm of crushed stone and the same amount of sand are poured onto the leveled bottom, the layers are compacted manually or using a mechanical tamper. Next, the primary layer of concrete is poured - “milk” to hold the compacted pad together. Waterproofing will be carried out immediately. The photo shows two layers - a regular plastic film on the bottom and a more solid one on the bottom and the entire height of the walls with an overlap on the garage floor. Joints and corners MUST be glued and overlapped.
After this, the reinforcing mesh is laid and the base layer is poured.
For concreting the walls, formwork will be required. Since the inner surface of the pit is important, the formwork is installed from the inside, having previously secured a reinforcing mesh to the walls of the pit.
Before concreting, it is necessary to install exhaust and supply ventilation pipes.
Boxes with power supply cables enclosed in a corrugated sleeve are also installed.
After installing the formwork, concreting is carried out.
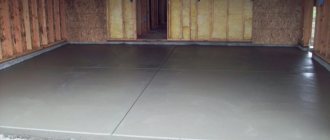
It is advisable to concrete the entire floor in the garage at the same time - this will reduce the time for arrangement.
After the concrete reaches its design strength (at least 50...60%), you can remove the formwork, check the free passage of air into the ventilation pipes, the position and functionality of the electrical wiring.
Sockets and lamps are installed in the niches.
The walls are plastered from the inside and painted (optional). Install the boardwalk onto the pit.
Please note: board covers are made from separate parts. This makes it more convenient to lift them as needed, and easier to replace damaged parts. Wooden parts of the inspection pit must be treated with an antiseptic.
How to make a brick inspection hole in the garage
Most of the stages coincide with the process of arranging a concrete pit: excavation of the pit, its strengthening, waterproofing. It is also better to concrete the floor, it is easier than laying it out of brick.
In the video, the author recommends constructing a screed using filler - fragments of concrete screed and brick.
Laying begins after the concrete at the bottom of the pit reaches its design strength.
You can alternate bricks with blocks.
After completing the main masonry, a corner is laid around the perimeter. By trimming the corners and welding, it is connected into a strong frame.
The frame is attached to the brickwork using pins, aligned to the level. An additional row of masonry is made and the connection between the frame and the walls is strengthened using cement mortar.
After completing the installation of the walls, backfill the soil to the walls and compact the soil.
Interior finishing, ventilation and electricity installations are carried out in the same way as for a concrete pit. In the case of brick-block masonry, you can also immediately lay niches for electrical equipment and tools or design them later, insert ventilation pipes into the masonry.
Necessary materials
To calculate the volume of concrete, you need to multiply the length, width and height of the wall. The same calculations are carried out for gender.
When using brick, understanding its characteristics, you can simply determine its quantity in pieces. Brick dimensions - 250x120x60 mm.
For the work the following is used:
- shovels and bayonet shovels;
- buckets;
- trowels;
- welder;
- hacksaws.
The following materials are also needed:
- bricks;
- sand, crushed stone, cement;
- concrete M200;
- boards with a section of 400x50 mm;
- reinforcing bars;
- corner 50 mm wide;
- waterproofing material.
Finishing the inspection pit from the inside
If a repairman spends little time in a ditch, the quality and features of the interior finishing are not important. However, for convenience and aesthetic appearance, it is still recommended to use finishing materials.
One of the most popular methods is plaster. In this case, it is advisable to add additives with an antibacterial effect to the solution - to prevent the development of mold and mildew - and also to paint the walls.
It is very convenient to decorate the interior with ceramic tiles. It is easy to clean from any contaminants, and it is more difficult to get injured on uneven walls if you move carelessly.
Please note: the contrasting decoration of the perimeter of the inspection pit, and often the lighting, is not a whim or a tribute to aesthetics! This is a basic precaution. This makes it easier to see the edges of the hole and less likely to fall into it.
When decorating steps, it is not advisable to use smooth, sliding tiles - it is better to install rubber or metal overlays on the steps.
If this is not possible, you should prefer non-slip tiles.
Metal/wooden stairs located vertically or with a slight slope must be equipped with railings at least in the upper part.
Instead of wooden panels, it is convenient to use lattice covers on the inspection hatch.
Ventilation and lighting
It will not be possible to fully cover these topics here, but it is worth paying attention to the basic diagrams of ventilation and lighting in the inspection pit.
The presence of supply and exhaust ventilation is especially significant if a cellar is adjacent to the inspection hole, as is often the case in a garage.
For greater efficiency, it is better to separate the ventilation systems for the cellar and inspection pit.
When planning electrical wiring in the garage, you can follow the following diagram.
In this case, it makes sense to provide control of the inspection pit lighting from two or three places.