- How to prepare a cement-sand mixture for a semi-dry screed
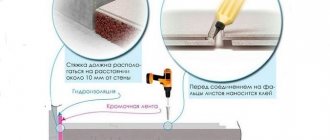
- Installation of damping tape
Screeds made using semi-dry technology (with a low water-cement mixture ratio) meet all the requirements set out in the code of construction rules SP 29.13330.2011. They are used to cover pipelines and cable lines, form inclined and horizontal planes for drains and decorative cladding, as well as transfer uniform pressure to elastic thermal and sound insulation slabs.
Semi-dry floor screeds (SSP) based on cement-sand mixtures (CPS) are universal, as they are used in all types of industrial, commercial and residential premises. They act as an alternative to traditional wet leveling and prefabricated dry technology, providing a high-quality and durable monolithic layer, as well as significantly reducing the time required for construction work on site.
General information and scope
Leveling floors and other horizontal surfaces with a semi-dry screed is done using a cement-sand mortar of low plasticity, in which the water content is only slightly higher than that required for cement hydration. This accelerates the development of strength in the layer, prevents the formation of cracks when excess moisture evaporates and minimizes shrinkage upon complete hardening. Additional strengthening is provided by the same methods as when pouring wet screeds - fiber and reinforcing mesh.
Rice. 1. Two methods of reinforcement - fiber and mesh
The surface, rubbed after initial setting, does not require additional processing or finishing leveling with bulk solutions. You immediately get a horizontal plane suitable for laying all types of decorative floors - from ceramic and stone tiles to laminate, linoleum and the most demanding surface linings in terms of flatness - natural parquet and polymer coatings.
Leveling can be carried out using special equipment. Mechanized floor screed not only speeds up the process, but also improves the quality of the layer.
Rice. 2. Installation of semi-dry screed is a mechanized and cleaner process than traditional “wet” pouring.
The technology can be used on concrete and wooden floors in a wide variety of situations, regardless of the type of room, base and planned floor covering. However, it turns out to be most profitable when:
- It is necessary to carry out the entire range of repair work at the site in a short time.
- The work is being carried out on thin interfloor floors without waterproofing (with an increased risk of water leaking to the lower floors).
- It is assumed that finishing materials with zero vapor permeability will be laid - linoleum, Tarkett-type vinyl tiles, etc.
- PSPs are installed on sandy and gravel-sand soils - in basements, on the first floors.
pros
Using semi-dry mixtures for floor screeding has many advantages. However, among them there are both fundamental and secondary ones.
The main advantages of semi-dry screed:
- The smooth surface of the screed allows you to lay tiles, parquet, laminate, etc. without additional work and, therefore, costs.
- Possibility of installing water and electric heated floors.
- Strength. It is achieved in two ways: through the hydration process, resulting in the formation of cement stone without cracks and cavities (cavities); inclusion in the components of a mixture of small reinforcing fibers (fiber fiber) made of steel, basalt or polymers.
- Budget cost. It is formed from the relatively low cost of consumables and low labor costs (performed very quickly, but by a team). This allows you to hire professionals for installation without exceeding the overall costs compared to wet screeding yourself.
- The ability to work without flooring when laying the screed itself and to carry out other finishing work in the room 12 hours after grouting the surface.
- Work can be carried out in any weather conditions. The allowed range of air temperature fluctuations is from -5 below zero to +40 above zero, humidity - from 60 to 90%. Such fluctuations do not affect the quality of work.
Important: the process of gaining strength lasts 28 days. Therefore, during this period, materials, tools and equipment with high specific pressure per unit area should not be placed on the screed. If such a need arises, then it is necessary to place slabs of plywood, fiberboard, chipboard or wide boards under the load.
At the same time, there are a number of additional advantages that consumers pay little attention to:
- due to the porous structure of the cement stone, the screed cushion serves as an additional layer of heat and sound insulation;
- the properties of the set solution eliminate moisture leakage, which allows you to avoid waterproofing (with the exception of a warm water floor);
- the ability to lay on various floor substrates, including concrete, wooden subfloor, soil;
- ability to withstand large mechanical loads, including dynamic ones (various types of impacts);
- there is no risk of water leaking onto the lower floor, which is possible when screeding using a wet method;
- it becomes possible to hide communications (various pipes and cables) inside the laid pillow;
- can be used in hard-to-reach places and on inclined surfaces;
- environmental safety - all components of the mixture are made from natural materials, which guarantees the absence of allergic reactions of family members to the screed;
- relatively clean process, without traces of mortar on the walls;
- the minimum time for setting when laying porcelain stoneware and ceramic floor tiles is 72 hours, linoleum is 7-8 days;
- high speed of work - the use of small-scale mechanization reduces the time of screed laying several times, reducing the cost of work.
Attention: laying other types of flooring on a semi-dry screed requires at least 28 days to gain strength, optimally 40 days.
The use of modern materials in the composition of the mixture components, in particular reinforcing fibers, made it possible, firstly, to increase the strength of the screed layer, which made it possible to reduce its thickness to 4 cm and, secondly, to reduce the mass of the solution. All this together sharply reduced the load on the floor coverings. This is another quite important advantage of semi-dry screed.
Mortar parameters and rate of strength gain
Each technique involves working with certain solutions. However, sometimes when discussing types of screeds, the emphasis is not on technology, but on the composition of the mixture:
- Cement-sand.
- Concrete (in addition to sand and cement, the composition includes crushed stone).
- Lime - not recommended, but sometimes used in economy-class construction.
- Gypsum is less durable than cement-sand, but dries faster.
- Expanded clay.
- Arbolite (with organic filler, for example, sawdust) - are outdated due to the availability of slab insulation for floors such as high-density polypropylene polypropylene.
| Strengthening rate of semi-dry screeds | ||||||
| Type and content of plasticizer, % | Water/cement | Setting time, min | Ultimate compressive strength, MPa | |||
| S-3 | Trisodium polyphosphate | Start | End | After 2 hours | After drying | |
| — | — | 0,41 | 8:00 | 11:00 | 5,3 | 13,8 |
| 0,3 | 0,03 | 0,36 | 24:40 | 36:30 | 8,5 | 16,1 |
| 0,5 | 0,06 | 0,3 | 20:30 | 27:20 | 11,0 | 25,9 |
| 0,8 | 0,08 | 0,27 | 21:00 | 29:35 | 15,1 | 29,2 |
| 1,0 | 1,0 | 0,25 | 22:20 | 33:00 | 16,0 | 30,6 |
Delays in the distribution and leveling stages, as well as errors in calculating the amount of added water and plasticizer, lead to defects: the screed cracks and/or does not gain the design strength. Compliance with technological requirements guarantees the quality of work and provides significant advantages over traditional (wet) leveling. For example, you can finish finishing walls while walking on a new screed within 24 hours, and laying the final floor covering in 7 days.
The amount of fiber does not affect the setting time. The approximate value, tested in practice, is 0.6 - 1.0 kg per 1 m3 of cement-sand mixture. A larger amount does not have a positive effect in reducing the risk of cracking.
Composition of mixtures
The basis is the wet screed method: the cement-sand mixture is diluted with water and the resulting solution is used to level the floor. But in this case, much less water is taken: just enough for the mass to become plastic. The material should not flow, but roll into a lump that holds its shape well.
With this consistency, all the water goes to hydrate the cement molecules and almost does not evaporate from the finished surface. The screed dries much faster, and after 12 hours you can walk on it, and after 4 days the floor is ready for further stages of work.
The evaporation of a small amount of water continues for about two more weeks, and wooden coverings that are sensitive to humidity - boards, parquet, laminate - can only be laid after this period.
To prevent such rapid drying from reducing the strength of the coating, fiber fibers are added to the composition. They strengthen the material and prevent cracking and subsidence. The efficiency of the fiber is so high that semi-dry floor screed becomes comparable in performance to reinforced concrete.
Plasticizers are also introduced into the solution - substances that allow a slight increase in fluidity without increasing the water content. Thanks to them, the mass completely fills the corners and fits tightly to the walls.
Solution proportions and consumption
Rice.
6. Laying the material Correct introduction of plasticizers and water into the mixture is critically important. However, it is enough to follow the values given in the previous section in order not to make mistakes. A non-specialist may have a lot of questions about the calculation of the main components.
How to prepare a cement-sand mixture for a semi-dry screed
And the first of them: “How to choose a brand of cement?” To obtain a specific brand of mortar, you can use cements of various characteristics. You just need to mix them with sand in proportions corresponding to the brand of cement chosen.
| Proportions of cement and sand in the mixture for semi-dry screed | ||||
| Cement brand | Cement consumption, kg | |||
| Solution M 150 | Solution M 200 | |||
| Per 1 m3 of solution | Per 1 m3 of sand | Per 1 m3 of solution | Per 1 m3 of sand | |
| PC M 300 | 510 | 470 | ||
| PC M 400 | 400 | 350 | 490 | 450 |
| PC M 500 | 330 | 280 | 410 | 360 |
Suppose it is necessary to install a semi-dry screed using EPS with covering underfloor heating pipes (d = 22 mm) in a room of 16 m2.
Let's choose the thickness of the screed. The total height of the 2-layer alignment is:
- Smin + Δ, where Δ = 15 mm is the height difference across the heat-insulating layer.
- Smin = hв + 2d, where hв = 15 mm + 22 mm (thickness of the bottom layer of the screed + pipe diameter).
- Smin + Δ = 15 + 22 + 22 x 2 + 15 = 96 (mm). Round the result to 100 mm (0.1 m).
The volume of the screed (and the dry mixture for the mortar) will be Vс = 0.1 x 16 = 1.6 m3.
We need a mortar of grade M 200. Suppose we choose cement grade M 500. Then it will need 1.6 x 410 = 656 kg.
The required volume of sand will be 656/360 = 1.82 m3.
Ready-made mixtures or preparing them on site?
When formulating dry mixtures, laboratories use empirical methods to determine the fractional composition of sand. It plays an important role in gaining the design strength of the screed. In factory mixtures, these requirements are guaranteed to be met.
By preparing the mixture yourself, you can get a significant benefit in the cost of materials. However, it is unrealistic to comply with the recipe sand fraction with one exception: if you produce semi-dry screeds in a given region constantly and know the right supplier with a stable offer in composition.
Step-by-step instruction
Semi-dry screed technology includes:
- Preparation of the base.
- Marking the clean floor.
- Laying waterproofing, damper tape (additionally sound insulation, insulation, vapor-tight membranes).
- Installation of equipment.
- Preparation and supply of the mixture to the installation site.
- Formation of beacons from ready-made mortar or slats.
- Laying the screed to the calculated thickness, leveling the surface using the rule.
- Grouting, removal of beacons and compaction with a surface grinder.
- Cutting expansion joints.
- Care.
Preparation
The floors are cleared of debris. All objects that interfere with work are removed from the premises. All communications, heating radiators and other equipment, the installation of which could damage the coating, must be installed.
The recommended temperature for work is not lower than +5°C. Until the concrete reaches 50% strength, a positive temperature must be maintained.
Marking
It is carried out with a level, laser or water level. The horizontal line is marked with a pencil on the wall. Within one room, the markings should converge at 1 point. In other rooms, the floor level is agreed upon with the customer and may differ.
Construction of underlying layers
The technical waterproofing film is laid with an overlap of at least 100 mm, the joints are taped. Insulation and sound insulation are carried out. “Heated floor” tubes are installed, which are secured in accordance with the laying diagram to the reinforcing mesh or using bosses.
Along the perimeter of the room, around columns and foundations, a damper soundproofing tape with a thickness of 4 mm or more made of foamed polyethylene, isolon or other similar materials is glued. It effectively dampens impact noise and also compensates for thermal deformations of the coating.
Installation of beacons
Slats or strips of quick-hardening mortar are laid along a long wall at a distance of 50 cm in increments of 1.5-2 m. After leveling, the metal profiles are removed, the seams are filled with mortar, and the surface is rubbed.
Preparation of the solution
With a small amount of work, you can prepare the mixture yourself. First, the dry ingredients are combined, then water is added in small portions. The mass needs to be shoveled several times, dry and moistened.
Proportions for making the mixture:
- cement M400-M500 - 1 part or 1 bag;
- clean sand of medium coarseness (natural humidity) - 3 parts or 30 shovels;
- water - at the rate of W/C = 0.3 or 15 liters for a given volume of the mixture;
- fiber fiber - 35-40 g per m2 of floor (with a mortar layer of 50 mm) or 70-80 g per bucket of water;
- plasticizers - according to instructions.
If cooking is carried out in a bunker, the mass is mixed for about 3 minutes, after which it is delivered to the place of placement. The maximum time for transporting the solution is 5 minutes.
Filling the screed, leveling, sanding
The mixture is evenly spread out and leveled using a rule supported by beacons. Grinding begins immediately, before the solution begins to set. In openings and areas over 30 m2, expansion joints 4 mm thick are cut with a height of at least 1/3 of the thickness of the screed.
Care
To quickly reach the design strength, the screed needs maintenance. It consists of moisturizing and preventing drying out for 3 days. If the air in the room is dry, the surface is covered with a film.
After 3 days you can walk, but point loads are not allowed - installing scaffolding, stepladders, etc. In 10-12 days, the coating gains sufficient strength to withstand the calculated mechanical loads. Laying of facing tiles is possible. The parquet and boards are installed no earlier than 20 days later, when the base has dried well.
Video - semi-dry screed by hand
Equipment for semi-dry screed
Mechanized laying of semi-dry screed involves the use of specialized equipment and tools at different stages of the process:
- Mortar pumps (pneumatic blowers).
- Milling machines.
- Grouting machines.
- Laser levels on telescopic stands.
For manual semi-dry screeding from the list above, only rotary trowels are used.
Mortar pumps (stations)
Our company operates a fleet of the best machines in the industry. The new Putzmeister M740 units combine the functions of mixers, concrete pumps and pneumatic blowers. The averaging of the solution is controlled automatically, and a uniform supply of the mixture is ensured to a height of up to the 40th floor.
Milling machines
Serve for uniform laying and compaction of the solution. Since they require additional manual leveling and are not capable of serving rooms with complex configurations, they are not widely used.
Trowels
To grout screeds for laying finishing coatings, our craftsmen use Putzmeister single-disc rotary machines of the TL series. These models allow you to create a perfectly smooth surface both over large areas and in small rooms with complex configurations.
Why is equipment quality important?
At the moment, the rental of medium and small construction equipment is not regulated by anyone. Therefore, customers of semi-dry screed from “universal” teams often encounter 2 problems:
- By offsetting the cost of renting mortar pumps, workers save on plasticizers and fiberglass, increasing the water content in the solution. The result is cracks and subsidence of the screed surface.
- Machines that have exhausted their service life are used. Such units do not average the composition of the mixture, which leads to premature destruction of the leveling layer.
Floor leveling technology with semi-dry and dry screed
The process of leveling the floor with dry and semi-dry screed differs in the technology used.
The technology for installing dry-pressed screed is represented by the following points:
- Waterproofing the floor with polyethylene film overlapping the adjacent walls.
- Filling with dry mixture for floor screed (filler), for example, expanded clay, quartz sand, etc.
- The dry filler is compacted.
- We cover the dry-pressed screed with sheets of chipboard, plywood, or OSB.
Floor leveling using a semi-dry screed device has the following structure:
- Thorough cleaning and preparation of the subfloor.
- Priming the floor surface with a deep penetration primer.
- Framing the room around the perimeter with damper tape.
- Leveling beacons for floor screed.
- Pour in the semi-dry mixture and distribute it evenly.
- Final polishing of the resulting surface.
These are the technological aspects - of course, there are no fundamental differences between them, but still, some distinctive points are present.
Have you ever wondered if it is possible to install a screed directly on top of a wooden floor? Let's talk about this in more detail later.
Stages of work on semi-dry screed
Rice.
7. The process of laying semi-dry screed Using the already mentioned example of semi-dry screed using EPS, we will show the sequence and stages of the technological process
Installation of damping tape
It is laid along the entire perimeter of the walls and around columns. It is fixed using its own adhesive layer, or, if there is no such layer, with double-sided tape, foam adhesive or using a stapler (if the wall is plastered). If a waterproofing material (film, foil flooring, etc.) is laid on the subfloor or insulation, then the tape must be folded inside the room, overlapping with the horizontal surface.
Reinforcement
Reinforcing steel mesh is laid on a layer of insulation with overlapping sheets, which are connected with wire. The mesh should be located in the lower third of the screed, but not at the very bottom, but on top of the 1st layer. This height provides, on the one hand, a protective layer of concrete under the metal, and on the other, the ability to lay heated floor pipes using rows of cells as markings.
To do this, after filling the 1st layer and distributing the mixture, the mesh is lifted upward and only then the surface is compacted. When compacting, the mesh does not sink completely into the screed. It is clearly visible when laying pipes or cables.
Preparation of the solution
Since the setting time of the mixture is limited, it is necessary to prepare the solution exactly for laying one layer (bottom or top). Fiber fiber is added to water and then mixed. The consistency of the resulting mass should be similar in plasticity to snow when forming a conditional “snowball”, but water should not be released.
Laying the mixture
From the mortar pump, the screed mixture is supplied to the site in discrete portions into a special absorber receiver standing on a tripod. The mass that spills onto the floor from the damper is distributed around the room using shovels and rakes.
The main team forms the second (top) layer of semi-dry screed immediately after laying the pipes and preparing the second portion of the solution.
Seal
On small objects, compaction of the 1st layer is carried out by trampling. In large rooms, compaction can be done when filling with milling machines. Compaction of the top layer is performed directly during leveling with the rule.
Laying heated floors
When a team of concrete workers leaves the premises, specialists enter it to lay pipes or electric cables for the heated floor. Since this operation does not require a strictly flat plane, it can be started immediately after compaction, without waiting for it to dry - the end of the setting time of the solution is sufficient.
Formation of beacons
This is done after filling the 2nd layer of screed. Unlike wet technology, semi-dry technology does not involve the installation of metal beacons. Areas of compacted screed serve as beacons. Point areas are made using a laser axle builder. Then the master, combining these sites with a rule, creates linear beacons. These guide elements must be formed along the walls and along the centers of the largest spans. The distance between parallel beacons should not exceed the length of the rule.
Rice. 4. Work on semi-dry screed over EPS in a small room
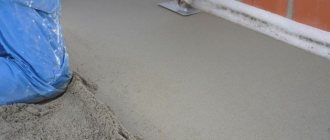
Leveling and compacting the surface
It is carried out by the rule according to the formed beacons. During the operation, a single plane is ensured, all irregularities are cut off, and the entire leveling layer is given the required density.
Grout
Mechanical processing with rotary trowels is carried out during the initial setting of the screed, immediately after its leveling and compaction. The metal disk of the machine cuts off the slightest deviations from flatness and further compacts the concrete layer.
Strength gain
To extend the drying time, it is necessary to slow down the evaporation of moisture. To do this, the surface of the screed is covered with film and left for a period of 1 week to a month (depending on) the temperature in the room, the work plan and the planned type of finishing coating.
Technology for laying semi-dry floor screed
The work consists of the following stages.
Preparing the base
Includes complete dismantling of the old screed and thorough cleaning of the work surface. There should be no dust, dirt, or loose lumps of cement mixture left on the floor.
Waterproofing
This type of coating continues to allow water to pass through its entire service life, so it is wise to protect the base with a layer of polyethylene or roofing felt. Strips of material are laid on the floor with an overlap and secured with tape, and sides are formed along the walls, several centimeters greater than the expected thickness of the screed.
Installation of beacons
Beacons made of T-shaped profiles are used, on which the rule will rest for precise leveling of the surface. They are installed parallel to one of the walls: the first with an indentation of 20-30 cm, the subsequent ones at a distance from it that is 10-15 cm less than the length of the rule. The beacon profile is fixed along the entire length in small portions of the same solution that is used for the screed.
Mixing the solution
It is very important to use a high-quality dry mixture based on cement - for example, weber.vetonit S 06. After combining it with sand, water is poured gradually, bringing the solution to the desired consistency. To ensure uniform distribution in the solution, fibers are added to each bucket of water.
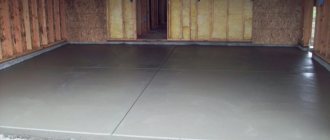
Laying the screed
The first layer of mortar is poured below the level of the beacons and quickly compacted with feet. Then they throw a second layer slightly above the level of the beacons and level it using the rule. The finished screed is immediately sanded and covered with polyethylene until hardened.
Average cost of semi-dry screed
All other things being equal, the cost of 1 m2 of semi-dry screed is comparable to the price of traditional leveling with wet mortar. Additional factors that increase unit prices may include:
- Use of ready-made mixtures.
- Introducing plasticizers and reinforcing fiber into the composition.
- Lifting materials to the floor.
| Example of pricing of semi-dry fiber-reinforced screed depending on layer thickness and number of floors, rub. | |||||
| Floor | Screed thickness, cm | For each subsequent cm | |||
| 6 | 7 | 8 | 9 | ||
| 1 | 560 | 640 | 720 | 800 | 80 |
| 2 | 580 | 662 | 744 | 827 | 82 |
| 3 | 593 | 677 | 761 | 846 | 84 |
| 4 | 599 | 683 | 768 | 853 | 85 |
| 5 | 604 | 690 | 776 | 861 | 86 |
| 6 | 610 | 696 | 783 | 869 | 86 |
| 7 | 616 | 703 | 790 | 877 | 87 |
| 8 | 622 | 710 | 793 | 886 | 88 |
| 9 | 627 | 716 | 805 | 894 | 89 |
The cost of a semi-dry floor screed in an apartment or private house for linoleum, parquet and vinyl tiles is always cheaper than the cost of a wet screed followed by final leveling with a self-leveling floor.
Advantages and disadvantages
As a rule, work is carried out by specialized teams that have the necessary equipment. The unit, similar to a mini-trailer, consists of a mixer where the components are mixed, a compressor that creates high pressure, and a pipeline of the required length with a damper at the outlet.
The equipment is installed next to the object on the street. Dry ingredients such as cement and washed river sand are stored nearby. Water must be in a constantly replenished container, plasticizers must be in conditions that comply with storage rules.
Advantages of semi-dry floor screed:
- high strength (with high-quality materials and compliance with installation technology);
- less shrinkage and cracking;
- high installation speed;
- rapid hardening;
- inexpensive and accessible mixture components;
- the ability to provide additional heat and sound insulation;
- there is no dust and dirt in the room, since the mixture is prepared outside;
- convenient laying of communications.
There are few disadvantages:
- installation requires special equipment;
- After installation, the coating needs maintenance.
Important. Since the advantages significantly outweigh the disadvantages of semi-dry floor screed, today it is the most technologically advanced and inexpensive way to create an even base for any type of finishing.
Pros of technology
Standard semi-dry floor screed differs favorably from other leveling technologies in that:
- Suitable for laying any coatings at no additional cost (no finishing leveling work is required).
- Demonstrates the best price-quality ratio (the cost of work is lower than the sum of the costs of a wet screed and self-leveling floor).
- Practically not subject to the formation of cracks and delaminations (subject to compliance with technological requirements).
- Reduces repair time. Despite the same time for complete drying as in the case of a wet screed, walking on the surface and doing plastering and other work related to the walls is permissible already on the 2nd - 3rd day.
- The process is much cleaner than laying wet screed. There are 2 reasons for this - the solution is not prepared on site (it is supplied there through a hose), and the finished screed does not require dusty mechanical grinding or installation of a self-leveling floor.
↑ Purpose of the screed
Semi-dry screed is used to level the floor for the final decorative coating.
The following are mainly used as a decorative layer:
- linoleum;
- tile;
- parquet;
- laminate;
- carpet
To ensure that the floor is level under the covering, its surface is rigid, and in order to ensure thermal insulation characteristics, a floor screed is performed. It is also needed to ensure the slope in the floor in the areas of floors required for structural reasons. A screed is used to mask communication pipes passing through the house, including protecting electrical wires laid in the shell.
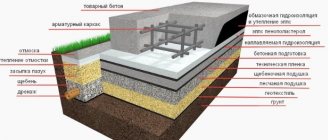
Important! At its core, a screed is an intermediate layer, small in height, but durable, used when laying floors. It serves as a layer between the base and the finishing coating. The quality of the screed directly affects the durability of the floor. In particular, the better the quality of this intermediate layer, the longer the repair-free period of the final coating.
Semi-dry screed is the rough base in the floor pie. The durability of the entire structure depends on its quality
The significance of the screed in the multi-layer “pie” of building construction is multifaceted:
- it perceives and immediately transmits to the layer located immediately below it (heat - sound insulation), the impact of loads from operating equipment, moving equipment, people’s movements, etc.;
- levels the rough base and is considered the foundation for creating perfectly level conditions for laying the coating.
Disadvantages of semi-dry screed
The disadvantages of the technology manifest themselves, as a rule, in conditions of handicraft work by teams that use manual work or low-quality mechanization tools:
- The solution sets much faster than a wet screed, which requires working in small portions.
- Inability or extreme ineffectiveness to work alone.
- Quality suffers greatly if you deviate from the standards of the mixture components. In particular, clay admixtures are not allowed in sand.
Strength of semi-dry and dry floor screed
The strength indicators of a semi-dry floor screed directly depend on the brand of mortar and added impurities - fiber fibre, plasticizers, etc.
Guided by the norms of SNIP, the following patterns can be distinguished:
- The density of semi-dry floor screed should be in the range from 2000 to 2200 kg per m3.
- A semi-dry screed with a layer thickness of 5 cm will weigh approximately 100 kg; its weight can be reduced by replacing a certain amount of the mixture with special fillers - expanded clay, expanded polystyrene and others.
- Strength indicators, depending on the brand of solution, are recommended from M150 to M200 minimum.
- The minimum thickness of a semi-dry screed should be at least 2 cm, and it is advisable to strengthen it by adding plasticizers, fiber and other fillers.
The strength indicators of a dry floor screed are significantly lower than those of a semi-dry floor screed. Here the main criterion is the load of the leveling layer (OSB boards, plywood sheets, gypsum fiber board) and the final finishing floor covering (laminate, linoleum, tiles, parquet boards) on the dry filler, which can be expanded clay, expanded polystyrene, etc.
For rooms with low traffic and little load from furniture, a dry floor screed will be quite sufficient. For “living” rooms with high traffic and large areas, a semi-dry version of the screed is better suited.
Well, that's all, it's time to wrap things up. But now you know exactly what dry and semi-dry floor screed is, the pros and cons of both types, installation methods and much more. Which option to choose is up to you. We just gave some advice. Great luck to everyone!
If the article was useful to you, share it with your friends by clicking on the buttons: Below, leave your comments, suggestions, ask questions, express your opinion - this is very important to us!
Features of semi-dry cement screed and installation rules
The disadvantages of semi-dry screed are completely solvable. To do this, you need to use the services of professional craftsmen who have equipment and experience in working with this technique.
To carry out the work, the following equipment and tools are required:
- pneumatic blower with hose;
- grinding machine;
- concrete mixer;
- level;
- trowels;
- rules;
- And so on.
Let's consider the option of a semi-dry screed without reinforcement, since it is less labor-intensive. During the work you will need the following materials: sand, fiberglass, water, cement and damper tape. For a high-quality result, it is necessary to consistently and clearly execute the stages of floor screed installation:
- Preparation for work. Removal of old floors, removal of debris and inspection of the sub-base.
- Primer. It is necessary to apply a primer or special glue to the rough base; it will smooth out imperfections and create a barrier to the penetration of moisture, that is, it will serve as waterproofing.
- Sound and heat insulation. A separating layer – polyethylene – is placed under the screed. Instead, you can use specialized soundproofing and heat-insulating materials - shumnet and analogues.
- Laying tape around the perimeter. It is necessary to lay a damper tape around the perimeter; it will serve as a separating layer and create additional sound insulation. Edge tape can be purchased ready-made or made from a foamed polyethylene roll.
- Laying cement-sand mortar. The prepared solution with fiber fiber is supplied to the room and laid over the entire area in one layer of the required thickness. It is important that the solution is of the correct consistency.
- Alignment. The procedure is carried out using a level. Using the rule, excess solution is removed, and where there is not enough material, additional solution is poured.
- Grout. For this operation, a special surface grinding unit is used - a “helicopter”.
Important! Semi-dry screed provides a perfectly flat surface. The only downside is that you can’t achieve this on your own. We need good craftsmen with extensive experience.
Benefits of technology
Semi-dry screed is considered a young technology. The real advantages of the method are:
- a perfectly flat surface that does not reduce its properties even when cutting cladding for other rooms;
- high strength under ideal conditions for the formation of cement stone without cracks and cavities;
- low cost of service for large volumes of work;
- walking without decks and ladders.
All other advantages are far-fetched and are used in aggressive advertising of service providers, pushing to the conclusion that their screed is better.
For example, wet sand concrete screeds can be poured over mineral bases on your own and sanded using the same machines without which this technology is impossible. You will have to look for high-quality sand for the mixture and possibly overpay for delivery. Concrete consumption, although slightly, increases, since the minimum thickness of the screed is 1 cm greater than that of the traditional (“wet”) screed.
Grinding wet concrete screed.
In principle, concretes with a low W/C ratio are created for hydraulic structures and foundations, since by default they have high strength, frost resistance and water resistance. Similar characteristics are not required from screeds, so high performance becomes rather a bonus.
Areas of application of German technology
German technology is relevant in cases where it is necessary to create a high-quality subfloor for the finishing coating and it is necessary to speed up the repair or construction processes. Semi-dry screed can be used:
- administrative buildings, social facilities, shopping and entertainment centers;
- for arranging floors with a finishing coating of porcelain stoneware or tiles;
- if the floors are made of wood or concrete;
- for arranging the base on compacted gravel-sand soil or sand.