Insulation
Publication date: 11/30/2015
1
9182
- Choosing insulation
- Use of polystyrene foam
- Use of mineral wool
- Liquid floor insulation
- Insulation: electric and water
Floor insulation is carried out in every building. The warmth and comfort of the residents depends on this. As insulation, you can choose various modern materials, from mineral wool and their varieties, to foam plastic and expanded polystyrene. There are also natural insulation materials, but they are rarely used. We will find out how and how to produce high-quality floor insulation in a frame house.
Insulation of a frame house on a screed
How to properly make a warm floor in a frame house with your own hands?
Warm floors have become very popular lately. And this is not surprising. This option, when the floor is heated from below, makes being in the room comfortable. Children can play perfectly on such a floor; it is comfortable to sit on it to watch TV or play with the dog.
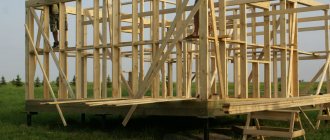
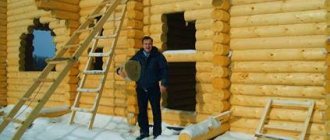
Frame houses are ideal for summer living. If you plan to live in a frame house all year round, then it is necessary to insulate it in accordance with the rules and regulations for a specific location.
Warm floors are very convenient in the bathroom, since most often the floor here is laid with stone or ceramic tiles, and we walk on it barefoot. The pleasant warmth from below is especially appreciated after a hot bath.
Heated floors are widespread in developed countries with cold climates: Germany, England, Sweden. It is known that such technology was used in ancient Rome.
Warm floor in the bathroom of a frame house
In the bathroom, it is best to install a heated floor using a heating cable, since this type of heated floor is suitable for all types of flooring. The heating cable is placed in a thick cement-sand screed 3–5 cm thick.
Warm floor in the bathroom.
Instead of a heating cable, heating mats can be installed in the bathroom. This warm floor is laid under ceramic tiles or porcelain stoneware. The mats are laid in a layer of tile adhesive, which ranges from one to one and a half centimeters.
The cable heats the floor longer than mats, but it can be used in both additional and main heating. The mats are used only as additional heating.
It is possible to install a heated floor in the bathroom using an infrared rod-heated floor. This is a new type of floor heating that has come into use quite recently. This floor has a number of advantages:
- Infrared radiation has a beneficial effect on human well-being and even helps improve immunity.
- This heating system saves up to 60% of electricity compared to a heating cable and heating mats.
- The infrared rod-heated floor is located in a layer of tile adhesive or leveling screed.
- Such a system can be installed under any floor covering.
The thermostat, which sets the required temperature, can be brought into the next room.
Insulation of the floor of the first and second floors
Warm floors can be electric or water. Electric heated floors can be installed both in a private and multi-storey building on any floor. Water heated floors are usually installed on the ground floor of a private house or industrial workshop. On the upper floors of a multi-story building, a water floor is not installed due to the possibility of leakage.
Warm floor pie.
On the first floors of a private house, floors can be laid on the ground or on joists. It depends on the type of foundation. On the upper floors, the floors are laid on the floor slab.
For more information about warm floors in a frame house, read the article “Insulation of the floor of a frame house on screw piles.”
Electric heated floor
Electric heated floors can be convection or infrared. The convection system works by heating the cable. The cable is laid under the floor covering or can be part of a heating mat, which is also laid under the finished floor. The floor covering can be anything.
Infrared heated floors require the presence of a thin film under the floor covering, which heats not the air, but the floor itself and objects in the room. This is an innovative development that is gaining increasing popularity.
You can install a heated floor yourself, after carefully studying the issue, or entrust it to specialists.
Installation of convection electric heated floor
- To begin installing the floor using electric convectors or heating mats, you need to install the thermostat. Prepare a sub-socket with electrical wiring and a vertical groove of 20*20 mm. Place a thermostat with a sensor in a corrugated tube with a diameter of 16 mm.
- Then we prepare the floor surface: we remove all debris, sweep, and apply a layer of primer under the heating mats. We lay reflective thermal insulation, attach a mounting tape or mesh to it, and lay the heating cable at a given pitch. The sensor in a corrugated tube is fixed at an equal distance between the heating cable.
- If the work is carried out using heating mats, then we perform a horizontal fine so that the sensor in the corrugated hose is located exactly between the heating cores.
- After installing the underfloor heating system, we check its operation. After this, we make a screed covering the heating cable and the subfloor on top.
This brief installation instruction does not describe the entire process in detail. Installation of convection electric heated floors does not depend on the type of foundation. We described the detailed installation process in the article “Floor insulation in a frame house on screw piles.”
Infrared or film heated floor and its installation
Installation of infrared heated floors is quick and simple. During installation, strips of infrared film are laid on a layer of reflective heat insulator. Do not allow sheets of film to overlap. You can immediately lay a layer of flooring on this structure.
Read more about installing infrared heated floors in the article “Insulating the floor of a frame house on screw piles.”
Water heated floor
A water heated floor is heated by hot water circulating through pipes laid under the floor. Its main advantage is energy saving. Usually such a floor is installed in private houses and cottages.
Installation of water heated floor
When choosing a water heated floor as the main or additional heating, installation is carried out as follows.
- You should carefully prepare the floor surface, removing all debris. Then lay a layer of waterproofing, insulation and reinforced screed. Install a collector in the middle of the room and lay the pipes, attaching them to a reinforced mesh. Connect the pipes to the collector and check the operation of the system.
- Then make a screed in which the entire heated floor system will be hidden. Flooring can be laid on the screed.
Warm water floor without screed and its installation
Modern technologies make it possible to install a water-heated floor in a house without a screed. Sometimes this can be very convenient: for example, when the height of the room is low, there is no cement, or the wooden floor is not very strong.
Warm water floor without screed.
A water-heated floor without screed has a base made of polystyrene or wood with grooves and metal heat-distributing plates.
As an option, you can use ThermoPol Comfort polystyrene foam boards, which have proven themselves well.
The advantages of such a warm floor include:
- installation without the use of cement;
- maintaining the height of the room, since the thickness of the slab is much less than the thickness of the screed;
- light weight of the system;
- quick installation due to the absence of cement work.
Installation of heated floors is carried out as follows.
- All debris and surface unevenness are thoroughly removed. A polystyrene base is laid - plates with grooves. The plates are secured to each other with snap locks. In the case of a wooden base, wooden plates are used, which are also fastened with locks.
- Aluminum plates are placed in the grooves, and pipes are placed in them, following a pre-developed pattern. The substrate and finishing coating are placed on the plates. If, for example, the finishing coating is tile, then chipboard, plywood or moisture-resistant plasterboard are laid underneath it.
- If the floor covering is hard, lay it directly on metal plates. You can put a soundproofing layer under it.
Such a warm floor will last a long time and provide the necessary warmth throughout the year.
Warm floor under tiles
Most often, electric heated floors made from electric convectors or heating mats are used under ceramic tiles.
Warm floor pie under tiles.
When installing infrared electric heated floors under ceramic tiles, it is recommended to use additional glass magnesite or plasterboard. A layer of any of the listed materials is laid on an installed and tested infrared heated floor system, placing polyethylene under it.
It is prohibited to use aluminum foil and materials based on it, as well as metal mounting mesh as a heat insulator.
It is also possible to install a water-heated floor under ceramic tile flooring. There are no special moments here.
For more information about the installation of these types of heated floors, read the article “Floor insulation in a frame house on screw piles”
Reviews from owners of heated floors
Warm floors in a frame house are not a luxury, but a necessity.
Tatyana K., 31 years old, Tula
I would like to say thank you to the builders who advised us to install heated floors in the living room. At first we were against such a proposal, since it clearly led to an increase in construction costs, and money was tight. But the guys still persuaded us. Now we are very happy: it is an extraordinary pleasure to walk on the floor barefoot. In addition, you don’t have to worry about kids who don’t recognize sofas and sit on the floor with their toys.
It turned out that this is not a luxury, but a very pleasant addition to a cozy home environment. I advise everyone to install heated floors, the costs are worth it.
Valery M., 48 years old, Taganrog
I would never have thought that heated floors were such a good thing! After all, with conventional heating radiators, warm air rises to the ceiling and then falls, but does not reach the floor. That's why the floors are always cold and your feet are freezing.
And with a warm floor, heating comes directly from below and the floor is always warm. It turns out that this is even very pleasant. This is especially noticeable on the first floors: it’s cold coming from the basement and no carpets can help, we actually walked around the house in felt boots in winter.
We chose infrared floor heating. Installation was ordered from the store. Everything was done quickly and clearly. Now we live and rejoice.
What materials to choose - a detailed review
In the 19th-20th centuries. sawdust, straw and even sand were used to insulate winter houses. The first two options are fire hazards, the last one is also not ideal. Large weight and thermal conductivity make the sand cushion not the best insulation.
In the 90s, mass construction of frame houses began. These were buildings that could not be called quality housing, but with population growth, accessibility was required. In such houses, expanded clay was used for thermal insulation of the attic floor. It has not disappeared from the scene to this day - lightweight, fireproof and low cost - an excellent material for temporary houses, country houses and garden buildings. Its thermal conductivity is 0.14-0.23 W/mK. But there are other parameters - vapor permeability (depending on the density of the embankment, fraction), ease of installation.
What materials have become leaders in the field of attic floor insulation?
| PPU – polyurethane foam spraying | The material is easy to use, easily covers uneven surfaces, and fits on almost any surface. Strengthens the ceiling due to the monolithic layer and is lightweight. The disadvantage is the high cost and the need for special equipment. |
| Mineral wool materials | The base is fiber made from glass or basalt. Installation is not difficult - the layers are simply laid between the sheathing beams. Pros - reasonable price and the possibility of self-installation, cons - caking over time, the need for vapor and moisture insulation. |
| Ecowool | Thermal insulation material made from cellulose. The composition includes additives that prevent burning, damage by insects, rodents and bacterial flora. Ecowool used for thermal insulation has the ability to “breathe” (like natural wood), that is, absorb and release a certain amount of moisture. This creates a microclimate in the premises that is comfortable for living. |
| Loose penoizol | Does not burn and does not emit harmful substances, sometimes applied manually. It is excellent for backfilling interfloor and attic floors, but requires moisture and vapor barriers because it allows water to pass through, although it does not absorb it. |
| Perlite or volcanic glass | Suitable for insulating floors in frame, timber, log and brick houses. Does not burn, does not emit harmful gases during operation and heating. There is one minus - perlite is not available everywhere and its price increases in areas far from the place where volcanic ore is mined. |
| Extruded polystyrene foam in slabs | Known as "Penoplex". It is capable of burning and releasing gases when heated, but does not attract rodents and insects. Conveniently mounted between floor joists. |
This is only a part of the materials used to create a reliable barrier against the cold entering the house. When choosing, focus on the availability of the material in your region and its cost.
What insulation should be used depending on the type of foundation?
Depending on the type of foundation, your own floor pie is made. Each case has its own characteristics.
With a strip foundation
When considering the option of insulating the floor of the first floor on a strip foundation, the easiest way is to make floors on the ground. To do this, the ground under the entire house is carefully compacted and covered with a moisture-proof film, for example, polyethylene. The main insulation is laid, for example, expanded clay (layer thickness 10–15 cm). A finishing screed is made on top of the expanded clay and the subfloor is laid. You can add additional insulation to the main insulation by laying waterproofing on top.
For columnar and pile foundations
With a columnar or pile foundation, the floors are arranged along logs.
Floor insulation using joists
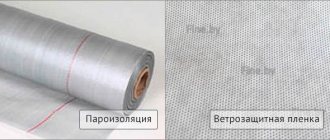
If the foundation is piles or a columnar foundation, then the floor is insulated along the joists. A sheathing with a moisture and windproof membrane is laid, then insulation is laid, a vapor barrier is laid, and then the subfloor is installed.
A design can be used where cranial blocks are placed on the logs, on which the subfloor is laid. Then a moisture and windproof film is laid down, insulation is laid and waterproofing is laid again. Next, the finishing floor is laid.
You can use sheets of mineral wool or polymer insulation.
Cross insulation
For greater reliability, you can perform cross-insulation of the floor when laying sheet insulation. On the first layer of insulation laid in one direction, a second layer is laid in the other direction, covering all the seams in the first layer of insulation.
If the required insulation thickness is 200 mm, then it is better to lay 2 layers of 100 mm insulation in cross directions than 1 layer of 200 mm.
Before the process of insulating floors, it is necessary to use an antiseptic so that the wooden elements do not rot. To protect against mice, a metal mesh is laid under the floor.
Insulating the walls of a frame house with mineral wool
In a frame house, as in any other, there are two types of walls - external, one side of which is located on the street, and internal, which are located entirely inside the house. So, it is necessary to insulate both of them.
The walls of a frame house can be insulated both from the inside and outside; this does not change the materials used and their quantity. We will look at insulation from the inside; everything is done from the outside in exactly the same way, only in a slightly different sequence.
Insulation of the external walls of the house
It is worth immediately noting that when covering a frame house outside and inside with your own hands, various materials are used; they may be different from those that I describe in this instruction. The order of actions may also differ, but in general, it turns out almost the same, as in the diagram. This is an approximate diagram, for example, instead of OSB boards, on one side you can pierce the sheathing with slats or a 25mm thick board. The board, as a rule, breaks through a certain distance - about 40 cm between the axes, but it is worth remembering that in this case, the rigidity of the walls will suffer a little.
The process of insulating walls with mineral wool with your own hands is almost identical to the thermal insulation of the floor, and is carried out as follows:
- The outside of the frame is sheathed with OSB boards, with gaps between them specified by the manufacturer, usually 2-3mm. After installation, the gaps can be foamed. This is what it looks like from inside the house:
- Then, also on the outside, a waterproofing membrane is stretched, which will protect the mineral wool, the frame of the house, as well as OSB sheets from external moisture, on top of which external finishing work will be carried out, such as installing siding, for example. Some manufacturers make waterproofing materials with self-adhesive strips to make the joint tighter. If there are no such stripes, it is advisable to glue the joints with double-sided tape.
- From the inside of the frame house, between the frame posts, which, if you did everything correctly, are located at a distance of 58-59 cm from each other, sheets of mineral wool are tightly inserted.
- It is better to use mineral wool with a density of at least 35-50 kg/m3. Less dense insulation will settle or roll to the bottom, which will lead to the appearance of voids and cold bridges. As a rule, manufacturers write on the packaging what material can be used for.
- Just like with the floor, layers of mineral wool should be laid so as to overlap the previous joint of the sheets by at least 15-20cm. The total thickness of insulation depends on the climate zone, but the average value is also 15 cm.
- After all the insulation has been laid in the walls, it is necessary to fill with foam all the small voids formed at the joints of the boards and beams.
- A prerequisite for insulation with mineral wool is that from inside the house, over the insulation, it is necessary to stretch a vapor barrier membrane, which will protect the insulation from moisture coming from inside the house. On top of which, most often, the same OSB sheets are stuffed as on the outside, but you can also use boards, slats and similar materials, depending on the further finishing. An important point in installing a vapor barrier membrane is that it is not overtightened at the internal corners, and the vapor barrier completely follows the corner of the frame. Otherwise, in the future, it will be difficult to nail the trim at the corners.
It is worth noting that this entire procedure can be done in reverse, first stretch the vapor barrier membrane from the inside, then the internal cladding material, and the process of insulating the walls with mineral wool can be done from the outside.
Insulation of internal walls of a frame house
Distinctive features of insulating the internal walls of a frame house are:
- Insulation of the internal walls of a frame house is carried out mainly for sound insulation. Therefore, if you have the opportunity, it would be better to use soundproofing material. But this does not mean that ordinary thermal insulating mineral wool or other types of insulation are not suitable.
- There are no such stringent requirements for the insulation of internal walls as for external ones, therefore, in principle, waterproofing and vapor barrier materials are not required.
- Otherwise, insulation occurs identically to the outer walls of a frame house.
If it is not possible, or there are no strict requirements for the soundproofing of internal partitions, it will be sufficient to use the same insulation as for external walls. The thickness of the heat-insulating layer can be much less.
What insulation is better for the floor of a frame house?
Floor insulation in a frame house can vary depending on the purpose of a particular room. According to GOST (state standard), the following can be used as insulation:
- expanded polystyrene;
- Styrofoam;
- mineral wool;
- ecowool;
- penofol;
- penoplex;
- expanded clay and other types of insulation.
The thickness of the insulation for the floor of a frame house in central Russia is chosen to be 200 mm. For more northern regions - 300 mm.
To insulate the floor of a frame house, you must choose only high-quality insulation. Otherwise, you may end up with insufficient insulation, which will lead to unnecessary costs for heating the premises.
Insulation with polystyrene foam or expanded polystyrene is the best and simplest solution. It is actively used in budget construction. The only condition is the use of good waterproofing so that the foam does not disintegrate into individual elements. When temperature changes, the foam can still form cracks. This is its main drawback.
To prevent such unpleasant moments, you need to lay the sheets “under tension” so that the sheets are tightly clamped between the joists. Such work should be performed by knowledgeable specialists.
Laying foam plastic between floor joists “in tension”.
Mineral wool can be used with great success for insulation. It has high thermal protection, is not flammable, but is also resistant to moisture. Waterproofing in this case must also be of high quality. It is better to use mineral wool in the form of mats than in the form of a roll, because the mats are denser. Be sure to cover the gaps between the mats.
If you choose an insulation thickness of 150 mm, then it is advisable to lay a layer 100 mm thick and cover the cracks with another layer 50 mm thick.
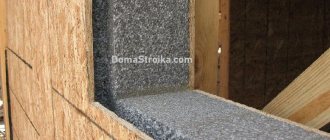
Ecowool is an analogue of glass wool, but is more environmentally friendly, although many experts question this fact. Ecowool is sprayed using special equipment and forms a layer of seamless insulation. Ecowool retains heat better than mineral wool, but is more expensive.
Insulating the floor with penoplex, which is a type of polystyrene, but is more reliable in strength and has a higher degree of thermal protection, will cost much more.
Insulating a frame house with expanded clay is quite possible. Expanded clay is cheap, it is fire resistant, and is also environmentally friendly. It is quite possible to insulate a floor with expanded clay yourself, without resorting to the help of a construction team. True, expanded clay is inferior in thermal conductivity to the materials listed above.
When insulating a floor with expanded clay, it is imperative to use waterproofing, because expanded clay absorbs moisture well. A layer of expanded clay is laid on the waterproofing, a leveling screed is made on top of it, then another layer of waterproofing is laid.
In principle, absolutely any insulating material can be used to insulate the floor. In the simplest cases it can be sawdust. As a rule, the better the quality of the material, the higher its price. Each owner chooses which heat insulator to choose.
Use of polystyrene foam
Floor insulation is carried out in several stages, the first of which is preparatory. So, step-by-step insulation of a wooden house with polystyrene foam:
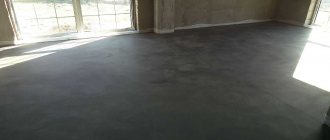
- We prepare the surface. If you made a screed on the ground, then it is a cement surface, smooth, without drops.
- We lay a layer of waterproofing. Ideally, waterproofing is carried out with one piece of film. If the size of the house does not allow waterproofing in one piece in the room, we lay the film overlapping with a good margin. We glue the connection with special tape for waterproofing. The waterproofing should rise up the foundation, and by this time the foundation should also be insulated with foam plastic foundation slabs.
- The third stage represents the actual insulation process itself. It is advisable to use foam plastic that comes with markings for the floor, that is, increased rigidity. If you choose cheaper foam with a low density, during operation it will experience loads that will cause it to deform. As a result, the floor covering will become distorted over time, and if the foam sheets are poorly bonded to each other, the floors will creak. There are several ways to lay foam sheets; you can start from a corner, or you can lay them away from the wall. Scatter laying is rarely used.
- At the fourth stage we again use waterproofing. Since floors are sometimes exposed to moisture (during floor washing or spills), we also make the waterproofing layer, preferably in one piece.
- Cement-sand screed is the final stage of floor insulation. Its layer should not be very thin, but not very thick. For better rigidity, mesh should be used. Do not forget that the screed must dry thoroughly before you begin laying the finished floor.
Read more about insulating a frame house with polystyrene foam here.
We fix the foam sheets to the floor
External floor insulation
When building on stilts, free space remains between the ground floor ceiling and the ground. It can be used to insulate the floor of the first floor from the outside. Such insulation can be called insulation of the subfloor.
Any tile insulation can be used as insulation. To do this, a vapor barrier is attached to the bottom of the joists using glue or using a construction stapler. Then the heat insulation sheets are attached to the wooden base using self-tapping screws. Finally, a wind membrane is attached to the bottom. If desired, you can sew up the entire structure from below with boards.
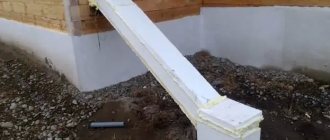
As an additional insulation to the existing insulation, you can use TM15 polystyrene boards. Polystyrene slabs measuring 1 * 1.2 m are attached to the joists lengthwise and crosswise using inch boards and self-tapping screws. The seams between the plates are filled with polyurethane foam. A vapor barrier is stapled to the bottom of the polystyrene slabs. The overlap pie will look like this:
- subfloor boards;
- vapor barrier;
- main insulation;
- logs;
- expanded polystyrene;
- vapor barrier.
Insulation of the floor below the house.
Ceiling insulation
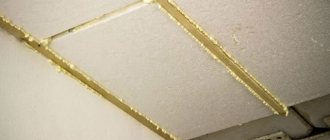
This is an important stage of work. Warm air rises, so most of the heat in an uninsulated building escapes through the upper railings. The do-it-yourself scheme for insulating the ceiling of a frame house includes the following steps:
- A vapor barrier film is stretched onto the ceiling beams from below.
- They secure it by stuffing wooden boards, OSB boards or plywood. Such a filing with a vapor barrier will serve as the basis for finishing the ceiling from the inside.
- Thermal insulation is laid on top between the ceiling beams - the principle is the same as when decorating the floor and walls. The thickness of the mineral wool for the ceiling should be 150-200 mm. The insulation is laid over the entire surface with an overlap onto the adjacent walls.
- Cover the insulation with boards or plywood to form the attic floor.
Insulating the ceiling of a frame house with mineral wool is best done at the stage when the roof assembly is not yet completed. This way there will be access to the ceiling beams on both sides, which is convenient for work. If access is only from below, you will have to additionally secure the insulation with boards from the inside.
Step-by-step instructions for the process of insulating the floor of a frame house with your own hands with photos
Most often, floor insulation in a frame house is made of mineral wool, as the most common, effective and cheap insulation. Foam insulation is also very popular.
Don't forget to use personal protective equipment when working with mineral wool: gloves, goggles and a respirator. When in contact with the skin, mineral wool causes itching, redness and allergies. Getting its particles into the respiratory tract and lungs is also extremely undesirable.
Floor insulation when laying a floor on the ground
Floors on the ground are most often installed with a strip foundation and in the absence of a basement. We carry out the work in the following sequence.
- The soil under the house is carefully leveled and compacted. Covered with polyethylene at least 50 microns thick.
Leveling the ground.
Covering the soil with plastic film. - Insulation is laid, for example, expanded clay is poured in a layer of 10–15 cm.
- Floor joists are installed.
- Between the lags, mats with mineral wool are laid, which are covered with a foil layer of vapor barrier.
On top is a layer of vapor barrier. - We lay the finished floor from plywood 15 mm thick or OSB boards 12 mm thick in 2 layers, on which the floor covering is laid.
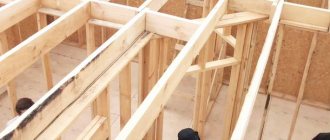
Floor insulation when installing floors using joists
Floors on joists are installed in cases of pile or columnar foundations. In this option, you should proceed according to the following scheme.
- After installing the logs, the construction of the subfloor begins. To do this, 50*50 mm bars, called cranial bars, are nailed to the lower edges of the logs, onto which board elements of the required length are laid. We choose boards with a thickness of 25 mm. We nail each piece of board with nails in four places - two on each side.
Skull bars between the floor joists of a frame house. - We spread moisture and windproof film.
- We lay insulation, for example, polystyrene foam. We choose an insulation thickness of 15 cm (depending on the climate zone). We lay the first layer of polystyrene foam 10 cm thick. We foam all the cracks and gaps. We select the second layer of polystyrene foam with a thickness of 5 cm and lay the sheets in a checkerboard pattern. We also foam the cracks.
Laying insulation in a checkerboard pattern. - Spread a layer of waterproofing.
- We lay the finished floor from 15 mm thick plywood or 12 mm thick OSB boards in 2 layers. We lay the OSB sheets in a checkerboard pattern, leaving small gaps (about 3 mm) to prevent the slabs from expanding. The plates are secured with self-tapping screws 35 mm long.
Insulation of floors is of great importance for creating comfort in a frame house, especially when living around the clock. Properly carried out insulation work will save heat and minimize heating costs.
What is the need
Perhaps, people who are far from all the intricacies of the process of constructing pile structures may not understand the need for floor insulation.
The absence of one, first of all, will lead not only to inconvenience during the operation of the building, but also to greatly increased heating costs in the winter. The reason is that without proper insulation, the floor simply will not retain heat inside the structure.
It is also possible that certain problems may arise in the form of:
- Formation of condensate on the surface of many floors;
- Rotting of wood due to the formation of mold on it, which is preceded by increased moisture;
- Significant reduction in the energy efficiency of such a house.
Technology and features of floor insulation from below in a wooden house
For each type of insulation, there are some specific features of use.
Mineral wool
The sizes of rolls and slabs are usually multiples of 60 cm, which makes this distance the optimal step between the logs. Mineral wool is cut to size with a cutter and placed in the space between the joists. For a tight fit, the size should be 1–2 cm larger than the distance between the joists. Cotton wool should not be pressed down forcefully as this may affect its characteristics.
The best option would be to lay two layers of insulation. The second layer is laid so that the joint of the lower layer falls on the center of the upper piece. This method of installation will prevent cold air from entering the room.
Installation of heated floors
The heated floor in a modern frame house can be water-based, if heating is carried out by circulating water through pipes, or electric, if the required temperature regime is ensured through the operation of special heating elements. Both technologies have proven to be highly effective, so the choice should be made depending on personal preferences and a number of factors, in particular:
- Climatic nuances of the area;
- Geological structure of the area;
- Features of the design of the house itself.
Water heated floor
Work on installing warm water floors in frame-type houses can be carried out using several methods: by deepening the pipe contour into a floating screed or by installing it on a wooden flooring.
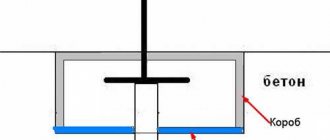
In the first option, the water circuit is filled with a 5-centimeter layer of screed. It must be taken into account that the screed creates an additional load on the foundation and the entire frame of the building as a whole (its weight on average is about 500 kilograms per square meter), and therefore, before starting work, it is advisable to check whether the house can withstand the required load.
After the solution has completely dried, the subfloor is covered with a waterproofing layer, which is usually polyethylene film or a special membrane. This layer is necessary in order to prevent the wood from filling with moisture contained in the concrete, as well as to prevent the screed from setting on the subfloor.
The film must be laid with approximately a 15-centimeter overlap on the walls, to which it is attached using mounting tape. If waterproofing material is laid overlapping, the joints must also be carefully taped. A heat-insulating layer and reinforcing mesh are laid on top of the film. The entire perimeter of the floors must be covered with damper tape.
Water floors are laid in a frame house on stilts in different ways depending on the area of the room. So, if the size of the room does not exceed 40 square meters, then one pipe circuit will be enough, but if the dimensions are somewhat larger, then it is advisable to divide the room into parts by laying several circuits. It is also convenient to use damper tape to separate them.
The pipeline can be laid in the form of a snake or snail, depending on personal preferences. However, it is necessary to strive to keep the laying step minimal, not exceeding 15 centimeters. To prevent the pipes from changing position when pouring the screed, it is necessary to secure them with clamps to the reinforcing mesh.
After completing the installation of a heated water floor, it is necessary to perform a pressure test of the system to fully ensure its proper functioning. Pressure testing is done throughout the day, and the screed must be filled when there is pressure in the pipes.
After completing the crimping process, it is advisable to place beacons that are convenient to navigate when carrying out work on pouring and leveling the solution. Filling is done in the direction from the wall to the door. The beacons are removed after the solution has hardened for some time, and the holes formed in their place must also be properly filled and leveled.
The need to use a floating screed when installing a water heated floor is due to the fact that wood, being a natural material, under the influence of external factors, primarily due to changes in temperature and humidity of the environment, is constantly transformed, changing in volume and shape. When the screed is rigidly connected to boards, beams and other wooden elements, its layer will certainly crack periodically, while a floating screed does not have this drawback.
When installing a water floor on a wooden base, the subfloor is initially covered with a waterproofing layer, and on top of it there should be a layer of high-quality insulation. Then grooves are cut out in the boards, where the pipes will subsequently be integrated. These boards form a frame for laying pipes, which should be done with a minimum step.
A sheet of metal is placed on top of the pipes, which ensures more uniform heat distribution. Plywood or OSB sheets are installed on top of the metal, followed by laying the finishing floor covering.
Insulation with slab materials
The base of the floor plays a decisive role in choosing insulation. For example, if it is based on logs, mineral wool slabs would be an excellent solution, and for concrete, rigid materials for thermal insulation. The insulation technology is the same in any case.
- After laying the logs, the subfloor is prepared: cranial blocks are filled on both sides of their underside and the flooring is assembled from antiseptic tongue-and-groove boards.
- Glassine paper, which is based on roofing cardboard impregnated with bitumen, is spread on top of the roll-up. Among modern materials, we can recommend a waterproofing membrane, the vapor transmission capacity of which is more than 800 g/m2. In addition to protecting against moisture, it will freely release steam from the insulation and allow wood floor elements to breathe.
- A layer of insulation is laid on top. Obviously, for thermal insulation of such a floor, breathable materials, such as mineral wool, are more suitable.
- The next step is to spread a vapor barrier film to protect the insulation from condensation.
Advice
The subsequent installation of sheets on the frame depends on the selected insulation. In the case of bulk materials, the sheathing is carried out with sheets from the doors to the windows, and in the opposite direction when using slabs.
Another technology
Roofing felt is laid on the foundation or frame. Pour a small amount of sand on top and level it. Polyethylene film is laid on top in several layers and secured to the base using a construction stapler. The next layer is laid penoplex. The slabs are placed in such a way that there are no gaps or grooves.
What you need to know about insulating frame houses with polystyrene foam
People who decide to insulate a frame house with foam plastic leave positive reviews of this material, but there are also opposing opinions. After reading the information about the dangers and benefits of polystyrene foam and watching the video on our website, you will draw the appropriate conclusions for yourself.
The thermal conductivity of expanded polystyrene from different manufacturers ranges from 0.028 to 0.05 W/m*K. For comparison, the thermal conductivity of reinforced concrete is 1.69, red brick is 0.56, and wood is from 0.1 to 0.23. In other words, 1 centimeter of polystyrene foam will help save as much heat as 7 centimeters of red brick.
Another important plus is minimal weight. The density of insulation produced using different technologies can range from 15 to 45 kilograms per cubic meter. This is one of the lowest indicators for building and finishing materials. Due to this lightness, there are usually no problems when transporting and installing polystyrene foam.
Some experts do not recommend using polystyrene foam for insulation, as it is flammable. In stores you can easily purchase fire retardants - special substances that can significantly reduce the flammability of the material. Their use makes it possible to use polystyrene foam without any fear of fire.
Fire retardant is a component added to materials of organic origin to provide fire protection
It performs well when used over a wide temperature range. Tests show that it can withstand sudden changes from -50 to +75 degrees Celsius without harm.
Thanks to this, a frame house with foam insulation is not only lightweight, but also has excellent thermophysical properties.
What to choose - polystyrene foam or basalt wool?
For wall insulation, foam plastic is suitable; for roof insulation, it is better to use mineral wool.
Mineral wool - insulation
Basalt wool was first produced artificially at the end of the nineteenth century. And it soon gained popularity among builders all over the world. Well, insulating a frame house with polystyrene foam is a relatively new achievement, which not all cottage owners trust.
Because of this, a question or even a dispute arises - which is better, polystyrene foam or basalt wool? This is a very serious question that would benefit from a detailed answer.
The most important indicator for thermal insulation material is thermal conductivity
The lower it is, the better. Products from different manufacturers, created using different technologies, may have slight deviations from the norm. But in general, the thermal conductivity of these materials is almost the same. In addition, both materials are lightweight. It is better to continue the comparison using other parameters, where the differences are more noticeable.
Let's look at the table from SP 31-105-2002
As we can see from the table, the minimum insulation thickness is 25 mm, both for polystyrene foam and other insulation materials with a strut pitch of 40 cm or 60 cm.
Expanded polystyrene is an easy material to install. It comes in dense slabs that can easily be laid on the wall of a frame house and can also be easily fixed using slats. Basalt wool has a loose structure, which can cause various difficulties during installation.
The atmosphere is always saturated with moisture. And porous substances tend to absorb this moisture. Sometimes this leads to very undesirable consequences. Therefore, it is imperative to pay attention to such an indicator as water absorption.
Basalt wool, depending on the manufacturer and brand, has a water absorption coefficient of 1 to 1.5%. At the same time, expanded polystyrene has the best indicator - about 0.4%.
That is, polystyrene foam, when in constant contact with water or simply used in humid air, will absorb significantly less moisture. This means that its thermal insulation characteristics will decrease slightly even with prolonged use. Alas, the same cannot be said about basalt wool.
Where does the installation of insulation begin?
Polystyrene foam as insulation
Before installation of foam plastic begins, the wall is carefully examined. If there are small cracks on it, they are carefully eliminated by filling with foam. The smallest gap can cause significant heat loss and drafts.
Foam insulation process
The foam is attached with special plastic dowels, they are also called umbrellas or mushrooms
Foam fasteners
Installation of waterproofing
To protect the base from wind, atmospheric moisture and precipitation, special waterproofing materials are used. Some experts believe that this step can be skipped when using polystyrene foam, since polystyrene foam practically does not absorb moisture. However, a millimeter gap between the insulation boards or minor damage to the thermal insulation layer is enough for moisture to get under the foam and settle on the frame. When the temperature drops below zero, moisture freezes, which often leads to the destruction of both walls and thermal insulation.
To prevent this from happening, insulating a frame house with penoplex should begin with waterproofing.
For this you can use various materials:
- Mastic;
- Polyethylene film;
- Glassine;
- Membrane coatings.
Each material has certain advantages and disadvantages that should be carefully studied to choose the most suitable one. But in any case, if sheet material is used, it must be laid with a significant overlap (at least 10 centimeters) of one row on top of another. After this, the joints are taped with a special tape.
Creating a subfloor
Next, when the most basic parts of the floors in a frame house have been assembled, you need to create a subfloor. For it you can buy unedged boards, OSB, plywood, etc. All joists are sewn up with it. This is where support bars come in handy if OSB is used as the material for the subfloor
It is important to remember that at this stage work related to insulation and waterproofing is carried out
Step 1. You need to put any thermal insulation material between the joists and lintels. This can be mineral wool, polystyrene foam, ecowool, perlite, etc. It is laid so that there is free space up to the edges of the joists - ventilation gaps are necessary.
Laying insulation
Step 2
At the same stage, it is important to carry out all basic communications. Otherwise it will be more difficult to make them later
Communications are also carried out at this stage
Step 3. Next, you need to lay a vapor barrier material on top of the insulation and secure it. It will protect the cake from moisture coming from outside the house, and will also allow excess moisture not to linger from the inside. Individual vapor barrier sheets must be laid overlapping each other, and the joints are fixed and connected to each other to ensure an optimal level of protection.
Laying vapor barrier
Step 4. After this, you need to lay OSB boards 3-3.5 cm thick. You can also lay regular boards. The gap between individual elements of sheet materials should be several millimeters (usually 2 mm). If this is not provided, the floor may deform over time.
Installation of OSB boards
Step 5. After this stage, you can decorate the finished floors.
Thermal insulation materials
The choice of insulation for a wooden house is based on two criteria: non-flammability and the ability to resist the formation of mold fungi and other microorganisms. But when choosing a material for lower insulation, the specific situation and the intended installation method are taken into account.
Before purchasing materials, it is better to consult with a contractor than to insulate the floor in a private house from below. Most often used:
Minvata
It is considered one of the best insulation materials, so many people prefer it. A plus is good sound insulation performance. Cotton wool is not subject to biological destruction and does not burn.
Cons: low mechanical strength and deterioration of thermal insulation properties when exposed to water or steam. Therefore, when using, special attention should be paid to vapor and waterproofing. Cotton wool can be presented in flexible rolls or dense slabs.
Mineral wool in slabs is often used for insulation on the basement side
On our website you can find contacts of construction companies that offer house insulation services. You can communicate directly with representatives by visiting the “Low-Rise Country” exhibition of houses.
Styrofoam
- another popular insulation material. Combines the good qualities of mineral wool and mechanical strength. But in case of possible fire it releases toxic substances. Thanks to its structure, it retains heat well and ensures minimal heat loss. Long service life eliminates the need for replacement, but the ability to absorb moisture may negatively affect some characteristics.