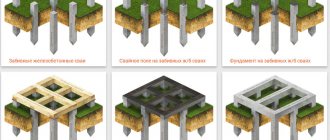
About the slab foundation
Slab foundation (monolithic) is a reinforced concrete slab installed around the perimeter of the structure, used in the construction of brick, frame and stone houses no higher than 2-3 floors, on weak soil foundations.
Monolithic foundations are most common in countries where a cold climate prevails and the soil freezes heavily in winter. The slab is laid under the entire area of the structure, thereby reducing the load on the soil; the foundation is a reliable platform and has high durability in the off-season. The second name for the foundation is floating due to the ability to sink and rise during periods of thaw and freezing, but you should not be afraid of this, this process occurs evenly and manifests itself only in non-buried platforms.
Which houses is it suitable for?
A monolithic foundation is a universal design, therefore it can be used for houses made of any material, any number of floors, complexity and size. However, the question arises about the rationality of using a slab foundation: if the soil allows it, and the structure itself is not heavy, then there is no point in using a monolithic slab.
It is advisable to use this type of foundation where there are good reasons for this:
- heavy weight of the structure;
- difficult soil;
- high number of storeys;
- A high-quality dry basement is required.
In all other cases, it is quite possible to get by with “little loss” by choosing a cheaper and simpler type of foundation. But this article will help you understand what kind of foundation is needed for an extension for a frame house.
On the video - for which houses a slab foundation is suitable:
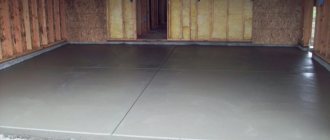
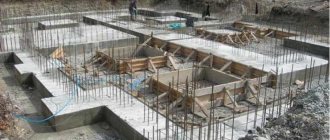
Slab base structure
Slab layers:
- Priming. Bottom of the pit.
- Compacted sand base.
- Geotextiles.
- Concrete preparation.
- Waterproofing.
- Monolithic concrete.
- Fittings.
Materials for building a foundation must have certain properties, especially concrete. Its strength should be from category M300, frost resistance from F200, water resistance from W8 and mobility P-3. The thickness of the slab foundation for light buildings can be 15 cm, and for private houses 25 cm. The first layer of the structure, after the soil, is a sand-crushed stone cushion; as a rule, it is 0.2–0.4 m in height. The slab cannot be installed without a sand base. The next condition is high-quality waterproofing; the foundation requires comprehensive protection from moisture. It is mounted overlapping on a sand cushion, the joints are sealed.
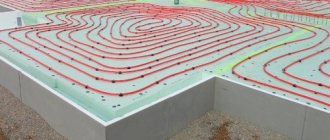
We reduce heat loss. It is recommended to insulate the foundation during the floor installation stage, under the screed, after pouring the base. There is also an option for sub-basement thermal protection, but it is only suitable for houses with summer residence. With such foundation insulation, thermal insulation is placed under a monolithic platform.
Advantages and disadvantages
Pros:
- Easy to carry out work; self-assembly of slab foundation base is possible
- High reliability.
- The load-bearing potential of the slab and its thickness are in an optimal ratio.
- Using a slab foundation as a subfloor or as a floor covering for the basement.
- Speed of work completion. Depends on the condition, if concrete is unloaded onto the site from a mixer truck.
As for the disadvantages, we can say that there is one and significant one - it’s not cheap, but the cost can be veiled. It depends on labor costs, such as additional labor-intensive installation of moisture protection. Selecting a level place on the construction site; the slab cannot be mounted on uneven surfaces. If the area is not level, then you have to level it manually or order special equipment. The reliability of the monolith fully compensates for all costs. If the house is frame, it will not be possible to move it, unlike a house installed on screw piles.
Disadvantages of a slab foundation
The slab foundation has its disadvantages, which are determined by the following parameters:
- When choosing this type of base, the duration of construction work increases, which means laying a waterproofing layer.
- To fill the base, it is necessary to form a perfectly flat area. In this case, the site area should not be winding, as this is not recommended for pouring this type of foundation.
- In this case, the costs of purchasing concrete mix and metal reinforcement increase.
Reinforcing mesh for a slab foundation
It is worth noting that considerable funds will be needed for construction work. However, the ease of implementation compensates for this drawback. If the slab foundation is made recessed, then its price can be determined by half the cost of the house, which is determined by the monolithic pouring of the base. In these conditions, it is necessary to purchase a huge amount of sand, crushed stone, concrete, and at the same time spend money on the use of special equipment.
Calculation of a monolithic slab and reinforcing frame
Any foundation requires calculations, a monolithic slab is no exception; this is the very first and very important point in the construction of a slab. It is not recommended to rely on the opinion of a neighbor who once built a slab foundation; it is better to entrust such important calculations, especially if you plan to build a house for living, to professionals. If you are going to build non-residential structures, you can resort to independent calculations. The main calculation parameter is the thickness of the slab. A monolith that is too thick will lead to unnecessary costs, and an insufficient thickness may not withstand the load.
Initially, in the calculations it is necessary to resort to soil analysis, this is done by specialists with a drilling rig.
With its help, you can assess the presence of top water, thickness, soil composition and subsequently use the data for foundation calculations. We take as a basis the optimal value of the specific pressure on the ground and the calculated value of the weight of the entire structure; it should be close to the optimal value with probable deviations of no more than 25%. If this indicator is exceeded, then the slab will begin to sink into the ground, if it is greatly reduced, then the foundation will warp at the slightest seasonal changes in the soil.
To calculate the thickness of the slab, it is necessary to determine the load of the building on the soil base, find the difference with the optimal pressure, cover the remainder with the mass of a monolithic slab, then using the specific density of the slab we calculate the volume, take our foundation area and determine the thickness. Keep in mind that it is necessary to leave the protrusion of the slab from the walls of the building at a distance equal to the thickness of the foundation, or more depending on the written project. To simplify the calculations, you can use the slab foundation calculator.
Let's consider the options:
- The most optimal thickness of a slab foundation is considered to be between 200 mm and 300 mm; this is the golden mean of price and quality.
- If the thickness of the monolith is more than 350 mm, then it turns out to be too expensive and it is easier to lay a different type of foundation (pile or strip), they are much cheaper and no less reliable. Or you can apply stiffeners to the slab and thereby reduce the thickness. In this case, it is strongly recommended to use the services of professional builders.
- When calculating a slab foundation using an online calculator, you may get a thickness result of less than 200 mm, and even a negative value. This means that the building you are going to build is much heavier than the site intended for construction. If it is not possible to change the building site, then it is necessary to choose the right reliable foundation; this can only be done with the help of highly qualified calculations by a group of professionals.
We decided on the thickness. We calculate the volume - multiply the area by the height to obtain the volume and add a reserve of about 10%.
Reinforcement of the most commonly used slab (200-300mm) occurs in two tiers, each mesh must be fixed at a distance of up to 50 mm from the edge of the slab. The distance between the rods should be from 20 cm, this distance can be compacted by adjusting the rods to the location of the load-bearing walls, it can be exceeded, but the excess should not be more than 1.5 times the thickness of the foundation. It is not necessary to fasten the rods by welding; it is better to do this with metal wire. We connect each reinforcement to each other with wire, the upper level with the lower, along the entire perimeter, is fastened with a U-shaped clamp, and we fix the stands along the area.
To more accurately calculate the amount of reinforcement, you can use an online calculator. Or calculate in your head - divide the length of the side of the foundation by the installation step of the rods, taking into account their length, and get the amount of reinforcement, also calculate by the width of the slab and multiply by the number of tiers. Don't forget to add about 10% reserve.
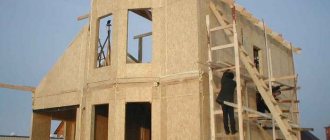
Do-it-yourself monolithic foundation slab for a house
The foundation is the fundamental element for any home. The service life of the building itself will ultimately depend on how competently, in compliance with numerous strict rules and regulations, the foundation of a residential building is made. There are many types of foundations that are used to build structures of different types and sizes. But one can hardly argue with the fact that the most reliable and durable foundation is the foundation slab.
The slab, monolithic base is suitable for the construction of almost any house - not only one-story, but also two-story. However, the cost of its construction by professionals is very high: sometimes the cost of work can amount to up to a third of the total cost of the entire building.
But if you are confident in your abilities and want to save money, if you follow all the rules, you can make a foundation slab with your own hands. For a house made of brick, aerated concrete, wood and other materials, this option will be more than appropriate.
Advantages of a slab foundation for a house:
- suitable for buildings of different number of floors (one-, two-story cottage, etc.), area, purpose, materials used in construction;
- optimal in houses where it is planned to build a basement;
- There will be no need to lay logs on the floor in the future: the finished floor can be made on a monolithic slab;
- the foundation of the house is strong, reliable, earthquake-resistant;
- the area and thickness of such a foundation for a residential building is large enough, the risk of being washed away by water is minimal;
- A tiled base is optimal in areas with difficult soil.
The slab for the base of the house can be made either flat or ribbed. It will be more difficult to create a ribbed one with your own hands, but its functional characteristics are somewhat better. The fact is that it is the ribbed slab that best withstands the loads that the building will exert on it. Therefore, for a large two-story house, you can choose this type of foundation.
To create such a foundation with your own hands, a system of ribs is initially poured, and then the slab itself. The space between the ribs of the base is filled with sand or a mixture of sand and gravel. If your soil conditions are not extremely difficult, and the building is to be built small or medium-sized, you should give preference to a flat monolithic slab.
Construction of the foundation. Stages of work execution
It is worth understanding that all the stages described are the basics and a unified scheme for constructing a slab foundation. Remember that each construction of a foundation has and will have its own nuances and pitfalls.
- Marking
- For more accurate marking, it is necessary to remove tall grass, bushes and debris. We set up the pegs and pull the rope to find out the position of all corners of the foundation. It is important that the corners are perfectly marked. - Pit
- We make markings on the site and dig a pit. We dig it to such a depth that the foundation protrudes slightly above the soil surface. You can calculate the depth using: the height of the sand cushion, adding it with a layer of thermal insulation, plus the height of the foundation. The width of the pit must be dug more than the width of the slab for more convenient installation of the insulated blind area and ring drainage. Additional installations in the form of an insulated blind area are of course not necessary, but if you are digging a pit using machinery, then it is better to do everything properly. - Leveling the bottom of the pit
- You can check the horizontal alignment using a laser or a water level, and you can level it with a shovel. There is no need to take the lowest point as a basis, take the middle one, sprinkle and compact the depressions, smooth out the remaining unevenness and vertical edges. After leveling, we set the markings of the monolithic slab on the bottom; the reinforcement should be higher than the pit so that the markings are visible after filling all the layers of the foundation. - Utilities
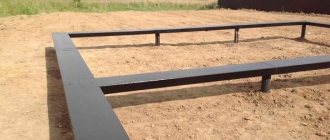
- If you plan to run water and sewer lines under the foundation, then you will need to dig trenches, secure the pipes at a slope, and cover the trench with sand. There is another way - to place the pipes in a sand cushion and bring the pipe with a plug out. - Formwork
- We install the formwork along the outer contours of the reinforcement, which are visible above the surface. The height should be equal to the height of the monolith, and the formwork can be made from ordinary boards. - Covering the layer of geotextile
- It is necessary to cover the entire pit to the edges, maintaining a gap of 30 cm between the sheets. Geotextiles will help the sand cushion remain in its original position and prevent the sand from being washed out, since the layer will separate the cushion from the ground and protect it during spring floods and prolonged rains. - Filling up sand
- Unloading sand with a dump truck is dangerous for the integrity of the pit walls; the only safe, albeit labor-intensive option is to transport sand using a wheelbarrow. The sand cushion must be filled in layers. The first layer needs to be spread up to 12 cm, and then thoroughly moistened to make the sand more dense and compacted using a vibrating plate (in order not to spend money on buying a vibrating plate, you can rent one). Maintain layer-by-layer filling of sand and its compaction until the required height of the sand cushion is reached. On average, the thickness of the pillow is 30 cm, depending on the soil. Be sure to check the quality of the sand and the reliability of the supplier, the sand must be clean and free of clay impurities, clay will not provide reliability and stability to your pillow. - Filling with crushed stone
- After filling with sand, it is necessary to make a layer of crushed stone with an average thickness of 15 cm, compact it horizontally and evenly with a vibrating plate. With good compaction, you can achieve strength almost equal to asphalt. - Waterproofing
- You can lay the waterproofing directly on the crushed stone, but it is more correct and to ensure that the crushed stone does not damage the waterproofing - use concrete preparation. Thus, we will ensure maximum sealing, high-quality leveling of surfaces and integrity of the waterproofing coating. This screed is applied in a layer of up to 7 cm. The waterproofing is laid overlapping each other up to 30 cm and overlapping the formwork, the joints are glued with mastic. - Thermal insulation
- Before installing the fittings, you need to take care of the durability of the slab and heat conservation in the house, but this is not necessary. It is necessary to tightly lay a layer of polystyrene foam on a horizontal surface and vertically on the walls of the formwork, fill the cracks with polyurethane foam. - Reinforcing frame
- We start from the bottom grid, at the selected step (the step was discussed earlier), lay out the reinforcement parallel to each other, the gap between the rods and the insulation should be at least 4 cm, you can use special stands. Subsequently, we lay out the reinforcement perpendicularly and tie the lattice with steel wire, also observing the spacing between the rods. We move on to the second level of reinforcement, secure the upper rods using spider stands, also called frogs, about two pieces per square meter and do the same as with the lower level. The overlap between the rods should be about 50 cm. - Pouring concrete
- pour in one go and comply with the requirements for the concrete mixture, see requirements above. The best thing is to bring an automixer. Simultaneously with pouring the concrete, the mixture must be distributed over the entire area using shovels and available means. To compact the mixture, you need to use a deep vibrator, since after pouring concrete, there may be air pores in the mixture, which result in reduced load-bearing capacity. To level the surface, the best solution would be to use a vibrating screed; it, like a deep vibrator, can be rented; this device will ensure the most even surface of the monolith and ideally compact the mixture. - Caring for the slab until it hardens completely
- During the first 24 hours, it is necessary to protect the slab from rain, and after 24 hours, water it generously with water to prevent drying out; this is necessary in order to improve the formation of concrete. After 10-15 days, depending on the weather, it will be possible to dismantle the formwork, and after a month it will be possible to begin building the house.
Creating a foundation with your own hands: the main stages of work
Step 1. Preparing the soil base. The relief of the area where the foundation will be created is leveled, soil is added, and then it is carefully compacted with a vibrating platform.
Step 2. Marking - the optimal thickness of the base, its length, and width are determined. The soil is removed to a depth of about 30 cm, and a so-called “trough” is created for the upcoming pouring.
Step 3. After the thickness of the future foundation has been ensured, the bottom of the resulting “trough” is covered with a special material - geotextile. It perfectly holds a backfill of sand and crushed stone, and at the same time does not allow water to pass through. In order for better drainage, main trenches are installed under the resulting depression. The resulting drainage trenches are also lined with geotextiles. Plastic corrugated pipes are laid in the crushed stone bed for drainage; they will discharge water into drainage trenches.
Step 4. After laying the special geotextile material, a sand-crushed stone mixture is poured into the “trough”. The surface is spilled with water and again compacted well using a vibrating platform. Waterproofing material is laid on top of the resulting crushed stone cushion. The best option is polyethylene (its thickness should be large enough). Then extruded polystyrene foam is laid.
Step 5. Assembling the formwork.
If you do this work with your own hands, please note: it is also advisable to cover the formwork with a layer of polyethylene: in the future, this will avoid such problems as “leakage” of concrete milk, which means that the pouring process will be much easier and faster.
You can use permanent formwork made of polystyrene foam; it is excellent for constructing an insulated base, the thickness of which is up to 25 cm, as well as for arranging a “warm” blind area around a residential building.
In order to install the reinforcing mesh with your own hands, you will need a special crowbar, and you will also need to use a jack. It is important that there is a minimum number of reinforcement connections in the slab - the fewer, the more reliable the binding will be.
Step 7. We reinforce the end ends of the monolithic slab with special elements in the shape of the letter “P”. They connect two levels of reinforcement with each other. When doing reinforcement with your own hands, the minimum length of such elements is determined by a simple formula: the thickness of the slab multiplied by two. Transverse “U-shaped” reinforcement (clamp) is placed at the end sections of the slab.
Step 8. We reinforce the foundation slab: install additional reinforcement on columns, walls and supports. In order to reduce the consumption of reinforcement, it is possible to make minimal reinforcement over the entire area of the slab (as required by building codes and regulations), and in those areas where the load is maximum, install additional reinforcement. True, in this case the work will be more labor-intensive. Particular emphasis is placed on the reinforcement of each internal corner in the slabs, as well as on the reinforcement of openings in the slab.
Step 9. Fill the monolithic slab. For this you will need concrete grade M350-M450. Concrete with good water resistance, at least W6, should be used. Concrete is supplied to the site from a mixer along a tray, and it is first spread onto the far side of the base and after that the near edges are concreted. If you do this work with your own hands, find helpers: several people should do the pouring. One deals with the distribution of concrete, the other processes the supplied mixture using a special deep vibrator. This ensures uniform thickness of the base and high-quality penetration of the concrete mixture throughout the entire volume of the foundation slab. The surface is thus leveled and air bubbles are eliminated.
Step 10. After the work is completed, you need to let the concrete set and the next day thoroughly water the slab with plenty of water. If you create a tiled foundation with your own hands in hot weather, you should definitely cover the base with thick plastic film - this will prevent cracking of the surface.
Work on the construction of the building can be continued when the concrete gains at least seventy percent strength. If the ambient temperature both during the day and at the exact time does not fall below 20 degrees Celsius, it is necessary to leave the foundation for 10 days, and at a temperature of no more than 10 degrees Celsius you will have to wait twice as long - 20 days.
By giving preference to a slab foundation, you provide a reliable foundation for a one-story or two-story cottage. Carry out all the work in accordance with the rules, use high-quality materials, and your home will indeed become a real fortress for you!