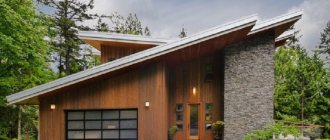
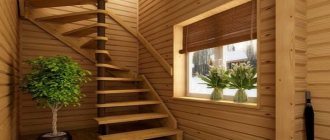
There are many amateurs who want to build a country house with their own hands. A desire that deserves respect. But not all of them are professional builders. A house is a rather complex structure that must satisfy many requirements: architectural, technical, environmental, legal. And you need to be fluent in using various tools. A novice builder is bound to make a lot of mistakes from the very beginning and put something off for later. Then mistakes have to be corrected and shortcomings have to be completed. Someone decided to quickly build a roof without finishing the box. The installation of the floors was postponed until next season. And at the same time, the question arose - if there is no ceiling under the roof, how to properly strengthen the rafters?
When is it beneficial to rest rafters on beams?
Of course, building a roof with a Mauerlat is more understandable and logical, because This method has been practiced for a very long time and has been studied, but you need to study the support of rafters on beams, and you will not find as much useful information as our website provides anywhere.
But when is such a rafter system needed and why such difficulties, you ask? Look, the approach is indispensable when:
- the construction site has rather fragile walls and it is difficult to lay the mauerlat on them;
- the roof of an old house is being rebuilt, but the bench is already old;
- the rafter system is quite complex and it requires intermediate supports, but there are none inside the house;
- for someone who is building a house, this method in itself seems more acceptable.
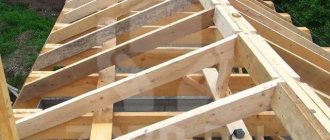
And it’s hard to imagine a real mansard roof without supporting the rafters directly on the beams outside the walls:
Convinced? Believe me, this technology has as many advantages as the classic one.
What are the rafters made of?
What to make rafters from
Beam attachment point
Most often, rafters are made of coniferous wood. This is a relatively inexpensive, fairly durable and easy to process material.
If you make your own rafters, it is best to use timber with a section of 10x10 or 15x15 cm.
Also, when choosing wood, you need to pay attention to its moisture content. The maximum allowable rate is 20%. At higher values, the material will shrink, which will lead to disruption of the configuration of the entire roofing system.
Video - Roof construction mistakes
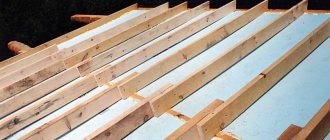
How to create a reliable foundation for rafters?
The first step you need to take is to build a solid foundation for these rafters. For example, if the floor beams do not have any support (at least in the form of an intermediate wall of the house), then the trusses on it need to be organized only according to the hanging principle. If there is support, the rafters can be safely supported directly on the beam without any auxiliary elements.
In simple terms, if the beam in the attic floor is installed securely and has its own supports, then rafters can be installed on it, and if all this is missing, then it makes sense to firmly connect the rafters to the beams themselves and hang them as a single system. Otherwise, before building the roof, you need to support the beams from inside the room, for which there are three different construction methods:
- The simplest classic support consists of a tie, one support beam and struts. The puff is suspended in the middle. Such suspension systems are used today most often for large spans.
- double support consists of a tie, hangers, two struts and a crossbar, which serves as a spacer between the boards.
- There is even a triple post, which is a separate three hanging system, or one double hanging system and one single hanging system. This is already a complex rafter system.
This is what such systems look like:
Ideally, you can also calculate such beams for deflection and tension, to what extent they are ready to support the entire roof. There are special online calculators and formulas for this, although it will also be enough to invite an experienced carpenter for your own peace of mind.
Methods for connecting rafters to beams
So you have two main options:
- First install the floor beams, mounting them into the walls, thereby creating a layered rafter system.
- Assemble the rafter trusses on the ground and lift them to the roof ready-made, while the bottom tightening of the trusses will simultaneously serve as a support-beam for the future attic floor.
Each of these methods has its pros and cons, but the methods of fastening are different - for trusses it is usually fastened with metal or wooden plates, and for assembly on the roof - chipping and tenoning.
Hanging rafters: tie and beam in one role
If we are talking about a small construction project, such as a garage, a bathhouse or a change house, then it is enough to simply make roof trusses on the ground, and only then lift them onto the walls of the building, securing them to special Mauerlat pins. Here, the floor beams are an integral part of the trusses themselves, and this is the case when the tie in the truss also serves as a support for the attic floor.
Here's how it works in practice:
But about the options when the rafters rest on the floor beams, and do not create a single system with them, we will now look in more detail.
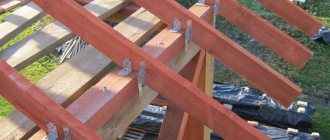
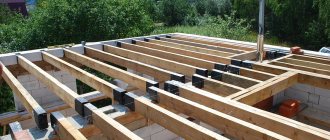
Layered rafters: support on beams at several points
Here is a modern master class in building a classic attic roof, in which the rafters are supported on floor beams directly on the roof, rather than building trusses on the ground:
Here, the floor beams are no longer part of a single rafter truss, but an independent element on which the entire rafter system rests. Moreover, the support occurs not only on the sides of the beam, but along its entire length.
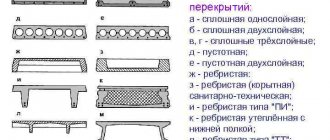
Fastening parts
Wooden and metal parts are used for the installation of rafter systems. The first include: block, triangle and dowel, etc. Metal in fastener parts is quite widely represented: nails, angles, bolts and screws, clamps and brackets. As well as special devices for installing rafters, which are called “sleds”.
W.B.
Fastenings of this kind are used during installation work on load-bearing floor beams during the construction of wooden buildings. Their main advantages: no cutting into the beams themselves is required, and fastening is carried out using bolts with screws of large nails.
How to install rafter legs on floor beams?
Once the floor beams are ready for the rafters to be installed on them, proceed to fabricate the rest of the structure and connect the rafters to the beams.
To connect the rafter leg to the beam, its end is cut at the desired angle, or a more complex cut into tenons is made. Let's look at both of these options.
Connection of rafters with beams without cutting
You can do without cutting if you use fasteners later - this is a normal solution. So, to make a simple cut on the rafters, make a template:
- Step 1: Take a building square and place it on the board.
- Step 2: Mark the cut location at the top of the rafter.
- Step 3: Using a wood protractor, draw a line parallel to the first saw across the rafter. This line will help you determine the line from the weight on the edge of the building.
Here's what it looks like in practice:
Making such rafters is much easier than for cutting. The main thing is to correctly determine the angle of the roof and the correct location for the future cut:
As a result, in real life such a design looks like this on a gable roof:
Types of cutting a rafter leg into a floor beam
The mounting configuration itself depends more on the angle of inclination of the slope. For example, for a roof with steep slopes, where the snow load is small, you can use a single-tooth mount. With the single tooth method, additional tenons are often made to help the rafters not move under loads. And for such a spike you will already need a nest in the beam.
But, you probably know that any such places can weaken the beam, and therefore their depth should be no more than 1/4 the thickness of the beam and no closer than 20 cm from the edge of the beam (to avoid chipping).
But if you have a roof with a slope of less than 35 degrees, then it makes sense to use a double tooth, because such fastening allows you to achieve high strength of the joints. As in the previous version, you can add two spikes.
With this method, each tooth can have the same or different depth. For example, you can cut the first tooth only 1/3 of the thickness of the support beam, and the second - half:
The bottom line is that two rafter legs in a structure supported by beams are secured with a tie. But, if the ends of these legs slide, then the integrity of the tightening will be quickly compromised. To prevent such sliding, it is necessary to insert, or rather, cut into, the rafter leg into the very tightening with the help of a tooth - with or without a spike.
In the process of cutting the rafters into the end of the tie, you need to move the tooth as far as possible. If you need to strengthen the fastening of such rafters, then use a double tooth. Another point: the teeth themselves can be of different sizes.
And finally, it is advisable to fasten the end of the rafter legs with twisted wire so that the wind cannot tear off such a roof. As a wire, it is better to take galvanized wire, and fasten it with one end to the rafter leg, and the other to a crutch, which is first laid in the masonry of the wall at a distance of 30-35 cm from the top edge.
Here is a good example of a neat cut-in rafter, which at the same time serves as a floor beam already in a hipped roof:
Metal fasteners for such a unit are still necessary, because the notch itself cannot support the rafter legs under load.
Construction of a gable roof step by step
Installation of the Mauerlat of a gable roof
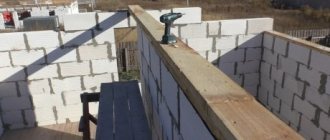
The Mauerlat takes on the entire load from the roof and transfers it to the walls, so a fairly thick and strong beam is chosen as the Mauerlat.
The thickness is chosen based on the thickness of the wall on which it rests. As a rule, they tend to choose the thickness of the mauerlat beam equal to or close to the thickness of the wall. The Mauerlat must be laid flush with the outer part of the wall, firmly connecting them together. To connect the Mauerlat to the wall, anchor bolts or wire are laid (poured into the reinforced belt) even at the stage of wall construction. If wire is used as fastening, then after laying the timber it is tightly tied with this wire around and remains firmly fixed in this form. If anchor bolts were walled into the wall, through holes are pre-drilled in the mauerlat, with which the beam is placed on the bolts and tightened from above with nuts and wide washers.
It is also important not to forget to lay a layer of waterproofing material in the form of a gasket between the wall and the Mauerlat. As a rule, roofing felt or similar materials are used as waterproofing.
More information about securing the mauerat is described in this video.
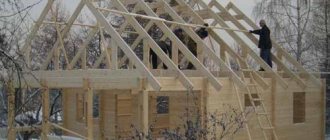
Installation of gable roof rafters
After the base has been prepared, we begin to assemble the rafter system of the gable roof. Installation of rafters can be done in several ways: install the rafters directly on the roof or perform some structural elements on the ground and then lift them to the installation site using special equipment. Correctly placing the rafters on a gable roof with your own hands without the help of a partner is quite problematic, so it is better to get help so as not to make a mistake and not nullify all your efforts.
To make it easier to attach the beams, it is worth marking the attachment points on each wall and connecting the opposite walls with beams (beams), on which racks will be installed to support the rafters. A ridge beam is installed on the racks, which serves as a guide for installing the rafter system. In order to connect the rafters as accurately as possible so that the entire skeleton of the rafters is the same, templates are used. This way you can avoid dips and distortions in the roof.
After installing the ridge beam, proceed to the most important part - the installation of rafters (already fastened together or separately)
It is important to constantly monitor the level and evenness of the installation. The rafters are fastened together, usually with nails or using iron staples.
Common schemes for placing rafters on a gable roof and attaching them to each other are shown in the figure below.
After completing the roof frame, it is necessary to install auxiliary fasteners to improve the rigidity of the roof. To do this, install struts and middle skates.
We invite you to watch a video that clearly shows how to install rafters with your own hands for a gable roof.
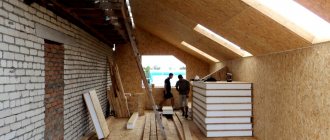
Gable roof sheathing
Sheathing a gable roof in the simplest case involves installing transverse boards on the rafters for laying roofing material on it. But, as a rule, modern roofing is a more complex pie of various layers.
After installing the sheathing, the roof is covered with a layer of waterproofing, the layers of which are mounted overlapping each other, and the joints are fastened with tape.
The next step is to secure the counter-lattice - strips fixed at an angle of 90 degrees to the main sheathing. This is necessary to provide a ventilated gap in the roof pie to get rid of moisture.
At the final stage of installation of a gable roof, the roofing covering is laid, the choice of which, as mentioned at the beginning of the article, depends on several factors, including the financial component
External work on installing the roof ends with filing the eaves and arranging the gables, if they are not part of the walls. After this, they move on to interior finishing work and roof insulation, if necessary. We will talk in detail about roof insulation in the following articles.
It is worth noting that building a gable roof with your own hands is not so difficult, the main thing is to make the calculations correctly and follow the instructions step by step so as not to miss important points during installation.
A brief video instruction on installing a gable roof is presented in the video:
Types of fasteners for nodal connections with a beam
Let's look at ways to connect the rafters to the floor beam:
One of the most reliable is a bolted connection, which uses a set of bolt, nut and washer. So, do everything step by step:
- Step 1. At the protruding end of the beam on its back side, make a triangular cutout so that its hypotenuse is at an angle the same as the angle of the rafters.
- Step 2. Saw the lower part of the rafter leg at the same angle.
- Step 3. Install the rafters directly onto the beam and secure with nails.
- Step 4: Now shoot a through hole for the bolt.
- Step 5. Place the bolt and secure the assembly with a nut.
Another quite acceptable option is to secure the rafter and beam with special metal fasteners:
And here is an example of making wooden fasteners for the same unit:
If possible, secure such rafters to the beams with forged wire on a special anchor that is mounted into the wall.
Recommendations for strengthening rafter systems from the inside
The question of how to strengthen the rafters arises in cases where it is necessary to eliminate defects in wooden structures that appear as a result of natural wear or loss of rigidity of the wooden frame and damage to its individual elements. As a rule, the rafter legs are the first to undergo deformation and begin to bend. This phenomenon can occur if, during the construction of a house or garage, the installation of gable roof rafters on a log house was not carried out according to all the rules.
The junction of the rafter legs with the roof ridge beam is one of the most important. If the slightest deviations are detected, the roof rafters should be strengthened in this place as quickly as possible. Sometimes a jack is used to tighten the rafters to the purlin or to each other. After this, the joint is properly strengthened with a perforated metal strip or a wooden overlay with a thickness of 2 cm. Such an overlay is installed under the ridge.
At the next stage, they move on to leveling the rafters. A hydraulic cylinder is used for this. Before strengthening the rafters and leveling them, triangular wooden stops are attached to them from the inside with self-tapping screws. After installing them, you can straighten the rafter leg with a hydraulic cylinder and install a spacer, which in the future will protect the roof frame from external loads.
The holes should be drilled with an indentation of 30-50 cm in a checkerboard pattern. Thus, an increase in the resistance of the frame to bending forces is achieved. The cross-section of holes and mounting studs must match. Threaded studs are threaded into the prepared holes, washers are put on and self-tightening nuts are tightened. They will ensure high-quality fastening and operation of the roof without the need to tighten the fasteners. You need to tighten the nut until the characteristic creaking sound of wood appears.
Additional “chair” structure for supporting rafters on beams
Sometimes installing rafters on floor beams is a rather complicated undertaking, in which the beams themselves serve 100% as support for the entire roof, and it is important to do all this as competently as possible.
In order for the rafter itself to be sufficiently strong and reliable in practice, the so-called “chair” is used as supporting elements. These are the rafter parts that connect all the elements, and in cross-section it really all looks like four legs of a stool:
Essentially, the “chair” is the struts that support the girder to its full height. Those. such a “chair” usually contains vertical posts, inclined posts and short struts. With its lower end of the stand, the chair is cut into the lower chord of the rafter system or lies perpendicular, or immediately into the floor beams. There are also different types of such chairs, depending on whether they rest on purlins or directly on the rafters.
Here's a good example from this series:
But this is an example of an unusual design of a rafter system, in which the rafters themselves rest on the floor beams both along and across, and the structure of the so-called support chairs is clearly visible:
Mounting methods
Sliding joint (swivel)
It is clear that, by definition, a Mauerlat is a structural element rigidly fixed to the wall of a house. This means that the “leg” must have a certain degree of freedom. This method is most often used when arranging the rafter system of wooden houses.
In such buildings, the role of the Mauerlat is played by the upper crown. Consequently, the workpiece (timber or log) laid in the last row will also be mobile to some extent, since shrinkage of the material necessarily occurs. This fastening allows you to balance changes in the geometry of the workpieces and protects the structure from destruction.
Gash
With this method, a figured cutout is made in the rafters, and the connection to the Mauerlat is made using:
- staples;
- 2 nails. They are driven in at an angle on both sides of the leg;
- metal plates, which are fixed with screws or nails;
- a vertically driven nail that passes through the leg and penetrates the Mauerlat;
“Release” of the leg outside the perimeter of the house. Bonding is done with plates.
Fastening with special “sleds”.
“Rigid” connection
The purpose of such a joint is to eliminate the possibility of twisting, bending of the part or its displacement. But the peculiarity of this method is that the upper part of the rafter leg is not fixed to the ridge span. A connecting jumper is made between the rafters at the top.
- Cutout in rafter leg.
- Corner with additional installation of a support bar.
Any of the above are used as fastening elements, depending on the ease of their use.
https://youtube.com/watch?v=n41HnMb7zTU
Practical advice
When fastening the rafter legs to the Mauerlat, maximum tightness must be ensured. If cracks form, it is not allowed to make “linings”, as they can become deformed over time, which will disrupt the stability of the structure.
When using bolts, washers must be installed on both sides (under the head and nut). The fastening must be comprehensive. You cannot use nails (or self-tapping screws) alone, as the reliability of such a connection will be in question.
It is necessary to take into account the intended type of roofing material. For tiles or “soft” roofs, it is advisable to use a sliding fastening.
Given the large selection of various fasteners, you need to focus on the ease of their use in each specific location.
Combined system: alternating supported rafters
Today, this version of the roof is also practiced, which consists of several especially strong trusses located at a distance of 3-5 meters from each other, and the gap between them is filled with construction pairs.
In simple terms, several powerful main trusses, two or three, are installed on the roof, and they support the entire run. And already in the space between the main trusses, ordinary rafters rest on such purlins, according to a simpler scheme.
Those. here, not all rafters rest on the floor beams, but only some, and the rest rest on the mauerlat. This way the entire load is perfectly distributed! And the concept of such a system is simple: the main trusses are made according to the hanging rafters scheme, and the secondary rafter legs are made according to the layered principle, relying only on the beam:
In fact, the whole secret of such a combined system is that here the layered rafters are laid directly on the triangular hinged arches. In this cunning way, bending stresses completely disappear from hanging rafters, and only tensile stresses remain. And this suggests that here it is possible to significantly reduce the cross-section of the rafter elements. In other words – save money!
As you probably already guessed, in your case, the method of supporting the rafters on the floor beams will depend on what kind of object you are building: a garage, a bathhouse, a country house or an entire country complex. In any case, all these methods have been tested, are actively used in practice today and deserve attention no less than the more familiar use of the classic Mauerlat.