Facade preparation.
Before installing the siding, all façade finishing work is completed. All the seams in the chopped walls are caulked. All unnecessary nails are pulled out from the walls, drainpipes and other hanging “extra” elements that will interfere with installation are removed. Remove trim from window and door openings. Rotten and broken boards are replaced with new ones. All loose structures are secured. If necessary, arrange thermal insulation.
Find out from our article: Which thermal insulation to choose for the facade of a house
Installation of finishing strips
The finishing strip is also very important in the installation of siding - it secures the top strip. This is done as follows. The distance of the finishing strip from the last panel is calculated. The strip is bent in an arc and inserted into the finishing strip.
Sometimes it happens that the edge of a panel has to be cut off - if the number of panels is not a multiple of the surface being coated. In this case, it is recommended to cover the cutting area with some decorative element.
The same applies to side panels. This situation occurs especially often when finishing the roof facade.
In general, like any type of finishing, facade cladding is a creative matter and here you can use any methods that preserve the aesthetics of the cladding.
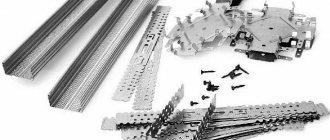
Lathing device.
In a house with frame walls, you can do without lathing, but only if the corners and surfaces of the walls are perfectly smooth, which does not happen often. On uneven frame wooden, as well as stone and block walls, sheathing must be installed. Please note: “flat surface” does not mean “vertical”. It's not the same thing. Siding can be installed on either a vertical or an inclined wall. It’s just more convenient to cover vertical surfaces. However, the main thing is that the walls are without bulges and depressions. They must be even throughout their entire plane. For lathing under vinyl siding, take dry wood with a moisture content in the range of 12 - 14%. A tree that is too wet will dry out over time, the sheathing will warp, and the covering will slide off along with it.
Typically, the sheathing is made from bars with a cross-section of 25 (30, 40, 50) × 60 mm. A galvanized plasterboard profile of the same width is also suitable for these purposes. Wood must be treated with antiseptics and fire retardants. Drywall does not require impregnation.
60 mm is the optimal width of the lath, at which the fastening falls exactly into the middle of the beam. With narrower slats, problems may arise.
There are problems: not all fasteners will fall into the middle of the block. If for some reason narrow slats are installed, the panels will have to be modified. In problem areas, the holes on the flange must be lengthened using a cutter or drill. You can use another suitable tool. The sheathing boards should be wide enough to hold the siding fasteners no matter how the panels are placed.
Find out from our article: what to use when constructing a façade: wind protection or vapor barrier
The lathing is installed around the perimeter of the walls, on the gables of the roofs, as well as along the perimeter of all existing holes and openings (windows, doors, niches, etc.). However, it is not recommended to nail the lower horizontal boards in the “frame” of the sheathing, as these bars will impede air exchange. Thus, along the perimeter, the lathing should have the shape not of a quadrangle, but of the letter P. Between the “frame” bars, intermediate laths are stuffed at a distance of 20 - 40 cm from each other. The standard step width is 40 cm, but in areas with strong winds it is reduced to 20 cm.
If the siding panels are supposed to be placed vertically, then the battens are filled horizontally, and vice versa: if the siding panels are placed horizontally, the battens are placed vertically. Options for the location of laths: a) horizontal laths for vertical installation of siding; b) vertical slats for horizontal installation of siding; c) cords for installing the sheathing between the corners; d) perimeter lathing around the windows First, the corner laths are attached. Cords are pulled between them, which serve as guides for attaching the remaining lathing. Usually the distance between the lath and the wall is set using direct hangers. Other fastening methods, such as wooden leveling pads, can also be used. It is important that the slats do not deviate from the vertical position. To check, use building levels or plumb lines and cords.
Installation of starting strips. After installing the installation, this is the second important step that affects the appearance of the skin.
Imagine that you need to draw a rectangle, and then shade it with parallel horizontal lines from bottom to top. The bottom outline of the rectangle will serve as reference points for the hatch lines. If the contour is curved, then all the shading will “move” away from the horizontal axis. The closer to the top contour, the more noticeable it will be. It's the same with siding. The starting panel is the bottom outline of the “rectangle”. If it deviates from the horizontal axis, the entire skin will be skewed. First, use a water level to determine the lowest level of the starting panel of the old siding or other cladding that the house had. They retreat upward 4–5 cm from it and drive a nail shallowly into this point. The second corner on the wall is marked in the same way. A cord rubbed with chalk is pulled between the nails. It is pulled back and then released, shooting like a slingshot. Having hit the wall, the cord will leave an imprint on it - a straight horizontal line. Checking the water level, mark the installation line for the starting profile along the entire perimeter of the house. If everything is done correctly, you will return to the starting point, of course, at the same level at which the first nail was driven in. A corner profile is applied to each corner and notches are applied to the sheathing where the edges of the nail strips of the corner profile will be located. 6 mm extend horizontally from these notches along a cord stretched between the nails. Here the starting strip profiles are attached to the sheathing.
If the starting strip is not installed strictly horizontally, the entire casing turns out to be skewed. Trying to fix the situation is useless. Sometimes the ends of the row panels are trimmed and the siding is stretched. However, this is not a solution: after some time, the casing will still warp.
The key point in installation is determining the size of the temperature gap. This applies primarily to vinyl siding, since such panels have an extremely high coefficient of thermal expansion. Vinyl siding panels must be installed so that nothing prevents their size from changing under the influence of temperature. In hot weather, the panels should have room to extend and not rest against anything. Otherwise, the casing will rise. In the cold, the vinyl should shrink freely, nothing should hold the panels, otherwise they will burst.
The coefficient of thermal expansion should be indicated on the siding packaging. You can rely on the following rule: an ordinary vinyl panel 3 m long, installed at an air temperature of 5 ° C, in the summer can increase in length by 10 - 12 mm. A temperature gap of 10–12 mm is left between the starting panels. They should not rest against the nail strip of the corner profile, and the corner profiles themselves should not rest against each other. Another option is not to make an indent between the starting panel and the nail strip of the corner profile, but to trim the nail strip itself. Having decreased in size, it will not rest against the starting profile, and during thermal expansion it will not bend the corner profile. 4. Installation of external corner profiles.
First, the cornice soffits are installed, or at least the location for their installation is marked. If the length of the corner profile is greater than the height of the wall, a length equal to the height of the wall corner plus 3 mm is measured on the profile. The marked profile is applied to the corner, set back 3 m from the soffits or roof eaves and secured to the top of the upper nail hole on both sides of the corner.
The profile will hang on two nails in a vertical position. There will be 3mm between its top end and the roof eaves. The lower end of the corner profile will be located 6 mm below the starting strip.
A special case is the cladding of houses with protruding plinths or structures that do not allow the installation of the corner profile described above to be used. This happens, for example, when tiling verandas. In these circumstances, the corner profile is trimmed so that it becomes less than the length of the corner itself. A gap of 3 mm is left between the upper edge of the profile and the cornice. The lower end of the profile is cut so that 6 mm remains between it and the base (floor or other obstacle).
Having figured out the length of the profile, it is finally attached to the wall. First, check the vertical position of the corner profile. If it does not deviate from the vertical axis, nails are driven into the centers of the nail holes or screws are screwed in. The fasteners are installed at a distance of 25–40 cm from each other. They are not recessed to the limit, so as not to interfere with the change in profile dimensions under the influence of heat and cold. If the wall angle is higher than the length of the vinyl corner profile, then install two profiles end-to-end. Corner profiles must be joined at the same level at all corners of the house. To achieve this, take metal scissors and cut off the nail strip on the upper corner profile along with the curly elements of the profile. Only two flat stripes are left on the profile. They form an angle. First, the lower of the two joining profiles is fastened, then the second is installed on top of it. The distance between the nail strips of the profile must be at least 9 mm, and the overlap of the panels must be at least 25 mm. Thanks to this placement, rain or snow will not get into the joint. The original corner profile can be replaced with two J-profiles. This option allows you to save on the purchase of components. However, under the J-profile it is necessary to lay waterproofing from a strip of rolled material. Otherwise, the corner will be poorly protected from moisture and other adverse environmental factors.
About siding
By and large, siding is almost any external cladding, if translated from the original language, but in the middle of the last century, Americans called this polymer decorative panels that imitate natural wood, developed at one of the factories. Initially, siding was made only from polyvinyl chloride (PVC), later metal and fiber cement siding appeared. But it is PVC siding, abbreviated as vinyl, that has been and remains the most popular facing material.
Vinyl siding is produced by the extrusion method - the molten polymer mass is forced through a molding hole, obtaining a blank with certain dimensions. At the next stage, the desired profile and texture are formed. Depending on the specific technology, coloring pigments are added directly to the mass, or a decorative protective coating is applied to the workpiece. The output is stacked panels with perforations for fasteners and a locking connection for fixing the planks to each other. In addition to the panels themselves, they produce various mounting strips and decorative and functional elements.
PVC, which is the basis of the cladding, is an environmentally friendly material that does not emit harmful substances into the environment during operation.
Modifying additives used by manufacturers to improve the properties of siding are also safe components. The popularity of vinyl siding is due to its technical and operational characteristics.
Alexey Zaretsky technical expert at HOLZPLAST
All products are characterized by increased frost resistance, resistance to fire, pollution, negative environmental influences, pests and pathogenic microflora. This makes it possible to use plastic cladding panels in the most severe climatic conditions. During the production process, only environmentally friendly materials and the most modern technologies are used, ensuring the highest level of reliability.
As for durability, the warranty on some vinyl siding collections today can be up to fifty years, with the preservation of basic properties.
But, despite the fact that manufacturers claim that all characteristics are preserved for the entire service life, the most doubtful thing is the resistance to fading, especially when it comes to dark colors.
Lotime FORUMHOUSE user
We want to cover the dacha with siding; we really like dark colors: dark green or dark red. Many manufacturers offer them, but it’s scary to buy them, they are more expensive than light colors, but I don’t know yet how they behave in long-term use. I re-read the forum threads, but did not find any relevant reviews. I'm interested in whether the color will remain, whether it will fade. I would really like to know how dark colors actually show up over time.
Alexey Zaretsky
Yes, it is true that dark siding colors, such as dark green, dark red and dark brown, are more expensive than light colors. The outer layer of this siding is made using acrylic polymer. This siding practically does not fade in the sun. Colors remain vibrant throughout use. The coating is less deformed by temperature changes and has an increased service life - more than 50 years. That's why this kind of siding costs more.
There are situations when owners of siding facades think about the possibility of painting.
NikVik77 FORUMHOUSE user
I'll describe the situation. I purchased an unfinished cottage with vinyl siding on the façade. The previous owner did not hesitate and made it all one color - the house is quite large, and this color scheme looks pale and uninteresting. I would like to fix this issue by making the corners and frames of windows and doors match the color of the roof. Dismantling the façade to replace these elements with colored ones is wasteful. So the question is: is it possible to paint siding (car bumpers, dashboards, etc. seem to be painted) so that it’s reliable and doesn’t peel off in a season or two?
zheka45 User FORUMHOUSE
I’ll raise the topic, there is a need to paint the siding, anyone with experience can share, I believe it’s possible. Once I stepped on spilled façade paint; the soles did not wash off for a very long time, taking into account the fact that the shoes were autumn-winter.
Alexey Zaretsky
If we are talking directly about vinyl siding and near-window elements, also made of PVC, then vinyl siding can be painted. The PVC material from which siding panels and components are made has a high degree of adhesion. In other words, there is a strong adhesion between the decorative coating and the painted surface of the siding. It is important to consider that not every paint is suitable for use. Vinyl siding can only be painted with water-based acrylic paint or solvent-based paints. Be sure to prepare the surface for applying paint and varnish material. Unfortunately, it is impossible to say for sure how long such a decorative coating will last. Because there are a lot of factors that influence this: the degree of preparation of the surface for painting, the quality of the chosen paint, the physical condition of the surface and much more.
However, the specialist emphasizes that manufacturers do not recommend painting vinyl siding and accessories. Still, it is better to purchase the necessary products in the color that interests you. You can make a preliminary calculation; perhaps the costs will not be as high as it seems. And in this case, you won’t have to worry about color fastness, since during factory production the color of the future siding is added to the mass, from which vinyl siding and accessories are then made.
Installation of internal corner profiles
The principles for installing internal corner profiles are similar to those used when installing external ones. The corner profile is shortened to the required length so that a 3 mm temperature gap remains between the end of the panel and the cornice (soffit). The lower edge of the inner corner profile should be located 6 mm below the level of the edge of the starting strip. If installation is hindered by the floor, plinth or other obstacle, the profile is raised 6 mm upward. If the height of the wall is greater than the length of the profile, take two parts and mount them overlapping each other. A gap of at least 9 mm is left between the nail strips. The upper profile is inserted onto the lower one by 25 mm. Nails or screws are placed in increments of about 40 cm. The fasteners are inserted into the center of the holes. The top nails are attached to the top edge of the nail hole. The original internal corner profiles, as well as the external ones, can be replaced with two J-profiles. Moreover, even one J-profile can be used to finish internal corners.
Installation Tips
Siding of wooden houses is not carried out in two cases:
- if the house is new;
- if the wood is damp.
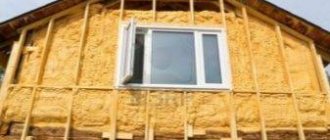
At the initial stage of installation, the J-profile and the initial profile are installed, as well as the external and external corners. Subsequently, vinyl siding panels will be strengthened onto such a base. During installation work, noise and heat insulation can be performed. Installation of siding panels on the facade of a building simultaneously serves as its insulation. This successful and inexpensive method of insulation is very popular. If siding is used as facade insulation, then its installation is carried out simultaneously with the use of penoplex or other cellular glass material. These insulation materials have a number of advantages and disadvantages, therefore, when choosing alternatives to siding, many factors should be taken into account: conditions of use, local climate of the region.
But this information will help you understand how to choose siding and what you should pay attention to.
Instructions for covering the facade with siding:
- Sheathing with siding panels should be carried out taking into account their deformation in the future due to possible temperature changes. Therefore, you should maintain a distance between the side parts of the panels of at least 7 mm. It will also be useful to learn more about how to cover a wooden house with siding.
- The panels should not be tightly screwed, they should move freely; within the boundaries of the holes that are made using a hammer drill.
- Since the panels can become deformed over time, it is necessary to leave a gap of 0.9 mm between the head of the screws and the siding board.
- Covering the facade with panels should begin in the direction from the center of the building to the extreme points.
- The fastening should be placed in the middle of the holes made with a hammer drill and vertically in the siding panel.
- The level of the panels should be checked no more than every 6 rows.
- If any protrusion from the reinforcement interferes with the sheathing, a new row should be started next to the unevenness. This method prevents the appearance of unnecessary overlaps.
- The hole in the board must be made 60 mm larger than the thickness of the reinforcement. The shape of the cutout should be identical to the protruding reinforcement.
- Fixation and installation of lighting fixtures must be carried out before installing the outermost row of siding panels.
Maybe
Installation of trim around door and window openings
Window and door units can be installed in the same plane with the wall or protrude from the wall, or they can be installed in a wall niche. Installation of platbands in each case has its own specifics. Windows and doors are located in the same plane with the wall or protrude above it. For cladding, platbands or J-profiles are used. First, window and door openings are covered with waterproofing materials. These can be aprons made of roofing tin, rolled bitumen waterproofing or aluminum foil. A total of four trims are required for one opening: two each for the top and bottom of the opening and two for the sides.
The platbands are cut so that their length corresponds to the height and width of the opening plus two heights of the vinyl profiles that were chosen for this cladding. First, install the top profile. On both sides, cuts are made on it, equal in height to the vinyl profiles. The incised part is folded down to form a “tongue”. They are needed to drain water from the top profile to the side ones. Then take the side profiles and insert them into the cut out part of the top profile. Pieces of vinyl are cut out at the top of the side trims so that the “tongues” of the top profile fit inside the side ones.
Now the lower casing is attached to the structure. To bring it inside the side profiles, “tongues” are cut out of them, and pieces of vinyl are plucked out in the lower casing - “windows” where the “tongues” should be inserted. The “windows” should be the same height as the profile. The tongues of the side profiles are folded onto the bottom profile so that they cover the cut on it. If the platbands are attached to a protruding opening, the tongues are pressed against it. If the opening is made flush with the wall, the tongues are folded inward, into the lower profile, or cut off. Windows and doors are located in a niche in the wall. In this case, near-window profiles are used for cladding. They are modified platbands. Near-window profiles are equipped with a shelf for covering the slopes of niches. These components are installed according to the same rules as conventional platbands. The shelves of the near-window profile, which cover the slopes, are cut to the depth of the niche. They are then driven into pre-set finishing profiles.
If you do not have experience with siding, it is recommended that you begin installing siding from the rear facade of the building. The front facade is the “face” of the house, which is seen by all passers-by, so it is important that the cladding here is impeccable. You can gain experience by cladding the rear façade.
Installation process
The further installation process is divided into several stages, which are described in more detail below. Also an important point in this process is the installation of siding near the location of windows and doors, as well as the installation of H-profiles.
Setting the starting line
vinyl siding installation process begins with attaching the starter strip . It is installed around the entire perimeter of that part of the structure that is intended for cladding or the entire house.
The starting strip has no special requirements, because it is subsequently covered by other panels . Its color can be absolutely any and it can be made up of segments.
IMPORTANT!
It is very important at this stage to level the starting line and check this as often as possible during the process. The appearance of even the slightest tilt promises errors in further work and the need to redo everything .
The installation process is as follows:
- Initially, mark the places where fastening will be carried out . To do this, screw in self-tapping screws along the lowest line of the wall, retreating a distance equal to the width of the plank itself;
- After this, tighten the thread between the screws and check its tension using a level;
- Use chalk to repeat the resulting level on the wall - this is the line along which you need to attach the starting strip;
- It is advisable to check every third row of the attached starting bar to ensure that there is no deviation from the level;
- After the above manipulations, the bar is secured.
Setting the starting line
Setting obtuse and acute angles
Considering that siding material has a high level of flexibility, it will not be difficult to trim the corners of the house with it . If the building has an obtuse angle, then the panel is pressed down; if it is sharp, it is compressed.
Initially, a corner strip is attached, into which row panels will later be inserted . They begin to fasten from the hole located in the upper part, screwing a self-tapping screw into it. In this hole, the self-tapping screw is placed at the highest point; in the remaining holes, the fastening element is located in the middle.
After installing the corner strips, prepared corresponding panels are attached to the corners. If you don’t want to make such a panel yourself, then you can purchase a ready-made J-profile .
Setting obtuse and acute angles
Installation of H-profile
This stage of cladding is quite simple, but it is very important to correctly determine the places where the plank needs to be fixed. The P-profile is fastened in the same way as the process of installing corners.
The step-by-step instructions are as follows:
- Install the bottom bar, then the top;
- if there is a need to lengthen the bar, then cut off small pieces 5-7 cm long;
- The profiles are fastened with an overlap.
There must be an abutment of the starting strips to the connections of the H-profiles and in no case vice versa.
If you do not want to install this kind of profiles, then you need to install the siding with an overlap.
Installation of H-profile
Finishing window and door openings
The process of finishing window and door openings with siding includes several stages:
- Initially, an external double-sided profile is installed at the corners of the slopes, to which the sidewall panel is attached;
- When attaching a profile, it is very important to ensure that the fastener is located in the center of the hole. This will prevent profile deformation;
- The perimeter of the window is equipped with a J-profile, onto which panels are then attached, cut according to the required dimensions;
- It is recommended that the panels be placed in a horizontal plane, this will allow the material to be in use for the longest possible time.
Finishing window and door openings
Siding fastening
During the installation process, one of the significant conditions for high-quality performance of the work is the fastening of the material according to certain rules :
- The distance that must be observed when screwing in screws should be within 25-30 cm ;
- when driving nails or screwing in hardware, you must maintain a 90-degree angle between the fastening element and the plane ;
- The location of the nails or hardware should be in the center of the hole installed for this purpose . This method of fastening allows the panel to move during the expansion process, maintaining its shape and integrity;
- There is no need to tighten the screws tightly ; you should leave a space of 1 mm between the head of the fastener and the surface;
- Be sure to ensure the distance between the starting bars , which are located nearby. The gap is left equal to 5-7 mm, it is necessary to compensate for the linear expansion of the siding;
- installation on the corner parts of the wall should not be carried out in full , because other special corner strips are used to arrange the corners;
- if staples are used to fasten the siding, then maintaining a gap of 1 mm is also necessary .
The rule regarding twisting siding is achieved in two ways:
- while tightening the self-tapping screw, place a coin under it and tighten it until it stops;
- Immediately tighten the fastener element to the maximum, then release the clamp by 1 turn.
ATTENTION!
It is not recommended to install the starting strip on windows and doors at the beginning of the process. Perhaps, during the process of attaching the siding, it will become clear that such elements are not necessary , in addition, the parameters of windows and doors are often far from ideal in order to be sure that the ordinary strips exactly match the level of the window or door.
Siding fastening
Laying panels
There are two options for laying the panels: in a circular direction or each wall separately. From a technical point of view, there is no difference in how the installation is carried out, the only question is convenience.
The essence of the installation process is divided into several stages:
- The first strip of panels is inserted into the grooves of corner profiles or H-shaped ones, after which they are fastened using self-tapping screws , observing their location at the central point of the lock. Fastening of hardware is carried out from the central point of the panel to the edge, adhering to the direction of the vertical strips;
- Next, the panel is lowered to the starting bar and snapped into place , it is very important to make sure that the locking connection has the correct adhesion between the elements. The location of the two lock elements must be parallel to each other and not have any deviation angles;
- While connecting the elements, you must not stretch the panel, this can lead to deformation of the locks;
- After installing the panel, it is secured using hardware;
- The remaining rows of siding are laid in the same way, except for the last one.
It is more convenient to insert the panel if you bend it a little first. After clicking the lock, the correct connection can be achieved by moving the bar in a horizontal plane - it should move freely.
Laying panels
Laying the last row
The last row has some features in its fastening process; its installation is carried out as follows :
- Initially, the finishing strip is fixed;
- after this, they measure the distance that remains from the last laid siding row, which will correspond to the size of the last panels;
- then an arcuate bend of the strip is made in the horizontal plane and inserted into the lock and the finishing strip.
Laying the last row
Installation of the first panel of vinyl siding
Work is carried out from the rear facade to the front, from the rear corners to the front. This way, the joints of the panels, when they are overlapped along the length, will be less noticeable. The lock of the first row panel, located in its lower part, is inserted into the corresponding lock of the starting strip. The upper part of the panel is attached to the sheathing. The siding cannot be stretched too tightly, otherwise it will burst due to thermal expansion.
If installation is carried out in the cold season, a gap of about 9 mm is left between the panels. During summer installation, it is reduced to 6 mm in warm weather and to 3–4 mm in hot weather. As already noted in the first chapter, the dimensions of the temperature gaps are indicated for solid panels. Cut parts also need a gap, but of a smaller size. If the ambient temperature drops below –10 °C, vinyl siding cannot be installed. Vinyl siding can be joined lengthwise in two ways: overlapping and using an H-profile. Overlapping joining. The nail strip and the locking part of the panels are cut so that the panels can be mounted with an overlap of about 25 mm.
Docking using an H-profile. The upper part of the H-profile is lowered below the soffit or cornice by 3 mm. This will be the temperature gap. At the bottom, the H-profile is lowered 6 mm below the edge of the starting strip. If there is a base, floor, porch or other limiter under the H-profile, a temperature gap of 6 mm is left between the end of the profile and the limiter.
If the length of one H-profile is not enough, install two overlapping profiles. The overlap joining of H-profiles is carried out according to the same principle as the joining of two corner profiles. The upper one is mounted overlapping the lower one. The H-profile visually emphasizes the vertical section of ordinary siding panels and makes them more noticeable. Therefore, it must be mounted in such a way that it does not spoil the appearance of the cladding, but fits organically into it.
Advantages of siding as a ventilated facade
Siding refers to ventilated facades. This means that there is a gap between the finishing panels and the wall, which allows air to circulate freely. If moisture gets under the finish, it will evaporate naturally without forming mold.
Siding is a ventilated facade. When installed correctly, moisture does not accumulate underneath and fungus does not form.
The second advantage of a ventilated facade is the possibility of external insulation. Covering your home with vinyl siding will reduce the cost of heating your home in the winter and cooling it in the summer. And also save usable space inside the house.
Installation of subsequent row panels of vinyl siding
Subsequent panels are installed according to the same principle as the first. Every third row is checked for horizontalness using a level. Installation of siding around the window opening. If there is a window on the wall, then the next row will definitely reach the bottom edge of the opening. The row panels that will be located under the opening are cut to the width of the window plus two horizontal temperature gaps (6 mm on each side). The cut ends of the panel are inserted into the receiving groove of the platband or window profile. At the same time, the siding will have enough space for thermal expansion.
The depth of the panel cutout should be such that a minimum vertical temperature gap (1 - 2 mm) remains between the panel and the receiving groove of the lower casing (near-window profile). Using a punch punch, hooks are made on the panel, by means of which the row panel is attached to the lower and upper trim of the opening. The depth of siding trimming depends on how high the window opening is from the ground. Therefore, if a near-window profile was used to frame the opening, a finishing profile is additionally installed in the lower trim.
Rules for installing siding
The rules for installing siding are not at all complicated, but it is better, if you have no experience, to entrust the installation to professionals. Well, or at least adhere to a few simple rules:
- Ensure free movement of panels during thermal expansion and contraction. Do not tighten the screws all the way; leave a gap of 1-1.5 mm between the head and the siding panel. Self-tapping screws must be installed in the center of the panel mounting hole. The siding panel fixed to the sheathing should slide freely in the horizontal direction.
- Leave thermal gaps. A gap of 5-6 mm must be left between the ends of the panels and adjacent accessories. in summer, and 9-10 mm. in winter. The diameter of the holes in the siding for the passage of pipes, cables or any mounting anchors should provide a gap of 5 mm from the panel to the obstacle.
- Do the sheathing correctly, ensuring the stability of the sheathing over time.
If you decide to cover the facade with siding yourself, carefully study the siding manufacturer’s instructions. Different manufacturers have differences in accessories for installing siding.
Instructions for installing siding from Doce can be found at this link, and from Mitten at this link, or in the section.
To have an idea about installing siding, watch this video:
Next article:
Cladding, wall finishing with basement siding
Previous article:
Calculation of wall heat transfer resistance
⇆
More articles on this topic
- Wooden floor on joists on the first floor of a private house
- The thickness of the walls of a house made of aerated concrete - gas silicate
- We are building a house, walls made of concrete blocks
- Do-it-yourself shallow strip foundation for a house
- Solar collector - water heater for home, pool
- Setting up, power adjustment, errors of the BAXI gas boiler
- Dry heated floor without screed in a wooden house
- Solid fuel heating boiler with heat accumulator
Installation of the finishing panel under the roof eaves.
The finishing role is played by an ordinary siding panel. A finishing or J-profile, sets of finishing and J-profiles, or internal corner and finishing profiles are attached under the cornice. In several places along the long side of the siding, measure the distance from the lock of the penultimate row panel to the bottom of the finishing profile gutter. The vertical temperature gap of 1 - 3 mm is subtracted from the resulting value. The result is transferred to the siding panel, from which the upper locking part is cut off.
Hooks are made in the upper part of the remaining piece. They should be located at a distance of about 20 cm from each other. The hooks are bent to the front side of the panel. The panel with hooks is inserted into the lock of the penultimate panel, and its upper part is inserted into the finishing profile. The siding is lifted up so that the hooks and locks snap into place.
Installation around the arch
The design of some houses and other buildings has openings ending in arches. In this case, it is also possible to cover them with plastic siding. All stages of work are similar to those used when finishing a regular opening. Only the J-bar is attached differently.
Thanks to this variety, the work of craftsmen is greatly simplified when working with arched openings. Notches are made on the profile in advance depending on the bending radius of the arch. The smaller it is, the greater the number of notches that should be applied. The profile must be attached to the top of the arched opening, fixed, and the siding panel inserted into it.
Installing vinyl siding on the roof gable.
To cover the perimeter of the roof gables, use an internal corner or J-profile. The top nail or self-tapping screw is driven in at the top edge of the nail hole, the remaining fasteners are in the middle of the holes. Row panels are mounted on the roof according to the same principle as on the walls. The edges of the panels entering the gutter of the receiving profiles are trimmed. A temperature gap of 6 mm for summer installation and 9 mm for winter installation is left between the siding and the bottom of the gutter. The fastening of the topmost panel is inserted into the central hole located in its upper part. As fasteners, use a self-tapping screw through vinyl or a stainless steel nail. This method of fastening is an exception to the rule. In all other cases, it is unacceptable to attach siding through vinyl.
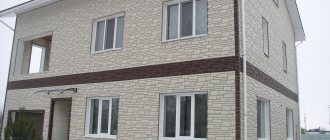
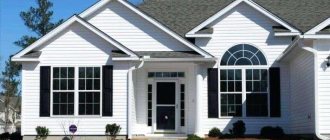
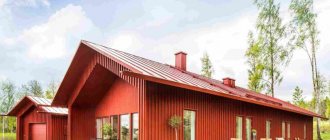
Facade cladding with siding
After finishing the construction of a house or during the renovation process, the question arises: what is the best way to cover the facade? Today, the choice of materials is large, so making a choice is difficult. For most, the priority is attractive appearance, practicality, ease of installation and affordable cost. Siding is the best option for those who value their time, money and want to get an attractive facade of the desired shade that does not require additional maintenance.
Installation of spotlights.
Perforated soffit panels are installed on roof eaves. They provide normal roof ventilation. First, using a level, make a marking running parallel to the bottom edge of the cornice. Then the receiving profiles are attached along the notches. To determine the required dimensions of the soffit panel, measure the distance between the bottoms of the receiving gutters and subtract 6 mm (the size of the temperature gap). A fragment of the required size is cut from the soffit panel. Each soffit is fixed centrally into holes in the mounting flange.
Vertical installation of vinyl siding
In general, vertical installation of vinyl siding is carried out in the same way as horizontal installation. There are differences only at the stage of installing the lathing and installing the starting profiles. For vertical siding, horizontal sheathing is made. The starting profiles are installed vertically along the central axes of the walls. The first fastener is installed at the top of the panel close to the top edge of the flange. Then the remaining fasteners are installed in the middle of the holes.
Read our article: Siding Life and Warranty
Siding installation
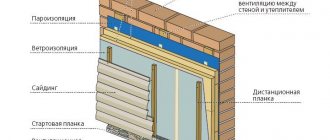
| Fig.4. Lathing for siding installation |
Vinyl siding is usually installed on sheathing. You can read about wall insulation with the installation of wooden sheathing for siding in the article “Insulation of walls with a ventilated facade.”
Another option for sheathing for vinyl siding using 40-50x50 mm wooden blocks or galvanized steel profiles for gypsum boards is shown in Fig. 4. A wall with such lathing can be insulated with mineral wool slabs no more than 60 mm thick. in one layer.
The distance between the vertical posts of the sheathing should be no more than 400 mm. The rack is fastened to the wall after 600-800 mm, no more.
Replacing a row panel
First, remove the damaged panel. The dismantling hook is inserted into the lock between the damaged panel and the panel located above it. Use a hook to pick up the lock and pull it down and along the panel to unlock it. When the top panel is folded, it will be possible to reach the nail strip of the damaged panel. Use a nail puller to pull out the fasteners and remove the damaged panel.
Vinyl siding is used to cover not only free-standing buildings, but also houses with extensions. Such “paired” structures have uneven shrinkage. Therefore, an H-profile must be installed at the border between them.
It happens that a nail or self-tapping screw sits too firmly in the sheathing and cannot be pulled out. What to do in such cases? There is no need to pull the nail with all your might: this will only damage the sheathing. On the contrary, you should hammer the stubborn nail into the sheathing as far as possible. The sequence of actions when installing a new panel is the reverse: it is nailed to the sheathing, after which the locks are latched using a mounting hook.
Securing the starting bar
Vinyl siding panels have a special fastening system. They are equipped with locks and special slots for nails and screws.
You can, of course, secure the panels by simply nailing them through them, but this method is not aesthetically pleasing and can lead to the destruction of the panel. As a last resort, if such a need arises, you need to drill holes where the nails will be driven in.
Siding starter panel
The starting strip is installed around the perimeter of the entire building or the part that is planned to be sheathed. The starting strip is covered with panels, so it can be assembled from parts.
Since it is along the starting strip that the entire cladding is leveled, its installation must be approached with particular care.
First, the place where the bar will be attached is designated. A nail is driven in there or a self-tapping screw is screwed in - at the lowest level of the wall, so that the distance from the nail to the ground is the width of the starting strip. The next nails are driven level, after which you need to stretch the thread between them. It is advisable to then draw a chalk line along this thread - this will be the line along which the starting strip will be attached.
In the future, you need to use a level as often as possible to check the horizontal installation of the slats - at least every three rows.
After marking the line, the starting bar is fixed.
The starting strip has small dimensions compared to the panels themselves. It is a strip with a width of about 3-5 cm and holes for fastening. The upper part of the bar is rigidly attached, but this fastening is sufficient to hold the bottom panel hung on it. The starting bar must be fastened taking into account possible deformations due to thermal expansion, which will be discussed below.
Corner profile repair
A common problem is damage to the front side of the corner profile. To correct the situation, it is not necessary to dismantle the casing. It is enough to cut off the face strips of the damaged corner profile, leaving the nail strip, bottom and wall of the receiving gutter. From another, whole, corner profile, you need to cut off the nail strip, leaving the front profile and the bottom of the receiving gutter.
Next, the cut fragment of the new corner profile is applied to the part of the damaged profile remaining on the wall and glued together or attached with vinyl or nylon rivets to the old nail strips. J- and H-profiles are repaired in a similar way.