Oriented strand boards are very popular when carrying out various types of work, which is explained by their excellent technical characteristics. But to obtain a high-quality result, the sheet material must be installed taking into account all the nuances. In this case, the OSB finishing will not create problems in the future and will have a long service life.
Material selection
To sheathe a house, you need to choose the right products. For every indoor and outdoor process, there is a product type that is most suitable.
OSB is divided into categories according to technical characteristics and size, so when choosing, you need to know the properties of the material, which must correspond to a specific situation.
Due to the interweaving of the chip elements with each other, OSB is also called bonded plywood
Types of OSB
There are four main types of products:
- OSP-1. The lowest class used for interior work. Such slabs are laid only in areas not subject to loads.
- OSP-2. This variation is more resistant to impacts, but is only suitable for dry rooms.
- OSP-3. The most popular type, which is used for work inside and outside. The products are able to withstand constant load and variable humidity.
- OSP-4. This option is characterized by increased moisture resistance and resistance to serious mechanical stress.
It is the products of the third class that are universal and suitable for all stages of work, which allows minimizing costs.
With a reasonable distribution of material, you can save up to a third of the budget, so spending money on moisture-resistant OSB-3 or OSB-4 for interior work only makes sense for cladding rooms with high humidity
Optimal size
Products are selected by thickness, depending on the design characteristics:
- For cladding a frame house, slabs of 9.5 and 11 (for one-story buildings) and 12 and 12.5 mm (2–3 floors) are used.
- Finishing vertical surfaces inside rarely requires the use of parts thicker than 9–9.5 mm, except in situations where the structure will experience loads or act as partitions.
- Products with a thickness of more than 15 mm are used for the construction of main and interfloor ceilings.
To sheathe a dacha for seasonal living, you can choose OSB-6 (the number indicates the thickness in millimeters).
On a note! The level of emission of harmful substances must be taken into account; the optimal indicator is E1.
When purchasing a material, in addition to the thickness and level of moisture resistance, you need to take into account the size and weight of OSB boards
Material quality criteria
Before deciding how to finish OSB on the outside, you should familiarize yourself with the quality characteristics, among which are fire resistance, strength and the ability to withstand moisture. An important factor is also the ability of the canvases to stick together. You can join the products using special compounds and, if necessary, paint them. The surface should first be coated with a primer and sanded.
Moisture resistance and water absorption
The slab is not as moisture resistant as it could be. There is still wood inside, which will swell when exposed to moisture. But this figure should not be more than 15%. As for water absorption, the slab may absorb water to a lesser extent, but it is still better to avoid constant contact with moisture of this material.
Strength
OSB board is tested according to several indicators in terms of strength. For example, with static bending this figure is 22 MPa. When stretched perpendicularly and longitudinally, the strength will be 0.34 and 3.2 MPa, respectively. This material is less durable than plywood in all respects, but better than chipboard. By comparing prices, you can understand which material is best to use for cladding the frame.
Fastener holding capacity
OSB walls hold fasteners quite well. This figure is 25% higher compared to plywood. This characteristic allows these slabs to be used in conditions where other materials cannot cope with these tasks.
Insulating properties
The canvases consist of layers, which, in turn, are formed from differently oriented wood chips. All this allows us to obtain a material that retains heat well indoors.
According to these characteristics, OSB is superior to edged boards and plywood, which means that it is better to prefer slabs when cladding a frame house.
Soundproofing properties are also excellent. Extraneous noise when colliding with such walls is dissipated, providing a high level of comfort. It is also important to consider the ability of the slab to insulate from fire. The base is wood, which does not cope very well with this task, but the chips are impregnated with fire retardants, which you should make sure of before purchasing the material. These substances can make self-extinguishing products from slabs. They are also capable of making the house free from insects and rodents, protecting the premises from the penetration of pests.
Large dimensions and stable shape
If you are still choosing a material for cladding the frame of your house, then it is worth taking a closer look at oriented strand boards, which have one important characteristic - large sizes. This allows you to cladding the facade in a short time, saving time and effort. An additional advantage is the stability of the shape. The geometric parameters do not change even when the slab is exposed to moisture or loads. The canvases do not deform or delaminate.
Environmental Safety
Before purchasing OSB boards, you should ask how they comply with international quality standards. If the material is safe, it must meet the E1 standard. This suggests that the slabs can be used in residential premises and will not harm human health. Does not affect the environmental friendliness and moisture resistance characteristics. It is based on:
- wood;
- resins;
- paraffin emulsion.
The percentage of content of the 2nd varies within 7%. Resins of this kind are safe for humans and are made from methyl alcohol. Another ingredient is paraffin emulsion. It increases water-repellent characteristics and makes the slabs able to resist insects and microorganisms. An additional advantage is that oriented strand boards do not need to be treated with fungicides.
Fire resistance
Although the slabs are treated with fire retardants, do not forget that they are based on wood, which has low fire resistance. If the building has a high level of fire hazard, it is better to avoid using oriented strand board. Even if the fabrics are treated with fire retardants during the production process, after some time the material is exposed to open fire, it will still burn. If you look at the fire resistance characteristics, you can say that the slabs are flammable and produce smoke well. They are flammable and dangerous even when combustion products begin to form.
Aesthetics
Not so long ago, chipboards were not so aesthetically attractive, but with the advent of new interior solutions they are even used in interior decoration. In apartments and houses, such canvases are only varnished in order to further highlight the structure and relief, but the same cannot be said about the exterior decoration. The cladding must be carried out necessarily, because OSB will eventually begin to absorb moisture and gradually deteriorate, no matter what modern impregnations are used.
Cutting OSB boards
Product processing is not labor intensive, but requires the correct selection of tools. This will prevent damage (especially around the edges), which could complicate further finishing.
You can cut OSB boards with the following devices:
- Hand tool. This is the best option for small volumes of work. For the process, a hacksaw with medium teeth is selected, which must be well sharpened and set apart. To eliminate unevenness, the part is secured or held. When cutting long lengths, both parts must be supported so as not to pinch the blade.
- Electric jigsaw. The most preferred solution for household processes. The tool allows you to cut not only straight, but also in a shaped manner, which is especially important for bypassing communications indoors. To cut the slab without damage, special wood bits are used. To ensure evenness of the cut, a stop is installed, which can be used as a rail.
- Circular Saw. This device is suitable for large-scale work, but great care must be taken and personal protective equipment must be used: OSB has a chip structure and small fragments can fly out at high speeds of the tool.
For figured cutting, a jigsaw is used;
The cleanest, fastest and easiest cutting is done using a circular saw; unraveling OSB with a hand hacksaw is difficult and very inconvenient. In order to process products without damage, it is necessary to prevent vibration of the sheet and sagging of the last section of the cut.
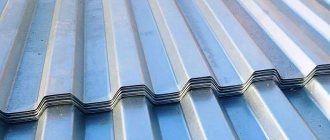
Scope of OSB and types of boards
In classic chipboard, sawdust is mixed together with a type of epoxy resin; as a result, they are located chaotically in the finished hardened layer. In an OSB board, they are oriented by vibration not only along the layers, but also in the direction of laying, as a result of which the board receives much greater fracture strength. In fact, OSB is one of the options for composite materials.
OSB boards differ in the degree of their resistance to high humidity, as well as in strength characteristics: how well they can withstand fracture loads. There are 4 grades of OSB: from OSB-1 to OSB-4. Each of these types uses its own types of adhesives, which impart the corresponding properties to the finished slab.
OSB is used for both interior and exterior decoration. It is necessary to use different types of slabs according to their resistance to moisture. OSB boards are durable and practical; they allow the formation of complex facades for subsequent painting or plastering on the outside or wallpapering on the inside.
Installation of OSB on external walls
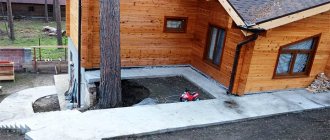
The technology for laying OSB on the street includes several stages that must be performed sequentially. The main goal is to obtain a flat surface.
Preparing the base
Algorithm of actions:
- If the old decorative coating interferes with the work, it is removed. Protruding objects are removed. Communication systems are completely replaced or transferred if necessary. The surface is cleaned of dust and dirt.
- The condition of the foundation is assessed. All cracks and cracks are opened, primed and sealed. If there are traces of mold and mildew, the areas undergo special treatment.
- Damaged areas are replaced or strengthened. When working with old buildings, it may be necessary to strengthen the foundation.
The supporting base does not require perfect leveling; it is enough to seal the cracks and treat the surface with a complex protective primer.
Further processes are carried out only if the base is well dried and residual moisture will not affect the structure in the future.
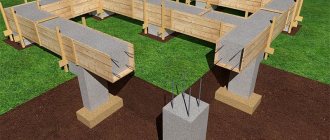
Construction of the frame and laying of insulation
The external walls are covered with OSB using lathing, which creates the possibility of additional thermal insulation of the house, so the process should be approached very responsibly.
Scheme of work:
- For installation it is better to use a wooden beam. In this case, the fixation is the most reliable, and the materials have similar thermal expansion rates.
- The frame parts must be prepared. The process includes drying, sampling and impregnation with protective compounds.
- The fixation of the sheathing elements is carried out according to the diagram. The outermost corner fragments are placed first.
- The placement step depends on several factors: the type of insulation, panel dimensions and direction. When using a sheet measuring 122*244, the optimal distance between the posts is 40.7 and 61 cm, and with dimensions 125*250 – 62.5 cm. Naturally, these parameters depend on the specific situation.
- If necessary, a vapor barrier is first laid. This is especially true when working with wooden bases.
- The racks are fixed vertically directly to the wall of the house. To level the edges, a cord is pulled and a level is used. To ensure the required evenness, boards are laid. In exceptional cases, hangers for metal profiles are used.
- The selected insulation option is placed without a gap in the resulting cells. If required, it is fixed with special dowels.
- The wind and hydraulic protection is being installed.
In order to ensure reliability and rigidity for the erected frame, a frame is first created in which the racks are placed.
You should know! The presence of a ventilation gap is not always necessary and depends on the climatic conditions of the area.
Installation of slabs
Before fixing the OSB to the sheathing, it is necessary to take into account a number of nuances:
- Fixation is carried out with the front surface facing out. It is not difficult to determine the desired side: it consists of larger fragments of chips than the wrong side.
- When using parts with a thickness of 9 mm on a one-story house, the placement is made horizontally. For taller buildings, 12 mm thick slabs are placed vertically. Many experts note that the first option provides better reliability due to a larger number of racks. It is taken into account that in this case the plates are spaced apart.
It is necessary to attach OSB to the frame according to the following instructions:
- The first part is set from the corner of the building. A gap of 10 mm from the foundation must be formed. To do this, you can use spacers that are placed around the entire perimeter of the building.
The cladding of the facade with OSB slabs begins from the corner, the first slab is aligned to the level - For fixation, galvanized brushed nails or self-tapping screws with zinc coating and incomplete threads are used. Each option is suitable for any job site. It is taken into account that with a slab thickness of 9 mm, the screw size cannot be less than 45 mm. The screwing or driving step is 10–15 cm.
- Adjacent slabs must be fastened with a gap of 2–4 mm, all edges must fall on the frame posts.
- After laying the bottom row, the next level is laid. It is shifted one step between the racks.
- Fragments of adjacent sections of the wall must be nailed overlapping to form a straight joint.
Despite the high density, oriented strand boards are subject to slight temperature deformations, so the elements are mounted with a damping gap of 2 - 4 mm.
Sheathing the outside of the house with OSB boards with your own hands if there is a second floor can be done using the same scheme, but it is recommended to lay the sheets so that the connection of the first and the next tier was covered with one fragment.
Attention! The heads of screws and nails should be recessed flush to avoid complications during decorative cladding.
Finishing work on OSB board
External OSB finishing can be done using a variety of materials.
It is important to first decide what funds you have. If your budget is small, you can choose a dyeing method
Perhaps the most expensive cladding options are decorative stone and siding. Plaster looks modern and simple. But the inside of OSB boards is most often covered with wallpaper or tiles.
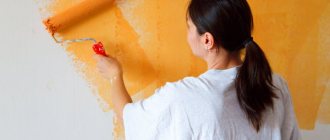
Painting
The exterior and interior of the OSB board can be covered with paint. For external cladding, you should choose compounds with additives that provide ultraviolet protection. If the surface does not require leveling, polymer-based mixtures should be preferred. They fit well on an uneven base and protect the walls from external influences. At the first stage, the wall is prepared by grinding. The next step is to fill in the uneven areas using putty. The facade or interior walls are coated with a primer, which dries well, and then painted.
Ceramic tile cladding
The inside of oriented strand board can be finished with tiles. This perfectly protects the material from moisture and temperature changes in the bathroom or bathroom. Sometimes the canvases are additionally leveled with plasterboard or cement bonded particleboard, but this will increase the thickness of the coating and reduce the height of the ceilings.
The service life of the cladding can be extended if the OSB is covered with reinforced mesh. In order to increase adhesion, the gloss is removed from the base with sandpaper. All dust is then removed and a primer is applied to the surface. Next, you can lay the tiles on the mesh.
Wallpapering
The walls are prepared by sanding and applying a primer. Each layer must be allowed to dry. If the wallpaper is thick, it can hide the unevenness of the oriented strand board. Otherwise, it is recommended to sand the blades additionally.
Plaster treatment
Before you begin applying plaster, you should seal the seams. Silicone or acrylic based sealant is suitable for this. A grinding machine will remove all defects. If you don't have a tool, you can use sandpaper.
For application to the wall, it is better to use an adhesive-based composition. It is distributed over a mesh made of plastic or metal. Its fastening is carried out with stapler staples. When the first layer is formed, the mesh is completely hidden. In order to achieve perfect evenness, you can apply a second layer of putty, but this should be done only after the first one has completely dried.
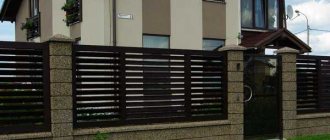
Exterior siding
Exterior siding begins immediately after the construction of the house. A frame made of wood or metal is installed. Guides should be located not only on flat surfaces, but also in corners and openings. When thinking about the question of how to finish OSB on the outside, consumers often choose siding. If you are also one of them, you need to familiarize yourself with the technology. At its next stage, you can begin lining the area around the openings.
On the main facade, the slats are laid from bottom to top. Sometimes the installation technique is used from one corner to another, but this can lead to the problem of mismatch between the dimensions of the wall and the profile. Installation of decorative panels should be carried out without distortions. A building level is used for this.
Installation of decorative stone
The outside of the OSB board can be finished with decorative stone. Quite often they cover not only facades, but also plinths. This material does not put any load on the foundation, is easy to install, and looks very realistic. If you have already decided how to decorate the OSB outside, and it will be a decorative stone, then you should know that it is installed with glue or a frame.
If you choose the wet installation method, the surface will need to be cleaned of dust, the pores closed by applying a primer and fiberglass glued on. It will reinforce the facade and make the cladding stronger and more durable. At the next stage, tile adhesive is applied to the back of the products, which are then applied to the base and aligned horizontally and vertically.
Finishing
There are quite a few options for finishing work on an OSB facade, which allows you to choose the best method, but the seams must first be sealed. For this purpose, elastic wood putty for exterior use is used. As an alternative, a self-prepared solution based on sawdust and PVA can be used, but in this case it is recommended to cover the joints with slats or special pads. This finishing will enhance the façade.
The simplest and fastest way to decorate an OSB facade is painting followed by upholstery with contrasting slats
The “Warm Seam” sealant has good stability, which is best applied at above-zero temperatures. When the slab thickness is more than 9 mm, a special insulating cord is additionally placed.
Various materials can be used as external cladding:
- Siding. Allows you to decorate the surface quickly and beautifully.
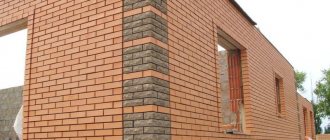
- Facade panels. Installed in a short time. Most often they imitate brick.
- Fake diamond. The technology for installing such products is quite labor-intensive and involves a whole range of preparatory processes.
Important! For finishing OSB cladding, it is not recommended to choose products that are fixed with glue, because in this case it is not always possible to ensure reliability.
Finishing methods
Craftsmen who have completed work with OSB panels on facade work often think about the material that is best suited for finishing. The choice of material should directly depend on the performance qualities that the craftsmen plan to endow the house with.
Painting
This is one of the simplest and most economical methods, but the work should be carried out carefully. One incorrect application can ruin the overall appearance of the tiles. When carrying out surface painting work, you need to remember the following rules:
The paint chosen as the surface coating material should not contain water
Excess water will cause the panels to swell and ruin the product.
During the work, you need to pay special attention to the edges of the slabs and paint these places liberally.
Experts recommend using oil-based paints when carrying out such work. This paint does not harm the structure of the panels and is deeply absorbed, creating a rich color.
In order for the texture to be completely painted, you need to apply paint in several layers
We must not forget that each layer should have drying time.
Sometimes the owner of the house wants to additionally protect the walls with a fire-retardant composition, but one must take into account the fact that not all paints are compatible with such impregnations.
In such cases, priming the surface will be an additional treatment that will be located between the impregnation and the paint layer.
Plastering
This option for covering OSB panels is the most popular and justified for outdoor work. This type of finishing has a number of features:
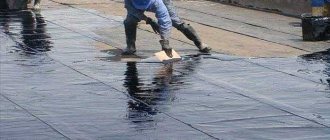
- experienced craftsmen carry out additional waterproofing of the surface using liquid rubber or roofing felt;
- for greater stability, a plaster mesh is used, which will prevent the formation of cracks;
- for plastering the mesh, a special composition is used for reinforcement in facade structures;
- It is customary to complete plastering work on the external façade with a layer of decorative plaster, which will not only provide strong protection from external influences, but will also give the building a characteristic personality.
Siding
The use of sheathing with the installation of siding panels is an economical method that helps improve the appearance of the building.
Siding can be fixed to the installed OSB surface.
There are a large number of options for siding panels, so if you wish, you can choose a model that imitates a block house or brickwork.
The advantage of such cladding is that if OSB boards are already glued to the side of the facade, it is not necessary to mount an even frame. However, you cannot do without a membrane that will protect from wind and moisture.
If this additional fastening is not installed, the siding will periodically sweat from the inside, and the OSB will swell under the influence of moisture.
If you choose between two types of siding panels - PVC or acrylic, then you can choose any type, since there are no significant differences between them.
Facing products are produced in one thickness, varying from 0.8 to 1.3 millimeters. They are able to withstand temperatures reaching 80 degrees Celsius and exposure to sunlight, under which they do not fade.
Both types are highly resistant to the spread of fire and chemical reagents. Acrylic panels have a rich color, but otherwise are almost no different from PVC products.
Is it possible to attach siding directly to OSB? For practical advice on installing siding from professionals, watch the video:
Rules for cladding walls inside the house
This OSB flooring technology is not very different from exterior work, but has some nuances:
- To build the frame, you can use a wooden beam and a metal profile. The second option is preferable when facing concrete and brick walls, as well as areas made of experimental materials.
On curved walls and if insulation is necessary, it is convenient to use fittings for plasterboard, in particular perforated hangers and metal profiles - Installation of sheathing posts is carried out in increments of 40 to 60 cm.
- Self-tapping screws or nails are used to fix the slabs. For a metal frame, special screws are purchased.
- Installation of OSB is carried out with a gap of 3–4 mm between adjacent elements. An indentation from the floor and ceiling must be formed.
- The fastening points are placed at a distance of 10–15 cm from each other and at a distance of 1 cm from the edge. In the center, a step of 20–30 cm is allowed.
- Vertical installation is optimal, because it allows you to reduce the number of joints.
The sheets are placed facing the room. It is taken into account that OSB-3 has a moisture-proof impregnation, which will need to be removed before finishing cladding.
It is impossible to leave the damper gaps uncovered, so first they are filled with sealants and then puttied
Fastening OSB boards to the wall over insulation using lathing
The slab is fastened to the wall using lathing, which is made from a wooden block or metal profile. The technologies for installing OSB boards on a wall with wooden sheathing and sheathing made of metal profiles are not fundamentally different. When choosing a block, it is advisable to choose a dry, planed block of 40-50 mm, then it will not twist or move after drying, which will have a positive effect on the evenness of the entire wall.
To attach the bar and profile to the wall, special metal plates (hangers) are used. Before attaching the hangers, it is necessary to draw vertical stripes on the wall, the distance between which should be half the width of the sheet, which will subsequently ensure the joint of the slabs right in the middle of the bar or profile and will make it possible to fix the OSB slab in the center along its entire length. After the lines are drawn, hangers are attached along them in increments of 30-40 cm.
A metal hanger is used to secure the sheathing.
Suspensions are attached along the marked lines. Hangers allow you to secure the sheathing over the insulation.
After this, the insulation is laid and covered with a membrane that protects the insulation from moisture, after which the sheathing is installed.
It should be noted that a vapor barrier is not needed on the outside of the building, since it prevents moist air from entering the insulation from inside the room, and from the outside of the building, excess moisture should freely escape outside.
Wall with sheathing. Insulation is laid between the sheathing and the wall.
After securing the sheathing, you can begin installing the OSB boards. For wall cladding, a slab with a thickness of 9 to 12 mm is most often used. If a facade is not mounted on top of the slab, then the slab must be moisture resistant. OSB slabs are attached to the wooden beam sheathing with nails at least 2.5 times longer than the thickness of the OSB sheet. For metal profile sheathing - use metal screws 10-15 mm longer than the thickness of the OSB sheet.
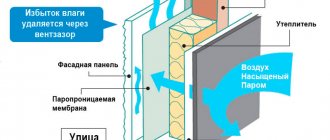
With this installation, the sheathing weighs above the insulation and does not create cold bridges in the insulation between the wall and the OSB boards. Thanks to this solution, maximum efficiency of the insulation is achieved. In addition, between the sheathing beams there is an air gap through which moisture is removed from the insulation, which also improves its performance. More detailed information about ventilated facade technology can be found in the article: ventilated facades, types of ventilated facades.
Options for decorating internal surfaces made of OSB
The resulting base can be finished using various methods, depending on the style of the interior. Naturally, you first need to seal all the seams. For this, acrylic sealants or self-prepared compositions of varnish and sawdust are used.
You can decorate a private house from the inside in the following ways:
- Painting. This is the traditional option. For application, special compounds with a high level of adhesion are selected. Laying requires a minimum of 2-3 layers with preliminary priming.
- Varnish coating. This design involves the use of colored or transparent compositions, but the result should be a decor in the form of a base made of wood chips.
- Wallpapering. Non-woven or vinyl varieties are suitable for work; paper ones require the use of plaster.
- Applying decorative putty. Although this method produces an attractive design, it is very labor intensive. It is difficult to achieve good adhesion with oriented strand boards, so a middle reinforcing layer will be required.
You can decorate the inside of a house in an original way using panels, a block house, or by combining various materials.
How is installation done?
If the attic is finished with OSB slabs, no difficulties should arise. The wooden rafter system allows you to fasten the panels directly to the supporting structures. However, it is necessary to check how evenly the sides of the rafters to which the OSB sheets are to be attached are located. If they are not located in the same plane, you will have to construct a sheathing.
Important: when using a vapor barrier membrane, it must have a permeability of 800 grams per square meter. It is not recommended to use polyethylene or glassine for these purposes due to their low permeability to moisture.
The panels are fastened using regular nails. The fastening step is the same as for ordinary plywood - at the joints of the panels, nails are driven in every 15 centimeters, and in other areas - every 30. At the edges of the sheet, it is better to make an indentation from the edge of at least 10 millimeters so that splitting or cracking does not occur.
The elements are arranged in such a way that a gap of 3 millimeters is formed between the plates if they have a smooth edge. For a tongue-and-groove joint system, no gap is required. This is necessary so that the material can expand when exposed to different temperatures. It is better to cut parts using a jigsaw with a hardwood saw or a grinder, since the panels are very dense and durable. Otherwise, installation is no different from attaching plywood or large sheets of drywall.
Features of cladding a frame house
For structures of this type, the correct execution of the cladding is the key to the durability of the structure, so during installation the following nuances must be taken into account:
- It is recommended to sew up the object inside and outside with OSB-3 boards.
- The facade installation is carried out first. Many craftsmen note that for additional rigidity of the frame, it is necessary to set the jibs. In fact, if the structure is assembled correctly and slabs with a thickness of 9.5 or 12 mm are used, this element is not necessary.
A frame house involves creating a cake from the following materials:
- Outer layer of OSB.
- Ventilation gap.
- Auxiliary sheathing boards.
- Superdiffusion membrane.
- The main pillars of the walls, between which layers of insulation are placed.
- Vapor barrier.
- Internal section of OSB-3.
The slab fixation scheme is similar to the processes for standard house cladding. At the final stage, finishing is carried out inside and outside.
Fastening OSB boards to a wooden frame
When building frame houses, recommendations for choosing sheets are the same as for covering previously constructed walls. The only difference is when the sheets act as a rigidity element. In this case, their thickness must be at least 12 mm. The recommended thickness is usually 15-18 mm.
When installing walls with a wooden frame, two main approaches are used: attaching OSB sheets to the frame through the sheathing and attaching OSB sheets directly to the frame without sheathing. Let's look at both.
How to attach walls to a frame using sheathing
When strong slabs are attached to the frame on the inside of the wall, ensuring good rigidity of the wall structure, then a sheathing can be made on the outside between the frame and the OSB board. The sheathing forms air cavities for ventilation of the insulation and reduces the deformation loads from the frame to the OSB board.
Insulation is laid between the frame posts. A wind and waterproofing membrane is attached over the studs and insulation, which easily allows moisture to pass through. Next, the sheathing and OSB boards are attached to it.
Installation of OSB boards on a wooden frame with sheathing.
With this design, the slabs can be left unfinished; you can paint them, plaster them, or attach almost any façade material to them.
When fastening OSB boards without using sheathing, maximum rigidity of the wall structure is achieved. In this case, it is recommended to attach the wind and waterproof membrane behind the OSB board, then install the sheathing to create a ventilation gap and install facade material on it, such as siding, boards or decorative panels. OSB boards are attached to a wooden frame with nails at least 2.5 times longer than the thickness of the OSB sheet.
The advantage of using nails over self-tapping screws when fastening OSB on the outside of a house is justified by the fact that nails better tolerate deformation of OSB sheets under atmospheric influences.
Installation of OSB on the walls of a frame house without sheathing
Among the methods of providing rigidity to the frame, three methods are considered optimal, which can be combined with each other:
Fastening sheet materials to frame posts inside the house;
Jib joints between frame posts;
Fastening sheet materials to frame posts outside the house.
When OSB sheets are mounted to the frame posts outside the house, the sheathing between the sheets and the frame posts leads to a reduction in rigidity by almost half. Therefore, to ensure maximum structural strength, this sheathing is excluded from it. Without the sheathing, the ventilation gap disappears, so it is recommended to attach such sheathing on top of OSB sheets. A waterproof, vapor-permeable film is attached to the OSB, then a sheathing, and on top of any suitable facade material: siding, corrugated board, wood, facade panels, and so on.
Technology for attaching OSB sheets to a wooden frame without using sheathing.
So, for example, when building a frame house using the Finnish “Platform” technology, there is no sheathing between the frame and the OSB frames. You can find out more about this technology in the article: construction of a frame house using the “Platform” technology.
The option described above is preferable. But there are other ways. When it is necessary for OSB sheets attached to the racks to act as a facade, and nothing is mounted on top of them, then a ventilation gap can be created between the frame racks. For this purpose, the space between the frame posts is not completely filled with insulation. Leave 2-3 cm for a ventilation gap between the insulation and the OSB sheets. The waterproof, vapor-permeable film is attached to the frame using slats. So that these slats remain between the racks - on two sides to each rack.
Ventilation gap when attaching OSB sheets directly to frame posts
A compromise option is to use oblique sheathing. It is laid at an angle of 45 degrees. This helps to increase rigidity compared to straight sheathing. To increase rigidity, boards 25 mm thick are better suited for such sheathing. The board is attached to each frame post with two nails. Due to the increased consumption of materials and the complexity of the work, this method is used extremely rarely, so there is no statistical information on the performance characteristics of built houses.
Oblique sheathing.
Technology of painting OSB with primer-paint
This method of painting oriented strand boards was developed by Holzer specifically for finishing the facades of frame buildings. Therefore, the instructions offered by the manufacturer use exclusively its products.
Tools and materials required to perform the work.
- A spatula with a narrow metal blade.
- Holzer Festspachtel Elastich putty.
Putty Holzer Festspachtel Elasticch
- Holzer primer color.
Holzer primer color
- Roller for applying paint (with a foam or faux fur coat).
- Container (tray) for paint.
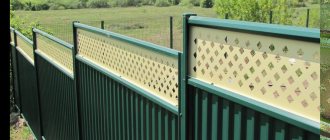
If desired, you can use narrow decorative panels, with the help of which you can decorate the façade in the half-timbered style.
Finish example
Instead of plastic panels, you can attach thin wooden blocks, pre-treated with an antiseptic and painted in a color that harmonizes with the finish of the facade.
Stages of work
Step 1. Puttying the seams between OSB boards.
Holzer Festspachtel Elastisch putty is applied to the seams between OSB boards. Use a spatula to press the compound into the gaps and spread the putty at a distance of 5-7 cm from the seams. They strive to smooth out the composition in such a way as to obtain a smooth surface without visible cracks. Wait for the composition to harden.
Puttying
Step 2: Painting the panel.
Using a roller, Holzer primer is applied to the slab.
Application of primer
The soil dries in about 6 hours
You can choose any color from the manufacturer’s catalog (there are more than 7 thousand colors in stock). If a fur roller is used, it must first be kept in water for 1.5-2 hours. If a bucket is chosen as a container for paint, you need to prepare a small piece of plywood on which to roll out the roller, removing excess paint from its coat.
Coloring technique:
- paint is poured into the container;
- dip the roller in paint and roll it several times over a special part of the tray or plywood;
- Apply paint to the wall so that each next layer overlaps the previous one by 4-5 cm.
Holzer paints have good covering power, so even surfaces do not require a double coat. But in the case of OSB, it will be necessary to properly paint all the protrusions and recesses. Therefore, the manufacturer recommends painting with vertical strokes on the first day of work, and horizontal strokes on the second day. In this case, the coating will acquire the thickness and strength necessary for facades.
Video - Creative finishing of OSB boards
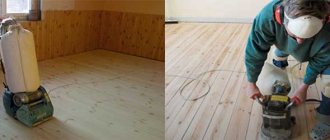
Preparing OSB boards for painting
OSB requires preparation before painting
Before painting, the oriented strand panels are prepared. First of all, they need to be primed. This is not as simple a task as it might seem at first glance. The fact is that the front surface of the new slabs is smooth and quite slippery, so the primer will collect in drops and flow down. For this reason, experts recommend not to waste time and money on priming new slabs, but to immediately begin filling or painting them.
Panels that have stood in the open air for some time lose the smoothness of their front side. The surface becomes rough and able to absorb primer. The composition is applied with a roller on a long handle. The optimal choice is the Ceresit ST17 primer, the quality of which has been tested by time.
Primer ST 17
Prices for Ceresit primer
Primer Ceresit
Technique for painting OSB boards
When applying paint with a brush or roller, you may notice that some chips swell from moisture and rise. This happens regardless of the type of composition chosen. If you need a budget solution for finishing the facade, you can ignore these small shortcomings.
But if you intend to complete all the work with the highest possible quality, you need to adhere to the following technique:
- priming the panel;
- installation of fiberglass mesh over the entire façade area;
- puttying with a moisture-resistant and frost-resistant composition;
- coloring.
When choosing elastic paints (for example, Descartes or Emarque), the puttying step can be skipped. These paints will fit perfectly on the mesh and cover it. After applying the second layer, the OSB will acquire a smooth, glossy surface.