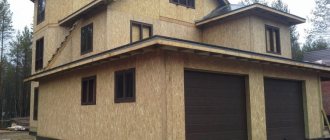
The companies that create and sell it talk a lot about the advantages of prefabricated housing made from SIP panels. However, the relatively simple technology of building a house from SIP panels, built with your own hands, reveals many nuances. They are contained, for example, in the issues of creating an optimal foundation design for a SIP building or choosing from several existing ones the most suitable method of connecting building elements to each other.
What you should immediately pay attention to
Even at the stage of choosing the dimensions of the future house, the first feature of its structural elements appears. Indeed, in order to minimize waste of building materials, it is necessary to take into account the standard width of the SIP panel - 1.25 m. If the development of the house project was ordered from a specialized organization, then expansion gaps will also be included in the construction plan. These are 3 mm tolerances, which are specifically left at the junction of two panels. However, as experience shows, OSB-3 boards, which make up the cladding of SIP panels, can have quite significant deviations in standard dimensions. So, in accordance with the standards, the permissible error is +/- 3 mm per linear meter. In addition, SPI panels from different batches can also differ significantly in linear dimensions, up to 5 mm. This leads to the fact that, for example, one of the 8 panels that make up a 10 m long wall on the plan will have to be cut at the installation site. You can, on the contrary, get a gap of 20-30 mm, which is already eliminated by filling with polyurethane foam.
Choosing a foundation
Structures made from SIP panels have significantly less weight than walls made of brick or even porous concrete (gas or foam blocks) and, often, they do not require wide, powerful foundations. However, when choosing the type of foundation, it is necessary to focus on the characteristics of the soil. Therefore, houses using the new technology of SIP panels can use the following types of foundations:
Reinforced concrete monolithic shallow slab
This is the so-called “Swedish” or “floating” foundation. It is one of the most expensive, but most effective bases. It is recommended to use it on weak-bearing unstable soils (swampy, quicksand, peat bogs). At the same time, if the site has a high level of rising or standing groundwater, then a branched drainage system should be installed under the reinforced concrete monolithic slab.
“Floating” foundations often contain elements of the main utilities of the house, layers of insulation, and in some cases, “warm floor” heating systems. This design can play the role of a heat accumulator and significantly increases the energy efficiency of the entire structure.
The technology for building houses from SIP panels on a slab base allows for the construction of two and three-story buildings.
Strip foundation
On non-heaving soils, its depth may be higher than the freezing level. If it is planned to equip the house with a basement or the rock adjacent to the base is subject to severe frost heaving, then the base of the foundation is buried below the actual freezing mark. Ribbon structures, especially reinforced concrete ones, have a fairly high load-bearing capacity, so they can be used for the construction of houses of any number of floors.
Bored pile foundation
It is characterized by a laying depth exceeding the level of soil freezing. Installation of SIP panels is carried out on a prefabricated reinforced concrete grillage, which performs the functions of tying piles. Bored supports support the weight of structures, allowing houses with attics to be built on them.
Screw piles
A prefabricated wooden rand beam is usually used as a strapping on them. On soils with average bearing capacity, screw piles can be used in the construction of one-story houses, as well as those with small attics.
Zero level
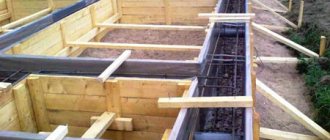
Before starting the installation of SIP panels, a lower trim (crown) beam with a section of 100x150 mm is laid on the foundation base. The place where it is placed should be reliably waterproofed. For this, bituminous mastic, roofing felt (in two layers) or several layers of bituminous paper are used. In addition, the timber itself must be treated with antiseptic and water-repellent compounds. The figure below shows a diagram of laying the strapping on a strip foundation.
IMPORTANT! The installation of the lower beam and the establishment of the “zero level” must be approached with special responsibility. Not only the ease of subsequent assembly of SIP panels, but also the quality and durability of the entire structure depends on the accuracy of its positioning.
Crown fastening
The lower beam is fastened to the base using anchor bolts with a diameter of 10-12 mm. They are buried in the concrete by at least 100 mm, installed in increments of 50 cm. The bolts are screwed flush with the surface of the beam. To do this, it is recommended to drill countersunk holes in the wood - holes larger than the diameter of the bolt head, and to simplify installation operations, use socket wrenches. The recesses of the recesses can be filled with tar or bitumen; they will help prevent corrosion of the fasteners.
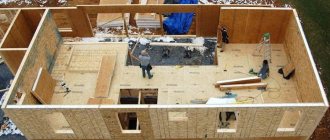
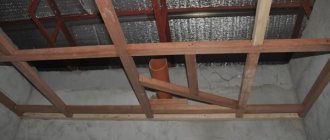
Basement tier
The structure of the basement tier (floor) consists of wooden logs (load-bearing frame) and horizontally arranged SIP panels. To assemble it, the first panel is laid on top of the frame in the corner. A groove is selected in the polystyrene layer along the perimeter of its end part. A SIP key or an insert from a piece of timber 80x200 mm (for SIP with a thickness of 225 mm) is placed into the short inner end. Such protruding elements become ridges, to which the next SIP panels with pre-selected grooves are installed.
After assembling the first row, a groove is also selected in its longitudinal end part for laying a log made of 80x200 mm timber or doubled from 2x40x200 mm boards. The pairing is made with wood screws 75 mm long, screwed in at intervals of no more than 40 cm. The panels are attached to the joists through OSB-3 facing boards with self-tapping screws 40 mm long at intervals of 150-200 mm. The final stage of creating a basement floor is the protection (rubbing) of the external ends of the SIP panels. They are covered with a 40x200 mm board.
This is what a typical arrangement of basement floor elements looks like:
IMPORTANT! Before laying the panel elements of the basement tier, their lower planes must be treated with bitumen waterproofing mastic.
Sometimes, for the sake of imaginary savings, the technology for building houses from SIP panels is deliberately violated and ordinary boards on joists are used to construct the basement floor. The creation of a thermal insulation barrier is carried out on a base of expanded clay, poured directly onto the ground over a layer of waterproofing. Although this method can be used when installing a strip foundation, however, its effectiveness leaves much to be desired. Good thermal insulation of such a structure will require the installation of additional insulation between the subfloor and the finished floor, such as foam sheets or mineral wool. This will negate the initial savings and will end up being more labor intensive.
Connection of SIP panels
Panels for SIP houses are fastened according to a special principle. It consists of using a wooden dowel (beam).
The beam is placed in a special nest (groove) and secured in it using fasteners. For fastening the following are used:
- self-tapping screws;
- screw nails;
- rough nails.
To make the connection airtight, polyurethane foam is applied to the side of the SIP panel. This material fills the cracks, thereby providing thermal insulation and protecting the panel from moisture. Thus, SIP panels form a durable structure that is not susceptible to moisture.
Walls
Bottom wall trim
After assembling the basement floor, the beams of the lower wall framing are installed on it in accordance with the plan of the interior. The elements of the bottom trim are beams with a width corresponding to the thickness of the polystyrene foam in the SIP panel and a height of 50-60 mm. A massive beam of this size is not always available for free sale, and it costs a lot. Therefore, often, a composite element made up of several boards of suitable sizes is used instead. The lower trim is fastened with 75 mm self-tapping screws in increments of no more than 40 cm.
When placing the timber, it is necessary to take into account the location of the doors in the interior. For ease of installation, as well as to prevent errors in planning, the timber in the doorways is cut after the walls from SIP panels have been assembled. Therefore, in such places, the lower trim is not screwed to the floor.
Installation of wall panels using a frame method
The wall assembly of houses from SIP panels is carried out using methods similar to those already described for the lower floor. The most common is the frame method, in which the splicing parts are no longer logs, but double racks 40 (50) x 150 mm (for SIP with a thickness of 175 mm):
- assembly begins from the corner of the building, placing the first wall element on the framing beam and aligning its end flush with the floor slab;
- the panel, on the outer and inner sides, is attached to the frame with self-tapping screws (L=40 mm, pitch - 150 mm);
- A single 50x150 mm post is placed in the outer vertical end and screwed through the OSB sheets with self-tapping screws (L=40 mm);
- A vertical double post (corner tenon) is installed along the inner edge of the panel opposite the end of the corner perpendicular wall. It is attached with 8x240 mm self-tapping screws with partial threads, screwed in from the outer plane of the first wall panel with a pitch of 400 mm;
- The assembly of the corner ends with the joining of a perpendicular panel, scrolled along the corner tenon with self-tapping screws 40 mm long. To ensure a tight fit, it is knocked down from the end with a sledgehammer through a spacer made of board or timber;
- further ordinary technology for installing SIP panels involves similar actions - connecting the next section of the wall through a tenon rack.
IMPORTANT! In order for the rack to extend into the panel to the required depth, a groove is made in the polystyrene foam. The strength of the connection of the wall elements, as well as the thermal efficiency of the joint, depends on the uniformity of its sampling. Therefore, when making a high-quality groove yourself, you should purchase or rent a thermal knife (in the figure below) or a special device for an angle grinder, consisting of a stop and a milling attachment.
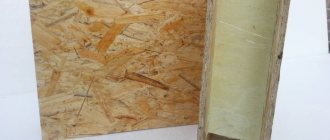
Installation of wall panels using a frameless method
The frameless connection method involves the use of dowels made from OSB-3 boards or special thermal inserts, the so-called “splines”. They are a narrow fragment of a SIP panel, its dimensions fitting inside the groove of a full-size panel. This frameless assembly technology makes it possible to reduce heat loss through the wood material of the timber, which has a higher thermal conductivity than polystyrene foam. The diagram for installing a SIP panel in a frameless manner using splines is shown in the figure below. It is optimally suited for the construction of one-story houses.
IMPORTANT! Regardless of the chosen installation method, the joints of any elements are treated with polyurethane foam before placing them in place. It helps to achieve absolute tightness of joints and increase the reliability of the structure as a whole.
After completing the assembly of the walls of the first floor, the upper ends of the panels are also foamed, and a 40 (50) x 150 mm strapping beam is placed into the foam sample. It is screwed along all OSB sheets with self-tapping screws 40 mm long, and to the frame posts - 75 mm.
Interfloor and attic floors are made in the same way as the basement level, just as the technology for assembling the walls of the second or attic level repeats the installation operations for the walls of the first floor.
Instructions for assembling houses from SIP panels
In Russia, every year the number of families who have built their own houses using panel-frame technology increases exponentially. It is likely that there is no longer even the smallest settlement where several similar buildings do not stand. But before construction, the question arises: how will the installation take place?
In the illustrated instructions, we tried to show in sufficient detail all the stages of construction of the designed home. For quick and high-quality assembly of SIP panels, strictly follow the provisions of this instruction.
1 The initial step of construction is the construction of the foundation. The recommended types for the panel-frame system are varieties of screw piles. The advantageous advantages of this proposal are that all work takes place in a very short time (approximately 1, 2 days), it is possible to carry out construction in the winter season, screw piles do not need to settle, and the cost is significantly lower than traditional options!
2 After completing the foundation work, we move on to reliable waterproofing of wooden elements from metal and concrete parts of the structure. Before laying the base crown (tiring) beam on the heads of a pile foundation or another type, roofing material is laid in two layers in accordance with GOST 10923-93.
3 The third stage is the connection of the lower strapping beam, which serves as the basis for the floor. It is installed on the heads of iron or concrete piles in accordance with the developed drawings.
4 Further construction involves installing a floor. For waterproofing from the outside, SIP slabs are coated with bitumen mastic in accordance with GOST 25591-83 and GOST 30693-2000.
Sandwiches, according to the “foundation overlap” drawing, are laid out around the perimeter of the house. Their merging along the length and width is done by connecting them to a tongue-and-groove beam and fixing them on both sides with self-tapping screws. Immediately before splicing, polyurethane foam is applied to all SIP grooves.
5 At the end of the stage with the floors, the ends are foamed with a special compound and sewn up with a board along the outer perimeter.
6 Next, the partitions of the first floor are made. First of all, in accordance with the previously developed scheme of actions, the lower trim is laid according to the drawing “plan for the location of the trim board.” Its installation should be carried out very carefully, because if you deviate from the instructions, difficulties will arise during further work with the walls.
Afterwards, we proceed directly to connecting the interior dividers, consisting of parts of OSB boards and insulation and a wooden frame between them. First study the layout and markings of each component using the drawings. You should start by placing two corner panels.
Next, the sequential distribution of all wall parts and racks continues along the perimeter and in the interior of the building in both directions from the first corner. Before installation, all samples in polystyrene foam of installed SIP plates are treated with polyurethane foam.
The installation of each SIP is strictly controlled by the building level.
The final action regarding the lower tier of the house ends at the pre-selected last corner. The last rack, which will cover the end of this wall, is inserted into the pre-processed selection of SIP elements.
7 After completing the placement of all room partitions for the 1st floor, the upper ones are foamed with mounting mixtures, then the upper frame is laid in them.
8 On the interfloor floors, which are placed on the base of the 1st tier along the perimeter, foam of the appropriate composition is first applied. The entire process is similar to the points for the floor with a hallway.
9 The assembly of the walls of the second floor is also carried out by analogy with the first.
10 If necessary, if the spans of the rooms are large enough, then according to the drawings, the interfloor floors are reinforced with timber or high-strength LVL timber.
Later, during finishing, it can be covered with plasterboard, a suspended ceiling, or a decorative finish can be made.
11Roof placement is the final point, carried out using one of the standard SIP technology methods.
The peculiarity here is that the rafter system is simply not needed here. SIP panels have sufficient rigidity to withstand almost any possible load (for example, snow). They are connected to each other in the same way as the ceilings. The roof does not require additional vapor barrier and insulation; this is already provided for by the design of the OSB sheets themselves. There is always a warm attic under the roof in winter, so less money will be spent on heating the room as a whole.
12 After completing the building frame, the installation of windows and laying of the roofing begins. Openings can be cut in various sizes, so order windows of any shape without restrictions. This is another big plus of frame-panel construction.
Various roofing materials are used as roofing: flexible tiles, metal profiles, metal tiles - there are no restrictions.
13 Subsequent stages of work are carried out simultaneously and independently of each other, which ensures significant time savings: electrical wiring, water supply, and sewerage are installed.
14 The OSB board is a flat vertical surface; there are no restrictions on the use of finishing materials for both exterior and interior decoration, which is another huge advantage. Exterior finishing options can be very different. The outer surface of the walls is smooth and siding, block house, natural stone or stone-like tiles are suitable as cladding, plastered and painted, lined with brick.
Interior design can be done in completely different variations. In most cases, this is wallpapering over plasterboard.
Often our customers, due to their remote location or having “golden hands” in the family, assemble a SIP house from a set of the 1st configuration on their own. Our housing assembly technology is suitable for people without special skills; this will require only 2-3 people. Today we have developed very competent drawings for assembly, which even a person without an engineering education can understand.
When ordering, you will receive step-by-step instructions, which show in detail, with photographs, the entire process step by step, where, where and what fasteners to use.
To save on delivery costs, you can do this: we will send you a house kit with all fastening components, without lumber, but we will describe how much of it you need for construction (you can purchase everything at your construction bases). If you have your own transport, pickup from production is possible.
For assembly you will need carpentry tools, a list of which we will also provide.
We will try to fit within your budget. This is how we work with all customers.
Roofing structure for a house made of SIP panels
Installation of the roof begins with securing the load-bearing elements, mauerlats, purlins and ridge, resting on the load-bearing walls (in the case of a frameless assembly method) or on the racks of the structure. The purlins are fixed at the point of contact with the base with two 8x280 mm self-tapping screws.
Next, the rafter system is installed. Each rafter at the point of contact with the purlins is fixed with 8x280 mm self-tapping screws. Installation of rafters begins from one of the gables. If the roof has a complex multi-slope structure, then installation begins with the valleys. Below is a structural diagram of the placement of load-bearing elements of the roofing system.
Important! The rafter system of a house is a particularly important structure, so it is better to involve experienced assistants in its construction.
Summing up
Assembling a house from SIP panels with your own hands is quite affordable, even for home craftsmen who do not have much experience in constructing such structures. As a last resort, you can purchase a ready-made kit (constructor set) from a wide range offered by specialized companies. Carefully adjusted elements of such a constructor, as well as detailed instructions for assembling a house from SIP panels, make its use more preferable if you plan to do some or all of the work yourself.
SIP panels or frame house - which is better?
When choosing a project and technology for building a house, people often wonder what is better – sip panels or a frame house. The technology for building houses from SIP is positioned as a type of panel construction, since houses are assembled from factory-made elements. But, as a rule, when constructing a building, a wooden beam is used to connect the panels, which forms a rigid frame (as in a frame house), providing the structure with greater strength.
In fact, a house made of vulture panels is the same frame structure, where ready-made factory panels are used as an insulation cake. When filling the insides of a frame house, the human factor plays a role when it is possible to miss cold bridges, make an incorrect overlap between layers of insulation, or make a mistake when installing a vapor barrier, which is practically impossible in vulture construction (with the exception of possible un-foamed cracks, as discussed above).
Typically, housing made from sip panels is cheaper than a frame structure, so ultimately the decision is made based on the allocated construction budgets and the project you like.
Did the article help? Rate her