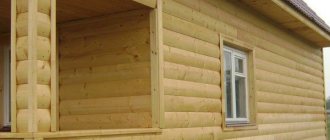
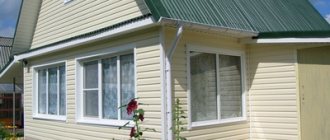
A wooden house has long been considered a symbol of good quality and high aesthetic taste. However, over time, the external attributes of well-being are erased, and the owner is faced with an urgent problem - to revive the former beauty of the structure. The question often arises of how to cover the cracked, peeling, crooked, shashal, and sometimes rotten walls of a wooden house so that it is inexpensive, practical and beautiful. Modern construction technologies offer many ways to solve this problem. Let's consider a practical, time-tested option - installing siding on a wooden house yourself.
Why siding
With the help of this material, two urgent problems are solved: protecting the building from external adverse influences; proper cladding will give the facade aesthetic appeal.
This is due to the characteristics of the siding:
- Long service life. Will last at least 50 years.
- Vinyl siding has the texture of wood.
- Easy to maintain, does not require painting, easy to clean.
- Easy. Does not exert significant loads on the foundation.
- Withstands temperature changes from -50 to +50, strong winds and precipitation.
- Immune to insect attacks and fungal infections.
- Large selection of colors.
- Simple installation technology, which makes the material convenient for finishing the facade with your own hands.
Tool for finishing the siding of a wooden house
Before you get down to work, prepare all the necessary tools so that they are at hand. Since the absence of just one element will stop the process of cladding the house. To do this you will need the following:
- roulette;
- level;
- drill;
- metal scissors;
- grinder (or grinder);
- screwdriver;
- knife for cutting plastic;
- jigsaw;
- punch (a device that makes holes around the perimeter of the panel);
- hammer;
- construction pencil or marker.
Installing siding on a wooden house is the best choice for homeowners. And the sheathing with insulation will make it possible to maintain warmth and comfort in the room for a long time.
We recommend reading: Options for finishing a wooden house inside
Preparatory stage
We decide on the amount of material. To correctly calculate the components of the future facade, you need to know what shapes there are and the produced dimensional standards for guides and panels.
- Vinyl panel. It is a polyvinyl chloride strip with a length of 3 m to 3.85 m and a width of 203-254 mm. When calculating the usable area, approximately 15 mm of the panel width, which is occupied by technological holes for fastening, is not taken into account.
There are two ways to count the number of stripes:
- First, we measure the total area of the building's facade, minus the area of door and window openings, and divide the resulting value by the total area of one vinyl panel.
- The second method is more labor-intensive, but economical. We draw up a sketch of the building, all the walls of the facade separately. We draw each panel on the drawing, based on its dimensions, and place the scraps in those places where they will fit in size. We add 5 percent to the final result and get the desired value.
- External and internal corners. The standard length of the element is 3 m. The quantity is calculated by measuring and summing the dimensions of the internal and external corners of the house, followed by dividing by the length of the selected model.
- Starting strip - used to start finishing. The required length corresponds to the perimeter of the building.
- Finishing - its quantity is calculated from the lengths: for a window strip = two heights and one width for windows (if they are recessed into the wall after finishing with siding), for a wind board = the length of the roof eaves + the length of the slopes on the side of the gables, if the wind board there is wide (in rare cases) and the length of the ends of the lining of those walls with panels that do not have pediments.
- J-profile is a universal and most popular profile. Used to complete the installation of panels around the perimeter of window and door openings, lining roof overhangs, and also as a finish on the gables of a building. The quantity is determined by measuring the lengths of the planes to be faced.
- H-connector. Serves for joining the main panels along the length. Gives the connection appropriate rigidity and decorates the joint. Purchased in quantities based on the size of the connecting seams.
- Window strip - necessary for finishing windows that will be recessed into the wall after finishing the facade. Calculated based on 1 width and 2 heights of windows + it is necessary to take into account the distance for trimming and connecting them at the corners, this for standard parts is: for pieces of planks in height + 7.5 cm in length to the piece and 15 cm in width for a piece.
Types of starting bars and characteristics
The fundamental element of the cladding, the initial profile, is complex in shape and conditionally consists of the following two parts.
- The top one has a number of holes designed for fixing to the base. There are options for the location of the grooves for fastening in 1 or 2 rows.
- The lower one is in the shape of a zigzag - a fragment of a locking connection responsible for the reliability of fastening the starting bar.
Models of initial profiles differ in size, although they are similar in shape. Each manufacturer supplies its own dimensions. But the main values are from 305 by 4.4 to 385 by 7.8 cm.
In finished siding, the starting strip is hidden from view by the first panel onto which subsequent pieces are applied. In this case, its main parameter is the length, which depends on the corresponding size of the cladding parts. Therefore, the initial profile must be purchased simultaneously with the siding itself, making a selection without discrepancies.
This part is endowed with a number of positive properties according to its characteristics.
- Not subject to corrosion, deformation, or cracks.
- Does not lose properties when exposed to weather factors, strength is maintained.
- Does not burn.
- Retains strength under temperature changes and exposure to the sun.
There is also no need to prepare special tools for installation.
Beginning of work
Siding installation activities are carried out in stages, in accordance with a pre-developed plan. Here are step-by-step instructions for carrying out the work.
- We are preparing the walls of the house for installation of the load-bearing frame. We clean the surfaces from old, peeling paint, dirt, and elements of old cladding.
- Using sandpaper or a plane, we clean the areas where the façade is affected by fungal diseases and mold. We replace rotten, rotten, and insect-eaten parts.
- Apply 1-2 layers of antibacterial solution to the walls using a brush, roller or spray. For this purpose, a deep penetration primer is used to treat wooden surfaces.
- If necessary, we waterproof the walls. Specialized materials are available on the construction market, but the use of ordinary polyethylene film is allowed.
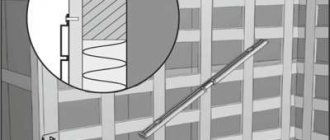
What is an initial profile and what is it for?
The first cladding panel must be firmly attached, as it determines stability and reliability. It’s also important what the result looks like. For this purpose, a starting bar is specially installed, from which installation begins. Both this element itself and the installation procedure for different cases have their own characteristics. It depends on the type of base and takes into account other nuances.
Cladding panels can be traditional or finishing, imitating natural materials. Sometimes they make combinations of them. Combination into one structure occurs through additions:
- the initial plank from which the rest of the installation is carried out, completely covering it with panels;
- corner;
- H-shaped, connecting;
- finishing, located at the top, completing the installation.
Other elements are also used. The starting profile is a plinth of complex configuration, equipped with grooves for attaching to the wall. The first trim panel will be installed on it. With a standard size of 3 by 0.66 m, it must be properly attached so that the rest of the wall trim can lie flat. The starting bar differs in fasteners, degree of reliability and resistance to the environment, depending on the manufacturer. Most often it is implemented in sets with other frame profiles.
Installation of supporting frame
The operation is performed if the option of installing and fastening the siding to the sheathing is chosen. Installation without sheathing is usually used when cladding new buildings and refusing to use insulation. Also in cases where the wall surfaces are smooth and do not have vertical deviations or significant flaws that could affect the straightness of the outer covering after its installation. Siding can be installed on OSP boards without lathing.
General rules for placing the frame base:
- For the sheathing, wooden slats or a standard galvanized metal profile are used. Wood is cheaper, but it must be prepared: dried and soaked in antiseptic;
- Frame guides are placed vertically, aligned horizontally and vertically, in increments of 300-400 mm;
- Installation begins from the corner of the house. Corner guides are attached in such a way that the perforated holes in the corner profile of the siding fall within the mounting surface of the frame rail.
- When insulating, it is better to make a rigid frame and 50x50 or 50x40 bars for insulation boards to be mounted horizontally, and a counter-lattice of 20x50 or 25x50 to be installed vertically.
Installation of siding sheathing
Sheathing for siding is a rigid frame that is attached to the surface of the walls for their further finishing. It is necessary for a number of reasons:
- Allows you to maintain the strict geometry of the walls and the entire structure.
- Forms a ventilation gap between the wall and the facade material, helping to remove moisture from them.
- Allows for external insulation of walls.
There are several lathing options.
Features of wooden and metal lathing
The lathing for covering a frame house with siding can be wooden or metal. To make a wooden structure, use a beam with a cross-section of 50x50 cm. This should be a well-dried material without signs of rot or delamination. Before installation work, the wood is carefully treated with fire retardants and antiseptics.
Wooden sheathing, compared to metal, is a more budget-friendly option. However, over time, it is susceptible to external factors, which negatively affects the quality of the cladding. The panels may swell and warp.
The metal frame is more resistant to moisture and temperature changes. It retains its rigidity and geometry for many years. For work you will need: UD-profile guides, ES-brackets (U-shaped).
One- and two-layer lathing
The frame for fastening the siding can be one- or two-layer. The choice of design directly depends on whether you will perform external wall insulation.
Useful: Linen insulation: natural and environmentally friendly
A single-layer frame, be it wooden or metal, is one row of guides to which the siding is attached. This option is ideal for houses with smooth, already insulated walls.
A two-layer frame is two layers of guides fixed perpendicular to each other. Insulation is placed in the cells formed by the first layer. The second layer forms a ventilation gap between the cladding and the insulation. This design is relevant for any wooden house.
Note! Quite heavy basement siding, the installation of which almost always also involves laying insulation, is attached only to a metal frame.
Preparing walls and plinth for installation work
The lathing is installed only on a pre-prepared base. It should be as smooth and clean as possible. To do this you need to do the following:
- Remove all protruding elements of the facade that may interfere with work: shutters, grilles, lanterns, etc.
- Securely fix the old coating if it is coming loose. It can be lining, block house, board.
- Dismantle the finishing of poor quality.
- Treat the wood with antifungal agents.
It would be a good idea to remove around the perimeter of the house those plants that can grow under the ventilated façade.
Assembly and installation of the frame - basic rules
The frame for the siding of a wooden house must be reliable and durable. To make it so, you must follow a number of rules.
- The lathing is mounted only on top of the waterproofing material . If you are building a frame house, then lay this layer of wall “pie” on top of the rough sheathing.
- The frame guides must be perpendicular to the facing panels. If you use vertical siding, then place the guides horizontally, and vice versa.
- The pitch between the sheathing elements on which the sheathing will be attached is 300-400 mm.
- The structure must be reinforced with stiffening ribs around the perimeter of window and door openings.
- The outer guides are installed at a distance of 100-150 mm from the corners.
- The frame is fixed with fasteners in increments of 300-600 mm.
Do not forget to use a building level at each stage of work. Immediately detected deviations of the frame along the vertical and horizontal axis will save you from financial, time and labor losses.
Installation of wooden sheathing
You can attach the guide bars of the wooden sheathing directly to the walls of the house if you do not plan to insulate them. The main thing here is to maintain the step between the posts and align all the elements along the axes.
If you cannot do without insulation, the scheme may be as follows:
- The insulation is laid between the beams of the first layer of sheathing.
- A vapor-permeable membrane is stretched over the walls, securing it with staples.
- A counter-lattice made of slats 30-40 mm thick is attached parallel to the frame beams. They form a ventilation gap.
This option is inconvenient because the pitch of the guides for the insulation is greater than the optimal pitch of the slats for installing siding (600 mm versus 300-400 mm). The insulation will have to be cut, and this is a rather labor-intensive process.
A worthy alternative is the installation of cross lathing. In this case, the guides of the first layer of the frame are mounted horizontally. Insulation is laid in them, covered with membrane material and pressed with a second layer of beams, mounting them vertically.
Assembling a metal frame for siding
Installation of metal sheathing profiles is carried out on pre-fixed ES-hangers. They are fixed on the working surface according to the markings made. A profile 3 m long requires at least four hangers.
After fixation, the perforated plates are folded back. Guides are inserted into the formed U-shaped brackets, aligned along the axes and secured with metal screws. The presence of perforations on the brackets allows you to adjust the distance from the profile to the wall of the house.
If you need a metal frame with insulation , follow the following instructions:
- Install hangings on the walls of the house.
- Place insulation boards on them. For convenience, you can pre-make holes in them with a knife.
- Using the same pricking method, attach a vapor-permeable film over the insulation.
- Attach the guides to the hangers and secure them.
- Trim or bend the protruding “ears” of the hangers.
To prevent the formation of “cold bridges” in the places where the mounting brackets are attached, place paronite gaskets .
Useful: 9 options for exterior finishing of a frame house
Insulation
Recommended but not required operation. The option without insulation is chosen if it is necessary to reduce estimated costs and if, when living in a given house in winter, the room is warm and easily warms up. With insulation it will be warmer in winter and cooler in summer. A budget method is to use foam plastic 40-50 mm thick, but it is not recommended for wooden houses and “breathable” facades. A safer, more technologically advanced and effective method is mineral and basalt wool. It is better not to use rolled heat-insulating materials for walls, but to give preference in the form of slabs. The insulation must be secured with special mushrooms and then the mineral wool must be covered with a film (membrane) and secured with a construction stapler. Then a conro-latt is installed to secure the panels.
How to attach siding
Installation of siding panels must proceed sequentially. Below is a step-by-step instruction for the stage-by-stage cladding of a house.
Preparation of the base and wood
Before you begin covering the walls with siding, it is necessary to conduct a preliminary inspection of the walls of the house for damage. The walls should be thoroughly cleaned of dirt and dust and unnecessary elements should be removed from them (old cladding, decorative elements, etc.) - everything that will interfere with installation work.
If there are areas affected by mold, they must be removed using sandpaper. You can also use a plane, but the main thing is not to overdo it and not remove a large layer of wood, thereby creating unevenness on its surface.
Afterwards, it is recommended to treat the wall with antiseptic and fire-fighting solutions - this will help prevent various problems with the walls in the future.
Waterproofing under siding
The walls of the room must be waterproofed. To do this, use a special material that can be purchased at any hardware store. If you use the material to insulate the walls, then the waterproofing is attached on top of it.
Insulation for siding
insulation with wall glass wool or mineral wool
An important step in external wall insulation is leaving a gap between the insulation and the cladding of the room in order to create air ventilation that prevents the formation of fungus and mold.
Lathing for siding
The basis for fixing the siding panels is the sheathing. It can be made from metal profiles or well-dried wooden blocks.
When using insulation, the sheathing is pressed onto a previously installed structure that holds the insulation material. If insulation is not used, then the sheathing is stuffed over the waterproofing material fixed to the walls of the house.
Installation process
- The bars are installed at the corners of the building. They must first be leveled so that there is no slope.
- The thread is tensioned between the corner beams.
- A starting strip is installed, on which the entire position of the canvas will depend. The starting strip is installed strictly according to the level.
- On the corner beams, a lower point is marked, from which 4-6 centimeters are retreated and the self-tapping screw is not completely screwed into this point.
- A thick thread is pulled between the screws, along which the starting siding panel will be aligned.
Corner profiles
The corner profile is applied to the corner of the building so that there is a gap of 6 mm between it and the beam. Then the starting guides are fixed to the sheathing so that the gap is at least 5 mm.
Note! It is best to fasten the panels using aluminum nails, 2 cm long and 3 mm in diameter.
Then the internal and external corners are installed, which are attached below the starting bar. The upper strip is fixed over the lower one with an overlap of about 2.5 cm.
Installing siding corners
Securing the starting J-profile
Once the corner profiles have been installed, the J-profile is fastened around the perimeter of the door and window openings. Afterwards the siding panel is installed in them. This is all done provided that the openings are located on the same level with the wall, but if they are recessed into the wall, then you will have to install door and window slopes.
How to cover a window
The next stage of cladding the house is the fastening of window trims, trims and ebbs. After mounting them, it is necessary to secure the linings at an angle of 45 degrees.
Panel installation - cladding technology
The most important process is the installation of siding panels. It is produced from the bottom up and begins with a starting strip into which the lower part of the siding is inserted. The upper part is attached to the sheathing using aluminum nails: you should start attaching the panel from the middle, gradually moving to the edges. After installing a row, you can begin installing the next one, and so on step by step until completion.
Important! When installing siding panels, it is necessary to leave a gap of 4-6 mm between them. Since siding tends to expand when the temperature rises. Installation of the panels is very simple, since they have lock-type connecting parts and special holes for fasteners
Therefore, they are easy to fix together and attach to the base
Installation of the panels is very simple, as they have lock-type joining parts and special holes for fasteners. Therefore, they are easy to fix together and attach to the base.
Step-by-step instructions for cladding
- Installation of the panels begins with fixing the corner pieces at the corners of the building.
- Installation of starting profiles. The strips are aligned horizontally and fastened along the lower edge of the frame base.
- Installation of window trims with finishing strips or trims around the perimeter of window and door openings.
- It is better to fix all elements with galvanized screws 19-25 mm. The screws are screwed strictly in the center of the panel mounting holes. In this case, a 1-1.5 mm gap is left (between the surface of the profile and the screw head) for the free movement of the material associated with thermal changes in dimensions.
- When marking siding, the property of temperature deformation is taken into account. Before attaching the panels, the material should not be exposed to open sunlight and frosty temperatures. The optimal temperature for work is 10-20˚С, otherwise the expansion coefficient is applied. At low temperatures, the strips are cut in the direction of decreasing the length; in hot weather, the length of the profile is 2-3 mm less than the distance measured from the fixation grooves of the vertical profiles.
- The first panel is installed in the groove of the corner and starting profile, secured with self-tapping screws, in the direction from the center to the sides. Subsequent strips are engaged with the previous panels and fastened in the same way.
- If it is necessary to join the sheathing elements, it is carried out with an overlap of 2-2.5 cm. If the finishing is carried out without connecting profiles (H-profile), then the joints of the panels should not be located on the same vertical line with adjacent panels.
Installation of overlapping siding
Installation of panels through the connecting - The finishing strip for fixing the topmost siding panel is secured in the manner described above. The last strip of the main profile is carefully cut to the required height, bent, and tucked into the groove of the finishing strip. It is recommended to make a nail in the last sheet of siding to secure it well in the final profile. To do this, from the inside, punch holes with a nail in the very top part of the panel, which will fit into the finishing groove. This will hold the last panel well and it will not fall out due to thermal expansion.
- On the side of the gables, the ends of the walls are framed with a J-profile or internal corners.
- Lining the roof with soffits begins with installing J-profiles from the wall of the house along the entire perimeter of the roof. If you installed internal corners on walls with gables, at the junction of walls and overhangs, then you do not need to install J-profiles on them. We also install a J-chamfer with finishing along the eaves of the roof, and on the gable slopes we install a J-profile or a J-chamfer if it is necessary to cover a wide board (in rare cases). After installing the parts, begin installing the soffits. It is recommended to cut them into pieces equal to the width of the roof overhang and insert them into the grooves of J-profiles and J-chamfers and secure with self-tapping screws.
Video: Siding - technology of work
If you adhere to these simple rules, the effect will be as expected. The wooden house will receive a new exterior, and the owner will be proud to say that it was done with his own hands.
Rules for installing a metal frame
To install this type of lathing, you will need a metal profile, which is used for installing plasterboard walls, ceilings and partitions. These are PN 28x27 and PP 60x27. These planks will be attached to the wall of the house using special hangers, which craftsmen call “pawns”.
Profiles PN and PP
If it is necessary to mount a two-tier metal frame, which requires the presence of a protrusion under the roof or in the upper part of the wall, special “crab” fasteners are used to connect the metal strips. They are designed for strong joining of vertical and horizontal planks. SMM 3.5x51 self-tapping screws, which experts call “seeds,” are used as fastening elements.
A visual diagram of the correct use of fasteners
Stages of installation of metal lathing
Installation of windproof film
Step 1: drawing up a sheathing diagram
At this stage of the work, it is necessary to decide what step between the sheathing posts will be optimal. This distance depends on what material is chosen for wall insulation. If it is mineral wool in rolls, then the pitch between the frame posts should be 3-4 cm less than the width of the sheet. This will allow the insulation to be laid in the openings between the sheathing posts so that there are no gaps between its sheets.
Next, determine the installation locations of the hangers, focusing on the following rule: the outermost “pawns” should be located no less than 15 cm from the side, top and bottom of the wall.
Profile installation diagram
Step 2: marking
Markings corresponding to the scheme are applied to the wall. Use a marker.
Step 3: installation of hangers
Fixed hangers
Using wood screws and a screwdriver, attach the hangers to the wooden wall of the house. These metal strips are placed horizontally, aligning the marking point with the center of the wide slot in the middle part of the suspension. At the initial stage of siding installation, the perforated “legs” are not bent, but left pressed against the wall.
Step 4: Installing Corner Sheathing Posts
What and how to cut a profile
Corner
How to make a frame for siding on an outside corner
This is what the corner looks like
Corner posts consist of two PP 60/27 profile strips connected at right angles. They will serve as the basis for installing the external and internal corners of the siding. When installing corner posts, it is important not to make a mistake and install the corner exactly as needed: for external corners with the protrusion outward, for internal corners with the protrusion inward.
Step 5: installation of intermediate vertical sheathing posts
Attaching the metal frame stand to the suspension
Profile fastening, side view
It is important that all vertical supports of the frame are located in the same plane. If you stretch a thread between the corner posts, installing the intermediate posts will be easier and faster. The lower and upper ends of the PP 60/27 profile are inserted into the PN 28/27 guides and secured with self-tapping screws. Thus, the frame acquires the required rigidity.
Profile 60x27 rests on horizontal 28x27
Profile extension, fastening with self-tapping screws and connector
Step 7: installation of frame for windows and doors
Longitudinal profile above the window
Docking profiles
Framing profile installed around the window
Lathing on the lintel between the door and window on the second floor
The metal frame around window and door openings must be a strong frame of regular geometric shape, exactly following the contours of the opening. It is necessary to take into account that the slopes and ebb should have a slight slope from the window installed in the house. Therefore, the frame is mounted in such a way that its vertical and horizontal slats are located at a distance of 1-2 cm from the window lines. The same requirements apply to doorways.
This is what a doorway looks like ready for siding installation.
Prices for popular models of screwdrivers
Screwdrivers
Installation of soffit siding
8.1. Using a wind bar
If the frontal board is small, it can be closed using a wind strip. To do this, a finishing strip is mounted along the upper edge of the front board, and the wind strip is attached so that its upper part is fixed with the finishing profile.
Then the J-profile is attached to the wall and a soffit is installed between it and the wind strip.
Installing a soffit using a wind strip
In this case, the soffit can be installed in one of two ways shown in the diagram.
8.2. Siding soffit - installation using the outer corner
Soffit siding - installation using an external corner In this way, installation is carried out if the front board is wider than the wind strip.
In this case, the outer corner is attached to the edge of the frontal board, and the J-profile is on both sides of it at the required distance. The soffit is cut to the required size and placed between one of the corner parts and the J-bar.
The second side is finished in the same way.
It is not recommended to install a dark-colored soffit in this way, since it is highly susceptible to fading on the front strip.
Installation technology
It is necessary to install additional elements taking into account certain rules and nuances. This will allow you to complete the work without much difficulty and avoid problems in the future.
Required Tools
For fastening you will need the following devices:
- Screwdriver or drill with adjustable speed. It is used for screwing in self-tapping screws, therefore it is additionally equipped with suitable bits.
- Level. Necessary for setting planks and profiles. If accurate alignment is not performed, further work will be extremely problematic.
- Grinder, saw or electric jigsaw. Used for cutting fragments to the required size.
- Pliers for creating holes. "Ears" provide more reliable fixation when connecting the finishing strip or molding.
- Hammer. Used when nails are used instead of screws.
- Mallet. Sometimes necessary for displaying panels. If such a tool is required, most often this means non-compliance with temperature clearances.
- Measuring devices: ruler and tape measure.
A complete set of tools for siding installation.
Everything you need is prepared in advance to complete the work without delays.
Attaching the starting strip
Work begins after installation of the sheathing. All racks must be exactly level in a single plane. The starting strip for metal siding or vinyl with horizontal panels must be mounted as follows:
- The part is fixed along the lower edge of the building or along the ebb, if the basement section is created separately (its cladding is almost identical to the work with the facade).
- To attach the initial element, 4–6 mm are retreated from the ground, a line is drawn, and 40 mm are measured upward from it. This is a standard setting for most products with a width of 45–50 mm.
The starting bar is attached at some distance from the ground - Screws are screwed in according to the markings or nails are driven in, everything is checked for level. The fastener is placed at right angles exactly in the middle. Fixation starts from the center and moves to the edges.
Important! For all components there is a general rule - there must be a gap between the head and the surface of the part. This will compensate for thermal expansion.
- If you need to join fragments when there is not enough length, they must be secured at a distance of 6–10 mm from each other.
Starter products are used together with complex corner segments, so a gap is also formed between them.
There are two possible options for joining starting strips and corner profiles: 1 - with a gap between the parts; 2 - without indentation, but with trimming of nail strips on the corner element
When choosing the vertical method, the parts are placed parallel to the panels.
Installation of H-connector and J-profile
Due to the fact that the joining strip is used to connect different sections of siding, it is placed after the initial strip and corners have been set. The product is placed strictly vertically; exceptions are possible only with complex cladding options, in which case careful adjustment is required. Fixation is carried out with self-tapping screws through the existing holes in increments of 35–45 cm; a technological gap must be left. The edges of the siding should not fit tightly to avoid deformation due to thermal expansion.
When joining elements, it is very important to take into account the damper gap
If the J-profile is used as a docking or other element, the procedure is as follows:
- The location is determined, after which the part is aligned in a given direction exactly according to the level.
- If trimming is required (especially when working with window openings and roof overhangs), it is done without forming an angle or maintaining a 45-degree bevel. The siding must be inserted with a gap; there should not be a tight fit.
- Fastening is done according to standard rules with a gap between the head and the surface.
It is quite possible to arrange external and internal corners using a J-profile.
This profile is an excellent option for creating a hanging structure and lining a cornice.
Installation of finishing strip
To complete the façade work, the finishing part is secured. The last panel is cut to the required size, the final profile is fixed under the roof overhang. For reliability, mounting holes are punched along the edge of the siding. The front part is slipped under the bent section of the finishing strip.
When using such a profile for window edging, it is recommended to cut it at an angle of 45 degrees with a small gap. The fragments are placed along the inner perimeter of the opening and are used to attach the spotlights.
Starting strip for façade panels
Siding is a wonderful development of mankind, one of the most popular materials for exterior renovation of buildings, and its installation begins with the starting element of galvanized siding. But in order to decorate a building with this material, you need to purchase a kit for its installation.
The installation of this part begins the process of finishing external surfaces, so this product is also called starter siding. The purpose of this element is to fix the initial sheet. The presentability of the building and its durability largely depend on the reliability of fastening the first sheet. If the starting strip is poorly secured, then the rest will not last long, this should be remembered when starting to arrange the facade.
Do I need a starter strip for siding?
This inconspicuous part of the trim takes first place in the list of additional accessories and this is no coincidence. After all, in order for all the arrangement work to be simple, absolutely smooth and reliable, it is necessary to use this very construct. Its purpose is to allow all subsequent rows to be secured perfectly evenly, being the basis of the entire process. All subsequent panels will be mounted on it. At the same time, it will not be visible, but hidden under the lower level of the siding modules.
This part for the beginning of the siding covering is made of galvanized steel. Galvanization provides resistance to corrosion and extends its service life. One of the main advantages of our additional elements is their reliability and long service life.
You can order our products by phone or leave a request by clicking the “Make an order” button at the bottom of the page.
Tips for installing initial siding strips
The initial strip for siding is attached to the assembled and structural frame or, as it is also called, sheathing. It is the starting and main one in fastening the panels. Starter siding must be installed taking into account the horizon. The most important aspect is that you need to set aside 40 mm from the bottom edge, because the mounting holes are higher than the mounting lock. To do this, you need to use a level and make a zero mark along the entire perimeter where the surface will be covered with panels.
To speed up and facilitate the process, you can use a chop cord. Everything is fastened with self-tapping screws, screwed to the frame in the middle of the corresponding hole. Thus, the work is carried out in the most competent way. After everything is securely screwed, you can install the facade finishing.
Proper installation is the key to long-term and unconditional service of this type of façade covering. To do this, you must select and purchase all the necessary additional elements:
- starting strip made of galvanized steel;
- connecting strip (or H-profile, designed, naturally, to connect parts of the trim, increasing the length and hiding the seams);
- corners (external and internal, designed for convenient installation in all curves of the building);
- near window products, platbands (for installation around doors and windows);
- soffits and wind strips are used for lining eaves and roofs;
- finishing strip is the final component that allows you to complete the fastening of the metal facade.
Finally, about starter siding and more...
Of course, everything can be done without additional accessories, however, the quality of the finished facade will be many times lower, including without special equipment, and the speed of work will be much lower. Agree that with a screwdriver the speed of screwing in screws is tens of times higher than with a screwdriver, although this is possible.
Do everything carefully, correctly and with pleasure!
And by clicking the “Make an order” button below, you can tell us about your needs, and we will try to fulfill your tasks in the production of additional elements.
Types of parts
In order to correctly select the necessary elements of decorative cladding and understand their types, it is necessary not only to know the dimensions and purpose of the components, but also to take into account the features of the constructed structure.
This cladding detail is used as a starting profile from which the main installation process begins. Its installation involves fixing the top edge with nails along a pre-applied chalk line.
Hinged bar
To protect the siding from rainwater flows, install a hinged strip. It is mounted above the top opening of the window or in the place where the plastic cladding panel meets the base of the building.
Connecting and window strips
The connecting part (3.05 m) provides for the connection of decorative panels to each other at the joints in order to hide the seams.
Along with the J-Trim element, the window trim (3.05 m) serves as a trim for door and window openings and is attached along their perimeter. There is a wide (more than 14 cm) variation of the window strip, its purpose is similar.
Related Items
External and internal corners at the junctions of two walls are covered with corner accessories, the length of which is 3.05 m. The roof eaves are finished with a J-chamfer (3.66 m). Standard (3.66 m) and wide platbands edge the openings.
The niches around windows and doors are sheathed with additional strips, the width of which ranges from 23 cm. Corner radius components are a rounded analogue of the outer corner part, and can be used together with a wide platband or separately from it.
Finish strip and soffit
Before installing the last row of vinyl panels, the finishing fastening element (3.66 m) is installed, which is the final decor of the facade.
The soffit dimensions are 3 m long and 0.23 m wide. This façade decor provides ventilation for the exterior of the building and its roof. It is usually used for cladding gables. It can be produced with partial or complete perforation, as well as without it.
Installation features
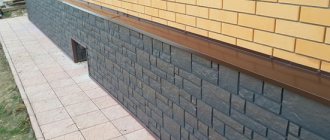
Types of socles
As mentioned above, this strip is mounted directly in front of the siding sheathing. Based on the fact that the base can be of different types, the installation of the strip is carried out in different ways. There are three types of base:
- Smooth.
- Sunken.
- Speaker.
When installing the starting strip on a sinking and level base, the installation principle is the same. A protruding base requires a different approach. In some cases, installed sheathing on the wall can turn a protruding plinth into a recessed one.
Note! The starter strip is installed not only to begin installing siding. It is also used for cladding attics and finishing gables. The plank can also be installed from the second or third floor.
Finishing strip and other additional elements for siding
First, let's get acquainted with the appearance and functions performed by the finishing strip and other additional siding elements.
Table. Finishing strip and other additional finishing elements with vinyl siding.
| Item name | Why is this element needed? |
| Starting bar | Installed at the bottom of the trim and serves as fastener for the first siding panel. The starting strip itself is fixed to the sheathing using self-tapping screws (it is also acceptable to use nails if the frame is made of timber). When connected to the first siding panels, this additional element is usually closed - it will not be visible from the outside. |
| Connecting H-bar | Sometimes the length of the walls is longer than the length of the siding panels. In this case, it becomes necessary to increase their length by installing sections of certain sizes. An H-shaped strip is used to seal them tightly with the main siding panels. It is attached to the sheathing on the left and right using self-tapping screws. The outer side of the H-shaped strip after joining with the siding panels remains visible, so the choice of its color should be approached responsibly. |
| External corner strip | A strip for joining siding panels on both sides of the outer corner. Conventionally, the product can be divided into visible and invisible parts. The first covers the ends of the vinyl siding panels, the second is used to fasten the plank to the wall. It is desirable that the color of the product be the same as that of all other additional elements. |
| Internal corner strip | In its design and function, this additional element is similar to the previous one, but is used not for external, but for internal corners of the house. |
| J-bar | This additional element is intended for edging and giving a finished look to window and door openings in the house. Also, J-shaped strip is used in some cases for gable edging. |
| Window strip | In some cases, the windows in the house are “recessed” into the opening. To finish them in such situations, a window strip is used, which plays the role of a slope. |
| Finish bar | It is used when finishing a house using siding to hermetically fasten panels in a horizontal position. The finishing strip is installed under the roof eaves. Also sometimes used to secure window trims when working with openings. |
| Drain plate | Installed above the walls of the house, it allows rainwater to drain to the ground without moisture getting on the siding panels. |
| Hinged bar | This additional element is fixed at the bottom of the finish if the house has a protruding base. The hinged bar closes it and protects it from moisture. |
| Soffit | Used to cover the inside of the cornice. As a rule, some of the soffit strips are perforated for the purpose of ventilation and to prevent the formation of condensation and dampness. |
In the figure you can see the main dimensions of the most important additional elements for siding
All additional elements for siding, their appearance and location in the exterior of the house
Installation of gable siding
installation of a J-profile along the roof slopes. Installation of a pediment is no different from the installation of ordinary strips of siding. Produced as follows:
9.1. installation of the starting strip. Occurs in full accordance with the rules described above.
9.2 installation of J-profile along the roof slopes.
Good to know: You can use all the remnants of the J-profile that you have accumulated during your work to finish the gable. Still, it is not visible under the roofing material.
Extension of J-profile 9.3. J-profile extension.
This work is performed as shown in the photo.
Fastening the J-profile at the top of the gable 9.4. Attaching the J-profile to the top of the gable.
To do this, the J-planks must be placed on top of each other and the front part must be cut diagonally. Don't forget about the gap.
The correct angle for cutting siding is 9.5. Preparing the planks.
In order to cut the siding strip correctly, you need to measure the angle of the roof slope.
This can be done using a simple technique: place a piece of a strip of material against the surface of the gable, and the whole panel in a level with the J-profile.
Then you need to draw a sharpened pencil along the overlapping sheets. The result will be an accurate angle of inclination. Next, remove the short piece and cut the siding along the drawn line.
The process is shown more clearly in the drawing above.
Set of siding strips 9.6. Set of siding strips.
Preparation of the last strip9.7. Preparing the last strip.
Cut the corner of the last siding panel and insert it into the J-profile.
Fastening the last strip 9.8. Fastening the last strip.
This is an exceptional case in the installation of vinyl siding, in which a hardware or nail hits right through the panel.
Tools for installing siding:
- Knife. Who doesn’t know how to cut vinyl siding: vinyl is a soft material, it can be easily cut with a sharp knife. To do this, you need to mark a groove on the panel. Bend and straighten the strip several times. As a result, it will break along the intended cut.
- Electric jigsaw. Used instead of a knife. Gives a more beautiful cut, and also allows you to speed up the process of preparing panels to size.
- Drill or hammer drill. With their help, it is convenient to enlarge holes for fastening hardware or punch new ones.
- Screwdriver. For tightening hardware.
- Building level. The laser is very convenient to use.
- Roulette.
Good to know. If you are planning to use a grinder to cut siding panels, this is acceptable. However, keep in mind that at high speeds, the sheet cut will begin to heat up and melt. This will lead to its deformation. Therefore, use the grinder at low power.