High-quality gluing of plastic panels
Before performing work, you need to determine the method of fastening. The panels are mounted using self-tapping screws or glued. Each method has its own advantages. The option with self-tapping screws looks more complicated, since you will have to drill too many holes. Such finishing can be dismantled easily and quickly if the need arises. This method is less successful because it will reduce the size of the room. It's better not to use it.
They are installed quickly and cheaply using glue, since a frame is not used, and the dimensions of the bathroom are preserved. The material will be more difficult to dismantle. The finishing should not be too heavy, then the installation will be successful.
It is worth understanding in advance the execution algorithm:
- The glue is applied in dots at a distance of up to 30 cm.
- The heavier the panels, the more often dots need to be applied.
- After applying the adhesive, you will need to wait a few minutes.
- Press the panel against the wall.
The plate immediately detaches and, after a few minutes of waiting, is pressed firmly against the base.
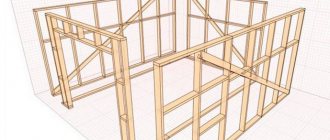
How to mount the frame
Repairing a toilet with plastic panels with your own hands (photo in the gallery) needs to start with the floor covering. Floors must be level and strong. After installing the toilet, you can begin working with wooden slats.
- Antiseptic treatment. This step is required for those who are ready to make high-quality coating that will last for years. The tree must be protected from rotting and the influence of fungus, so the planks will last much longer. Antiseptic compounds are harmful, so treatment is carried out in an open, ventilated space. All sides of the slats are processed, only the ends remain “clean”. It is better to perform this procedure a few days before the installation begins.
- Installation of side racks. The correct assembly of the entire frame will depend on the quality of this stage. Four wooden slats are attached to the corners of the room so that they do not touch the floor or ceiling. In practice, a piece of plastic is first installed under the bar, which is then removed. The slats are fastened with self-tapping screws, for which holes are prepared in the wall. Before the screws, plastic plugs are inserted into them.
- Lathing corner strips. The next stage is attaching slats for corners around the perimeter of the room. To ensure a strong and reliable connection, the bolts are fastened at an angle of 45 degrees. The remaining slats are attached to the walls using self-tapping screws. After completing the work around the perimeter, the intermediate strips are fastened. They are placed horizontally or vertically, maintaining a maximum distance of half a meter. Increasing the take-off run can lead to loss of structural stability.
- The final stage. When the frame is ready, you need to attach the fittings. Its corners are cut at an angle of 45 degrees. In this case, you will need all the accessories. If the fit to the wall is incomplete, then the cracks are filled with plastic tabs and then nailed down. The distance between the fastenings is about 30 cm. The crossbars and racks must be adjacent to the wall. Nails should be chosen with wide heads, but if they are not available in the store, you can use any. To save on tabs, you can cut pieces of the required size from bottles. To ensure that no unsightly marks are left on the coating, a special attachment is used when hammering.
Covering a toilet and bathtub with plastic panels with your own hands
Repairing a toilet with plastic panels with your own hands (photo in the gallery) needs to start with the floor covering. Floors must be level and strong. After installing the toilet, you can begin working with wooden slats.
Criteria for choosing a composition for work
On the market you can find a lot of types of adhesives for bathrooms and toilets. They can vary greatly in cost, characteristics and properties. You can find many user recommendations.
Good glue is a must:
- Will be transparent after drying
- Tolerates low temperatures, humidity, and aggressive environments
- Sets instantly and lasts for a long time
Finishing a bathroom is a responsible job; for this reason, the adhesive for plastic panels in the bathroom is chosen especially carefully. Qualified specialists do not use and do not recommend using universal compositions. It is advisable to find a composition that is produced specifically for this material.
Choosing the composition for work requires care. We can once again recommend using only those compounds that are developed for a specific finishing material. It is not for nothing that the manufacturer guarantees the high quality of joining objects with a special composition.
Recommended video: Experiment using different types of glue
In some cases, universal means can be used. You can find quite convincing examples. Synthetic resin adhesive Klebe-rit 636 has proven itself, it can be used in many situations, dries quickly, and is environmentally friendly.
The universal composition Moment Crystal has good reviews. It has proven itself excellent in finishing PVC; it is suitable for any plastic; it glues cork, wood, and plexiglass. The glue is transparent, its gluing quality is very high, and it is not afraid of external influences of temperature and humidity.
Advantages
- PVC panels can be mounted at a minimum distance from the wall. In total, after finishing the walls, the room will lose only 3-5 cm.
- Plastic is not afraid of wet cleaning and detergents.
- Plastic panels are much cheaper than most finishing materials.
- Huge variety of colors and designs.
- Finishing a toilet with your own hands, even without special skills, will only take a few hours.
- To work with panels, you do not need to level the walls. They will hide all the irregularities and mistakes of the builders.
Unfortunately, like any other material, PVC panels have a number of disadvantages, which also need to be taken into account when choosing a finish for a toilet.
A type of adhesive composition liquid nails
Liquid nails are a universal type composition. Allows you to create strong and reliable structures. To put plastic on glue, the surface is cleaned, leveled, and treated to remove mold and mildew. After degreasing the wall, it needs to be dried.
Liquid nails are applied with a grid to the surface of the wall. They need to be distributed evenly. The material is then applied to the wall and pressed. For work it is better to use a rubber roller. All joints and connections should be sealed with silicone sealant.
You can act a little differently. If it is impossible to level the surface of the walls or for some reason you do not want to do this, installation is carried out on the lathing. The material can be metal or wood. Wood should be protected from moisture with special compounds. The finished sheathing is covered with plastic panels. More reliable fastening is achieved by using staples.
Liquid nails are a special type of construction adhesive. They can be used almost always. It is especially practical and simple to install fragile PVC panels in the bathroom. They will not damage the material, have proven themselves well in interior spaces, and the work is done quickly. Even a beginner can handle finishing work using liquid nails just fine.
Panel adhesive requirements
Liquid nails for plastic must meet the following requirements:
- Designed specifically for PVC. The packaging says “universal” or “for plastic”.
- Provides a strong and safe connection to organic and mineral substrates. It can be stone, brick, plaster, chipboard, wood.
- Has a high degree of adhesion.
- Insensitive to moisture, detergents, temperature changes, ultraviolet radiation and chemicals.
- A common requirement for liquid nails for PVC panels is transparency.
- Service life is at least 15–20 years.
- Multifunctionality and wide scope of application: possibility of use on various planes: walls, floors, door and window slopes, interior decoration.
- Flexible and elastic.
- Convenient and economical packaging.
- Affordable price.
- Ability to glue loose parts.
- Does not corrode.
Glue installation method
To install with glue, unevenness should not exceed a third of a centimeter. The main thing is to prevent the presence of tubercles; dents are not so scary, they will be completely hidden. It is easiest to work if the corners of the walls are sharp, otherwise great difficulties await.
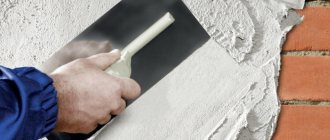
In order to carry out installation, you can use any acceptable method and glue. The question of how to glue the panels is not too complicated. If the wall is smooth and well cleaned of grease stains and old finishes, you just need to apply glue to the panel and apply it to the wall. The preparation stage takes more time. If you use any other adhesive compositions, you should know how to glue them with this composition, make sure that they do not contain any traces of organic solvents.
- The glue is distributed over the surface of the part to be glued. Then it is pressed firmly to the base and held in this position for several minutes. This is not easy to do, it is better to use spacers. More dense fixation of the material occurs with liquid nails. This composition can be purchased in tubes. One such package is enough for 5 square meters. m area.
- Glue is not applied to the edges of the material. If you glue the edges, there may be too much glue, it will come out and can spoil the appearance of the finish. The panel with applied glue is applied to the wall and fixed in a stationary position for at least 5 minutes. There are usually no problems with sizing technology. The first panel is very important, it must be well fixed. It is leveled and secured at the bottom and top with dowels.
If it is necessary to hide the pipes when installing the cladding, then it makes sense to combine installation with glue and on the frame, if the need arises. In any case there will not be any particular difficulties.
It is important to avoid mistakes when decorating bathroom walls. The material requires careful handling and should not be crushed or bent. The protective film is removed only upon completion of work. Panels are cut only from the front side. It is unacceptable to use organic solvents, which will damage the plastic and cause it to become stained.
Video: Bathroom renovation. PVC panels with glue
One of the low-budget ways to improve a bathroom is to use plastic, a lightweight modern material that comes in a variety of designs and sizes. Beautiful panels are also suitable for those who decide to quickly put the room in order, since a professional needs no more than 1-2 days to work.
The process is so simple that decorating a bathroom with plastic panels is suitable even for beginners, and some installation methods do not require prior leveling of the walls.
What glue should I use?
The quality of the entire finish produced often depends on the brand of glue, so it is better not to save money and buy compounds from well-known manufacturers.
Kleiberit
Liquid nails of this brand are based on synthetic resins. The product contains solvents, is not afraid of humidity, temperature changes, is homogeneous and viscous. The composition dries quickly, is powerful, and allows you to stick even wide sheet panels.
Glue Titan Wild
This is a universal tool for working with plastic, concrete, metal, wood and other building materials. It has a high degree of adhesion, is very resistant to temperature changes, and is suitable for wet rooms. Can even be used for outdoor use.
Liquid nails Quality
It is considered a professional composition for construction and finishing. White color, well suited for fastening PVC panels. It dries quickly and sets almost instantly, so you don’t have to hold the material with your hands for long.
Installing PVC panels using liquid nails is an excellent solution for those who value their time and want to make renovations in the bathroom, kitchen, or balcony quickly and inexpensively. The cladding will last a long time and without complaints, so if you have smooth walls, you can use liquid nails to install the panels without fear.
Why are plastic panels better than other materials?
The most popular material for finishing rooms with high humidity is ceramic tiles, which have a whole range of advantages. However, PVC panels have also won the love of residential property owners, and it’s not just their low price (although cost is sometimes the deciding factor).
From a design point of view, correctly selected plastic panels in the bathroom look no worse than ceramic tiles, Venetian plaster or artificial stone
According to reviews of master finishers and bathroom owners, plastic has the following positive characteristics:
- He is very easy to work with. On the one hand, this is literally a lightweight material with convenient sizes (a few parts are enough to decorate the walls of a small bathroom - 4-5 pieces 30 cm wide on each side), on the other hand, the methods of attaching the elements to the wall and ceiling.
- Easy maintenance after installation. Both the white gloss, matte colored surface, and decorative print can be easily washed with ordinary soapy water, without the use of special products.
- Plastic does not absorb water, retains its structure for many years, and therefore is not suitable soil for the spread of fungus or mold.
- PVC does not burn, but in the event of a fire it emits caustic smoke that is harmful to health, so special attention should be paid to the quality of electrical cables and the correct installation of the lighting system.
And one more advantage that ceramics does not have is that it is easy to hide communications and repair errors behind plastic, and at any time you can quickly disassemble the structure, replace pipes or wiring, and then install the panels in place.
If the parts are not glued, but fixed to the profile, they can be replaced with new ones at any time - this is necessary when one of the panels becomes unusable or a change in the interior is planned
There are also disadvantages, and they must be taken into account during repairs. The main disadvantage is that the installation of panels “steals” the living space, so when calculating the area, do not forget to subtract the thickness of the panel itself and the width of the profiles on which it is supported.
The next disadvantage is insufficient strength; it is easy to scratch soft plastic with a cutting object. And beware of the cheapest products, which can be recognized even by their smell - they emit phenol, which is not only unpleasant, but also harmful to health.
A comparative table of characteristics of inexpensive Chinese-made PVC panels and European analogues, from which one can judge the quality of the products
Care
Selection of products
For correct care, you need to familiarize yourself with several rules:
- First, protect your eyes, hands, and skin from contact with detergent. Wear personal safety equipment – hat, gloves.
- Remove all hanging items, if present.
- If there are large seams, you need to clean them with a rubber spatula.
- To clean PVC panels, use a soft, non-scratch sponge. For rags, you can use those that do not have lint.
- To protect the casing, do not allow the water to overheat above 40 degrees.
- When choosing a detergent, choose liquid or gel detergents. Powders can leave minor cracks, which become clogged with dust and spoil the appearance of the structure;
- After you finish cleaning the plastic with dust, be sure to rinse the solution with clean water. This way, fading does not occur.
- If the coating of PVC panels is glossy, additional treatment with polish will be required.
- Before using a new detergent, it is advisable to check for reaction with the material. Apply a small amount in an inconspicuous area, then wait 15-20 minutes. If visual changes appear, the product is not suitable for use.
Caring for panels
Using polyvinyl chloride sheets as a facing material for the bathroom is a good choice for people who do not have free time to install tiles or other materials. Quick installation, low cost and an abundance of color schemes are the main advantages of plastic, which is why it has become in demand.
Wall decoration with plastic - 2 popular options
There are several ways to attach plastic panels to the wall, all of them have distinctive features. We will look at two methods that even novice builders can master:
- fastening panels to wooden or plastic sheathing;
- gluing plastic parts to the wall using liquid nails or glue.
For gluing, additional leveling of the wall surface will be required; the first method can be applied to completely unprepared walls.
Method #1 - attaching panels to the sheathing
Whichever method you prefer, first of all you need to prepare the tool and walls. The same tool is used:
- for marking - tape measure, level, pencil, square;
- for trimming - a fine-toothed hacksaw, a construction knife;
- for drilling holes - a hammer drill;
- for fastening - a screwdriver, screwdriver, clamps, screws or dowels.
Materials also need to be purchased in advance in the required quantities.
If you have chosen decorative panels with a pattern for wall cladding, try to correctly calculate their quantity and buy with a small margin, since if necessary in the future it will be difficult to find similar ones
Many people prefer standard PVC panels for bathroom decoration - ordinary white glossy or matte products, but the range of modern products is so wide that you can choose a more interesting option: pearl or ash-colored, with gold or silver ornaments, with floral patterns or artistic panels.
In addition to the panels, you will need a profile - sales consultants will advise the best option - as well as silicone sealant. If the sheathing is wooden, then 10x30mm slats and an antiseptic are needed.
Antifungal impregnation is mandatory - without it, the wood will not only swell, but also become covered with mold, which will quickly spread to other surfaces
Preparing the walls consists of removing old coatings and dust and additional treatment against mold, especially if outbreaks have already occurred on the walls or ceiling. You also need to fill large gaps or potholes, but there is no need to level them - the profile frame will hide the curvature.
If you need additional thermal insulation, under the sheathing, in addition to pipes and wiring, you can hide insulation, for example, ISOVER rolled mineral wool
The marking stage cannot be skipped, as it guarantees the correct location of all parts relative to each other. To avoid distortions, we use a laser level.
If we plan to sheathe the surface of all the walls, draw horizontal lines at a distance of 1-2 cm from the floor and ceiling - the outer rows of the sheathing will be attached here. Then we draw the same lines vertically - along the line of corners.
Next, we mark the entire wall surface from bottom to top, placing or marking beacon markers at intervals of 40-50 cm. We connect them with lines and get several horizontal lines, which we will use as a guide when attaching the profile and panels.
Horizontal sheathing is a frame for vertically located panels that are attached perpendicular to the profile. If you need horizontal cladding, install vertical sheathing in the same way - in steps of 40-50 cm, but not from top to bottom, but from corner to corner
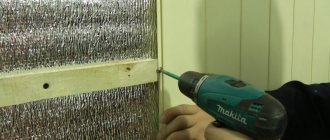
Exactly along the marked lines using a hammer drill we prepare holes for the dowels. We apply slats at a distance of 50 cm and alternately fasten them parallel to each other.
At this stage, we carry out all work related to communications: if necessary, we replace or repair pipes, lay wiring, mark the mounting locations for wall lights, sockets or switches.
We attach the profile or wooden slats to the wall area intended for cladding with PVC panels. If the walls are not completely covered, we also attach limit strips along the edges
Then we install the corners - we fasten them in all the corners involved, and insert plastic panels - lamellas - into them.
We fix the first part in the center, that is, in the corner farthest from the door, which is the first thing that catches our eye when we enter the bathroom
Before fixing, we cut each part to length. The standard length of the panels is 3 m, the height of the walls in typical apartments is 2.5-2.7 m, that is, each detail of the vertical cladding must be shortened by a few centimeters.
If the cladding is horizontal, we trim based on the dimensions of the walls. We insert the first product into the corner, press it, the second - into the mounting groove of the first panel, etc., along the width of the entire wall.
The last panel will have to be reduced in width. To do this, apply it to the wall, mark the cutting line and carefully cut along the entire length
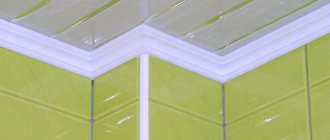
The final stage remains - masking the end protrusions, extreme cracks, and gaps between the panels. It occurs using thin plastic moldings of various shapes.
Decorative moldings allow you to ennoble a room. A ceiling molding is placed around the perimeter of the upper part, a plastic plinth is placed below, and the coal is carefully covered with corner parts
Having finished decorating the bathroom walls with PVC panels, we install lamps, sockets, fix shelves, hooks and towel holders.
Method #2 - installing panels with liquid nails or glue
The glue method is much easier than the previous one, but with one condition - if the walls of the bathroom are perfectly even and smooth. If this condition is not met, you simply cannot technically fasten the panels: they will bend, lie crookedly and not match the connecting grooves. Therefore, if you are unlucky with the walls (and most often this is the case), you need plastering or cladding in another way - frame.
If the walls are crooked, you will have to plaster them or level them in another way (for example, cover them with plywood), and this process is equivalent in cost to laying ceramic tiles
Let's choose the option with perfectly smooth walls. In order for the panels to lay beautifully and firmly, you need to choose the right glue. There are several types of adhesives made specifically for attaching PVC panels. Usually instructions for their use are applied to tubes of glue, but sometimes some points in the instructions raise additional questions, so let’s look at the whole process.
Now about the choice of glue. They haven’t come up with anything better than liquid nails yet, so we buy a tube (or several, depending on the area of the walls), not forgetting to check whether the composition is suitable for gluing plastic.
You can buy heavy-duty glue that hardens instantly and can hold even heavy structures, for example, Heavy-Duty Projects DAP heavy-duty (USA) costing only 200 rubles. Liquid Nails (USA) based on latex has approximately the same properties, but its cost is slightly lower - 180 rubles. Titebond universal rubber liquid nails for 260 rubles are capable of holding even wet or frozen panels glued to cement, brick plaster and other surfaces.
Moment Montazh liquid nails are popular on the Russian construction market at a price of 220-250 rubles per tube. They do not lose their properties at high humidity and temperature changes
Instructions for installing plastic panels with liquid nails:
- Surface preparation – removing grease stains and dust.
- Primer necessary for better adhesion. Primer compositions must match the adhesive, ideally from the same manufacturer.
- Trimming panels, corners, baseboards, borders to the required size (this can be done while the primer is drying).
- Alternate gluing of panels with simultaneous connection of locking edges.
It would seem that everything is simple, but each point has its own tricks. For example, the gluing process itself is a two-step process. First, apply glue to the underside of the panel in a checkerboard pattern, in large drops, and press it against the wall with pressure. Then we tear it off (according to technology) and let it dry for some time. After 5-7 minutes we glue the parts again, with pressure and tapping along the edges, finally. To save time, we glue several panels one after another, then tear off a few as well.
One of the options for applying glue is dotted lines, but there are other ways: in a checkerboard pattern, zigzag, stripes, spirals. The size of the drops depends on the weight of the panel - the heavier the product, the larger the drop of glue
Pruning also requires special care. Skirting boards, moldings and borders are small in width, so flaws in trimming will be more clearly visible. If you make a mistake by 1-2 mm, no one will notice the defect, as it will disappear under the baseboard.
When the process of cladding with PVC panels is completed, it is difficult to say exactly how they are fixed. However, when choosing the adhesive method, you will get a few centimeters of additional space, which is sometimes very important for cramped bathrooms
Watch the video to see how easy it is to carry out this installation:
Choosing panels for the toilet
Main manufacturers of PVC panels:
- Venta is a Belgian company, one of the European leaders in the production of decorative panels. Buyers value the company's products for quality and durability.
- Forte is an Italian manufacturer. Offers new designs and exclusive solutions.
- Grin Line is a Russian company. Works only on European raw materials. Known for the good quality of its products at reasonable prices.
- AnV-plast is a large company from Krasnodar, operating since 2001. It produces panels from domestic raw materials, which allows it to sell products at low prices.
- Pareti is a young Volgograd company that has already proven itself well in the PVC panels market.
Panels are divided into seamless and suture. The difference lies in appearance - suture ones have a recess at the junction of the panels. They usually have a small width (10-14 cm) and are often used to imitate wooden lining. Panels produced using seamless technology are slightly more expensive, can be of any width and are the best choice for toilet walls: due to their smooth surface, they are easier to clean.
The width of the panels is an aesthetic factor; it has little effect on the quality of the final finish and the time required for their installation. The only thing to consider when choosing the width of the panels is the size of the room. If you buy wide panels for a small toilet, you may lose too much material in cutting.
For walls, panels are produced with a thickness of 8-10 mm, and for ceilings, manufacturers have reduced the thickness to 6 mm or less. Wall panels can be safely used for the ceiling, but it is better not to use ceiling panels for walls. The overall thickness of the panel is not the main factor; the most important thing is that the thickness of the front plate in the panel is at least 2 mm, and preferably 2.5 mm. This indicator directly affects the strength of the surface and its durability.
When calculating the number of panels we need, it is necessary to take into account that the excess length will go to waste. Choose the length of the panels as close as possible to the height of your room, this will allow you to save a lot.
When purchasing panels, press the edge with your finger and release: the dent should disappear without a trace. Bend the screwed edge and twist it with your fingers. It must be plastic; a brittle edge indicates low quality plastic and will create problems during installation.
Making a ceiling from PVC panels
A suspended plastic ceiling in a bathroom is one of the best options, so we present to your attention brief instructions for its installation.
So, let's start with the preparatory work. They include the purchase of the necessary material and cleaning of the ceiling, from which the old coating must be removed. For preventive purposes, the entire surface must be soaked with an antiseptic, even if mold has not previously appeared in the bathroom. The material you will need is a metal profile, hangers, fasteners for the frame and panels.
A free space 5-7 cm wide is formed between the ceiling and the suspended structure, which is usually used for laying electrical communications or additional thermal insulation
Next we install the frame. First, we attach a galvanized metal profile (more reliable than wooden blanks) to the ceiling at a distance of 50 cm from one another, then hangers at intervals of 60 cm. The hangers protect the panels from sagging and ensure the stability of the structure.
When installing a plasterboard ceiling, transverse jumpers are also necessary, but for a lighter plastic structure, longitudinal profiles are sufficient
Then comes the actual fastening of the PVC panels. We cut the parts to the width or length of the bathroom (they will be mounted perpendicular to the profile), remove the film, and clean the edges.
We insert the first panel with its edge into the starting profile, bend it a little so that it fits into the opposite profile, and then slide it into the side one - so it is surrounded by the profile on 3 sides
Following the first, we install the remaining panels until the last one, which may need to be trimmed. The panels are fastened together with a locking connection.
If you plan to install spotlights in the ceiling, you should cut holes and fix the structures of the lighting devices before installing the panels
There are other ways to install a plastic ceiling, but this one is considered the most practical and rational.
As you can see, to decorate a bathroom with decorative plastic panels with your own hands, you need basic tool skills and a little free time. A couple of days off - and your bathroom will be unrecognizable!
Finishing touches
Despite the fact that the plastic panels fit tightly together, in corners and places with difficult installation there are small gaps through which water can get behind the panels and provoke rotting processes there. Therefore, it is necessary to cover all such places with the help of a sanitary sealant for bathrooms. If everything is done carefully, the sealant will be invisible and the cracks will disappear. After this, the bathroom will retain its beauty for many years.
Preparatory work and marking for sheathing
Preparing walls for finishing involves removing old wallpaper, if any, peeling paint, dust and dirt. This will prevent the occurrence of fungus and mold in the future. The use of antiseptic impregnation is recommended as an effective treatment method.
After cleaning the surface, the locations for fixing the sheathing are marked. To do this, you need to draw horizontal lines on the wall at a distance of 500-600 mm from each other. Measure the length of the lines and cut the profile or bars into pieces of the required length. If it is decided to install PVC panels horizontally, then the markings for the slats are applied vertically.
The distance from the floor, ceiling and walls to the outermost profile of the sheathing is no more than 25 mm.
Selection Guide
At first glance, PVC panels differ only in design, but this is a misconception; the quality of the plastic can vary significantly depending on the manufacturer.
It is best to ask friends who have encountered this issue, since it is quite difficult to visually determine quality. But there are some tips:
- The PVC panel must be soft. High-quality plastic can bend to an angle of more than 90 degrees. You can bend the panel slightly until you feel tension; the larger the angle, the better.
- The fastening groove should bend freely without kinks, and return to its original position when you release it.
- The panels should not emit any noticeable odors. A noticeable smell of plastic is a sign of poor quality production.
The next nuance that needs to be taken into account is the width of the panel. It can be from 12 to 35 cm; the wider the segment, the more carefully the sheathing will need to be leveled. The optimal option for walls is considered to be less than 25 cm wide.
Advice! Panels wider than 25 cm can be used on the ceiling. There, a slight distortion will not be so noticeable.
Once these two factors are taken into account, you can move on to choosing colors and patterns. Here everything depends on personal preferences and the style of the overall interior of the apartment.