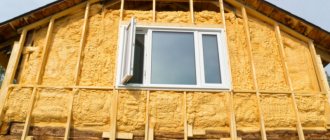
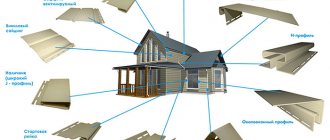
Types of PVC ceiling panels
A polyvinyl chloride panel for finishing the ceiling space consists of two plastic sheets connected by stiffening ribs. Along the edges of the panel there are fastening strips: large on one side, small on the other. The large strip allows you to easily attach the panel to the frame; with the help of a small strip, the panels are fastened together. For greater adhesion strength, each panel is equipped with a spike on the side. With proper care and proper use, plastic ceiling panels can last up to 10 years.
Ceiling panels have two types of connections. In one case, after installation, a visible joint is noted between the elements; in the second case, the junction is not visible.
Based on color, ceiling panels are divided into the following types:
- Plain products are characterized by simplicity and practicality at the same time. Thanks to its resistance to ultraviolet rays, the shade is maintained throughout its entire service life.
- Lacquered panels have a glossy surface due to the application of a layer of varnish. This coating makes the surface of the panel stronger and its appearance more stylish. However, varnished panels are afraid of any mechanical impact, as a result of which cracks or scratches form on the surface.
- Patterned products have specific patterns on the outside. For the manufacture of such panels, soft plastic is used, which makes them cheaper, but shortens their service life.
- Laminated panels can imitate natural materials, such as wood and stone. The disadvantage of such products is poor resistance to sunlight, under the influence of which cracks appear on the surface. As a result, consumer performance is significantly reduced.
There are also several standard sizes of PVC panels. The standard length of products is 2700, 3000, 4000 and 6000 mm, the width of the panels can range from 100 to 250 mm.
Depending on the shape, the following types of polyvinyl chloride panels can be distinguished:
- Sheet products are characterized by fairly large sizes. Small fasteners are used to secure them.
- The design of tile-type panels is similar to conventional tiles. The size of such elements is not very large, their appearance is quite aesthetic, and operation is not particularly difficult.
- The slatted material resembles lining in appearance and in the method of installation. Special construction staples are used for fastening.
DIY two-level ceiling made of PVC panels
It is clear that the possibilities for manufacturing plastic PVC cladding are not limited to flat, single-level schemes. Decorative finishing can be done in several levels, highlight a corner, and even make an oblique turn or slope.
For these purposes, special guide profiles are used, laid on a wooden frame. Small elements in the form of pencil cases and niches can be assembled using an adhesive base or simple hangers.
The system of edges and finishing profiles allows you to assemble quite complex multi-level surfaces
What is the difference between wall and ceiling panels
Despite the fact that the panels for finishing walls and ceilings are made of the same material, there is a difference between the products. Wall panels must withstand additional load, for example, from shelves or decorative elements. Consequently, such products are durable and heavier. Panels for decorating the ceiling space are lightweight, this is necessary to simplify installation work on the ceiling. The fragility of such products is not of great importance, since the ceiling space is practically not subject to physical impact.
Types of panels
There are two types:
- Wall. They have increased strength and a higher price. We wrote about them here.
- Ceiling. A lightweight option with less rigidity, since excessive strength is not relevant for a suspended ceiling. These panels are cheaper than their wall counterparts.
Ceiling products are divided by size and type:
- Rack and pinion. Plastic boards reminiscent of the usual wooden paneling.
- Seamless. Such products, due to the tight joint using the tongue-and-groove system, create the impression of a single canvas on the ceiling.
- Leafy. Rarely used for finishing residential premises due to the complexity of processing. Often used for cladding columns or uneven surfaces.
All plastic products have a service life of at least 10 years, are easily washed with ordinary warm water and soapy water and can be used more than once (if necessary, the plastic ceiling can be disassembled and assembled in another room with suitable dimensions).
Advantages of plastic panels
Ceiling panels in most cases are made from polyvinyl chloride, which is characterized by increased strength and other positive properties.
When comparing plastic panels with other finishing materials, several advantages can be highlighted in favor of PVC panels:
- Longer service life than natural materials.
- Reliable protection of the ceiling from the negative effects of external factors.
- Simple installation and easy maintenance.
- Possibility of laying electrical communication wires.
- Low cost, thanks to which most consumers have the opportunity to purchase plastic panels.
- The versatility of PVC products makes it possible to decorate absolutely any premises, regardless of purpose and design style.
- Plastic does not deform, does not absorb moisture, is not susceptible to the negative effects of ultraviolet rays and is not afraid of temperature changes.
- The panels can withstand minor mechanical impacts and are completely resistant to abrasion. In addition, the surface can be washed using aggressive acid-base compounds and any cleaning agents.
- The ability to maintain color and shape throughout the entire operational period, with the exception of places where direct sunlight constantly falls on the surface.
- High sound insulation characteristics are excellent for creating an insulating layer in rooms where peace and quiet is needed.
- Easy dismantling of the panels allows you to remove and reinstall the products.
- The ability to replace individual ceiling design elements without causing damage to the entire surface.
However, all materials, even with improved qualities, may have drawbacks; in this regard, plastic panels for ceiling decoration are no exception. When choosing PVC panels, it is worth considering some points. Firstly, it is not recommended to use plastic panels in rooms where high temperatures prevail. Under their influence, products made of polyvinyl chloride tend to become deformed beyond repair. In addition, low-quality plastic is characterized by the release of harmful and toxic substances when heated strongly.
You should avoid using low-quality materials in recreation rooms and for children. In addition, most products made from polyvinyl chloride are characterized by poor fire resistance, which can very often cause a tragedy. Therefore, you should give preference to materials from trusted manufacturers who provide a guarantee for their products.
Advantages and disadvantages
Before you start finishing the ceiling with plastic panels, you should understand the advantages and disadvantages of this material in order to clearly determine whether they are suitable for you in principle.
Advantages:
- low cost;
- ease of installation (even a novice finisher can handle installing plastic panels);
- a dense surface without pores and cracks is “inconvenient” for the development of colonies of microorganisms. To disinfect the surface, simply wipe it with a cloth with an antibacterial composition;
- intended for use not only in residential premises, but also in medical offices, in food industry workshops;
- resistance to high humidity allows the panels to be used for finishing kitchens, bathrooms and toilets.
Flaws:
- the ignition temperature of plastic is higher than that of the same wood, and it emits 50% less smoke, but the emissions generated when plastic burns are much more toxic;
- lack of natural ventilation. The material is mounted in a groove, which allows you to obtain a practically sealed ceiling surface, but in the case of rooms with a humid environment, condensation may occur in the under-ceiling space, which leads to the formation of mold and mildew. In this case, it is recommended to install additional ventilation holes.
Calculation of material for installation
To ensure high-quality finishing of the ceiling with PVC panels and to avoid unnecessary costs, it is necessary to correctly calculate the amount of material for the work. In the calculation process, the standard dimensions of the ceiling panels are taken as a basis:
- Length – 2.7-3 meters.
- Width – 0.25-0.5 meters.
- Thickness – 5-10 mm.
The calculation begins by determining the area of one panel, multiplying its length by its width. Then they begin to calculate the area of the ceiling space, which is to be finished with plastic panels. For this purpose, it is also necessary to multiply the length of the surface by its width. The next step is to calculate the required number of panels; to do this, divide the ceiling area by the area of one panel. The result is increased by approximately 20% for the margin, the resulting value is rounded up.
To solve the question of how to properly cover a ceiling with plastic panels, in addition to the panels, you should calculate the amount of materials that will be required to create the frame. To facilitate the calculation process, a reduced ceiling plan with longitudinal lines drawn will help. Most often, slats and profiles are placed at a distance of 50-60 cm, with this calculation the number of frame elements is determined.
As for fasteners, the distance between fasteners and the number of profiles are most often taken as a basis. The standard step between fixation points is 30-40 cm. We advise you to understand in advance how to properly attach PVC panels to the ceiling so as not to make mistakes.
When performing any calculations when finishing the ceiling with panels, it is necessary to make provisions in case of unforeseen situations.
How to calculate the required amount of lining
Calculation of the required number of panels
How many PVC panels are needed to cover the ceiling in a particular room is easy to calculate yourself.
First action. The quadrature of the ceiling is determined, then the area of the panel.
Second action. The calculated surface size is divided by the panel area. It becomes clear how many panels will be needed to improve the ceiling.
Third action. The result should be increased by 15% (margin). This number must be rounded to obtain the allowable number of whole panels (rounded up).
Fourth act. The length is determined:
- starting fittings profile;
- ceiling cornice.
To do this, add two dimensions of the length and width of the ceiling surface. Another 15% is added to the resulting perimeter.
Fifth act. The size of the ceiling surface between the walls is divided into equal sections. They have a length of 40-60 cm. Lines will subsequently pass through them, designed to secure the middle guides of the sheathing. This method determines the amount of timber (a metal profile can be used). The length of the beams will be the same as the length or width of the room, it depends on the planned orientation of the finishing material.
Attaching the main profile to hangers
Preparatory work
Preparatory activities prior to the installation of polyvinyl chloride panels on the ceiling include the selection of the necessary tools for work and surface treatment of the main ceiling.
In the process of deciding how to decorate the ceiling with plastic panels, you may need the following tools:
- Hammer to facilitate frame assembly.
- A screwdriver for fixing the sheathing elements and the panels themselves.
- A building level, without which no surface marking can be done.
- Marker or pencil.
- Tape measure for taking measurements.
- An electric jigsaw, which is used to trim elements to the desired size.
- A ladder or stepladder for performing installation work at height.
- Rubber mallet for fitting PVC panels.
- A construction stapler may be needed when using special staples as fasteners.
In the process of preparing to finish the ceiling with PVC panels, do the following with your own hands:
- Turn off the power to electrical appliances and lighting and disassemble them.
- Remove old finishing materials.
- Clean dust and dirt from the ceiling.
- Before sheathing the ceiling with plastic, tap the ceiling surface with a small hammer and identify problem areas. Correct any detected defects before starting installation work.
- The finished surface is covered with a layer of primer, wait for it to dry and proceed directly to finishing the ceiling with plastic panels.
Which plastic ceiling panels are suitable for a specific room?
Here are the main criteria for choosing PVC panels, which must be taken into account.
Firstly, the parameters - length, width, thickness. You should pay extra attention to the length. It is necessary to choose a model so that there is less waste. For example, if the width of the room is 2.4 m, it is best to buy a lining that is either 5 m or 2.5 m long.
It is also important to correctly measure the length of the room. It may be possible to select a panel of such width that it will be a multiple of the specified room parameter.
Secondly, the panels vary significantly in price due to the fact that they have different quality. You shouldn’t buy cheap finishing materials for your apartment. After all, high-quality plastic will last a long period, while low-quality plastic will lose its attractiveness much faster.
Frame method of fastening panels
Lining the ceiling with plastic onto the frame sheathing is a popular method of finishing surfaces, since in this case it becomes possible to hide any defects on the ceiling. Using a frame, you can fix plastic panels in absolutely any room, including those that have no heating or high humidity. You can install the frame yourself, without involving experienced craftsmen.
You can hem the ceiling with plastic with your own hands using wooden blocks, plastic strips or a metal profile. When choosing the type of material for lathing, you should consider several factors:
- The size of defects on the ceiling.
- An indicator of the humidity level in the room.
- Level of skill in working with certain types of material and knowledge of how to sheathe walls and ceilings with plastic.
It is easiest and most financially profitable to work with plastic sheathing. It can be installed in a room with any humidity, and its low cost gives it a great advantage over other finishing materials. Due to the small thickness, it is possible to line the ceiling with plastic panels in a room with low ceilings; in this case, the height of the room will not undergo much change.
The disadvantages of plastic sheathing include limited use. Such profiles can only be installed on a perfectly flat surface. Even if there are defects in the main ceiling of about 5 mm, an ideal coating will not work.
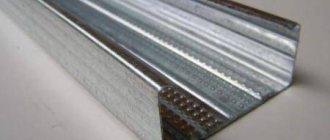
Metal profiles and wooden bars are popular due to their low cost, durability and resistance to the adverse effects of external factors. Such options are quite often used to create a frame when finishing the ceiling with plastic panels with your own hands.
The creation of a frame for attaching plastic panels should be taken quite responsibly; only in this case can a high-quality result in the work be achieved. Frame technology is in most cases used in rooms without heating or with high humidity. Under such conditions, the coating without a frame undergoes deformation and simply peels off from the main surface.
The frame is assembled and fixed to the ceiling, placing the main elements at a distance of up to half a meter. Fastening the panels to the sheathing when finishing the ceiling with plastic is done with nails or self-tapping screws.
The panels are applied one by one to the frame and each panel is cut off. Pre-cutting elements can cause unnecessary damage to the material.
After installing all the polyvinyl chloride panels, decorate the corner joints of the walls and ceiling with skirting boards and borders, securing them with liquid nails.
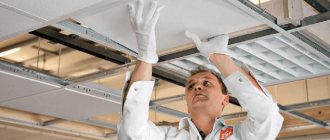
How to install battens for fastening ceiling panels
Lathing for plastic panels
Such actions are carried out sequentially. Before installation begins, the ceiling is marked. Then the main work is carried out.
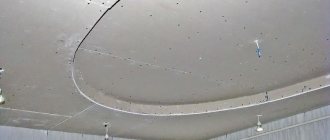
Ceiling marking technique
Marking the ceiling for PVC panels
You can choose any of the acceptable materials to install the frame; before attaching it, markings will need to be done according to the same rules.
Step one. On opposite sides, the ceiling of the room is marked into equal sections.
Step two. The twine is stretched across the width of the room and along its length to create straight lines on the ceiling surface. The frame guides will be attached to them.
On a note. The twine should be visible and colored. Then it becomes clearly visible against the background of the ceiling.
Step three. The lines also appear along the perimeter of the ceiling. After all, profiles or bars will first need to be secured in these areas.
Step four. If it was decided to lower the ceiling on suspensions, in this case, markings to the outer profiles are carried out on the walls below the joint marks at the distance provided for lowering the entire structure.
Step five. The lathing can be mounted in a suspended position, and not directly on the ceiling surface. It is lowered to the required distance, taking into account the broken lines. Then marks are made on the marked lines, retreating from each other by 50-70 cm. Suspensions will be attached to them.
Frame installation rules
Lathing for plastic panels
- When the frame is lowered to a certain distance, its installation begins by securing the hangers. The attachment points are already marked points on the broken lines. Holes are drilled through a plumb line in the ceiling with a drill. 2-3 dowels are driven into them. This is a good way to fix hangers over the entire ceiling surface.
- Lines were marked on the walls. A metal profile is attached to them. Holes are drilled in the wall and through it, a step of 30-35 cm is observed. Dowels are driven into the holes again.
Profile fastening
- At the required height, a profile is installed in the hangers. It is fixed on both sides using metal screws.
Connecting ceiling profiles with a crab
- The suspended profile with its ends is installed on the walls in the guide profile. These ends are also secured with self-tapping screws, two are enough.
Guides for the profile
- If the owner of the room so desires, instead of a metal suspended profile with parameters 60x27, wooden beams will be used.
- In those areas where lighting devices are to be mounted, the rail or profile will need to be reinforced with jumpers. They are secured by:
- use of "crabs";
- cutting profiles at corners and bending sections at right angles.
Fastening PVC panels without frame
Already by the name you can understand that polyvinyl chloride panels are attached directly to the main ceiling. Therefore, you can line the ceiling with plastic using a special adhesive composition, which allows you to securely fix the panels to the ceiling.
To obtain a high-quality result when deciding how to sew up a ceiling with plastic, you must follow a certain sequence of actions:
- Remove dust and dirt from the working surface.
- Apply a layer of primer.
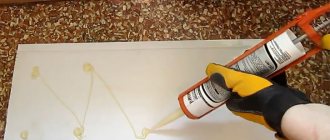
- Using a notched trowel, apply the adhesive composition to the treated surface.
- Glue is also applied to the panel; these can be dots or lines on the inside.
- The panel is applied to the ceiling and pressed with little force for a short time.
- The position of the glued panel can be adjusted until the adhesive has dried.
Unfortunately, with this method of fastening polyvinyl chloride panels, it is impossible to install spotlights and other lighting devices that are used when installing lighting for multi-level structures. Therefore, before lining the ceiling with PVC panels, you should consider all the options.
Do-it-yourself ceiling cladding with PVC panels
There are two real options for arranging the base for plastic cladding of the ceiling surface:
- In a simplified design for small spaces. In order to assemble a ceiling from PVC panels with your own hands, you will need to sew a wooden frame made of a block measuring 40x20 mm around the perimeter of the bathroom or toilet;
- Using a full-fledged frame assembled from wooden slats or metal profiles.
When using a simplified scheme, the slats can be mounted not on the ceiling, but can be edged around the perimeter of the upper edge of the wall. What is the difference? The ceiling in an apartment is almost always a concrete slab, which will need to be drilled with a hammer drill or impact drill, or a drill with a carbide crown. Internal walls are, as a rule, gypsum blocks or bricks; it is much easier to make plugs for installing the sheathing and align the frame slats to the horizon level. All that remains is to correctly attach the plastic panels to the ceiling, approximately as in the video:
For large rooms, such a scheme is unacceptable; the strength and rigidity of the perimeter slats is clearly not enough. Even if you try to install plastic panels on the ceiling using only the edge laths of the sheathing, the PVC cladding will still sag in the center when the work is completed. Moreover, a sudden opening of doors with a flow of air or a gust of wind outside the window can cause the plastic panels to bend and inflate like a sail. Therefore, a full-size sheathing is required on the ceiling under the PVC panels, and moreover, each must be attached at least at four points.
The fastener heads on the ceiling will not be visible
Installation of plastic panels on the ceiling and walls - features of the work
Plastic panels today are increasingly used as a finishing material for walls and ceilings. Their popularity is constantly trending upward, due to their good performance characteristics, aesthetic appearance and ease of installation work. Another significant advantage of panels of this type is the affordable price level.
How to choose plastic panels
Plastic panels can be used in rooms with high humidity, such as the bathroom, without any particular concerns.
This material is resistant to aggressive environments and temperature fluctuations - suitable for balconies. Moreover, their use prevents the formation of mold and mildew, which is important for the toilet. When choosing PVC panels, you should take into account the length and width. The surface of the material can be varnished, glossy or matte.
Another significant advantage of PVC panels is the absence of the need for careful leveling of the surface, as well as the ability to hide individual communication elements under the frame.
When choosing this variation of finishing material, you should focus on the fact that plastic panels for walls and ceilings have certain differences. The former have higher weight indicators. In addition, they have a more rigid structure.
Plastic panels intended for finishing the ceiling have less weight. This is due to the need to carry out installation work at height. Minimum weight indicators greatly facilitate this procedure.
Along with this, plastic ceiling panels are more fragile. When performing installation work, you should be very careful, as you can easily damage the surface of the finishing material.
With a standard thickness of 5-10 mm, the width of the panels can vary from 25 to 50 cm. The length ranges from 2.7 to 3 m. When choosing a finishing material, you should pay attention to the quality of the color of the panel, the uniformity of the pattern and the correctness of the shapes. You should also take into account the quality of the stiffeners. They should not stick out from the outside. The surface of the material should not contain characteristic chips and cracks.
The level of resistance of the material to deformation will depend on the quality of the density and flexibility of the PVC panel. If such a panel is tightly compressed, there should be no traces of mechanical damage on it.
Required tools and materials
When performing work on installing plastic panels on the wall and ceiling, at the initial stage you should select the necessary tools and materials. To resolve an installation issue, you may need:
Moldings and corners should also be added here. By using the latter, you can achieve the most even markings. Otherwise, when installing plastic panels on walls or ceilings, certain difficulties may arise.
Plastic panels are selected depending on the specific layout of the room. In a small room it is advisable to use narrow panels. If you are finishing a larger room, it is most advisable to resort to the use of wider products.
Self-tapping screws can be used instead of dowels. They are necessary if the frame will have a metal design. Dowels are only relevant if a wooden frame is used. It should be noted here that a wooden base cannot be installed in rooms with high humidity. This is due to the fact that such material is susceptible to rotting, as well as the negative influence of fungi and mold. For this reason, using a wooden frame in the kitchen and bathroom is not a practical solution.
Construction of lathing for walls and ceilings
The structure of the frame is the primary issue that should be resolved when installing plastic panels on a wall or ceiling. It was noted above that a wooden or metal variation of the frame can be used as a base. The optimal distance between the individual elements of such a base is equivalent to 50 cm. In this way, it is possible to compensate for the uneven surface of the ceiling or walls. The recommended sequence of actions will look like this:
- Carrying out markings.
- Installation of profiles along the entire perimeter of the surface.
- Installation of transverse profiles.
- Installation of the base for fastening PVC panels.
- Installation of panels.
When marking, you should first determine the minimum ceiling height. From this point on the walls you need to draw two lines. To do this, you can resort to using a cord painted with chalk. The correctness of the marking is checked using a building level.
After marking, profiles should be installed along the entire perimeter of the surface. These elements must be fixed without creating voids or gaps. Otherwise, it will be very difficult to achieve maximum reliability of the entire structure.
After installing the transverse profiles, the task that needs to be resolved is to install the base for the panel fastenings. Self-tapping screws can be used to attach plastic profiles.
When installing a metal frame variation, you should be as careful as possible. The total weight of the structure will be quite large, so it is necessary to ensure high reliability of its fastening. Attaching hangers to concrete floors can be done by using special dowels with a head on the sleeve. Conventional dowels will fail, since concrete is characterized by the presence of internal voids.
Holes in the metal profile can be drilled simultaneously with the preparation of holes in the wall. If the frame is mounted on ceramic tiles, it is advisable to use a hammer drill only if the adhesive mixture has completely dried. Otherwise, cracks may appear on the surface of the tile.
Features of panel installation
It is best to start installing PVC panels on a ceiling or wall by determining the optimal length of the material. It is recommended that this issue be resolved in advance. To cut plastic panels, you can use a regular hacksaw.
There is nothing complicated in the installation procedure of such panels. They are first placed in the profile and then secured using self-tapping screws. It is recommended to start installing plastic panels from the corner of the room. This applies to both the ceiling and the wall. It is also very important to monitor the quality and evenness of installation of the first element. It should be located strictly perpendicular to the wall or ceiling. Otherwise, the panel will not be able to snap into the groove and there will be a need for dismantling and new installation.
Subsequent panels are installed inside each other and attached to the mounting profile. Attention should be paid to the need to implement a very tight joint between the individual elements. The absence of gaps is the main condition for high quality work.
The edges of the plastic panels must fit into the slats. The last part is adjusted to the optimal distance to the wall. If necessary, you can cut the panel with a regular hacksaw.
Advice! Before carrying out work related to the installation of plastic panels on a ceiling or wall, it is recommended to first take care of installing various elements of communication systems. They are capable of well camouflaging water pipes, electrical wiring or heating pipes.
Moldings for joints
At the final stage of installing plastic panels, care should be taken to install the moldings. These elements are ways to emphasize the elegance and beauty of the panels, as well as make the overall design pattern holistic. Moldings are used to hide the joints and junctions of panels to the ceiling.
It is best to install moldings at a distance of 5 mm from the corner. This placement will avoid destruction of the cellular structure of the finishing material. Fastening of these elements is most often carried out using screws or ordinary nails.
A wide range of colors, relevant for such moldings, allows you to solve design problems of any level of complexity. Being made of polyvinyl chloride, they can easily imitate wood and other materials. At the same time, moldings are resistant to high humidity and have a fairly long service life.
What's the result?
The procedure for installing plastic panels on a wall or ceiling is not particularly difficult. This variation of finishing material is characterized by increased resistance to temperature changes and high humidity. Thanks to this, PVC panels can be used to decorate the walls of a bathroom or kitchen. The rationality of their use is determined by the minimum price indicators and the extreme ease of caring for the material.
Installation of plastic plinth on the ceiling
While I was installing the intermediate bars, my wife and son hung up the wallpaper. You can install a plinth. In a miter box, cut it with a hacksaw at an angle of 45 degrees.
Photo 5. Trimming the baseboard at an angle of 45 degrees in a miter box.
The walls turned out to be crooked, so the joints in the corners had to be adjusted. To do this, I sawed off a piece of the same block for the sheathing L - 400 mm and wrapped it in sandpaper, securing it with L - 15 mm self-tapping screws. This device will also be useful to us when cleaning the cut on PVC panels.
The plinth is attached to the sheathing bar with self-tapping screws with a press washer L - 15 mm in increments of 250 mm.
Photo 6. Attaching the ceiling plinth.
Where the last panel will be, the baseboard must be removed after fitting. Otherwise the panel won't fit.
Walls and ceilings made of plastic: features of panels
PVC panels for finishing ceilings and walls are leaders in the finishing materials market due to their low cost and huge range. Depending on the size, purpose and shape, PVC panels can have several varieties.
And the name day:
- Sheet panels. They are used for finishing large-sized premises; when fastened, they form the smallest number of joints.
- The stacked tile panels are square, thanks to which you can create a completely unique room design.
- Stacked slatted panels are rectangular with a length of up to 6 m and a width of 20 cm.
Plastic panels have many colors, patterns and textures. According to the technology of applying the ornament, they are divided into laminated and varnished products. A film on which a pattern has already been applied is glued to the laminated panels.
PVC panels can have different textures and images. This can be an imitation of natural materials (marble, wood, stone, etc.), as well as complex artistic ornaments.
Varnished PVC panels involve printing a design onto the plastic itself. This type is more durable.
Fastening plastic panels to the wall on a frame
Before you start finishing the walls, you need to make a frame from timber or a metal profile.
Before starting work, you need to remove excess dirt and dust from the walls, and also treat the surface with a special antifungal agent. Then you need to draw the sheathing grid using a level. The distance between the slats should be no more than 40 cm. On the marking lines, you need to drill holes at a distance of 50 cm from each other. It is in them that the profile will be attached to the wall with suitable fasteners. First you need to screw on those profiles that will go along the perimeter of the room, and only then you need to fasten the transverse parts.
If the walls in the room are relatively flat, that is, the difference is not more than 5 cm, then you can use wooden blocks for the frame, but if the difference is larger, you need to use a metal profile. It is much easier to secure it at a distance from the wall using special fasteners. Once the sheathing is completely completed, you can begin finishing work.
It is worth starting work from the corner farthest to the entrance, because it is the one that is most visible and any trimming will be visible here. First you need to secure the starting strips at the top and bottom of the frame. The outer or inner mounting corner should be secured to the side. These elements will help secure the plastic and hide the unaesthetic appearance of the panel cuts. Now you can begin installing the material.
Cut the plastic to the required size, it is better to make it 5 cm less in height - when temperatures change, this will help the panel not to deform. Insert it first into the upper and lower grooves, and then into the side. The plastic must be secured to each sheathing post using screws or a stapler. Subsequent planks will be attached in the same way.
Installing the last strip is the most difficult step. To do this, it needs to be cut half a centimeter less than required by the rules. First insert it into the corner profile, and then snap it into the groove of the previous panel. This way you will not deform the guides and finish the wall installation neatly.
What are plastic panels for walls and ceilings, their advantages
To understand how to repair a ceiling made of plastic panels, it is recommended that you familiarize yourself with the strengths and weaknesses of this finishing material.
The composition of polymer products includes polyvinyl chloride, which is characterized by sufficient lightness, hardness and strength, which makes it possible to sheathe walls and ceilings in residential spaces, shopping centers, and offices.
A decorative image or design is placed on the outside of the panels using offset printing, thermal printing or lamination. To give a higher degree of strength, wear resistance, antistatic effect and resistance to sunlight, the surface is coated with matte or glossy varnish.
Manufacturers in the process of manufacturing finishing materials from polyvinyl chloride do not use phenol-formaldehyde resins, which have a negative impact on human health. For painting PVC panels, water-based paints are selected.
A variety of plastic finishes makes it possible to decorate bathrooms, toilets, bedrooms, hallways, and living rooms.
The positive characteristics of plastic products include:
- Simplicity and speed of installation of PVC panels. Even an untrained person can install the sheathing and finish the room, especially if the base base does not have serious irregularities or cracks. Often installation work is carried out using liquid nails. If the surface needs to be leveled, then a metal or wooden structure is mounted - a frame, where the panels are fastened with self-tapping screws
- During operation, the coating does not cause any particular difficulties, washes well, and is not afraid of wet cleaning. But in order not to spoil the appearance of the plastic panels, it is not recommended to use household chemicals; just prepare a soap solution
- Environmentally safe for humans, do not emit toxic substances or harmful fumes
- Good degree of durability. Here it is important to make the right choice, use a denser coating for wall cladding, and a lightweight version is quite suitable for the ceiling surface
- Sufficient level of heat and sound insulation. When decorating a room in this way, you can improve sound insulation parameters and retain heat.
- Extensive range of color solutions. The traditional option is white panels, but there is also plastic with imitation of natural stone, wood or with patterns
- Moisture resistant. Thanks to the smooth surface, the plastic does not retain moisture, and the absence of pores in the coating structure prevents pathogenic microorganisms from spreading. This quality of the panels determines its use in bathrooms
- Resistance to changes in room temperature
- Long service life of the coating, subject to proper installation and selection of quality material
- Relatively low price compared to metal panels
Among the negative characteristics are:
- Low level of resistance to ultraviolet rays, especially for white plastic, which over time loses its original appearance and turns yellow
- Low degree of impact resistance. With a slight load, traces of dents or deformation may remain on the coating. It is recommended to purchase panels from reputable manufacturers
- The presence of a specific odor. This drawback is felt during the first time after finishing the room. But after a few days it completely disappears
- In terms of environmental friendliness, plastic is inferior to natural materials, so it is not advisable to use it for decorating children's rooms.
How else can you fix PVC panels on the walls?
Although the method described above for decorating walls with plastic panels is not very complicated, it is not suitable for everyone. For example, the walls are perfectly smooth after plastering with beacons or leveling the walls with plasterboard. It is clear that lathing is not needed. It will only take up space. In this case, they violate technology - they glue plastic panels onto silicone or polyurethane foam.
In this case, the starting profiles will still have to be installed, but they will need to be secured to the appropriate dowels. After that, foam (zigzag) or silicone is applied to the back side of the panel (in islands in increments of 10-15 cm), the bar is inserted into the profiles, pressed, and fixed in one or two places with appropriate fasteners. They continue in the same spirit.
The advantage of the method is that it is very fast, the disadvantage is that it only works on smooth (or almost) walls. But the most important thing is that it is simply impossible to remove the finish without destroying the plastic panels.