Any homeowner (bathhouses, garages and other buildings are also considered) really wants his building to require repairs as little as possible. And the first concern is the safety of the foundation. To do this, it is important not only to plan and build correctly, but also to drain water - groundwater and precipitation. The drainage system handles the removal of groundwater, and sediments are removed using a blind area. This equipment does not have the most complicated design: a blind area of any type is easy to make with your own hands. There is not a lot of work and costs, but it solves several problems.
Why do you need a blind area?
We have long been accustomed to the fact that there should be a path around the house: it gives the entire layout a finished look. Especially if combined with the finishing materials used to decorate the building. In addition, it is practical: you can walk along the path. And the fact that the path is a blind area, and its main purpose is to drain water, is a successful combination of the properties and qualities of materials and a well-thought-out design.
The main function of the foundation blind area is to remove sediment from it
If you look at it from a utilitarian point of view, the blind area drains rain and melt water from the foundation. The second very important practical task that can be solved with its help is to insulate the foundation. If you put insulation under the walkway, it will protect the house from freezing, which will greatly reduce heating costs.
When should a blind area be done? Immediately after finishing the external walls, but before finishing the basement. Why is that? Because a compensation gap must be left between the finishing of the blind area and the wall of the house. This is an excellent path for water that flows down the wall of the house (falls on the walls during slanting rain, for example). But it is impossible not to make this gap - the foundation will collapse. It is also unrealistic to seal the gap hermetically. The solution is to make sure that water does not get into the gap in any case. This can only be achieved if the base trim hangs over the seam. Then the water will flow a few centimeters further from the seam, and then fall into the drainage grooves. This can only be done if you first organize the blind area and then finish the base.
Why do you need a foundation blind area, when to do it, we figured it out, now it remains to understand how to do it correctly.
Soft blind area pie
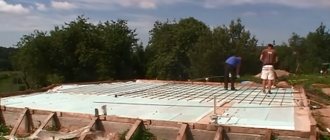
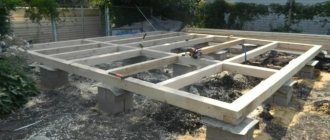
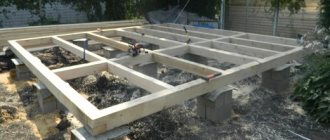
Our user with the nickname Papahomi built a log house on MZLF 10x12m: a 40x80 strip on a thirty-centimeter sand cushion, buried from 10-40 cm (due to the slope).
An uninsulated soft blind area to drain water from the foundation was made a year later.
Papahomi
I settled on a soft blind area, as it was more repairable, and a lot of concrete jambs popped up among people at that time.
The structure of the blind area was made of non-woven geotextile with a density of 200, a geomembrane with a pressure profile, crushed stone of fraction 20-40 and coarse sand.
At the first stage, soil was removed along the perimeter of the foundation to a depth of 20 cm. Since this blind area was still supposed to work as a path, in places with “busy traffic” its width is 140 cm, and in the rest - 120.
Papahomi
Along the perimeter of the dug trough, they made a groove the depth of a spade bayonet and set it to slope towards the natural decrease in the ground level.
Having compacted the soil, they used sand to make a slope in the direction from the house to the ditch. The sand was spilled and compacted. Usually geotextiles are placed in this place of the soft blind area, but Papahomi missed this: it has dense continental soil, and over the years “nothing has settled.” It was even possible to do without sand, just tearing the soil downhill.
Papahomi
A membrane was laid on the sand and secured to the foundation with a clamping profile. To do this, holes were made along the entire length of the foundation every 30-40 cm and the profile was secured with a dowel-nail. On one side, the membrane with an overlap of 15 cm lay on the foundation, and on the other, in the drainage groove.
The ditch was covered with geotextile and filled with crushed stone.
Sand was poured onto the membrane (by spilling and compacting).
Another layer of geotextile was laid on the sand, and crushed stone on top.
The end result was the base on which the paving stones were planned.
The blind area lasted only two years, and small vertical cracks appeared on both sides of the foundation.
Fortunately, we never got around to laying paving stones on the blind area, but still, it took a lot of time and money to remodel and insulate the blind area along with the EPS plinth.
Blind area dimensions
It is necessary to remove sediment from the foundation along the entire perimeter. That’s why a protective belt is made around the house. The width of the blind area is determined depending on the type of soil on the site and the length of the eaves overhang. In general, it should be 20 cm wider than the roof overhang. But SNiP sets minimum standards: on normal soils the width of the blind area is at least 60 cm, on subsidence soils - at least 100 cm.
The width of the blind area of the house is at least 60 cm on normal soils and at least 100 cm on subsiding soils
Blind areas around the perimeter of buildings must be prepared from local compacted soil with a thickness of at least 0.15 m. Blind areas should be arranged with a slope in the transverse direction of at least 0.03. The edge mark of the blind area must exceed the planning mark by at least 0.05 m. Water falling on the blind area must flow freely into the storm drainage network or trays.
From this passage it is clear that the depth depends on the technology chosen, but cannot be less than 15 cm.
What rules and nuances need to be taken into account during construction?
What you need to know in advance:
- Work on the construction of the blind area is carried out before facing the base and after finishing the finishing work on the walls. Reasons: an expansion joint must remain between this element and the wall of the building. This distance is 2-3 cm, given in case of shrinkage or physical changes in the material from which the house is made (applies to wood). The cladding of the base will cover the seam and water rolling down the walls will not get into the joint.
- Lay out a blind area around the perimeter of the entire building, with the exception of the porch.
- The width depends on the soil. For elastic up to 1.5 m, for loose up to 2 m. In any case, the coating must exceed the width of the roof overhang by 20 cm (standards are indicated in SNiP 2.02.01-83).
The depth is equal to half the depth of soil freezing in a particular region. For central Russia it is 30-40 cm, in the south up to 20 cm.- It is imperative to have a slope of 2-3 degrees from the wall of the building already at the stage of digging a trench. The top covering is also laid at an angle, otherwise the meaning of the blind area is lost.
- It is necessary to lay a layer of waterproofing and thermal insulation, the layers should rise 20 cm from the building wall.
- The bottom of the trench is sprayed with chemical compounds that prevent plant growth and the proliferation of microorganisms (herbicides).
- Gutters and drainage pipes are used to drain water from the base of the building. Depending on the amount of precipitation in the region, they are laid in the corners of the house and additionally along the perimeter of the blind area. They work as a preventative against puddles and the formation of swamps at the junction with the soil.
- The expansion joint is not left empty; elastic material (roofing felt, foam plastic, etc.) is placed inside and covered with a strip of sand.
- If the blind area is planned to be made of concrete, damper joints must be installed along the entire perimeter at a distance of 2-3 meters. These are boards 2.5 cm wide; they are placed vertically so that the concrete is not monolithic along its entire length and does not crack from frost.
You need to approach the construction of a blind area prepared so that the element performs all its functions and preserves the foundation of the building.
Device technology
Any blind area consists of an underlying layer and a protective coating.
Backfill: what materials to use
The purpose of the underlying layer is to create a level base for laying the protective coating. Its thickness is about 20 cm. Sand and crushed stone are often used for these purposes, but native soil or clay can also be used.
The simplest design of a blind area made of clay
Sand and crushed stone are used on well-draining soils. In this case, sand is first laid, spilled and compacted. Then there is a layer of crushed stone, which is also compacted.
If the soil on the site is clay or loam, then it is better to use native soil. If, with such soils, crushed stone or sand is laid around the foundation, then water will certainly be present near the house. Because it turns out that the density of the soil outside the underlying layer will be higher. This will cause water to accumulate under the blind area. If, with this design, a drainage pipe is laid around the perimeter of the bedding, the problem will be solved. And it’s effective. But there will be more work, and the cost of the blind area with drainage will be higher.
Types of protective coating
The covering for the blind area must meet many requirements:
- should not allow water to pass through;
- must be frost-resistant;
- have increased abrasion resistance;
- should not be destroyed by water.
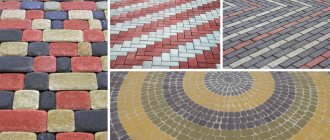
This could be paving slabs or paving stones. The shape and color can be very different - you select based on the general design of the territory and the houses of nearby buildings. The thickness of these materials is at least 6 cm; only in this case will they withstand harsh operating conditions.
The protective coating can be made of natural or artificial stone
You can use slabs or tiles made of natural or artificial stone, you can lay out the paths with large pebbles or pour crushed stones on top of all layers.
There is another type that is becoming increasingly popular - this is a soft blind area. It has few layers but works effectively. There may not be any hard or waterproofing layer on top: you can pour soil and plant grass or flowers. An interesting solution for a summer house or country cottage.
The principle of constructing a soft blind area
All these options are not bad, but the cost of their arrangement is quite high. If there is a need or desire to do it cheaply and cheerfully, your choice is a concrete blind area. There will be a lot of work, but the total cost is low.
General principles
Depending on the soil on the site and the purpose of the building, different materials and layer structure can be used, but there are some points that are always present:
- the blind area has a general slope “away from the house”, its minimum value is 3% (3 cm per meter);
- There must be an expansion joint of 1-2 cm between the protective coating and the foundation (lay roofing material in two layers, polystyrene foam or EPS, cover with sand, fill with sealant);
- when waterproofing and insulating the foundation, the material rises to the level of the blind area;
- the base should hang over the expansion joint and it should not interface with the protective coating (a gap of 1-2 cm is left).
Another popular type of protective coating for house formwork is paving slabs or paving stones.
How to make a blind area at home with your own hands
First, markings are made along the perimeter of the building using pegs and laces. The following is the order of work:
- The plant layer and some soil are removed. The depth of the trench depends on the size of the underlying layer and the thickness of the protective coating. Usually - 25-30 cm.
- The bottom is treated with herbicides. This is necessary to prevent plants from growing in this area. They are able to destroy even concrete and asphalt, and they grow instantly between tiles or paving stones.
- The bottom of the trench is leveled, forming the required slope and compacted.
- The underlying layer is laid and compacted, maintaining the slope. It is advisable to compact everything using a vibrating platform. Manual tamping is ineffective. Density is especially important when laying concrete, but it is advisable to compact it well under tiles or paving stones: it will not collapse or warp.
- A protective coating is laid.
- A drainage groove is formed.
It's very short and sketchy. Each coating has its own characteristics, and each needs to be discussed separately.
Materials and technologies for the construction of blind areas
The blind area around the house can be made with your own hands by pouring, laying or paving. In the first case, concrete is made and poured into a pre-installed wooden formwork. Another option is asphalt. It is a relatively stable material that does not flow and does not require any form. The disadvantage of this solution is that in extreme heat the asphalt becomes soft and begins to emit an unpleasant odor. Paving is done with paving stones or paving slabs. A feature of this technology is the need to lay waterproofing material under the fill to protect the soil from moisture. Today, the most effective method in all respects is a concrete slab, resistant to all possible external influences.
To work you will need the following set of tools and accessories:
- concrete mixer;
- grinder, welding machine;
- hammer, axe, hacksaw, shovel, pick-hoe;
- pliers, screwdrivers;
- level, roulette, rule;
- rope;
- tamping;
- putty knife.
List of building materials:
- cement, sand, crushed stone;
- plasticizer;
- geotextile fabric;
- thick cellophane or roofing felt;
- sealant for filling damper joints;
- boards for formwork;
- hardware (nails, screws);
- reinforcement or finished steel grating.
The production of the blind area should be carried out in the warm season, when the soil on the site dries out and settles after winter heaving. The last thing you need to buy is cement, as it has a limited shelf life. Everything else can be purchased in advance.
Concrete blind area around the house
The most widespread covering is concrete. It turns out to be the most inexpensive. Traditionally, the underlying layer consists of poured compacted sand (10 cm) sand, on top of which compacted crushed stone (10 cm) is laid. As already mentioned above, this scheme works normally on well-draining soils.
Construction of a concrete blind area for a house for different soils
If there is clay or loam around the house, make the underlying layer from native soil. To reduce the effect of heaving and avoid cracking, pour 10 cm of sand on top of the compacted soil, and then lay concrete on it. This way the concrete will crack less, but you will not get rid of cracking completely: especially in regions with harsh winters. In such conditions, it is better to make a blind area from crushed stone or pebbles - there will be no problems with cracking. If funds allow, they make it from tiles. For harsh winters, with correctly selected layers of substrate, they stand well.
In general, on heaving soils it is advisable to make drainage that will drain the water flowing from the tape. This will be an effective and reliable solution. All the rest are just half measures. The drainage pipe is positioned so that water from the coating enters it.
Rules for concreting a blind area
Formwork is installed and secured along the perimeter of the marked area. Most often, the board is of sufficient height, secured with pegs and spacers.
To reduce surface cracking, reinforcement is often used. To do this, a mesh of steel wire with a cell size of 10-25 cm is laid out on the finished underlying layer.
Diagram of a reinforced concrete blind area around the house
Wooden planks treated with antiseptics are laid on top of the mesh (if there is one). The thickness of the planks is 2.5 cm, and they can be treated with hot drying oil. These strips are damper joints that will prevent the concrete from cracking when temperatures change.
The planks are set while maintaining the slope from the house. The rule is then “pulled” along them, leveling the solution.
To make the surface strong and smooth, ironing is carried out. Almost immediately after pouring, while cement laitance is still on the surface, the concrete is sprinkled with cement (can be crushed several times) and rubbed with a trowel or plaster float. A thin but strong, smooth and slightly shiny surface is formed on top. It is very resistant to abrasion.
Do-it-yourself concrete blind area. To compensate for changes in concrete dimensions depending on temperature, wooden planks are laid
The last stage is concrete care. The path is covered with a damp cloth. During the week, it is regularly moistened (sprayed from a hose or watering can). The fabric should remain damp. To avoid hassle with watering, you can cover it with film, but it is more difficult to keep it in one place.
Concrete for blind area
For the blind area, standard sand and gravel concrete is used. Darkness is preferably at least M150. It can be higher: the higher the grade, the more durable the protective coating will be. The proportions for preparing the solution for the blind area can be selected from the table. They are given for concrete grade M400 - not very expensive, the characteristics are normal.
Proportions of materials for different grades of concrete
Insulated blind area
It only makes sense to install an insulated blind area in a heated house. In buildings for seasonal residence, in which above-zero temperatures are not maintained in winter, this makes no sense. The meaning of adding a double layer of insulation:
- create additional protection against freezing and reduce the likelihood of winter heaving;
- reduce heating costs.
How an insulated blind area works - it moves the freezing zone away from the foundation
If the insulated blind area of the house is laid at the design stage, then one more reason is added: if this detail is present, reduction factors are applied when calculating the depth of the foundation. That is, the foundation has a lower height, and therefore less cost.
An option for installing an insulated concrete blind area with a drainage system is demonstrated in the video. Everything is described normally, they just didn’t specify what to do if the layer of loose soil is more than 40 cm, which is required for the blind area. In this case, it must be filled with soil having a density higher than that located on the site. If there is clay on the site, then only that can be used. If it is loam, you can take either clay or loam.
One point: lay the clay not in a dry state, but diluted to a paste. The technology is old, but nothing better has been invented yet. It is laid out in layers, trying to avoid the formation of air pockets - water will certainly stagnate in them (or someone will settle).
The blind area is crumbling - use modern impregnations for concrete
If the technology was violated during the construction of the blind area, the concrete began to deteriorate from the influence of moisture, care should be taken to protect it.
In this case, special impregnating compounds will be useful. They can be used not only for new structures, but also for used ones. This finishing of the blind area will help give it strength and maintain its integrity longer.
Impregnations for concrete, their types and purpose
Impregnating compositions for concrete are made on various bases. Their classification is based on this:
- Organic. They are able to fill the pores of concrete and make it impervious to moisture, dust and other negative factors.
- Inorganic. They react with molecular compounds and lead to the formation of a film on the surface, which makes it impossible to react with other substances.
Impregnations also differ in the functions they perform. Most often, such compositions are used for:
- Adding color. Much more effective than paints and varnishes. They penetrate deep into the concrete and paint from the inside. A nuance is the need to use a water-repellent composition to protect the colored coating.
- Dust-removing compounds are rarely used for blind areas. But they also have moisture-repellent properties, which makes their use rational for home paths.
- Moisture resistant helps increase resistance to moisture. The top layer becomes hydrophobic, thereby increasing its resistance to ultraviolet radiation, fungus and mold.
- Strengthening mixtures can penetrate up to 5 mm. inside the concrete layer and significantly increase its resistance to mechanical influence.
Some impregnations have mixed properties, capable of simultaneously protecting against moisture and increasing the strength of the structure.
Rules for using impregnations
The effectiveness of using impregnation depends on correct application. If the old blind area is being strengthened, then preliminary repairs will need to be made: clean the surface of dirt and dust, eliminate cracks and chips, and sand the path. The subsequent impregnation technology is similar for new and used structures:
- Work is carried out at temperatures from 5 to 40° above zero.
- The procedure is carried out in dry weather; the composition is applied to a dry surface.
- It is necessary to use personal protective equipment to prevent the impregnation from coming into contact with the skin or mucous membranes.
- The composition should be applied in layers. Each subsequent layer is coated after the previous one has set. The specific time is indicated by the manufacturer on the packaging.
- Brushes and rollers used to apply impregnation must be made of materials that are resistant to the components of the solution.
Protecting the blind area is not only a way to extend its service life, giving additional decorative and quality characteristics, but also the main method of combating the destruction of the foundation from the influence of moisture.
A properly strengthened house path is resistant to the influence of external negative factors, which significantly reduces the need for repairs. By thinking through the finishing of the blind area in advance, you will be able to save money in the future.
Blind area made of crushed stone or pebbles
This is one of the types of soft blind area. It's easy to do it yourself. This system is used if there is a drainage system or the soil drains water well, and there is no clay or loam under the plant layer.
Soft blind area made of crushed stone
The order of work is as follows. A layer of geotextile is placed in a dug trench on a leveled and compacted bottom. This material is not thick, but very elastic. It will prevent crushed stone or pebbles from being pressed into the ground. And the path will not sag. Crushed stone is poured on top and compacted. Layer thickness 10-15 cm, fraction 10-80 mm. All.
If desired, the gravel blind area can also be made insulated. Then 50 mm thick EPS (extruded polystyrene foam) is laid in the trench on compacted and leveled soil, a high-density geomembrane is laid on top, and pebbles or crushed stone can be placed on top of it. But it is not advisable to walk along such a path.
Do-it-yourself blind area made of tiles or paving stones
There are several device options, but the most optimal and versatile are “pies” using geotextiles.
For example, one of them is shown in the figure. It can be used to construct a blind area on heaving soils with harsh winters. Note:
- both layers are attached to the wall with clamping strips;
- on the far side of the foundation, the geotextile rises to the ground level.
Construction of a foundation blind area for heaving soils
It is advisable to use geomembranes as waterproofing. They are made from high density polyethylene. By brand: you can take Tefond, Isostud, Fundalin, TechnoNIKOL Planter Standart, etc. They cost around 150-250 rubles/m².
Geotextiles are available in different brands and densities, with different functional purposes. Choose based on the geology of the site. Their price is from 15 to 50 rubles/m².
When constructing a blind area with your own hands, the main thing is to make sure that the water leaves the foundation and does not collect in the sand or crushed stone layer near the house. What will definitely happen if the soil is heaving (clay or loam), the underlying layer is made of sand and crushed stone, and there is no drainage.