Which plaster is better to plaster brick walls
It is quite difficult to navigate the variety of compositions. You need to purchase a material that is easy to apply, durable and not affected by moisture.
Many craftsmen choose mixtures based on price and ease of use, but do not know what is the best way to plaster the walls inside the house so that it is safe for its inhabitants.
When performing interior work, the composition of the material should not release harmful substances into the air; the finished coating should be vapor-permeable, resistant to humid environments and biological destroyers. Have sufficient viscosity to be applied to the wall and strength to provide surface protection.
Plastering brick walls is done with special mixtures
Cement-sand mixture
The most popular material. The binder gives the layer sufficient strength, fire resistance and immunity to destructive factors.
Plastering brick walls with cement-sand mortar creates a monolithic coating on the surface that meets all safety parameters. The solution does not require special skills to operate and is economical.
Advantages of using the composition:
- strength and resistance to mechanical damage;
- good tolerance to high humidity, it is often used in the kitchen and bathroom;
- affordability;
- The solution can be prepared and applied to the wall yourself.
Among the disadvantages, several points can be highlighted - this is a long setting and increase in the strength of the layer, and susceptibility to cracking. If the building is new and has not gone through the shrinkage process, it is not recommended to use it for plastering.
To prepare the mixture, use cement grade M400-500, fine sand 1-3 mm and clean water.
Advice!
Functional additives should be added to the composition, with the help of which you can improve noise and heat insulation properties, change the plasticity coefficient and increase or decrease the hardening time.
Limestone
A universal composition that is often used for leveling walls indoors. The material has good adhesion to brick substrates and is easy to apply, but does not have the strength of cement mortar.
Lime plaster is used in the kitchen and living rooms. The coating is hygroscopic, easily absorbs moisture and also releases it into the air, which makes the walls “breathable” and creates a good microclimate in the room.
It is not advisable to apply a coating to level the walls under ceramic or stone tiles in the bathroom. The heavy weight of the material and high humidity will quickly render the plaster layer unusable.
The solution is sold in ready-made dry form, which must be diluted with water. You can also prepare the mixture yourself from cement, lime and sand or clay.
Lime plaster is only suitable for interior decoration
Plaster
The material has increased plasticity, fire resistance and environmental friendliness. Gypsum-based plaster is used in living rooms and is white in color, which simplifies further wallpapering or painting. The mixture has good adhesion to brick surfaces and creates a perfectly even layer. Suitable for DIY work even for an inexperienced craftsman.
Plastering walls with a gypsum composition creates a “breathing” layer on the surface that is harmless and vapor-permeable, which is often used to decorate children’s rooms, bedrooms and living rooms.
The mixture is not recommended for use in damp areas due to the rapid absorption of moisture, as this destroys the coating. Industrial compositions often include additional components that increase resistance to water and prevent the formation of fungus and mold on the surface.
Perlite
It has special durability and strength. The multicomponent composition with the addition of functional additives allows the mixture to be used in any premises and on building facades.
Perlite plaster is made from cement grade M350-500 and fine sand with a fraction of 0.65-1.0 mm with the addition of water and plasticizers, which reduce the thermal conductivity coefficient and increase the strength of the layer.
Plaster mixtures are sold ready-made with an optimal ratio of components in the composition. You can also make it yourself, but strictly maintaining the proportions.
Types of coatings
According to modern building codes and regulations SNiP III-21-73, in parallel with TsPS, today three main types of coatings can be distinguished:
Low quality
Plastering walls is allowed mainly in non-residential and street premises; you can also treat a balcony or garage. Deviations from the norm in a coarse mixture are allowed within a size of 3mm per 1 meter, and an uneven contour can have a depth of up to 5mm. It is permissible to finish the surface with the most common starting solution.
Average
In this case, the rules and regulations for the coating are strict: non-compliance with the standards is allowed within 2 mm per 1 m. The curve can be allowed to be no more than 3 mm deep. This decorative look can be used to treat the facade of any house, the walls of a bathroom or kitchen for further finishing work in the form of marble or bark beetle.
High
Here the conditions and requirements are of the highest class. Displacements in parameters should not be more than 1 mm per 1 m, and the depth of irregularities should not be more than 2 mm. This type of processing is used when not a rough, but a finishing version of the interior is being done. Paint will be applied to it; you can glue any wallpaper or tiles. For example, in new buildings they successfully practice unusual finishing in the Venetian style, relief putty with painting, artistic modeling of any color, a stone facade, expanded clay and clay embankments in the courtyards, a building base with a laser pattern, and a tiled sidewalk.
Preparing a brick wall for plastering
The mixture is applied only to a clean, dry surface, so before finishing work, several steps must be carried out to create optimal conditions to improve the adhesion of materials to the base.
Preparation for plastering brick walls involves cleaning, removing dust and degreasing the surface. If the house has not yet been finished, then the order of work is reduced.
The durability of the coating depends on the quality of preparation.
New wall
Does not require completion of all preparation activities. Before plastering, you need to clean the surfaces from mortar protrusions, construction dust and wash the walls with a degreasing compound. The remains of the masonry mixture are knocked down with a chisel and hammer, the seams are slightly widened and notches 4-5 mm deep are applied to the brick. Next, the surface is vacuumed and heavy dirt is removed. Degrease with a 5% hydrochloric acid solution and dry.
old wall
It requires a complete preparation process and depends on the type of mixture that will be used for plaster and the condition of the old layer. If the brick was covered with cement-sand or perlite mortar, only the flaking areas can be removed. It is advisable to remove gypsum and lime plaster completely.
Surface preparation steps:
- Cleaning of old plaster layer. You need to go over the entire surface with milk and beat off all areas that can be removed.
- If there are any violations of the integrity of the seams between the bricks, you need to clean and remove the old mortar.
- Rinsing the surface with water and a stiff brush. This will remove dust and old dirt.
- Degreasing the surface with a 5% hydrochloric acid solution.
Note!
If it was not possible to clear the walls of old plaster, and there are violations of the seam joints, you need to apply primer with antifungal drugs to the surface.
Next, the base is leveled with a cement-sand mixture and dried for 24-48 hours until the layer completely sets with the base.
Cracks in brickwork must be repaired
Surface priming and reinforcement
Do I need to prime a brick wall before plastering? Definitely yes. In the process of finishing brick walls, priming occupies a special place, which prevents the absorption of excess moisture from the cement mortar. In addition, priming creates a special layer to ensure stronger adhesion between the brickwork and the plaster mortar. Moreover, it is recommended to apply the primer composition in two layers.
As for reinforcement, this process is not mandatory. Reinforcement of brick walls is used when finishing surfaces with a large number of cracks, irregularities or dents. Reinforcement technology involves fixing a special mesh to metal fasteners that are “pressed” into the layers between the bricks. It is recommended to pre-deepen the mortar joints for better adhesion of the first layer. Reinforcing elements must be made of materials that are not subject to corrosion - plastic mesh is an excellent option. The use of a metal mesh may, after some time, lead to the appearance of rust on the surface layer of plaster.
Tool
You need to prepare a full set of necessary devices in advance. The viability of the solution is 30-60 minutes, during which time it must be applied to the wall and leveled, so all tools must be at hand.
What is needed to perform plastering work:
- hammer, chisel, scraper and brush for preparatory work;
- stepladder or sawhorses for safe climbing to the top;
- perforator with a nozzle for mixing mortar;
- screwdriver, dowels and screws for attaching beacons;
- metal profiles, tape measure and building level;
- container for mixing the solution;
- ladle, trowel, trowel, grater for plastering walls;
- smoother and a set of spatulas for final leveling of the surface.
All these tools will be useful at different stages of plastering walls in a brick house. They will help you quickly apply the solution to the surface and give it the desired smoothness.
Also, do not forget about respiratory and eye protection during dusty work on cleaning the base from the old layer.
Required materials and tools
Before you plaster a brick wall with your own hands, you should take care of purchasing the tools and materials that will be required during the work.
To prepare the surface and directly for plastering, you will need the following tools:
- falcon;
- trowel;
- usually at least one meter long;
- grater;
- grater;
- mixer;
- container for preparing plaster mortar;
- hammer;
- chisel;
- brush with metal bristles;
- roller;
- brush 150 mm wide;
- container with cuvette;
- metal scissors;
- plumb line;
- laser level;
- roulette.
From the materials you need to prepare:
- metal or plastic reinforcing mesh if you plan to carry out work outside the building;
- primer solution;
- profile slats used as guide beacons;
- plaster mixture in bags.
How to plaster a brick wall with your own hands
To make the coating strong and durable, you need to strictly follow the production technology. Many novice craftsmen do not know how to properly plaster a brick wall and make mistakes that affect the quality, which will lead to premature repair of surfaces.
How to prepare a mortar for plastering a brick wall
Stores sell mixtures to which you just need to add water and mix thoroughly. But preparing solutions yourself saves a lot of money, so DIY is often practiced by craftsmen.
For proper mixing, you only need to know the proportions of the components and the stages of introducing them into each other.
Preparation of different types of plaster for brick walls:
- Cement-sand mortar. Cement of grade M400-500 is used - one part, clean sand, washed to remove clay and silt deposits, 3-4 parts and water is added. For spraying, the solution is made more liquid; for leveling and the base layer, the solution must correspond to the consistency of thick sour cream.
- The lime mixture is prepared in a ratio of 2-3 parts of filler and 0.5 parts of cement and lime. Water is added until creamy.
- Gypsum mortar is prepared differently for different stages of work. For spraying, mix 1 part lime, 2-3 parts sand and 0.5-1 parts building gypsum. For working layers, mix 1.5-2 parts of sand and gypsum in equal proportions and add water to the desired consistency.
First, all dry ingredients are mixed until smooth, then liquid is added to the composition. Additionally, plasticizers are added to the mixture to improve the plasticity of the material, antifungal drugs and components that slow down the setting of the solution so that you can work calmly.
The technology for preparing the solution is the same for all types of mixtures
Wall cleaning
The preparation of a brick surface for plastering must be approached responsibly. If the wall is new and has not been finished, it is enough to make small notches, remove dust and start priming.
It is advisable to completely clean the surface that was previously plastered from the old coating. Hidden defects in the form of cracks and destruction of seams lead to heat loss and increased humidity in the walls, which affects the strength of the plaster layer.
Identifying deficiencies and eliminating them
In old houses, the integrity of the seam joints is often compromised, the brick may crack, and in some places sagging, delamination and deflection of the brickwork occurs. Before plastering work, all surface imperfections must be eliminated.
Types of brick wall repairs:
- Cementing cracks and cracks. To prevent expansion and increase in defects, the surface is treated with waterproofing compounds. Cover with cement-sand mortar, and cover the top with deep penetration soil.
- Partial replacement of bricks. If there is deformation of the seam and the old masonry mixture is crumbling, it must be removed and replaced with a new one. The brick needs to be dismantled, new mortar applied and put in place.
- Wall injection. It is carried out by specialists if the surface is severely damaged with partial destruction. For injections, polyurethane resins and polymer gels are used. The masonry is expanded, and compounds are introduced into large cracks that strengthen the structure.
For your information!
If the wall has no visually identified defects, you can proceed to the next stage of work.
Surface primer
The brick base has a porous structure that quickly absorbs moisture. Priming the surface is a mandatory step, which ensures good adhesion of the mixture and the wall during the setting process.
For processing, acrylic or silicone aqueous solutions are used. To improve absorption, the primer is applied twice with intermediate drying for 10-12 hours at a temperature of +18-20 degrees.
Reinforcement
Reinforcement is necessary in new buildings so that the shrinkage process does not destroy the layer of plaster and in old houses, to strengthen the structural elements of the building. When applying a cement-based coating, a galvanized metal mesh is used; for gypsum and lime mortar, a fiberglass reinforcing sheet can be used.
To align and fix the corners, you need to purchase special profiles. When attaching the plaster mesh to a brick wall, you need to overlap the sheets with each other so that there are no uncovered areas. Fixation is carried out with dowels or nails in the masonry joints of at least 10 pieces per square meter. meter.
Reinforcement is performed during external work
Marking and installation of beacons
The work process is necessary to determine the curvature of the walls and correctly calculate the required amount of mortar. Beacons for plaster are set if the layer thickness differs by 1 square meter. m. is more than 2 mm.
Step-by-step instructions for installing guide profiles:
- Installation of plumb lines in one vertical plane in the corners of the walls.
- The horizontal line is stretched, and the heads of the fastening dowels are leveled using a building level.
- Beacons are cut to the height of the wall and placed in increments of no more than 1 m along the leveling cord. The profiles can be attached to mortar or nails.
After the plaster coating has completely dried, the profiles are removed and the places where they are fixed are covered with the mixture.
First layer
Plastering brick walls begins with spraying. To do this, prepare a slightly liquid solution, which is spread on the wall in a thin layer. This creates a rough surface so that subsequent coverings will adhere better. The spray is applied to a slightly moistened wall, not leveled, but allowed to set for 24 hours.
Second layer
The second layer is the base, which is made for rough alignment of the wall along the beacons. The solution is applied to the surface from bottom to top in equal parts and leveled along the profile slats using a rule or a trowel. This creates an even layer, but small defects are acceptable. At this stage, the outer and inner corners of the wall are straightened with a spatula or trowel, and the excess mixture is cut off. The base is applied with a thickness of no more than 2 cm, and sets in 12-48 hours, depending on the type of mixture. If the second layer is made as a base for subsequent covering and leveling, then the drying time is reduced by 3-4 times. The next stage of work is carried out on the unset surface.
Third layer
The third layer prepares the surface for finishing wallpaper and is applied with a thickness of 1-2 mm. To do this, prepare a slightly liquid consistency, as for spraying. The second layer is sprayed with water, the mixture is applied to the wall and, using the rule, all residual defects and irregularities are smoothed out.
The coating is applied in a thin layer
Final grout
This is done if the walls are to be painted and smooth plasters are applied, then the slightest irregularities will be visible. The final grouting is done with a float on a damp surface. First, perform circular movements with the tool, then horizontal, and then accelerated movements so that circles do not appear on the surface.
Features of plaster with gypsum mixture
When choosing this type of material for leveling walls, you need to know the subtleties of application. The gypsum mixture is very plastic and is easy to apply to the surface, but dries quickly. The solution must be diluted in the amount that can be produced in 30 minutes. When the top layer dries and it needs to be leveled, you can moisten the plaster with water.
If the walls have large defects and a larger coating thickness is required, then the work is carried out in stages, applying 20 mm of the mixture, leveling and priming. Subsequent layers are applied after the surface has completely dried.
Attention!
If the number of applications is 2-3 with a maximum thickness, it is recommended to further strengthen the coating with another layer of fiberglass mesh.
Features of sand-lime brick plaster
Walls made of this material strongly absorb moisture, so gypsum mixtures are not used on them. It is better to plaster sand-lime brick with a cement-based mortar with the obligatory use of a metal mesh.
Before carrying out work, notches are made on the wall to improve the adhesion of the smooth surface and the mixture, and primer is applied in 2-3 layers. The number of plaster mesh fastenings is increased to 20-25 pieces per square meter. m.
The adhesion of plaster mortar on sand-lime brick is significantly deteriorated
Application of the solution
How to properly plaster a brick wall yourself? Here you need to adhere to the following recommendations.
- The volume of the batch should be small in order to have time to place it within 1 hour.
- The stirred solution must be given a few minutes to “rest”.
- Plaster work is carried out in 3 layers - in builder slang they are called spray, primer and covering (the minimum thickness of the plaster layer is 1 cm).
- The solution for the first layer (spray) is prepared in the required proportion of 1 to 2 - an increased amount of binder is necessary for better adhesion of the solution to the wall. Consistency: sour cream.
The first layer of plaster is sprayed.
Attention: if the walls have not been primed, they must be wetted before plastering. If this is not done, the wall will take some of the water from the solution, thereby changing its proportions. As a result, the hydration process will be disrupted.
- The first layer starts from the lower left corner. They lead from bottom to top, from left to right. First, the space between the first and second beacons is closed, then the second and third, etc. The thickness of the spray is 4-5 mm, which allows for good adhesion of the solution to the wall. It is applied with a trowel by sharply throwing a small amount of plaster onto the wall (hence the spray). In this case, you need to use a brush, and not your whole hand - this is the only way to ensure that all voids are filled with the solution. The solution is supplied from the container to the wall on a falcon. After 3 minutes, strongly protruding areas are either removed or smoothed. There is no need to level the spray.
Trowel (trowel, plastering spatula).
The initial layer of solution can be applied using another method - spreading. Its essence: the solution is applied to the falcon with a trowel, brought to the wall and spread over it with a plaster spatula.
- The next layer - soil - is laid with thicker plaster (approximately like dough) and a different ratio of components (cement / sand as 1/3). Apply after the first layer has completely dried. Maximum thickness 20 mm. Application technology: the plaster is applied to the wall with a trowel, mainly on those places where there are indentations after spraying, then it is leveled from the bottom up (the excess is returned to the container with the solution). If there are any depressions left, plaster is thrown over them again and the rule is put into action again. The final leveling of the soil is done with a trowel. They can work up and down or left and right. If the soil layer thickness exceeds 2 cm, then its application must be carried out in two stages.
Leveling the plaster using the rule according to the beacons.
Important: if the plaster thickness is more than 3 cm, it is economically feasible to abandon plastering the walls and level them with gypsum board.
- Before applying the third layer, covering, the second layer must dry thoroughly. The solution is made liquid and preferably only from cement. When mixed with sand, the parts should be equal, and the components should be sifted on a fine sieve so that there are no lumps or small pebbles. Apply with a trowel no more than 2 mm thick. Before application, the wall is wetted with water. Smooth with a trowel in a circular motion. Here you will also need a wooden (plastic) smoother.
Ironing iron.
Attention: the cover should slightly cover the guide profiles of the beacons.
After the plaster has set, the beacons are removed, and the marks are sealed with either cement-sand mortar or putty.
Differences between plastering walls outside and inside
The main difference is in the choice of composition: gypsum mixtures are not used on facades; they are unstable at high humidity. The best materials for finishing will be cement, lime and perlite mortar.
On facades, external corners must be reinforced; indoors, this stage of work is carried out if the layer of plaster exceeds 4-5 cm.
Outside, before plastering, the spray is additionally treated with a primer to improve adhesion to the base coat, which is applied no more than 1.5 cm thick at a time.
What is the best way to plaster brick walls inside a house?
The best choice for dry rooms would be gypsum mortar - the composition is environmentally friendly, safe, easy to work with and does a good job of leveling.
In rooms with variable humidity, it is advisable to use cement-based mixtures; they are not affected by water and can withstand the loads of finishing materials such as ceramic tiles or stone cladding.
For the finishing layer, silicone and acrylic-based compounds are used, which are intended for any room.
How to plaster the facade of a brick house - nuances
The finishing of surfaces on the street is influenced by negative factors, so it is necessary to carefully follow the entire technological cycle and choose the appropriate material for finishing.
Nuances in working with external plastering of walls:
- The total thickness of the applied layer should not exceed 30-40 mm.
- Bricks on the facade before plastering must be covered with deep penetration primer and have notches 4-5 mm deep.
- The optimal temperature for applying the mixture is +18-20 degrees with a humidity of 70%.
- For external work on bricks, a mortar with the appropriate technical characteristics is used.
- When using a cement-sand mixture on a façade, additional lime is added to the composition in a volume of 10-15% of the batch.
Fact!
When all stages of work are completed and the layers are dried at the optimal temperature, the plaster will serve for a long time without peeling or repair.
Working with external walls has its own characteristics
Differences in technology
The stages of applying the mixtures are the same for both internal and external walls. The main thing is that when working outdoors in hot and sunny weather, cover the fresh layer with shields or awnings and, if necessary, wet the surface during the first day of drying.
Indoors, the plaster, after being applied to the wall, is protected from drafts and the windows are curtained from the penetration of heat. The coating must dry under optimal conditions without speeding up the process.
Installation of beacons
External plastering of brick walls begins with the installation of beacons. If this stage is carried out correctly, you can completely eliminate the need for subsequent leveling of the surface, making it initially flat.
The beacons consist of a metal profile; a gypsum-based mixture is used for fixation. Using a level, the accuracy of installation of beacons is determined; a plumb line is also required for this work. Also, the modern building materials market offers laser systems for faster and easier measurements. An economical option is to attach threads to beacons.
How to fix beacons:
- gypsum mixture is prepared;
- small cakes of approximately the same size are formed from the mixture;
- each is attached to the walls at an equal distance;
- beacons are applied so that the plaster layer is a maximum of 2.5 cm (if the plaster is strong and thick, then the maximum limit increases to 4-5 cm).
Plastering of brick walls outside begins when the beacons installed on the plaster dry well.
The mesh, which is attached to the wall before covering with plaster, will help strengthen the adhesion of the materials and increase the strength of the canvas. This will make it possible in the future not to redo the entire plaster layer that protects the brick from negative natural factors.
Mechanical plaster
When the solution is applied to the wall under pressure, the work time is significantly reduced. A mechanized plastering station allows you to make the correct mixture and apply it to the surface in an even layer. This improves the quality of the finished coating, but the work must be carried out by trained specialists.
Algorithm for performing work with mechanized plastering
The equipment is used only for mixing and applying the mixture, so all preparatory and intermediate stages are performed manually.
How does the mechanized wall plastering station work:
- All components of the solution and water are poured into separate bins.
- On the equipment, a batch preparation program is selected: for spraying, base or finishing layer.
- All preparatory work is carried out, including priming the surface and attaching the mesh.
- When starting work, the equipment makes the solution in the required quantity. One person applies it to the wall, the other does the alignment with the beacons.
The plastering station operates under pressure, which improves the adhesion of the mixture to the base. The mechanized process has its pros and cons, which must be taken into account when ordering a team for work.
Applying plaster using a machine is a fairly new method.
Advantages of machine application
The advantage is a significant reduction in application time; the setting process is not accelerated, so breaks in work will take the same number of hours as when doing plastering manually.
Advantages of machine application:
- high productivity, which is 4-5 times higher than the volume of the processed surface from manual plastering;
- good quality of coating, the station does not allow defects during operation;
- saving on materials, equipment saturates solutions with oxygen, which affects the consumption of dry components;
- saving workers' labor; usually two people are enough to service the station.
The disadvantages include the cost of equipment, which affects the entire decoration of the room. When doing the work yourself, plastering will cost half as much, but the time to complete it will also increase significantly.
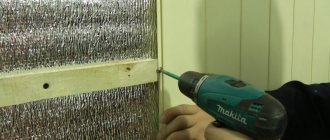
Necessary tool for plastering bricks
Rice.
4. Minimum set of tools for plastering brick An experienced finisher’s list of tools includes up to 30 items. Let us mention the minimum set of tools, without which it is impossible to work. These include:
- The trowel, which is used to mix the working mixture during its preparation, is applied to the wall and leveled. These operations are also performed with a set of spatulas or a falcon.
- An electric drill (perforator) with a mixer is convenient to use for preparing the solution.
- “Semi-grater” (oval or standard) for drawing out corners.
- A smoothing board, a spray bottle (brush), a building level (preferably a laser), usually a plumb line, a tape measure for leveling surfaces.
- Bubble level rules. For small ones, up to 1.5 m, the plaster is leveled. Large checks the quality of application (horizontal, vertical).
Decorative plaster on a brick wall
The most popular finishing is on facades, but it is also often used indoors. Using decorative plaster you can create a smooth surface, embossed or “stone-like”.
The procedure for applying decorative coating will not change. It is necessary to carry out all the preparatory work, reinforce the walls with mesh, apply a spray and a base layer.
The plaster is applied to a completely dry base: on the facade it should be a cement-based mixture; indoors it is permissible to use gypsum and lime mortars.
Note!
Smooth decorative coatings are applied in layers with intermediate drying, the time depends on the thickness and manufacturer’s requirements.
The textured finish is created with the help of special rollers, which are rolled out over wet plaster and leave a certain pattern on the surface.
Relief coating is more often used on facades or as a separate decorative element of walls indoors. Especially popular is the “stone” finish, which is created using stencils on a wet base.
When the decorative layer dries, it is painted in different colors or coated with varnish compounds.
Process Features
Depending on the material from which the walls were made for plastering, as well as on their location (outside or inside the building), different plaster mixtures and application techniques are used. Before plastering walls with gypsum plaster or other composition, you need to know some of the nuances of finishing various bases.
Brick walls
Such structures are usually finished with cement-based plasters. In some cases, a little lime is added to them to increase the plasticity and moisture resistance of the material. The thickness of the plaster layer on brick walls should not exceed 3 cm. It is also recommended to use reinforcing mesh to strengthen the layer.
When finishing a brick wall, it is necessary to use a reinforcing mesh to strengthen the plaster layer
If we are talking about facing bricks, then working with them is quite difficult. Its surface is very smooth, so the solution can fall off even if a reinforcing mesh is used. Such material must first be impregnated with special primers, and only then can finishing begin.
Concrete walls
Smooth surfaces of this type are pre-treated with primers containing quartz sand or flour. This material increases adhesion and ensures tighter contact between the plaster and the wall. To finish such surfaces, cement-based plasters are used, to which a little gypsum or lime-gypsum mixtures are added. For rough concrete walls, ordinary cement plasters without additional components are sufficient. The main thing is to treat them with “Betonkontakt” before plastering the surface yourself.
It is recommended to treat concrete walls with “betonkontakt” primer
Cellular concrete walls
If the building was erected or insulated using gas or foam blocks, then plastering work will be quick and easy. At the preliminary stage, you will only need to treat the walls with deep penetration impregnation. Such surfaces can be plastered with gypsum plaster, concrete or lime mortars.
On a note! Currently, construction stores offer a wide range of plasters suitable for certain surfaces and operating conditions. Manufacturers indicate the proportions in which the mixtures need to be diluted and provide various recommendations for use, so there will be no problems with the choice.
Preparing walls made of cellular concrete for plastering
Most common manufacturers
When purchasing mixtures, many manufacturers deserve consideration. The following manufacturers are especially popular: Ceresit, Knauf, Bolars, Glims, Kiilto, Unis; they guarantee the quality of their products.
But you shouldn’t mark them specifically when purchasing materials. Small companies producing building mixtures offer equally decent quality.
The main thing when choosing is to pay attention to the store that offers the formulations. Ready-made solutions cannot be cheap, and if you save, you can incur large costs for repairing surfaces.
Decorative plaster is applied in one or several layers
Finishing a house with plaster - types of compositions for protecting walls outside
Specialized stores offer an expanded assortment of various materials for plastering external walls.
Various materials for plastering external walls are presented in an expanded range
Finishing compositions are divided into the following types:
- plaster mixtures based on cement or lime.
- polymer-based acrylic compositions;
- silicate plasters containing liquid glass;
- silicone solutions including fine filler.
Each type of plaster has its own advantages and disadvantages.
Mineral compositions
They are offered in the form of a dry mixture containing binder material, filler and special additives. A distinctive feature of mineral compositions is their low cost, due to the low cost of binders.
The main advantages of cement plaster:
- environmental cleanliness;
- Fire safety;
- durability;
- good adhesion;
- water-repellent properties;
- resistance to the development of microorganisms and mold formation;
- noise protection characteristics;
- thermal insulation properties.
The main disadvantages of mineral plaster:
- limited color range;
- cracking of plaster during shrinkage of the building.
Each type of plaster has its advantages and disadvantages
Acrylic plaster
Sold ready for use, it has good contact with wood, stone, concrete and brick, preventing cracks from forming. Plaster is a dispersion solution containing a polymer component – acrylic.
The finishing composition has a number of advantages:
- good vapor permeability;
- resistance to temperature fluctuations;
- increased elasticity;
- ease of application;
- resistance to moisture penetration;
- texture.
When purchasing a mixture, you should pay attention to the weaknesses of acrylic plaster:
- the need for regular updating;
- gradual destruction under the influence of ultraviolet radiation.
Silicate composition
Contains liquid glass and is sold ready-to-use. Advantages of using silicate-based plaster mixture:
- improved vapor permeability properties;
- acceptable price;
- surface resistance to contamination;
- variety of color shades.
Acrylic plaster is a dispersion solution containing a polymer component - acrylic.
Due to reduced electrostaticity, dust does not linger on the treated surface. Disadvantages of silicate plaster:
- cracking of the protective layer during shrinkage of the building;
- problematic use for finishing aerated concrete walls.
Silicone mixture
It has a fairly high price due to the polymer ingredients it contains. The workforce is characterized by:
- increased vapor permeability;
- high elasticity;
- self-cleaning properties;
- long service life.
Walls coated with a silicone mixture do not need to be washed or cleaned throughout the entire period of operation. The main disadvantage of the material is the increased cost of purchasing finishing.
Prices
The cost of the material is determined by the composition of the mixtures and the manufacturer. For global brands, the price may differ significantly from Russian manufacturers with the same technical characteristics of the finished coating.
Average cost of plaster in stores:
- cement-sand 25 kg – 200-250 rub. per bag;
- gypsum 30 kg – 200-230 rub. per packaging;
- limestone 25 kg – 200-250 rub. per bag;
- perlite 15 kg – 200-230 rub. per package.
Having knowledge of what material is needed on the facade and inside the premises and how to properly plaster the walls, you can do the work yourself. Create a unique decoration for your home yourself and in a design that will be comfortable for the whole family.
Was this information useful to you? Share in the comments!
Which material is best for plastering external walls?
When performing finishing work, it is important to consider what material the façade surface of the building is made of.
Plaster of external walls fits well on the following materials:
- hardened cement;
- reinforced concrete panels;
- natural stone;
- natural wood;
- ceramic brick;
- concrete blocks.
Modern plastering compounds will reduce the cost of finishing the facade.
Various types of facade surfaces require preparation:
- Wooden walls should be thoroughly impregnated with protective mixtures to prevent wood rotting. To improve adhesion to a wooden surface characterized by an increased coefficient of expansion, you should attach a reinforcing mesh, install lathing, or attach sheet insulation.
- The concrete facade provides increased adhesion to the plaster mixture. However, the porous surface of the concrete mass absorbs moisture at an accelerated rate. To seal the pores, surface treatment of concrete with deep penetration primers is performed. The joint areas of reinforced concrete panels should be sealed with cement.
- Brick walls are a proven base that provides reliable fixation of the applied plaster mixture. The rough surface of the brick promotes improved adhesion of the plaster. To ensure adhesion of finishing compounds to brick facades, additional jointing of masonry joints is performed.
You should take into account the properties and features of the finishing material when selecting a plaster mixture to protect and decorate the facade walls of the building.
Plastering on beacons
In case of large unevenness or deviations of the wall, plastering is carried out using beacons (guides for the rule).
Beacons can be installed after a full cycle of preparatory work has been completed and the primer has dried.
Do-it-yourself installation of beacons before plastering walls is done using a metal profile, gypsum mortar and a building level.
Instead of gypsum mortar, you can install beacons on self-tapping screws.
Installation of beacons for plastering walls
We divide the wall into sections of 1-1.5 meters, depending on the length of your rule, and draw vertical lines using a plumb line or building level.
The distance between the beacons should be less than 20 cm of the length of the rule.
We drive a large nail at the top of one side of the wall and hang a plumb line on it. Along the plumb line, we drive another nail at the bottom and fasten the lower end of the plumb line to it, approximately at a distance of 8-9 cm from the wall.
We also install another plumb line on the other side of the wall. The plumb line should be well tensioned.
We stretch the thread between two installed plumb lines, simply tying its ends to them so that it easily moves along the plumb lines. We will set the height of the beacons along this thread.
We move the thread to the middle and find (using a ruler) the most protruding place on the wall, mark it (write down the distance from the thread to the wall).
We also find the most protruding place at the bottom and top.
We compare the marked points and find the most protruding place on the entire wall. Here we drill with a hammer drill and install the first 8x40 mm dowel with a screw or self-tapping screw and measure the distance from it to the cord; we will tighten all subsequent screws to this distance.
We screw in the screws on all previously drawn vertical lines in increments of approximately 50 cm.
Video instructions for installing beacons
Next, you can install the beacons on the solution or special fasteners.
Below we will look at mortar mounting.
We prepare the gypsum solution at the rate of 20-30 minutes of work, since then it will begin to set and apply it to the vertical lines between the screws.
We install the beacon on the solution and press it tightly against the screws along its entire length. We apply the rule to the lighthouse and make sure that there are no gaps between them. Remove excess solution.
So we install all the beacons for plastering the walls and let them dry completely.
If you are not sure about the quality of the material from which the beacons are made, then after drying you need to take them out and plaster the places where they are installed.
Plaster reinforcement
If the thickness of the applied plaster is more than 2 cm, the surface must be reinforced.
For reinforcement, meshes made of various materials are used:
- polymer;
- metal;
- nylon;
- galvanized;
- fiberglass, etc.
If the thickness of the leveling layer is large, a galvanized mounting mesh is installed.
Fastening is done using dowels with plastic washers. The thickness of the leveling layer can reach up to 6 cm.
After installing the mesh, it is covered with a sufficiently liquid solution to completely fill the voids. After drying, the main layer of plaster is applied.
Small 2-3 cm leveling layers can be reinforced with fiberglass mesh. Install it directly on the plaster or on a special adhesive for reinforcing mesh.
Depending on the material and type of reinforcing mesh, the thickness of the applied layer of plaster also varies. These standards are indicated on the packaging.