Is it necessary to build a warm chicken coop?
The health and egg production of poultry directly depend on their comfort, adequate nutrition and general physical activity. Temperature and daylight hours play an important role.
Old barn converted into a chicken coop with a run for walking
The period from November to March is the most difficult for both poultry and poultry farmers who keep laying hens all year round. If in spring and summer the bird leads an active lifestyle, walks freely around the enclosure or alley, bathes in sand and specially designed containers with water, then in winter, for obvious reasons, its activity is greatly limited.
If the temperature is too low and there is no light, the egg production of laying hens is greatly reduced, and in some cases stops completely. Based on this, during the cold season a chicken coop should be built for chickens, providing the following conditions:
- temperature above 10–12 °C and low air humidity;
- artificial lighting that increases daylight hours;
- natural or artificial ventilation for constant air exchange;
- a place for nests and a free perch at a low altitude;
- free space at the rate of 1 m2 per chicken.
Compliance with the conditions described above ensures that laying hens not only remain completely healthy and survive the winter well, but also maintain egg production and overall body weight.
Deciding on the sizes
Any construction begins with the creation of a sketch. Draw on paper how you imagine the building, calculate its dimensions, think about the construction materials. Now the main thing is to decide what dimensions the bird house will be.
If you plan to have 10 chickens, a 2 by 2 meter building will suffice. If the number of birds is 20, then the area doubles. Therefore, we will talk about building a 4 by 4 building.
When calculating the size of the chicken coop, it is necessary to take into account the following:
- For meat breeds of chickens, 1 square meter will be enough. m for 3 pieces;
- 1 square meter is enough for small chickens. m for 10-15 pieces;
- For laying hens, 1 square meter is enough for 4 hens.
Don’t forget to indicate on the sketch: walking area, perches, nests, vestibule.
Types of insulated chicken coops
An ordinary chicken coop is a barn, near which there is an area for walking the birds in the fresh air. The walking area is fenced with a fine mesh net, which will reliably protect the bird’s habitat from unwanted penetration of predators.
Winter chicken coop made of timber and boards for 30–35 chickens
In fact, this option can be taken as a basis when building a warm chicken coop. Especially if you need a room to keep no more than 10–15 chickens. If desired, you can consider a more comfortable chicken coop with both external and internal walking areas. But in this case, its size will be noticeably larger, which is not suitable for small suburban areas.
Depending on the number of birds, the following types of chicken coops can be used:
- 10-15 chickens - a mini-chicken coop in the form of a barn with an area of 10-15 m2. This will be enough for the free movement of birds and chicks if they are planned to be bred. Walking area - 2x2 m. The chicken coop must have at least one window and a ventilation grille;
- 20–30 chickens – a full-fledged barn with an area of 18–20 m2. The optimal height of the chicken coop is 1.8–2 m. Walking space is 2x3 m. This is enough to build a tiered perch and install 5–7 nests. If there is enough free space on the site, then you can build a barn with a vestibule, which will allow you to provide a small space for walking, and also make the chicken coop warmer;
An aviary for walking chickens can be made from lumber and fine mesh
- 50 chickens or more - a building with an area of up to 50 m2, which will require not only more thorough insulation, but also the installation of an additional heating system. The height of the chicken coop, as in the previous version, is no more than 2 m. The space for walking is 3x4 m. It is optimal if the perches are located opposite the window, and 7–10 nests near the far wall in the chicken coop.
In many ways, all three types of chicken coops are similar and differ only in size, but with enough materials and free space on the site, an insulated chicken coop can have a completely different look.
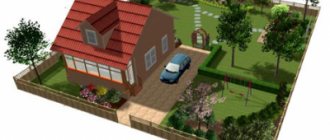
For example, you can build a completely enclosed structure, which will already have a place for walking. This will prevent the chickens from getting hypothermic during walks, and will also allow the birds to walk freely, even when it is -15–20 °C outside.
Requirements for the construction site
Since the winter chicken coop is created for many years, the choice of location must be approached especially carefully. It is necessary to take into account not only the comfort of the birds themselves, but also other animals, as well as people. Primary requirements:
- elevation – you should not choose low-lying places due to the constant accumulation of moisture (the slope can be determined visually and using a level);
- as far as possible from a noisy road, garage, doghouse;
- at a distance of at least five meters from the entrance to the house.
Important! Windows and chicken walking areas are located on the south or southeast side. There should be no shadow from a wall, fence or other buildings.
Choosing materials for construction with your own hands
A variety of building materials can be used to build a chicken coop - from edged boards to masonry bricks. Any material has both positive and negative qualities, which should also be taken into account when choosing.
Base material
The construction of a chicken coop, like any structure, begins with laying a load-bearing foundation. The foundation is necessary for reliable protection of load-bearing walls and roofs. In the absence of a foundation, the walls of the chicken coop will be under constant influence of moisture, which will come from the damp earth. As a result, this will lead to rotting and damage to structurally important components of the structure.
Concrete, brick or foam blocks are used to make foundation supports
To build an insulated chicken coop, you can use the following types of foundations:
- columnar - suitable for building chicken coops using frame technology, when the walls are made of thick boards and OSB. Foam blocks or concrete mixture are used to make the foundation. The supports are erected along the perimeter of the future structure;
- pile - used for the construction of buildings on heaving and moving types of soil. A base in the form of metal piles sunk into the ground around the perimeter of the building is suitable for constructing wooden chicken coops. If the foundation is a pile-grillage foundation, then its load-bearing capacity is sufficient to build a chicken coop from foam blocks;
- strip - the most reliable type of foundation. It can be used to build a chicken coop of any size and design. To make a strip foundation, a concrete mixture of grade M500, steel reinforcement Ø18 mm and edged boards are used.
To make a grillage, you can use either a 20x20 cm wooden beam or an M500 concrete mixture. The first option is cheaper and easier to implement. Using a concrete mixture requires the ability to set formwork and knit a reinforcement cage, but in general, the use of these materials allows you to build a more reliable and durable foundation.
The choice of materials for making the floor in the chicken coop depends on what type of foundation is used. For pile and columnar foundations, it is more rational to use wooden beams, edged boards and CBPB sheets. In the case of a strip foundation - concrete and reinforcing materials.
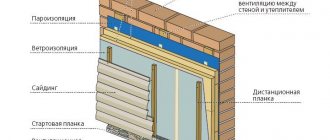
Wall materials
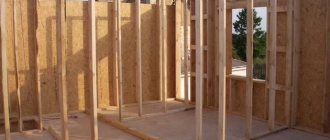
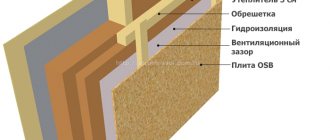
The choice of material for constructing the walls of a chicken coop depends on the size of the structure and the technology by which it will be built. The simplest and fastest option is a chicken coop made of wooden beams and OSB. A beam or thick board (from 22 mm) is used to construct the frame, which is later sheathed with OSB sheets inside and out.
Foam block is perfect for constructing permanent walls of a winter chicken coop
To build the main walls of a chicken coop, you can use the following materials:
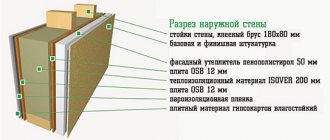
- shell rock is a natural material with low thermal conductivity. Perfect for building chicken coops for 25–30 chickens. The shell rock is a rectangular block 180x180x380 mm. The technology of work is in many ways reminiscent of the process of laying foam or cinder blocks;
- foam concrete is a popular environmentally friendly building material. Suitable for building chicken coops of any size. For the construction of walls, it is better to use D400 foam blocks measuring 200x300x600 mm. The thickness of the walls being erected depends on the temperature regime in the region;
- brick is a traditional material for the construction of load-bearing walls. Has low thermal conductivity and long service life. It is best used for the construction of permanent chicken coops for 50 or more chickens. Both solid and hollow bricks are suitable for the construction of chicken coops.
When choosing material for walls, you should also take into account how long the structure will be built. If you are just trying yourself as a poultry farmer, then the optimal choice of material for walls will be wooden beams and OSB. In the future, such a chicken coop can be disassembled or expanded with a small extension.
If you already raise chickens in large numbers and are planning to build a permanent chicken coop, then it is better to build a permanent structure from foam blocks or bricks. Such a chicken coop will cost more, but its service life is noticeably longer.
Insulation material
To insulate the floor, walls and ceilings of the chicken coop, you can use various thermal insulation materials. The cheapest option is to use sawdust, expanded clay and dry hay. Expanded clay is used to insulate floors or ceilings, and sawdust and hay are used to insulate walls.
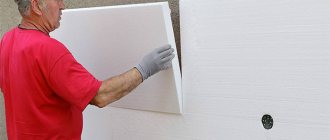
Polystyrene foam has a low thermal conductivity coefficient, which makes it one of the best materials for wall insulation
The only disadvantage of this method compared to modern heat insulators is that the materials have a high thermal conductivity coefficient. In turn, this requires the installation of a large layer of insulation, which is not always possible when building a chicken coop.
Modern insulation materials that can be used to insulate walls and floors in a chicken coop include:
- polystyrene foam is a cellular insulation material with high thermal insulation qualities. The thermal conductivity coefficient is lower than that of foam concrete, brick or mineral wool (0.047 W/m*K). Available in slabs of various sizes. The material is convenient to install on walls and ceilings. One of the disadvantages is that foam plastic is very fond of rodents, but this problem can be solved by covering the walls with OSB or plywood;
- mineral wool is a heat and sound insulating material with a different fibrous structure. In terms of thermal insulation qualities, it is slightly worse than polystyrene foam (0.056 W/m*K), but unlike foamed heat insulators, it is not food for rodents. To improve practical properties, it is recommended to use it in conjunction with reflective membranes;
Stizol has a metalized surface, which helps retain heat indoors
- extruded polystyrene foam is a modern cellular insulation with a closed structure made of polystyrene foam. It features high performance and long service life. It is an environmentally friendly material. With equal thickness of insulation, it is superior to polystyrene foam, mineral wool, expanded clay and other heat insulators;
- stizol - insulation and soundproofing material made of polyethylene foam. It is characterized by moisture resistance, durability and high thermal properties. It can have different types of front surface: metallized film, aluminum foil, non-woven fabric, etc. It is recommended to use material 10 mm thick as insulation.
When choosing a thermal insulation material, you should take into account its cost and the surface area that you plan to insulate. For small chicken coops, you can use stizol and other materials made from polyethylene foam. Stizol has a low thermal conductivity coefficient (0.3 W/m*K) - this ensures that the material reliably retains heat indoors.
For chicken coops with 50 chickens or more, it is recommended to use a combined approach. For example, insulate the floor with expanded clay and the walls with extruded polystyrene foam. If you want to save money, it is better to use polystyrene foam or mineral wool together with stizol.
What kind of foundation is needed?
For such a room, the simplest type of foundation is suitable.
This may be a pile option or a shallow foundation option. If you plan to build a permanent chicken coop from brick, foam block, cinder block, etc., then a conventional strip (not reinforced) foundation is suitable. For buildings made of wood, it is enough to organize a basic foundation from blocks, which you can make yourself. When using a columnar foundation, it is enough to install the posts every 2-3 meters, as well as in the corners of the building.
Preparatory work
In order to quickly and easily build a chicken coop, you should carefully prepare for construction work. To do this, you need to decide on the location of the chicken coop, draw up a drawing of the future structure, calculate the material and prepare construction tools.
The diagram should show the location of nests, roosts and feeding areas.
When choosing a location on the site, it is advisable to adhere to the following:
- It is not recommended to build a chicken coop in a lowland or on a slope. It is optimal if it is a free site located on a hill;
- chickens and other poultry are afraid of noise. Therefore, it is better to build a chicken coop away from the road and other sources of noise;
- The health of chickens directly depends on the amount of sunlight. To ensure free flow of light, the structure should be located on the south side.
If the soil on the site is clayey, loamy, swampy or other soil that does not absorb moisture well, then it is recommended to drain the site before building the chicken coop. If this is not done, the supporting base of the structure will quickly become unusable, and this will reduce the service life of the chicken coop as a whole.
Once you have found a suitable place to build a chicken coop, you can proceed to drawing up a drawing. This can be done either using regular paper and pencil, or using special computer programs for design.
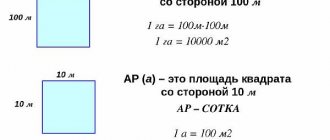
Opposite each structural element you need to indicate the size - this will help to avoid mistakes during construction
The drawing should show the structure on a reduced scale. It is taken into account that the size of the structure depends on the number of chickens that are planned to be kept.
Opposite each structural element, its size should be indicated. This will help you quickly navigate the project without wasting time on calculating this or that part of the structure. Additionally, you should depict the chicken coop in a projection from above. On this part of the diagram you need to locate the entrance to the room, perches, nests, feeding area, etc.
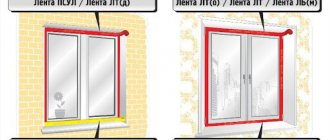
As an example, consider the two diagrams located above. Both options are designed for keeping 10-12 chickens. The first diagram shows a chicken coop on a columnar foundation 200x400 cm with a pitched roof. To make a chicken coop, edged boards with a thickness of 10 to 20 mm are used. If desired, this diagram can be taken as a model on the basis of which the chicken coop you need will be built.
The second diagram shows a chicken coop with an aviary for walking. The dimensions of the structure, including the vestibule, are 425x525 cm. To build the chicken coop, as in the previous version, a wooden board and timber are used.
Materials for building a chicken coop
Materials for building an insulated chicken coop are selected based on personal preferences and the funds you are willing to spend on building the structure. For example, to build a chicken coop from the first example described above, the following material is needed:
- cement M500;
- fine sand;
- gravel fraction 20–40;
- expanded clay fractions 20–40;
- fittings Ø16–18 mm;
- edged board 20x200x6000 mm;
- wooden beam 20×20 mm;
OSB sheets are ideal for covering the walls of a chicken coop built using frame technology
- OSB sheets 2440x1220x8 mm;
- slate;
- mineral wool;
- vapor barrier membrane;
- stizol;
- roofing felt;
- metallized tape;
- wood antiseptic.
It is advisable to use galvanized wood screws or galvanized nails as fasteners. To ensure reinforcement of the frame, you can use a steel angle of a suitable size.
Tool for work
To build a chicken coop you need the following tools:
- bayonet shovel;
- hand drill;
- wood hacksaw;
- construction stapler;
- screwdriver;
- concrete mixer;
When insulating walls with mineral wool, the use of a vapor barrier membrane is mandatory
- building level;
- roulette;
- pencil;
- wooden pegs;
- rope.
What tools and materials will be needed
To build a frame chicken coop for the winter with your own hands, you will need the following materials and tools:
- cement;
- sand;
- gravel;
- water;
- wooden boards and beams;
- insulation (wood paneling is often used);
- tow;
- slate for roofing;
- glass;
- Rabitz;
- roofing felt;
- door hinges, door lock;
- glass for windows;
- plastic pipes for the ventilation system;
- hammer, nails;
- bolts, nuts;
- self-tapping screws;
- anchors;
- saw;
- level;
- screwdriver;
- pliers.
What material is best to build a shed from?
Along with traditional wood, which retains heat well, is environmentally friendly and durable, other materials are also used to build a winter chicken coop:
- foam concrete;
- brick;
- cinder block;
- shell rock
The better to insulate
The winter chicken coop must be made warm, especially in the climatic conditions of the North-West, the Urals and Siberia. For this purpose the following materials are used:
- mineral wool;
- polyurethane foam;
- Styrofoam;
- sawdust, hay, manure (as flooring).
Features of chicken coops in the cellar
Keeping chickens in a house cellar or utility room basement is a compromise option when building an insulated chicken coop is not possible. In fact, this method of keeping chickens is not much different from the usual one. The only downside is that the chickens will not roam in the fresh air.
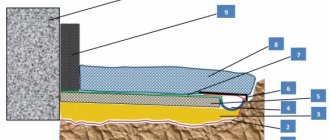
When converting a basement into a chicken coop, you should insulate the foundation walls with mineral wool or polystyrene foam
Recommendations for equipping a chicken coop in the cellar are as follows:
- litter - a layer of dry sawdust 4–5 cm thick. The litter is changed as it gets dirty, but at least once a week. Sometimes you can use hay, but you will have to change it more often;
- lighting - LED lamp power from 5 watts. Using artificial lighting, you should regulate the length of daylight hours. This will help increase the egg production of laying hens;
- insulation - mineral wool, stizol or other rolled heat insulator. To protect the insulation, it is better to use a vapor barrier membrane or dense polyethylene. The thickness of the insulation layer is from 5 cm;
- ventilation - vents in which you can install a supply and exhaust valve. The cellar or basement should be well ventilated periodically. For example, at the time of cleaning the litter.
Nests, as in the case of a full-fledged chicken coop, can be made from edged boards on the basis that one chicken requires 30–40 cm of space. The perch is installed 50–70 cm from the floor level. If desired, the perch can be connected to the nests using boards.
Creating a favorable microclimate inside
After installing the door and window opening, they move on to arranging the inside of the poultry house. The next stages of work are supplying electricity to the barn and installing ventilation. In winter, it is almost impossible to ventilate the poultry house through the window - due to the flow of cold air, the birds can catch a cold. However, it is necessary to take care of good air exchange, because carbon dioxide and ammonia vapors accumulate in the room, which are harmful to the health of chickens. To ensure normal air circulation, you will need a ventilation system.
How to organize air exchange in a chicken coop: instructions, diagram
Natural draft can be used to remove excess moisture and harmful fumes from the room. In this case, the air flow is created due to the difference between the atmospheric pressure inside and outside. It is enough to install a plastic pipe in the ceiling and bring it outside through the roof to establish air exchange. Its upper part is equipped with a special cap to protect against precipitation.
Attention! If natural draft is not enough, you need to increase the air flow by installing a piece of pipe at the bottom of the wall. It is equipped with a damper on the inside. With its help you can regulate the speed of air mass inflow.
Another option is to build an exhaust fan into the wall. It connects to the mains. The simplest models operate from a switch, but there are equipment on sale equipped with a timer or humidity sensor. As soon as the room becomes too damp, the fan starts working.
Lighting
For good egg production, chickens need 12–13 hours of daylight, so they cannot do without artificial lighting in winter. You will have to install electricity into the chicken coop and make wiring to connect light bulbs. The cable must be hidden in a corrugated pipe and secured to the wall so that birds cannot damage it. Light bulbs are placed in moisture-proof lampshades.
Attention! Most of the natural processes of a chicken's body - sleep, appetite, sexual activity, egg production - are regulated by lighting.
Laying hens need light twilight - 6 W per 1 m2. Too bright light provokes cannibalism. Lamps should be evenly distributed throughout the entire area of the poultry house. Experienced farmers agree that it is best to use incandescent or infrared lamps, as laying hens like their soft tone.
Infrared lamps in the chicken coop
Practice has shown that egg production indicators improve with intermittent lighting. For the convenience of turning the light on and off, poultry farmers connect an automatic time relay to the lamps. The device allows you to regulate the daily routine of birds with an accuracy of up to a minute.
Chicken coop care after winter
Disinfection of the chicken coop is carried out for preventive purposes at least once a year. This allows you to avoid an outbreak of infection and the spread of harmful microorganisms. It is best to carry out disinfection in the spring or summer, when the chickens can safely walk in the fresh air and you can clean the chicken coop.
A set of products for disinfecting chicken coops and other objects where animals and birds can be kept
To disinfect the chicken coop you will need to do the following:
- cleaning - the floor, walls, ceiling, perches and nests must be completely cleaned of dirt and dust. To do this, use a convenient broom and brushes with hard bristles. After this, the surfaces are washed with hot water with the addition of soda ash;
- treatment - special means are used to disinfect the internal space in the chicken coop. For example, caustic soda in the form of a 2% solution or a 4% xylonaftha emulsion. The solution is prepared strictly according to the recipe without exceeding the norm. When processing, personal protective equipment is used: goggles, gown, respirator.
After treatment, you should wait until the product evaporates completely. The minimum holding time is 2 hours, but it is advisable to wait at least 5–6 hours and only then release the birds. And they also disinfect feeders, drinkers and other accessories that were in the poultry house.
Main stages of construction
Any construction, be it residential premises or ordinary household. construction must be properly planned. This will organize the entire work process and help achieve high quality work and the shortest possible time.
Any construction is divided into certain stages:
- First you need to decide on the location of the building.
- Next, a project plan is made, materials are selected, and tools are prepared.
- After this, the foundation is laid.
- Walls and partitions are removed if necessary.
- The roof is being installed.
- The last stage of building a poultry house is the interior arrangement: construction of perches, insulation of walls and floors, installation of perches.
Attention: if a poultry house is being built for year-round operation, it is advisable to supply electricity and heating to it.
Video: review of a winter chicken coop with walking
The construction of a chicken coop is not particularly difficult - the work can be done independently, without the help of auxiliary workers and specialists. To do this, carefully study our instructions and read the advice of other chicken breeders, which can always be found on the Internet.
- Author: Vitaly Varlamov
Hello. My name is Vitaliy. Area of professional activity: technical means of automation and design technologies. Rate this article:
- 5
- 4
- 3
- 2
- 1
(86 votes, average: 3.8 out of 5)
Share with your friends!
Arrangement of the poultry house inside
Laying hens need nests. They are placed away from the door, in the coziest, darkest place in the barn. You can use wooden boxes or wicker baskets. The bottom is covered with soft straw or wood shavings.
Birds use perches to spend the night. They are installed at a height of 0.6–1 m from the floor, and, if necessary, equipped with ladders. Chickens of egg breeds can fly, but for heavy meat and egg layers, getting up or down can be problematic. Clumsy birds often fall from the perch and get injured.
Attention! The farmer must ensure that each hen has enough space to roost. 20–25 cm of pole length is allocated for 1 individual.
A thick bedding made of a mixture of sawdust and peat is laid on the floor. You need to monitor its condition - turn it regularly, add a portion of fresh shavings, and completely renew the material 2 times a year. Containers for dry and wet food, drinking bowls, and a basin filled with a mixture of sand and stove ash are placed on the floor.
Making your own chicken coop: step-by-step instructions
At the very beginning of construction, markings are made for the foundation (base) of the chicken coop using wooden pegs and a rope stretched between them. The foundation of the fencing of the walking area is carried out at the same time as the foundation of the chicken coop.
Base
Sequence of work:
- A trench is dug for the foundation. The structure of the chicken coop does not have a large mass, so the foundation is made of strip or columnar to a depth of no more than 45 cm. However, the use of a columnar foundation will lead to high costs for thermal insulation of the floors.
The foundation for a chicken coop can be strip or columnar.
- First, crushed stone and then sand are poured and compacted at the bottom of the trench, creating a so-called cushion (the thickness of the total layer should not exceed 5–10 cm).
- The formwork is being installed for pouring the foundation. The height of the formwork is equal to the height of the foundation. The upper edge of the formwork serves to level the poured concrete.
The foundation must be made according to all the rules so that it does not warp or crack after drying.
- Reinforcement is placed inside the formwork and tied at the corners with steel wire.
- Concrete is poured into the formwork, leveled over the surface until cement laitance forms and covered with film. It needs to be watered daily for a week to prevent cracks from appearing.
After 20–28 days, when the foundation has gained the required strength, you can begin constructing the chicken coop structure. A layer of waterproofing is laid on top of the foundation to protect the structure from moisture.
Floor
From the place above which the floor of the chicken coop will be located, the top layer of soil is removed, then sand is poured there and compacted, and a layer of expanded clay is laid as insulation. A mesh is rolled out over the expanded clay and a screed is made using cement mortar. The thickness of the floor screed should be from 2 cm.
For several days, while the screed hardens, you need to water it with water. It is recommended to make the screed with a slope of several degrees, which will ensure free flow of water when cleaning inside the chicken coop.
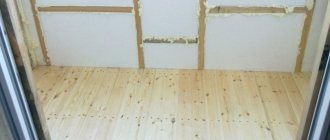
To make the chickens comfortable, the floors in the chicken coop are covered with boards.
The arrangement of the walking area is carried out in different ways: either it is poured with concrete or covered with boards.
Sawdust, straw, and hay are used as bedding. Usually, during the cold period, the litter does not change, and each time a new dry layer is poured on top of it. This results in natural heating of the floor due to warm droppings mixed with dry bedding.
Another option for arranging a walking area is to preserve the natural soil, which will allow the bird to look for insects, seeds and stones in the future.
You need to think in advance about what kind of floor there will be in the bird walking area.
Frame
The sequence of work is as follows:
- Before erecting the frame, it is necessary to decide what kind of structure the roof will be. Often, to reduce labor costs, the roof is made pitched. Then one of the walls is built to a greater height, and the upper crown of the side walls is made in accordance with the angle of the roof. After determining the height of the chicken coop and the slope of the roof, the frame is erected. Its construction begins with laying timber (with a cross-section of at least 10x15 cm) on the surface of the foundation. The beam is attached to the foundation with anchor bolts, and the beams are connected to each other using angles or metal plates.
- The timber is installed vertically in the corners and secured to the lower chord using the same corners or plates.
- The upper horizontal belt is attached to the vertical bars in the same way. On the outside of the frame there is a sheathing made of small wooden planks or slats, on which the heat-insulating material will be laid. The sheathing is attached with horizontal strips to corners or nails.
Frame construction is the simplest: such a chicken coop can be easily erected alone
- Using the same timber, openings are formed for windows, entrance doors and miniature doors for birds to exit.
- The rafters for the roof are laid on the upper horizontal belt of timber. The pitch of laying the rafters is equal to the size of the roll or sheet of insulating material.
Roof
A sheathing made of unedged boards or sheets of plywood is nailed to the rafters. A special vapor barrier film or polyethylene is laid and secured over the sheathing. The film is laid in overlapping layers, and the seams are sealed with adhesive tape. Thermal insulation material (mineral wool board) is laid out on it, and waterproofing is covered on top.
Most often, the roof of a chicken coop is made pitched due to the simplicity of its construction.
Next, through the waterproofing, transverse strips are nailed to the rafters with the required spacing, which depends on the type and size of the roofing material. If a soft roof is used, then plywood or OSB sheets must be laid on top of the slats, along which roofing material spreads. If slate is used, then wood cladding is not needed.
After completion of the roofing work, the frame and internal wall cladding are insulated.
Insulation of walls and floors
The work is carried out in the following sequence:
- Thermal insulation material - mineral wool or sheets of expanded polystyrene (the gaps between the sheets are filled with polyurethane foam) are placed on the sheathing installed on the outside of the frame from the inside of the building. A film with vapor barrier and windproof properties is laid on top of the mineral wool. It is attached to the beam using a construction stapler.
In a winter chicken coop, the walls, floor and ceiling must be insulated.
- The horizontal sheathing is installed again, but on the inside of the frame so that the insulation layer is inside the wall. The lathing is attached in increments smaller than the width of the roll by 4–5 cm.
- Edged boards, plywood or OSB are nailed onto the sheathing on both sides of the room, going around the door and window openings.
- The ceiling is covered: sheets of plywood are attached to the rafters from the inside of the structure.
Polyurethane foam is also sometimes used as a thermal insulation material. But for its installation, specialists with equipment are involved, with the help of which this insulation is applied to the surface of the walls. The use of polyurethane foam is expensive, but the application process is not labor-intensive and provides maximum protection from the cold.
You can sheathe the outside of a winter chicken coop with edged boards or other façade material, except plastic, since it does not tolerate severe frosts well.
A concrete floor, even with an expanded clay cushion, does not ensure heat retention inside the chicken coop in winter. For this purpose, the floors are additionally insulated.
You can lay infrared film on the floor and use a cement mortar screed on it. This heating system operates both periodically and regularly, ensuring the desired temperature in the chicken coop.
Or you can use a less expensive option: cover the floor with wooden panels. These boards are boards tightly fitted to each other, attached to the logs. In winter, plant litter up to 15 cm thick is laid on them to increase floor insulation, and in summer they are removed from the chicken coop, cleaned and disinfected.
The arrangement of the chicken coop should be such that the birds are comfortable both in winter and in summer.
Sometimes electric heating devices are placed on the walls inside the chicken coop, and the installation sites are protected with heat-resistant material. But more often infrared lamps are suspended from the ceiling.
Lighting
The design of the poultry house must have windows. Despite the fact that they are a source of heat loss, their presence cannot be abandoned, since the supply of sunlight is required to maintain the health of the birds. Therefore, triple glazing is built into the windows, and mesh is installed on the glass for the safety of birds.
In winter, it is imperative to ensure that the daylight hours are at least 14 hours. This is done with the help of artificial lighting. And when installing an automatic on/off system, you get rid of the unnecessary hassle of maintenance, although you will spend additional money on it.
Lighting devices can serve as heating, but must be safe for birds
At first, individual individuals will roost for the night directly on the floor. This is not dangerous if the floor is insulated and covered with shavings or hay. Over time, the birds will get used to it and, at nightfall, will begin to move to their roost. But you can do it differently: wake up the birds early in the morning, turning on the lighting for this, and allow them to fall asleep at sunset.
Ventilation
In a warm chicken coop, a ventilation device is required to remove excess moisture. To do this, a piece of plastic pipeline is installed in the ceiling, which rises 1 meter above the roof. This way ventilation will be carried out naturally due to the existing pressure difference.
If the air flow is weak, then an additional channel is made at floor level (far from the nests), which must be covered with a grille. And the damper installed on it will allow you to regulate the ventilation speed. You can also install an electric fan in the wall.
The ideal humidity level is 65%. A decrease or increase in this indicator negatively affects the activity and health of the bird. To increase humidity, just install a container of water, and to decrease it, install a hood and hang an infrared lamp: it dries surfaces well.
The chicken coop must be equipped with ventilation so that the birds do not get cold from increased humidity.
Making perches
The perch is made of timber with a cross-section of approximately 4x4 cm or 6x4 cm.
All corners are ground into a rounded shape, and the surface is cleaned to a smooth state so that the birds do not injure their paws. You can also use a tree branch as a perch.
If several perches are installed, then the distance between adjacent planks should be about 30 cm in width and 20 cm in height. For convenience, a small ladder is attached to the lower perch.
Perches are mounted either between two walls, or in the form of a ladder installed across the room.
To install perches, you must:
- Determine the location and height of the perch - attach one or more planks near the window at a height of 0.5–0.7 m from the floor level.
- Measure the width of the chicken coop and cut off the required amount of timber.
- On opposite walls, nail 0.5 m pieces of board with cut grooves for perches.
- Place perches in the grooves and secure with self-tapping screws.
Nests for laying eggs are made in the form of a semi-open box assembled from timber, boards or plywood. And sometimes ready-made plastic boxes are used as nests. If the nests rise to a certain height, then they are mounted on supports.
A ladder is provided to the nests for ease of movement of birds.
Choosing the optimal location for the chicken coop on the site
To choose the optimal location for a chicken coop, convenient for construction and comfortable for chickens, follow simple principles:
- in the lowlands, as a rule, it is very damp: in the spring the ground dries out more slowly after the melted snow, and after the rains puddles appear there. Thus, it is better to place the poultry house on a hill - in addition, it is more convenient to walk chickens there;
- birds love peace, so it is worth placing the chicken coop away from active recreation and sources of noise;
- the well-being of birds is directly proportional to the amount of sunlight they receive, so if possible, you should make sure that the windows face south;
- overheating is harmful to birds, so in extreme heat it is worth shading the windows;
- the chicken coop should be located close to a person’s home so that you can regularly monitor the birds;
- Place the house on dry, sandy soil. In the case of clayey, swampy or simply damp soil, you should first drain it;
A quiet and windless place on the site is suitable for placing the chicken coop.
Helpful advice! Use drainage channels or holes and then fill them with sand. In the future, you can use drainage channels, ponds or pits for chickens to bathe. The ideal place for poultry farming is with a slope to the southeast.
- make sure that the area you choose for building a poultry house is reliably protected from cold winds - planting in the form of shrubs and trees is optimal for this;
- near the chicken house there should be a suitable area for walking, where there is an opportunity to shelter from rain, piercing wind, scorching sun and other unpleasant weather phenomena;
- It is worth equipping a small pond for swimming chickens.
Choosing a location is one of the most important stages in the instructions on how to build a winter chicken coop, because an unsuitable location and uncomfortable conditions for the birds affect their health. Birds become lethargic and sickly, lay less eggs, and problems with fertilizing eggs are also possible. As a result, the chicken coop brings in less and less income.
Make sure that the conditions for keeping the chickens are balanced: with high humidity, the chickens become tufted and lethargic, and if in the heat under the scorching sun the chickens do not have shelter in the form of trees, bushes or other sources of shade, there is a risk of dehydration, which threatens the death of the birds.
When arranging a poultry house, it is necessary to provide a place for chickens to walk
Helpful advice! It is possible that in the future you will need to increase the number of birds. Therefore, if possible, position the chicken coop so that, if necessary, additional buildings can fit next to it. Even if 20 chickens are enough for you to provide eggs for the whole family, it is possible that in the future you will decide to raise birds for profit.
Features of the interior decoration of the poultry house
No less important components for the comfort of chickens, along with insulated walls and a leak-proof roof, are the internal elements of the poultry house: drinkers, feeders, perches and nests. Birds can be released into their new home only after the chicken coop has been equipped with everything necessary.
Interior decoration of the chicken coop using OSB boards
How to make perches, nests, drinking bowls and feeders
In order to build perches, you will need a block:
- Choose a beam with a cross-section of about 30x40 mm or slightly thicker.
- Slightly round the top edges of the block.
- Choose a non-accessible place in the chicken coop.
- Secure the perches. Please note that the distance between them should not exceed 30 cm from each other.
The optimal perch length for 20 chickens is at least 6 m for all perches. The calculation is very simple - to prevent birds from crowding, each chicken should have at least 30 cm of perch. To make house cleaning easier, place waste trays directly under the roost.
Nests are of open and closed type. Covered nests are the best option, as birds feel safer in them. However, they are more difficult to construct, and it is permissible to make do with open-type nests. The size of such a nest should be at least 30x40 cm. The optimal material for constructing nests is wood: boards and plywood are best suited.
The perches and shelves in the chicken coop are made of wooden slats
Ten nests are enough for 20 chickens. To ensure comfort for the chickens, line the bottom of the nests with sawdust or straw. It is also worth lining the floor of the entire poultry house with sawdust or hay - this way you will provide comfort for the chickens and ease and speed of cleaning for yourself.
To prevent debris from getting into bird feeders and waterers, place them some distance above the floor.
Comfortable stay of laying hens indoors in winter
The room in which the chickens live should be insulated for the winter, the hatches for access to the range should be closed, and the floor should be covered with deep litter. It is made from dry sawdust, straw or peat. As the litter is trampled down, a new layer should be laid. Mixing with chicken droppings, the litter begins to warm up, providing warmth to the room. At 10-12 degrees indoors, the chickens feel good and continue to lay eggs. If it is not possible to maintain the optimal temperature in a natural way, you should additionally equip the house with heaters. In this case, it is necessary to ensure a flow of fresh air into the room, and make a place for the birds to sleep on perches located 60 cm above the floor.
Considering that maximum egg production in chickens is observed when the daylight hours are 12-14 hours, it is necessary to additionally illuminate the room using artificial light lamps. The usual schedule for llamas is from 6 to 9 a.m. and from 5 to 8 p.m. The lamps are positioned in such a way that birds cannot damage them.
Of particular concern is food.
The duration of the molting period and the egg production of chicken livestock depend on their quality. The predominant share in the diet is given to grains, these include wheat, barley, corn; it is better to feed grain crushed or sprouted. Grains provide birds with the energy they need. Chickens receive vitamins by consuming succulent feed. These are chopped root vegetables: carrots, beets, boiled potatoes. Chickens readily eat fodder squash, which are well stored throughout the winter.
Mash is an excellent opportunity to provide birds with the necessary microelements. Mixtures are prepared from bran and sunflower cake, and eggshells, bone or fish meal are added to them. In the summer, it is worth stocking up on dried herbs: clover, nettle, chicken millet, and mouse peas. Knittings made from such hay can be hung at some height from the floor.
In the chicken coop, in separate bowls there should be crushed chalk, shells, small gravel, pebbles, drinking water, this is especially important for purebred Brahma chickens. At sub-zero temperatures, water should be given heated, sometimes potassium permanganate should be added to it
Juicy feed should be given in the first half of the day; at night it is better to feed chickens with grain.
In moderate frosts, chickens should be able to roam. Usually, for these purposes, an area on the south side of the room is fenced off, open to sunlight and cleared of snow. On the walks there are baths with ash and sand, which must be dry. In cold and windy weather, the walking trays are kept closed.
This entry was posted in the Chickens category and tagged chicken coop, chicken breeds, chicken breeding by admin.
Heating using a boiler and stove
Some site owners use a boiler and radiators to heat buildings for birds. If desired, you can use a potbelly stove or wood-burning boiler. In this case, the pipe is routed along the walls of the building. This allows the maximum amount of heat to be released.
Iron structures can be covered with bricks. Thanks to this, the oven will retain heat for a long time. If the heating system is created correctly, one heating can be enough for about 2 days.
How to build a warm chicken coop: choosing the type of foundation
The foundation is the basis of any structure, which is why it is so important to immediately decide on its type. First of all, you should carefully weigh all the pros and cons of each option.
Advantages and disadvantages of different types of foundations for chicken coops:
| Foundation type | Advantages | Flaws |
| Tape | High reliability indicator | High cost, justified when building a house, but not when building a chicken coop |
| Columnar | Cheap and simple design | Less reliability compared to the tape version |
| Pile | High reliability and simplicity of design: using modern screw piles, two people can easily handle the construction of the foundation | Relatively expensive: a pile foundation is cheaper than a strip foundation, but more expensive than a column foundation |
How to make a columnar foundation: step-by-step instructions
The most common choice is a columnar foundation: it does not require much time and effort, while guaranteeing the reliability and stability of the building. Let's figure out how to make such a foundation yourself:
- start with markings. To do this, take a rope and several thin long pegs or metal rods;
- Next, you need to place pegs in the corners of the future structure and tighten the rope. Carefully ensure that the markings are even. The rope should be taut, but at the same time spread along the top layer of the earth;
- inside the marked area, dig a 15-20 cm hole - you need to remove the top layer of soil;
- dig holes for the posts. Their depth should be approximately 60-70 cm, and their width should correspond to the parameters of two bricks, that is, approximately 50-55 cm. The distance between the pits should be maintained at 1 m. The cabinets must be installed along the entire perimeter of the future chicken coop;
- After finishing digging holes, pull another rope over the rods. It should be at a height of 20-25 cm above the ground. To ensure that the structure is smooth and neat, use a level;
The optimal structure for a chicken coop is a columnar foundation.
- It is necessary to pour a small layer of sand at the bottom of each hole. The thickness of this layer should be 5-7 cm;
- then fill in the same layer of gravel - both layers serve as a cushion for the future foundation;
- Place two bricks at the bottom of the hole. Next, put a cement solution there in a ratio of 1:3;
- lay two more bricks across. Repeat the steps until the height of the pedestal reaches the level of the top rope;
- if the height of the column is insufficient, level it with cement;
- To protect the foundation from the destructive effects of moisture, its base part should be covered with gravel.
Floor insulation
Thermal insulation work on arranging a chicken coop begins from the floor. Any material can be chosen from insulation materials. This could be peat moss, straw or sawdust shavings.
To create a temperature of +26… +28 °C, deep bedding is required. If you lay a thin layer of insulation, the thermal insulation properties will be low.
Due to its low thermal conductivity, peat moss is often used as a thermal insulation material.
Moss peat for insulating the floor of a chicken coop
Peat moss is a universal material with absorbent properties. It efficiently absorbs moisture and chicken droppings.
Thanks to this, there are no unpleasant odors in the room, which makes the material an ideal insulation material. Birds do not suffer from dermatitis and various skin diseases, since their paws always remain dry.
Be sure to read:
How to make a chicken feeder: drawings, dimensions, examples from wood, plastic bottles and pipes
In spring, the litter is removed and the beds are fertilized with it.
Straw as insulation for a chicken coop
The use of straw is the most popular option for floor insulation , since it has the ability to accumulate heat and retain it for a long time.
The material is laid more than 20 cm thick. During operation, the straw cakes and its layer becomes smaller. Because of this, the temperature in the room decreases.
To prevent this, 10 cm of straw is regularly added on top. To make the bedding soft, dry grass is laid on top of the straw. The material to be laid must be of high quality, free from mold. Otherwise, the mold will spread throughout the deck and expose the birds to serious illness.
Wood shavings and sawdust for heating the chicken coop
Coniferous shavings and sawdust are endowed with disinfectant properties and absorb moisture well.
Tree shavings are good bedding for a chicken coop. It is poured in a thin layer onto the main flooring to add softness.
Coniferous sawdust is considered the best because it contains essential oils. The floor surface is covered with pine sawdust and small shavings in a ratio of 1:3. The litter tends to cake, so it is regularly loosened.