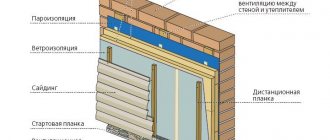
Insulation is an important stage in completing an apartment renovation or building a private house. By insulating external walls from environmental influences, their service life increases. Heating costs can be reduced by 30–40% depending on the difference in thermal conductivity of the insulation and the facade. Insulating a house with polystyrene foam is the most common way to increase the energy efficiency of a building; we will tell you in detail how to do this correctly below.
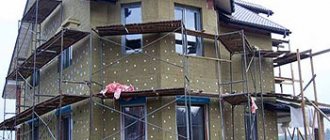
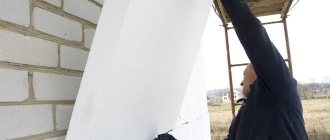
An example of insulating a house outside
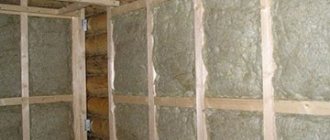
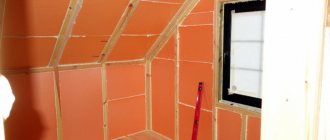
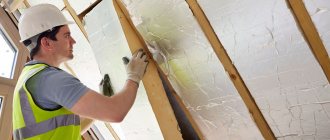
Example of internal insulation
Insulate from outside or inside
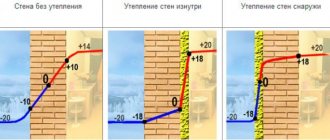
Diagram - location of the dew point when insulating a house from the outside.
Insulating walls with foam plastic from the outside allows you to shift the dew point (0º C) into the insulation, and if you do it yourself, it is also much cheaper. The negative impact of seasonal temperature changes, leading to cooling and heating of the facade, is also eliminated. The difference in temperature between the inside and outside of the wall is eliminated, which slows down the appearance of cracks.
With internal insulation, the dew point is also in the insulation, but the front side of the wall is exposed to external influences and completely freezes in winter. Walls insulated on the inside are destroyed faster than without thermal insulation.
Video: thermal engineering calculation. Dew point
What is expanded polystyrene?
Let's figure out what polystyrene foam is and how it differs from its distant relative polystyrene foam.
Polystyrene foam is a whole group of polymer materials, which are plastic masses that are obtained by steam processing of raw materials placed in a block mold. During this process, its molecules swell and sinter together. As a result, large micropores appear, which cause high permeability of the material, low strength and fragility.
Expanded polystyrene is one of the types of foam plastic. It is made by extrusion (it is also called penoplex), which leads to a completely different process and final result. Unlike polystyrene foam, expanded polystyrene has an integral microstructure. This means increased resistance to both mechanical stress and external factors.
Foam selection
To understand which foam plastic is better for insulating a house, you need to check the technical documentation. The marking should be PSB-S-40, self-extinguishing polystyrene foam. During manufacture, the density can be from 20 to 40 kg per cubic meter. Insulation of facades with polystyrene foam requires high density of the material.
The minimum possible density is 30 kg/m3, because it is necessary to create a mandatory protective layer.
Check whether the product corresponds to the documentation by breaking off a piece from it. If the edge is uneven, with round capsules, then the foam is of poor quality and is not suitable for outdoor use. At the required density, the granules are of the correct shape and the fracture is even.
Material properties
Expanded polystyrene – boards consisting of granules of foamed styrene. Due to the presence of internal voids filled with air, it has low thermal conductivity. The material is lightweight and environmentally friendly, which is why foam plastic is widely used in insulation.
Technical characteristics of insulation (click on the picture to enlarge)
Characteristics (GOST 15588–70):
- Thermal conductivity 0.037 W/(m*K).
- Density up to 40 kg/m3.
- Vapor permeability 0.05.
- Temperatures from minus 50º C to plus 70º C.
Disadvantages that need to be taken into account during installation work:
- flammability, high flammability, class G4;
- attracts rodents with the opportunity to create a warm nest;
- low resistance to chlorinated and aromatic hydrocarbons, acetone and carbon disulfide;
- low pressure resistance;
- Under ultraviolet light it releases toxic substances.
The need for external insulation with foam plastic
Sheathing a house with foam plastic can significantly reduce heat loss. You no longer have to spend as much money on heating in winter. And in the summer, the rooms become much cooler and more comfortable. If the temperature outside the window fluctuates in the off-season, the microclimate in the house will be better for living. External insulation is the most reasonable solution for several reasons.
If we compare this technology with the one that involves installing thermal insulation from the inside, it can be noted that the internal volume of the rooms is not reduced. With external insulation, the dew point will not be inside the wall or house. The problem expressed in the freezing of walls will be completely forgotten. The material at the base of the building will not get wet and will not collapse.
Sheathing a house with foam plastic is also justified for the reason that the main walls will have thermal inertia, which will stabilize the temperature inside the premises. During night frosts, warm walls will not allow the air to quickly cool down in the rooms.
Which houses can and cannot be insulated?
Insulation diagram for a foam block house with description
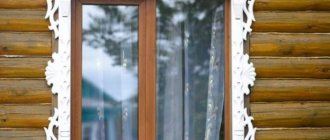
Insulation of a wooden house
When the question arises - is it possible to insulate a wooden or foam block house with polystyrene foam, you need to know the main features of these materials. Thus, wooden walls have high vapor permeability, and due to the low permeability of polystyrene foam, moisture begins to accumulate inside the fibers. Therefore, in order to avoid rotting of the timber and dampness inside the house, it is necessary to use another heat-insulating material.
- A log house is most often insulated with aerated concrete or mineral wool, and siding is placed on top.
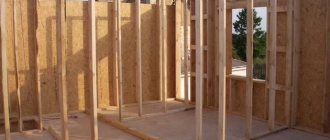
- A wooden frame house is suitable for external wall insulation; it is only important to waterproof the wood.
- A house built from foam blocks requires less insulation thickness due to its own low thermal conductivity. Sometimes it is not advisable to carry out thermal insulation work if high quality materials are used for construction.
Calculation of foam thickness
Table of insulation thickness depending on the thickness and material of the external walls.
The thickness of foam plastic for wall insulation must be calculated individually for each building. The final indicator is influenced by the thermal conductivity of the wall material and the region in which the house is built. A thickness that is too small will not perform its functions, and a thickness that is too large will not provide additional benefits. To make the calculation, you need to know the thickness and thermal conductivity of the walls, as well as the foam. You also need to take into account the requirements of SNiP 23-02-2003, which establishes for each region a certain heat transfer resistance coefficient of residential buildings.
Recommended insulation thickness depending on region
For a house in the Moscow region (3.16), with red brick walls (0.67), 0.4 m thick, the following calculations are required:
- 3,16 – (0,4/0,67)=2,57
- 2,57*0,037=0,095
The resulting value is always rounded up, in this case to 10 mm.
Features of the material
Polystyrene foam is 98% air, which allows it to retain the maximum amount of heat in rooms. Therefore, this material is used not only for insulating the walls of residential buildings, but also for ceilings, floors, basements, foundations and warehouses.
Is there really one reason why polystyrene foam has become so popular? Not at all. There are other positive qualities inherent in this material.
Advantages
Let's start, as usual, with the advantages, because it is thanks to them that home owners choose polystyrene foam for insulation:
- Sound and thermal insulation of premises.
- Light weight, which helps reduce the load on load-bearing walls. This means that expanded polystyrene is also suitable for very old buildings.
- Versatility of use. It can be used for both interior and exterior work, for residential and non-residential premises.
- Moisture-repellent properties.
- Affordable price. The cost of polystyrene foam is quite low compared to other materials.
- Duration of operation. This advantage can be considered relative, since unprotected foam is quickly destroyed when exposed to sunlight. But if it is covered with facing material immediately after installation, the service life will be up to 30–35 years.
- Safety. The foam is coated with antipyrines, which prevent the heat insulator from smoldering and releasing caustic substances.
- Prevalence. This insulation can be found at any hardware store. At the same time, slabs of different densities and thicknesses are presented at one point.
As we see, there are really a lot of positive aspects, and now it becomes clear why those who want to insulate themselves buy polystyrene foam.
Flaws
Pros are pros, but each material also has several disadvantages. They should not be ignored at all, and sometimes a few disadvantages can outweigh a large number of positive aspects. Polystyrene foam also has its disadvantages:
- fragility. A slab of any density and thickness breaks easily. This must be taken into account during the cutting and installation process; it is advisable to be as delicate as possible with this material;
- low vapor capacity. You should not rely on natural ventilation if the house is lined with foam plastic. Vapors will accumulate in the rooms, and this will lead to a deterioration in the microclimate. This material is categorically not suitable for insulating wooden buildings;
- does not tolerate exposure to ultraviolet radiation and some paints and varnishes;
- if the foam is not coated with fire retardants, it easily ignites and produces acrid smoke;
- love of rodents and birds. Rodents settle in slabs and make their own nests. Birds pick holes in slabs that are not covered with facing material.
Having familiarized itself with all the advantages and disadvantages, the buyer makes his choice whether or not to purchase this insulation.
Preparing for home insulation
Due to the fact that polystyrene foam can be installed on almost any surface, it is used for brick, reinforced concrete and cinder block houses. Preparing the walls begins with cleaning any protruding parts, such as drainage pipes, ebbs and elements of external decor. If a large amount of hardened cement mortar protrudes into the brickwork, it should be carefully knocked down. The painted surface is sanded until the paint is completely removed.
One of the stages of preparing a wall is priming
After this, the surface is checked for cracks, unevenness and, if necessary, covered with cement. It is necessary to check the level and evenness of the walls. The difference between one edge and the other should not exceed 1.5–2 cm, especially if the finishing will be done using siding. When there is a significant difference, a screed is made. Putty is also used for depressions with a diameter greater than 3 cm. A layer of penetrating primer is applied to the finished surface, so work cannot be carried out in winter. This improves the adhesion of the glue to the wall surface and also prevents the development of fungus under the insulation.
Larger homes will require the use of a spray bottle to apply the primer, while smaller ones may use a brush or roller. After the walls have been completely processed, when the preparatory layer has dried, the installation of ebbs and slopes begins.
Video master class: proper preparation of walls
Methods for installing foam plastic
- Adhesive when lightweight foam sheets are used.
- Installation of dowels with wide heads that hold the slabs in place and are attached directly to the wall. The main thing to remember is that to minimize temperature transfer you need to use plastic dowels.
- A combined method that uses an adhesive solution and fixatives is the most reliable method, eliminating the possibility of peeling off the edges.
To attach to the walls, you will need a special adhesive solution, as well as plastic dowels with a wide head, 5 pieces per sheet. The amount of glue required depends on the manufacturer chosen.
Insulation technology:
- In one layer when the slab is full thickness;
- In two layers, when the sheets are glued to each other, and have half the required thickness.
How to determine the required number of sheets:
- To determine the required number of foam sheets, you need to multiply the height of the walls by their length, and subtract the area of all openings. The resulting value needs to be increased by another 20%, this is done in order to take into account the loss of material for fitting and cutting to the correct size.
- For finishing you need to buy a reinforcing mesh made of fiberglass or polyurethane, with cells 5 by 5 mm, 20–30% larger than the insulated area.
- The edges of the mesh must overlap, as well as the corners, in order to support the weight of the plaster.
- After this, finishing materials are purchased. It is important to check that the plaster and glue are suitable for application to the foam.
Tips and tricks
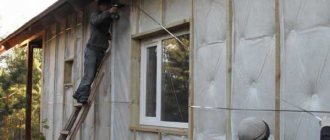
Insulating a house with polystyrene foam
Before you start sheathing the outside of your home with insulating materials, read the following recommendations for the work:
- in order to sheathe a house with high quality and save as much money as possible on utility bills during the heating season, select polystyrene foam with a density of 25 and a thickness of 40 mm;
- if you were unable to buy special glue, you can use regular adhesive cement, which is used for ceramics;
- purchase reinforcement mesh with a mesh size of 5mm;
- In order for the foam to be more firmly fixed on the wall, before applying the adhesive mass, the surface can be treated with a needle roller, which forms additional perforation;
- To increase the level of adhesion of foam plastic to the reinforcing mesh, it is worth priming the surface before laying it.
In conclusion, I would like to add that by following the above-presented foam plastic installation technology, you can get warm housing without disturbing its microclimate. Thus, you will not make any mistakes in your work and reduce the amount of heat loss in your home.
As you can see, such house insulation does not take much time and your family budget will not incur large financial waste if you carry out the work on your own, without the involvement of expensive specialists.
Installation of foam sheets on the facade
Installation tools:
- bucket 2–5 l;
- spatulas 8 and 20 cm;
- construction mixer;
- drill;
- building level.
The plate for applying the adhesive composition should be rough; if it is smooth, then brush it with a brush with metal bristles. The glue is diluted according to the instructions, mixed with a mixer, the finished consistency should be thick enough to support the weight of the slab. But if the mixture is too dry, it will not adhere the foam properly. In order to understand what the consumption will be, mix 50–100 g of dry glue, gradually adding water.
The first stage of installation is the starting profile
Installation begins with attaching the bottom plank or corner to the wall, at a level of 20 cm from the edge of the ground or blind area. The profile will serve as support while attaching the slabs to the wall, and after drying, allow the foam to support more weight of the plaster.
The finished adhesive mixture is applied along the perimeter to the rough side of the polystyrene foam, retreating from the edge by 3-4 cm, after which several patches are made in the middle of the sheet and applied to the wall. The surface of the sheet should be covered by approximately 40%. The first row starts from the bottom corner of the house, the next one is laid so that the edges fall in the middle of the previous row. If the walls are insulated in several layers, then the second layer is applied so as to overlap the joints of the previous one.
Apply glue and glue
If there is a gap between the insulation boards of more than 3 mm, it is sealed with polyurethane foam, the protruding parts of which are cleaned off after hardening. The same is done with the protrusions of the sheets. An adhesive composition is applied to the seams and fasteners to eliminate unevenness.
Video: the result of insulating the facade of a house with foam plastic after 2 years
Insulation of walls from the inside with polystyrene foam - stages of work
Internal insulation of wooden or brick walls can be carried out at any convenient time of the year. However, it is resorted to only if it is not possible to create a layer of insulation from the outside.
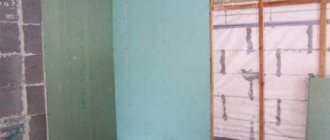
Work on insulating the walls inside the house with polystyrene foam begins with thorough cleaning of the old layer of finishing. If the surfaces have been affected by fungi, the problem areas are treated with specialized compounds.
After cleaning, the area needs to be leveled so that the insulation fits snugly. First you need to eliminate irregularities, crevices and cracks, then prime the surface.
Expanded polystyrene is fixed with a special glue, and for reliability it is additionally fixed with mushroom dowels.
Installation starts from bottom to top. However, the sheets are not arranged in a strict checkerboard pattern, as this may cause the joints to overlap. The seams are treated with putty or polyurethane foam. You can also use construction tape. Large cracks are sealed with thin strips of insulation.
Final protective and finishing work
Polystyrene foam does not tolerate direct sunlight, so it is necessary to carry out external work to isolate it from the external environment. To do this, a special adhesive mixture is applied to the insulation, and a fiberglass mesh is placed on top of it, with an overlap of 6–7 cm. To strengthen the corners, the reinforced mesh should overlap the adjacent wall by 10–15 cm. If heavy finishing is planned, then the corners are reinforced metal corner. After completely covering the house with mesh, the layer is allowed to dry for 1–2 days.
When the mesh is fixed, it is sanded and primed. While the primer dries, fix the roof drainage system. After the primer has been absorbed, apply putty in a layer of 3–4 mm, or external plaster, and allow the layer to dry for 3–4 days.
Insulating a house with polystyrene foam is quite simple; the main thing is to choose substances compatible with the material so as not to dissolve the granules. It is also important to create a finishing layer that protects polystyrene foam from exposure to the sun.
Mechanical fastening of sheets
After covering the facade with polystyrene foam with your own hands using glue has been completed, you need to leave the walls for 3 days. The purpose of this soak is to allow the glue to dry thoroughly. Then the sheets are fixed with dowels in the form of umbrellas. There should be 5 fasteners per square meter. Their length should be such that they enter the main wall by 5 cm or more.
Dowels are also called fungi; they can be located in the center and along the edges. In the latter case, it is necessary to make a small indent. An alternative option for the location of fasteners is the joining points of adjacent panels.