The buildings
Date of publication: 06/15/2018
0
3912
- Types of attic roofs
- What does the attic roof frame consist of?
- Frame mansard roof project
- Roof installation
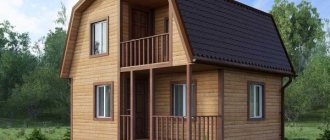
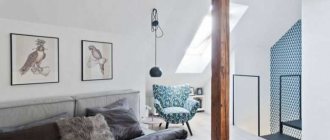
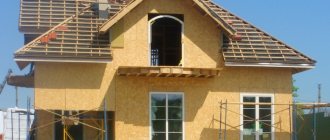
A frame attic is a living room located in the attic of a private house. The main difference between such a room is the sloping or hemispherical ceiling. Recently, this method of expanding living space has been very popular. This is explained by the low costs of arrangement.
Interior of a frame attic
At minimal cost it is possible to obtain the functionality of the second floor. But in order to build a room comfortable for living, you need to know how to properly create and implement a frame mansard roof project. Let's look at the nuances in more detail.
The main feature of mansard roofs
When we mention mansard roofs, we immediately recall a pentagonal gable structure of impressive size over a log house, concrete or brick walls. Visual memory suggests that its slopes must certainly have different slopes, i.e. the bottom of the roof simply has to be much steeper than the top. Due to the difference in the angles of inclination, a convex fracture is formed, which gave the roof the popular name “broken”. The term has justifiably migrated to the technical definitions of attic structures. It reflects the essence of the usual standard in the device, but often has nothing in common with the configuration. Despite the fact that the design of all mansard roofs necessarily includes two parts, their presence cannot always be determined visually.
Purely based on external indicators, the predominant number of attic structures can be divided into:
- Triangular roofs, the lower and upper parts of which have an equal slope. Outwardly, they resemble traditional gable structures without kinks in the plane of the slopes.
- Pentagonal roofs with slopes having convex corners. This category clearly demonstrates the presence of two joined parts in the design.
In both of these varieties, the rafter system consists of two tiers stacked on top of each other. The lower structure forms the useful space of a residential attic with a height of 2 to 2.5 m, so that moving inside it is not difficult. The second tier creates the shape of the roof top and is allowed to be of arbitrary height.
By varying the angle of inclination of the upper and lower rafter legs, you can obtain the optimal roof shape in your own opinion. It is believed that a pentagonal attic, the corners of which are in contact with an imaginary circle, looks best.
Note that the principle of constructing a sloping roof is suitable not only for gable rafter systems. Interpreting the basic method, the attic can be organized in hip, single-pitched, hipped and other roofing structures.
Sometimes an existing structure is converted into an attic, the construction of which did not use “broken” technology. However, these roofs cannot a priori be classified as attic. True, if the rafter legs have sufficient power, no one bothers to use the crossbars of pitched rafter systems as ceiling beams, and the supports of additional purlins as beams for cladding the attic.
We found out that the main feature of an attic roof is the presence of two adjacent rafter structures connected into a triangle or pentagon of a shape that is attractive to the owner. Their construction uses standard technologies for the construction of rafter frames for pitched roofs:
- Layered, according to which the lower tier of the attic is built and used in the construction of the upper part.
- Hanging. In accordance with it, only the upper part of the structure is built.
If, to simplify, the section of the attic roof is divided into two halves, you will get a trapezoid at the bottom and a triangle at the top. The inclined sides of the trapezoid are allowed to be exclusively layered, and the sides of the triangle are layered and hanging.
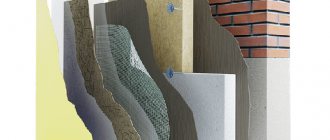
Advantages of frame buildings
Technologies for the construction of frame houses with an attic are constantly being improved. In terms of their performance, they are not inferior to structures made of concrete or brick. The main advantages of building buildings using frame technologies include the following:
- adapted to domestic building codes and regulations;
- the frame structure is erected in a short time (installation of the foundation takes from 1 to 3 days, installation of the entire house with an attic lasts from 2 weeks to 2 months);
- cost-effectiveness of construction without loss of quality;
- you can build frame houses with an attic and carry out finishing work all year round, regardless of weather conditions;
- frame structures are light in weight, so it is permissible to install an inexpensive, lightweight foundation.
- if it is necessary to repair the foundation, the building can simply be raised above its surface, without dismantling the structure;
- are characterized by a high degree of energy saving (they warm up several times faster than a brick or concrete building, and the low thermal conductivity of the walls retains heat indoors for a long time);
- the use of wood and natural insulation makes the building environmentally friendly, comfortable and safe for people to live in;
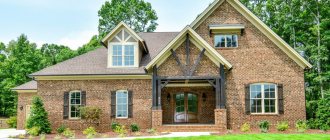
- frame technologies make it possible to build houses with various architectural solutions (these can be compact country houses with dimensions of 6x4, 6x6 m or large two-story buildings with an attic, garage, terrace, balconies, bay windows);
- the design is resistant to combustion, thanks to the use of modern building materials, as well as due to the treatment of wooden elements with fire/bioprotection agents
- vertically located wooden posts practically do not shrink.
The use of modern building materials, as well as effective protective agents, makes it possible to increase the degree of fire resistance of wooden structural elements, as well as prevent the processes of rotting and destruction.
A frame-panel house has many advantages: speed of assembly, no shrinkage, the possibility of construction at any time of the year
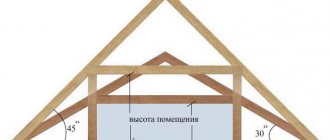
Basic diagrams of rafter systems
A “classic of the genre” is rightfully considered to be the pentagonal diagram of the rafter system of an attic roof with support posts forming the walls of the interior. Its section is conventionally divided into simple geometric shapes. In the center there is a rectangle, on the sides of which there are two mirrored rectangular triangles, and an equilateral triangle on top.
Standard attic construction
The layered rafters of the lower part of the structure rest at the bottom on the mauerlat, and with the upper heel on the right or left purlin. The part of the mansard roof frame that crowns the structure is made up of hanging rafter arches. They are supplemented with a suspension headstock in the middle if they are intended to cover a span of more than 3 m. The headstock cannot be connected to the arch tightening with a notch, like a support post. Its job is to prevent the tie from sagging - it is not a support, but a suspension.
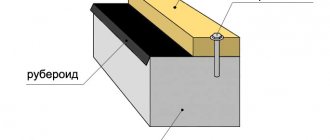
The supports-racks of the layered rafters of the lower part rest through the beam on the ceiling. If it is necessary to increase stability, struts are installed under the supports. The posts are connected to the frame and purlins by notches, the joints are duplicated with metal corners and toothed plates. If the floor is concrete, bitumen waterproofing is laid under the floor. The bed can be laid not on the ceiling, but on brick pillars or on leveling boards. When constructing an attic on a wooden floor, you can do without the beams altogether and embed the racks directly into the beams.
The rather steep lower parts of the slopes of attic roofs are practically not affected by the snow load; precipitation does not linger on them. However, steeply installed rafters have another problem - gusty winds will tend to overturn and tear off the roof. Therefore, attaching the system to the Mauerlat must be taken very seriously. In an attic situation, each rafter is tied to the walls with twists, and not through one, as in conventional pitched structures.
Method of moving rafters beyond the wall line
It often happens that the planned attic structure creates too narrow an internal space. It can be expanded by moving the rafter legs outside the walls. Those. the rafter leg will rest not on the mauerlat, but on the beams of the upper floor. This case, in theory, does not need a Mauerlat at all. But reinforcing struts in the scheme with the removal of rafters are used without question, because there is no support at all under the extreme part of the side triangles.
The installation of the Mauerlat can be eliminated, but pouring a monolithic reinforced concrete belt for attaching beams to brick walls is highly desirable. The floor beams are attached to the monolithic belt with anchors, and support posts are driven into them to a maximum of 1/3 of the thickness of the beam. An important point: moving the rafters outside the wall is simply required to form a cornice for wooden houses with a width of at least 0.5 m, for concrete and stone houses at least 0.4 m.
Technology for constructing a rafter structure with the rafter leg extending beyond the wall:
- We install the outermost floor beams that define the contour of the eaves overhangs. Because the ceiling will be loaded, the section of the beams is taken from 150x200mm. If, when laying the starting beam, it turns out that the walls do not form an ideal rectangle, we try to correct the flaws by changing the position of the beams.
- We lay and fix the remaining bars along the laces stretched between the fixed outer beams. We control the height and pitch of the beams before fastening. The distance between the floor elements is equal to the step between the rafter legs. For insulated roofs, the optimal rafter installation spacing is 0.6 m, because it is equal to the width of the insulation slab. If the rafters will be installed with a similar frequency, they can be made from 50x150mm boards.
- From the left and right edges we set aside a distance equal to the length of the short leg of the right triangle. At the marked points, carefully use a chisel to select nests a third of the height of the beam under the outer supports.
- Let's make supports by cutting out tenons. They need to be made according to the size of the selected nests. For the manufacture of corner supports, a beam with a cross-section of 100×150 mm is suitable, and two load-bearing supports for the gable sides of the roof should be made from it. For ordinary racks, 50×100 mm timber is sufficient. The material for the supporting elements should be longer than the design height by the length of the tenon, but it is better by 10 cm in case of errors during cutting.
- We install the corner posts and fasten them with temporary spacers. We connect the posts with lace.
- We use a plumb line to check the points in the beams for selecting nests for row supports and select the indicated holes.
- We install row posts and two load-bearing supports in the centers of the attic gables.
- We lay purlins on the installed supports - boards with a section of 50x150mm. We fasten the purlins with corners. It is not necessary to use as many nails as in the corners of the holes. Two or three are enough for each plane. As a result of laying the boards, the frame of the walls of the future attic is obtained.
- We connect the supports installed opposite each other with bars, attaching them to the purlins with corners. These elements will serve as tensile crossbars. Therefore, for their manufacture you will need 1st grade lumber with a cross-section of 100×150mm. For each installed crossbar, a temporary support from a 25x150mm inch is needed.
- We temporarily fasten the crossbars on top with the same inch, retreating 20-30cm from the edges of the frame. Temporary thin flooring of one, two or three boards is needed for ease of installation of the upper part of the rafter system.
- We make a template for the rafters of the bottom row from an inch. To do this, we apply a blank board to the end of the purlin and beam. Then we outline the lines of the grooves along which the excess will be sawed off. We try it on and trim the excess if necessary.
- We make rafter legs using the template. If there are doubts about the flawlessness of the construction, then it is better to cut out only the upper groove first. By placing the rafter in its proper place, you can then adjust the lower groove after the fact without unwanted damage to the material.
- We install the end rafter legs, which will need to be connected again with lace.
- Using the lace as a guide, we install the rafter legs of the lower tier of the attic.
- Similarly, we make a template for the upper part of the rafter system. In order to find the line of the top cut, we temporarily sew a board onto the gable support.
- Let's make a mirror version of the previous template. The rafters of the upper tier will rest against each other.
- Let's try both templates on the roof. If everything is normal, we use them to make the required number of upper rafters from 50x150mm boards.
- We are constructing the upper tier of the rafter system.
- To prevent the crossbars from sagging, we install headstocks of the required size to each upper truss. We firmly sew them only to the ridge area; the bottom should not be rigidly fixed.
Next, the rafter legs are screwed to the walls with wire ties. Then the pediment frame is installed, along which it needs to be sheathed. Finally, the sheathing is installed at a pitch corresponding to the characteristics of the roofing material.
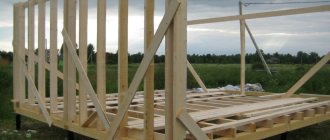
Method with frame modules
The technology differs from the previous method in that it is not individual supports that are installed on the floor, but modules-blocks of the side walls of the future attic that are completely prepared for fastening.
The block method of constructing a rafter system allows you to optimize the construction of an attic roof, because the construction of modular elements is carried out on the ground. In quiet conditions without a sense of altitude, it is easier to achieve precision node connections.
The process of installing a block mansard roof:
- Based on a pre-made design, we manufacture the frames of the attic walls. Using this method, longitudinal beams play the role of purlins and beds. We lay them out together with the racks on a flat area and use a square to mark the sockets for the supports of the side walls. We make cuts along the measured lines.
- We cut out spikes on the racks, the size of which must correspond to the size of the nests.
- We connect the longitudinal beam with vertical posts, we get two modular frames - these are the walls of the attic.
- We lift the frames up and install them in the intended place. We temporarily fix the position of the walls with spacers, then attach them to the floor beams with brackets.
- Using a chisel, we select sockets at the edges of the beams for installing the lower row of rafters. They need to be placed in one line. To maintain the geometry, it’s easier to first mark them with a chainsaw, then modify them with a chisel.
- We perform the upper rafter tier of the attic on the ground, having previously fitted the blanks to the installed elements. To ensure an accurate fit, we temporarily nail a board to the end of the future roof so that one of its edges clearly follows the central axis of the rafter system. The base of the upper attic triangle serves as a stretcher. Its length is equal to the distance between the outer vertical planes of the installed frames. We select nests along the edges of the guy wires, and spikes on the lower heels of the rafters.
- We assemble the trusses of the upper tier, for reliability we install an additional crossbar, and we reinforce the ridge assembly with a triangular wooden overlay.
- Before we move to the roof, we make preparations for the rafter legs. We try them on to the frames laid out on the ground. It is more convenient to “cut” them in one fell swoop, grabbing several pieces with a clamp. We cut out only the upper bevel, taking into account the fact that it will rest partly on the wall post, partly on the stretch of the upper rafter trusses.
- We try on the bottom rafter to the end. In the area of its lower heel we draw the shape of a spike, repeating the configuration of the nest in the beam. We cut out the thorns.
- We move the trusses of the upper tier and the rafters of the lower tier to the roof. We first install the trusses, attaching them to the upper frame of the walls with staples, then the rafters of the lower part, attaching them to the floor beams with the same staples.
The subsequent stages of roof construction are carried out according to standard rules. Drawings for a mansard roof, clearly representing the structure, will introduce you in detail to the described principles of constructing a rafter system. Thanks to the production of joints by cutting half a tree, the strength and rigidity of the frame as a whole increases, which will eliminate the need to install additional struts.
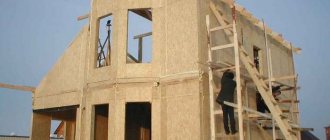
The disadvantage of this method is that the finished modules are quite difficult to transport to the roof. To transfer the assembled blocks there without the use of lifting equipment, a minimum of 4 people will be required.
Board and nail rafter system
It is impractical to build a powerful attic over small country houses, but you still want to save space on a small plot. For owners of small buildings there is an excellent option - a lightweight board and nails layered structure. The method should appeal to those who love saving, because the construction does not use solid timber.
For the manufacture of each of the supporting elements, two boards are used, between which spacer sections of the bar are installed. The cavity formed by the bars explains why the system is lightweight compared to its solid counterparts. To ensure spatial rigidity, wind braces are installed connecting the supports to the rafter legs. The lathing, in turn, will make its contribution to strengthening the structure.
The popular way to develop a layout
For a successful work result, a project is very desirable. It is not a fact that the presented drawings with dimensions are suitable for furnishing a particular home. Typology in construction is now not at all welcome. If there is no documentation at all, it is better to make at least a sketch of the future roof, not forgetting the height of the ceilings in the attic. Wherein:
- Proportions must be observed, because an attic that is too large can turn a small house into an awkward, mushroom-like building.
- It must be remembered that the lower part of the attic roof is built using layered rafter legs, and they optically lower the overhang and overlap the upper part of the high windows. There will be no noticeable overhanging effect when constructing an attic according to the scheme with the rafters removed.
- Do not forget that the height of the attic room must ensure freedom of movement. It is this landmark that is required to correctly determine the height of the racks of the attic walls.
You can select the best roof proportions using the traditional template-layout method. According to it, bars or boards are laid out on a flat, spacious area, repeating the contour of the building in real size. By changing angles and moving components, you can achieve the optimal configuration. The elements need to be fixed with nails and immediately measure the lengths of beams, rafters, tie rods, and posts. The resulting dimensions will help in making templates.
The video will demonstrate the calculations and layout of the rafter system for an attic roof:
The basic options and diagrams for the installation of an attic rafter structure that we have given will help you decide on the choice of the optimal type of rafter structure.
Types and types of attic floors - dimensions and dimensions of the attic
The height of the attic floor determines its type (type):
- full floor. Vertical wall higher than 1.5 m;
- attic. The height of the smaller wall ranges from 0.8 to 1.5 m;
- semi-attic. The height of the wall is less than 0.8 m.
Depending on the needs of the residents, rooms on the attic floors can be arranged for various functional purposes.
But most often there are bedrooms and lounges.
If the requirement for a building height of 2.3 m is met, then according to the standards prescribed in SNiP, the area of the attic floor cannot be less than 16 sq. m. In this case, the bedroom must be at least 7 square meters.
If the height of the walls of the attic floor exceeds 2.3 m, then the construction of a bedroom of a smaller area is allowed. The justification for reducing the area is the large total cubic capacity (volume) of the room.
Armed with this theory, you can begin to build an attic floor with your own hands. Construction is not a troublesome task if you have detailed step-by-step instructions.