Calculation
Publication date: 01/15/2020
1
30029
- The role of layering
- What does the size depend on?
- Influence of the type of insulation
- Effect of finishing
Frame houses, despite their increasing popularity, do not inspire 100% confidence among potential owners. And the point is not only that frame houses are associated with old village wooden houses, more like barns, but that people today are not inclined to trust modern technologies, especially those that reduce the cost of construction by an order of magnitude. We are accustomed to the fact that cheap cannot be good, so we are extremely skeptical about reports that a thin frame wall can equally replace double block masonry.
Frame house wall
What thickness is enough for a frame house?
When a person is going to build a building using frame technology, sooner or later the question will arise: will the thickness of the walls be enough, and will the house be warm and comfortable? Although modern construction has stepped far forward in its technologies, still not everyone trusts it - people do not believe that such a small thickness of frame walls can provide the necessary thermal insulation. The consumer is confident that double block masonry is many times more reliable than a thin wall of a frame house.
But this is a mistaken opinion, since if all construction technologies are followed, such a wall can be many times more reliable than a brick wall.
In order to correctly answer the question of how thick the frame walls should be for comfortable living in it in winter, you need to take into account many nuances, such as:
- The material from which the internal and external cladding of the building is made;
- Insulation material, its thickness and quality;
- Climatic environmental factors of the region;
- Thickness of lumber for constructing the frame.
Articles on the topic
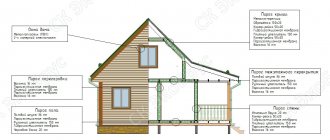
The structure of a frame house from foundation to roof is described here in some detail.
Foundation for a frame house. Do-it-yourself foundation construction
Ventilation in a frame house: main features
What thickness should the walls of a frame house have?
Do-it-yourself frame house: step-by-step work
Pros and cons of frame houses. All the pitfalls of popular technology
Do-it-yourself frame house: how to build it so that it turns out efficiently and economically
Materials and fastening of cladding outside and inside frame houses
Reviews ()
How a frame wall sandwich works
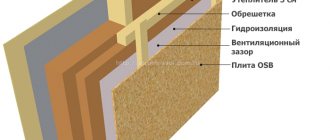
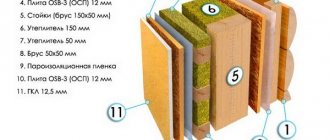
The wall panel of the frame structure is multi-layered, thanks to which such a panel shows excellent thermal insulation characteristics. A unique air cushion helps retain heat. The thickness of the walls of a frame house depends on the layers of which they are composed:
The first layer in a wall sandwich is the interior trim, usually installed from plasterboard. This coating hides all sorts of unevenness and is excellent for covering them with wallpaper or paint, as well as decorative plaster.
The next step is to install the OSB board, which will serve as the basis for the inner finishing layer.
After the OSB boards, a vapor barrier layer is laid; this measure is designed to prevent steam from penetrating into the middle of the structure and to remove moisture from the wall.
After the vapor barrier layer is installed, the insulation is laid. It is the insulation that will determine the thickness of the walls of the frame house. Insulation is the most important structural element. It is necessary to determine the type and material from which the insulation will be made before construction begins. The thickness of the heat-insulating layer determines the cross-section of the beam. The parameters of both must match. For example, if the insulation is 100 mm thick, then the beam should have a cross-section of no more than 100 mm.
After thermal insulation work, a layer of waterproofing is laid. This can be either a polyethylene film or a membrane specially designed for this purpose. Specialized waterproofing materials, unlike conventional ones, remove condensation and steam and do not allow moisture to accumulate inside.
After waterproofing, the OSB board is re-installed; it performs the function of protecting the insulation from mechanical influences, and external finishing is also installed on it, for which it serves as the basis.
And the final layer is the exterior finishing. It can be made of siding, plaster or clapboard, all at the discretion of the owner of the building, based on personal preferences and in accordance with climatic conditions.
The wall thickness of a warm and cozy frame house for permanent residence is determined by these seven layers of sandwich panels. Its resistance to cold in winter depends on the quality of such a wall.
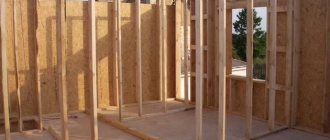
The initial stage of wall construction is frame assembly
The frame determines the geometry of the house, ensures its rigidity and safety. That is why it is so important to choose the right building material for it and follow the construction technology.
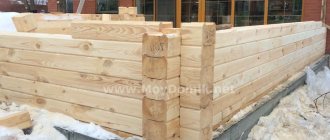
Bottom trim - material used and preparation for installation
A week after pouring the foundation, you can begin laying the bottom trim . It provides support for future walls and connects them to the foundation. Most often it is made of timber with a rectangular cross-section of 150x200 mm.
You can choose between solid and laminated timber. Their main differences are strength and price. Glued laminated timber can withstand heavy loads, but its price is higher than that of solid timber.
Immediately before laying the strapping, be sure to check the evenness of the foundation. If the horizontal line is maintained, begin waterproofing work. For this, bitumen or roofing felt is used.
Note! If the horizontal deviation is more than 10 mm, a mortar is used. If the deviation is less than 10 mm, planks are placed under the harness.
Connecting the beams of the lower frame and fixing it to the foundation
The frame is attached to the foundation using anchor bolts. Holes for them are made in the beams and foundation at a distance of 1-1.2 m from each other. Anchors must have a diameter of 12-16 mm and enter the concrete to a depth of at least 100 mm. Choose anchor bolts with a hex nut and a wide washer.
The beams can be connected to each other in several ways. Particular attention should be paid to the corners. The following connection types are suitable for these areas:
- “half a tree” and “in the paw”;
- "dovetail";
- "root thorn".
The last two options are reliable, but labor-intensive. That is why in practice “half-tree” and “claw” joints are widely used.
A half-tree connection involves sawing out part of the timber. The height of the cut is equal to ½ of the thickness of the lumber, and the depth is equal to its full thickness. The “paw” connection is made in the same way, but the cut is made at an angle. As a result, the protruding part of the beam has a trapezoidal shape.
In this case, the beams are additionally reinforced with reinforced metal corners and 120-150 mm nails. You can also use a dowel - a wooden pin connecting the beams to each other. It should be slightly smaller in height and diameter than the hole previously prepared for it. This requirement is connected with the subsequent shrinkage of the frame house.
Installation of vertical racks
Vertical frame posts begin to be installed from the corners. To fix the corner elements on the lower trim, reinforced metal corners are used.
Racks on straight sections can be secured by complete or incomplete cutting or using the same steel corners. In this case, conventional products without additional reinforcement are suitable.
The cutting method involves cutting out special grooves in the strapping beams. Their width corresponds to the same size of the vertical post, and their height is equal to 30-50% of the thickness of the strapping beam. With complete cutting, the end of the rack is completely recessed into it to the selected height, with incomplete cutting - only partially. As a result of drinking, it takes on an L-shape.
Note! If you choose the cutting method, then the length of the racks corresponding to the height of the future walls must be increased by the height of two grooves.
The pitch of the racks largely depends on the pre-selected wall material.
Performing the top trim
The upper harness is performed in the same way as the lower one. Fastening the racks to its horizontal beam can also be done using metal corners or cutting. In this case, choose the method that has already been used when working with the lower harness.
It is important! The upper grooves for the racks should be cut strictly perpendicular to the lower ones. This will avoid distortion of the frame.
Each vertical post is not only inserted into the cut-out groove, but also additionally secured with two nails. They must be recessed into the frame element by at least 100 mm.
Jib bars - what are they for?
Jib beams are boards with a cross section of 25x100 mm. Fixed on the bars of the lower and upper trim and racks, they give the structure spatial rigidity.
Useful: Waterproofing a frame house
It is important! Do not confuse long struts that connect multiple posts with short struts within a single vertical member.
The jibs are installed at an angle of 45-60°, cutting grooves for them in the frame. In places where they drank, they are additionally fixed with two nails. For walls up to 6 m long, two jibs directed from the center of the lower frame to the two upper corners are sufficient. For longer walls, their number can also be increased.
What else does the thickness of the walls depend on?
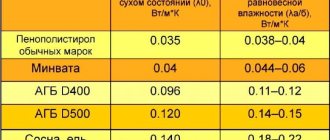
The thickness of the walls must correspond to the climatic conditions of the region where the structure is being built. The further north and harsher the climate, the thicker the walls of a building must be for permanent residence. The optimal solution in this case would be to create two layers of insulation. Sometimes, of course, there is no such need, and a regular frame is enough, but to be on the safe side, an additional layer is made.
If the house is intended for the summer period, then the thickness of the thermal insulation layer may not exceed 100 mm. In case of permanent residence in a room, insulation must be installed with a thickness of at least 150-200 mm, and internal and external finishing is also taken into account.
The thickness of the walls of a frame house, when using such common insulation materials as polystyrene foam or mineral wool, taking into account the external and internal decoration, is 200-250 mm, despite the fact that cotton wool and polystyrene foam are used with a thickness of 150-200 mm.
If the insulation material is polystyrene foam, then the thickness of the slabs is usually 50-100 mm; therefore, it can be laid in two layers, which, in turn, will significantly improve the thermal insulation qualities of the wall. The second layer of foam is laid in such a way that the joints do not coincide with the joints of the first layer. This method of laying slabs will avoid the formation of cold bridges, through which the main heat leakage from the room occurs.
You can, of course, use bulk insulation, but they are usually used for outbuildings. The raw materials for this type of insulation are straw, sawdust, expanded clay or polystyrene. The material is poured into ready-made wall structures using special equipment. This method of thermal insulation is more suitable for insulating a floor or ceiling, since it will shrink in the walls over time, which will lead to the formation of voids. In this case, you can use special equipment that compacts the insulation.
With this type of thermal insulation, the wall will be slightly thicker.
You can, of course, use ready-made SIP panels. The panels use polystyrene foam as insulation, and the cladding is made of wood materials. The thickness of the walls of a frame house with such panels is set at the manufacturer’s factory and can be from 125 mm to 225 mm.
Depending on what the external and internal finishing will be made of, the thickness of the wall panel will depend and it can vary from 20-100 mm. If a ventilated facade is used, then the air gap should be 10-20 mm, this will improve the thermal insulation characteristics. By increasing the interior decoration, the area of the room is hidden. For this reason, it is better to build up the insulation from the outside.
The most suitable material for this would be polystyrene foam. It is not hygroscopic and prevents moisture from entering the insulation inside the panel. If cotton wool is used as the first insulation, then the use of polystyrene foam in this case is especially important.
External wall cladding
Taking on a large load, the outer cladding of the wall frame ensures the rigidity of the structure and its stability during operation. Properly selected building materials for cladding will allow the walls to maintain their shape for many years and withstand negative external factors.
Application of OSB-3 boards in frame construction
OSB-3 boards (OSP-3) are moisture-resistant oriented strand boards of increased rigidity. They are made by pressing and gluing three to four layers of wood chips. In each layer it has a different direction, which gives the material increased rigidity.
Advantages of OSB-3 boards:
- The optimum ratio of price and quality.
- Easy to process - cutting, drilling, grinding.
- Suitable for using various fastening elements - nails, screws, dowels, etc.
- Resistant to splitting even when fasteners are used close to the edge of the slab.
- Do not deform due to temperature changes and various atmospheric conditions.
The main disadvantage is the low vapor permeability. Walls made of OSB boards do not “breathe”.
Of no small importance is the fact that synthetic resins are used for gluing chips. This means that the cladding material can release formaldehyde and phenol into the air. However, stoves made according to European standards are safe for humans.
Note! The most environmentally friendly material is the one marked E0 and E1 .
Cement particle boards (CSP)
DSP is a material based on a mixture of wood chips and high-grade cement. To improve its performance properties, special additives are included in the composition.
Cement particle boards have the following advantages:
- Resistant to moisture and, accordingly, to mold formation.
- They are not afraid of rodents.
- Environmentally friendly. They do not release harmful substances into the air.
- Fireproof, belong to the category of low-flammable materials.
- Retains heat well.
- They have good vapor permeability and are breathable.
- When covering the frame, a flat surface is formed.
In contrast to the advantages of DSPs, they also have disadvantages:
- Heavy weight.
- Difficulty in processing the material. Drilling and cutting require a lot of physical effort. At the same time, a lot of dust is generated during the work.
- High price.
The recommended thickness of cement particle boards for frame construction is 12-18 mm.
Fiberboard for external cladding
Fiberboard is wood fibers pressed into a board. As in the production of OSB, they are laid in several layers, in each of which the fibers have their own direction. No adhesives are used. Enough pressure, exposure to high temperatures and resins contained in coniferous wood.
What characterizes this material on the positive side?
- It provides good heat and sound insulation of rooms.
- Environmentally friendly.
- The slabs are light in weight.
- Good vapor permeability.
The main disadvantage of fiberboard is its low stiffness index. When using this material, it is necessary to install jibs and select rigid internal lining.
Note! The recommended thickness of fibreboards for cladding the walls of a frame house is at least 25 mm.
Covering the frame with plywood
Plywood is a sheet material made from several layers of veneer that are glued together. In frame houses, regular walls made of moisture-resistant plywood have a thickness of at least 12 mm.
Useful: SP 31-105-2002: basic requirements of the standard
Advantages of plywood:
- not afraid of low temperatures;
- easy to process;
- high compressive strength;
- affordable price.
The disadvantages of plywood include its flammability, the presence of synthetic resins, and its tendency to chip.
Attaching the outer skin to the frame
Attaching the outer skin to the frame is done according to general rules.
- The presence of a temperature gap of 3-5 mm between the plates (sheets) is mandatory.
- Their joints should be in the middle of the frame beam.
- To fasten the sheathing, self-tapping screws 55-70 cm long are used. At the same time, they must go into the frame stud to a depth of at least 40 mm.
- Self-tapping screws are screwed in at a distance of at least 10 mm from the edge of the slab.
- Fixation of sheets or slabs is carried out in increments of 15 cm - along the edge, in 30 cm - in the center.
Since you will be using a huge number of fasteners, stock up on high-quality power tools in advance.
Briefly about the insulation of frame structures
Insulation of a frame structure is carried out in stages, which are divided as follows:
- Preparatory measures for organizing work;
- Steam and waterproofing works;
- Thermal insulation measures;
- External and internal lining of the sandwich.
The first step is to clean the frame of the building from debris and dust. If the frame is made of wood, then all problem areas must be treated with sandpaper in order to remove sharp elements. Protruding fastener parts must be either bent or hammered. Minor damage to the wood must be filled with putty, large gaps should be filled with foam. Damp or damp areas must be dried with a hair dryer.
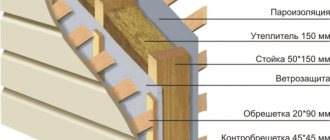
The waterproofing layer is laid on the insulation from the outside of the base of the structure. It serves as protection for the heat insulator from unfavorable climatic conditions and from precipitation. A vapor barrier layer is laid on the inside, this will prevent moisture from entering from inside the room. With both one and the other layer, the film or special membrane must be overlapped. The first layer should overlap by 150-250mm with the next one.
If the work is done correctly, there will be no need to make the walls of the frame house too thick. The joints of the vapor and waterproofing layers must be taped with tape in order to increase the tightness. The insulating film should adhere to the insulation as tightly as possible. The membrane is attached to the wooden frame using staples and a construction stapler. If mineral wool is used as insulation, then the vapor and waterproofing must be done especially well, since this material is the most hygroscopic.
The insulation must be laid between the frame posts.
Since the insulation is selected before construction begins, the distance between the supports is set so that the heat-insulating material fits between them as tightly as possible. For example, when using mineral wool, the racks are installed in increments of 580 mm between each other. If polystyrene foam or extruded polystyrene foam is used, then this step should already be 600 mm. With polyurethane foam this figure is insignificant, since it is blown in a liquid state.
The mineral wool is mounted on special dowels. There should be no gaps between the supports and the insulation, this will avoid the formation of cold bridges. The foam is attached either with glue or with dowels with a large head.
The thickness of the walls of a frame house is influenced by the selected insulation. If the thermal insulation layer is made of mineral wool, then it is necessary to install an air cushion, which will help remove moisture. To do this, after the waterproofing layer, you need to retreat 50-100 mm and install the sheathing. In cases with dense insulation, such as polyurethane or foam, there is no need to create an air cushion, and the sheathing can be installed directly on the thermal insulation layer.