When preparing walls for coating after leveling with putty, it is important that sanding is done quickly and efficiently with precise alignment of planes and angles, and in some cases, curved surfaces. And the more expensive the object, the more complex places there are (“thanks” to fellow designers and architects) and the more demanding the customers are, both in terms of execution time and quality.
Let's highlight the most difficult areas:
- sanding ceilings, especially high ones,
- sanding large areas
- grinding of non-flat (convex and concave) surfaces,
- grinding corners and other narrow places,
- grinding curved surfaces of walls and ceilings.
When solving these problems, each Master strives to find a universal solution. Here it is worth noting the importance of finding a system solution, which includes not only the selection of a grinder or grinding, but also the selection of appropriate equipment: effective dust removal, correctly selected abrasive materials and auxiliary devices that provide expanded capabilities.
To ensure an effective solution to the above problems it is necessary:
- High removal productivity, which is only possible on powerful machines with a large sole area and good dust removal.
- Availability of accessories for the machine (for example: an extension cord or rod) that increase your access options and make it easier to work on high areas of walls and ceilings.
- The presence of a suction mode will provide maximum convenience for ceiling sanding by compensating for the weight of the machine.
- The presence of a triangular or rectangular sole will provide convenience for working in corners and narrow places.
- The presence of a soft spacer (a soft substrate under the abrasive wheel) will provide the ability to work on curved surfaces.
At the moment there are many options for solving these problems. Arsenal Masters specialists reviewed the main solutions and at the same time compared them. Let us emphasize once again that the problem is solved most optimally in the complex:
Choice of method - dry or wet
When applying putty to the wall, you, one way or another, leave various marks on the surface. These could be grooves from a spatula, drips of mixture, bumps, waves, etc. Naturally, you shouldn’t leave them and move on to the next stage of work. Therefore, such defects are removed after the putty has completely dried, which usually occurs about a day after its application.
And there are options on how to do this. Let me make a reservation right away that the grinding process is quite a dirty business in the truest sense of the word. Therefore, make sure in advance that subsequent cleaning is minimally labor-intensive. So, you can sand the walls wet or dry. In the first case it is logical to use water, in the second it is not. What are the differences and which method is better to choose?
Wet sanding is appropriate for relatively flat surfaces, such as drywall or a normally plastered wall. This type of sanding will also do a great job of removing scratches and small waves. And its main advantage, of course, is the relative purity of the process.
Related article: Wall cladding with wild stone is a chic option
The fact is that you will not see dry dust, which means that the air and surrounding furniture will not be filled with it, and subsequent cleaning will not take much effort and time. Dry grinding is associated with the formation of a large amount of this very dust and this is its main disadvantage. However, you cannot do without it if the wall has folds, bumps and drips, or has not been leveled beforehand.
Technology + tools + abrasives + dust removal + accessories.
And it’s better - in exactly this sequence, because technology determines everything else. For example, it is more effective to mill off old paint from walls rather than sand it off. And these technologies require different tools and equipment. Next, we compare grinding solutions and the necessary equipment. Let's start with the manufacturers' data. Here is the data, for example, provided by the manufacturer FESTOOL (Germany):
With a removal rate of up to 30 kg per hour, PLANEX LHS 225 deservedly wears the leader’s “shirt”, which is, in principle, confirmed by the majority of Masters. According to Festool, eccentric machines with a sole diameter of 150 mm are 10 times behind. But at the time of testing there was no MIRKA DEROS machine, which, as we will see below, significantly reduced the gap with machines with a sole with a diameter of 225 mm. Important note: here the productivity, for example: “up to 30 kg” is indicated as the maximum figure under ideal operating conditions. It is not normative, since performance depends on many factors: preparedness/condition of the surface, quality and fraction of putty, experience of the Master, tools, etc. Another manufacturer that tested its machines was MIRKA (Finland):
From this diagram we see the following:
- Compared to paper-based abrasive wheels, mesh abrasive has 27% greater productivity due to faster and better dust removal. This once again confirms the fact that an effective dust extraction significantly increases productivity, not only by increasing the suction force, but also by increasing the suction surface area. It is this solution that is implemented in the mesh abrasive.
- The MIRKA CEROS eccentric machine (the more modern DEROS) is an electric rotary-orbital (eccentric) machine with a grinding stroke of 5 mm, under equal conditions it lags behind the Giraffes in productivity by only 35%.
- Mesh abrasive material on a larger surface of the sole gives a significantly greater result: on a sole (plate) with a diameter of 150 mm - plus 27%, and on a sole 225 mm - twice or more.
Now let’s combine these tables and the information that we were able to put together on this topic on the pages of the Runet. In order to balance all possible options from the point of view of reliability of comparison, we will accept the following assumptions:
- We believe that in all cases, abrasive material with a grit size of P 120 on a paper base was used. To do this, let’s assume that cutting with abrasive grain size P80 is 30% more productive than P120.
- Each machine used a similar abrasive: paper backing, open pack, aluminum oxide grain.
- Dust removal - professional using a construction vacuum cleaner, with the exception of manual sanding with abrasives without dust removal.
- As an eccentric machine with a sole diameter of 150 mm, we took the most productive option in the table (according to the reviews of the Masters themselves) - MIRKA DEROS.
- We assume that the suction power is the same (we use the same vacuum cleaner).
And this is what we got:
How to sand putty correctly
In order for the work to be possible even for a non-specialist, and for the result to be excellent, it is necessary to decide in advance: how and with what to sand the walls after puttying? The first rule that must be remembered: mandatory consideration of the holding time, i.e. You need to start smoothing the surface no earlier than after 24 hours have passed since the completion of plastering. This is necessary so that the layer of applied cement-sand (or other type) material dries thoroughly.
In modern construction and repair business, two completely different sanding methods are used:
- dry method;
- wet method.
There are advantages and disadvantages to each of them.
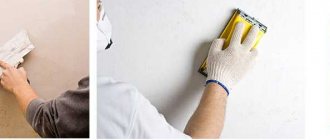
You can sand in different ways
Comparison results between sanders for walls and ceilings
| Grinding type | Hand sanding | Machine grinding | ||
| Tool | Manual grinder/grater without dust removal 115x225 mm | Manual sander with dust removal 115x225 mm | Eccentric machine with round sole (d=150 mm) (MIRKA DEROS) | Sander with round sole (d=225 mm) (Festool Planex) |
| Removal capacity kg per hour (according to manufacturers) | 1 | 1,5 | 7 | 18 |
| Productivity in square meters per shift – 8 hours** (expert assessment) | Up to 80 sq.m. | Up to 120 sq.m. | Up to 290 sq.m. | Up to 520 sq.m. |
| Grinding area/machine sole – sq.m. | 0,026 | 0,026 | 0,018 | 0,04 |
| Working height when working from the floor, m | up to 2.2 m | up to 2.2 m | up to 2.2 m | 2.5/3.0/3.5 m* |
| Weight of grinder/machine | 1 - 2 kg | 3.8/4.6/5.4 kg* | ||
* Working height and weight of the machine respectively without extension / with one extension / with two extensions. **Figures are averaged and rounded to the nearest 10 sq.m. based on a sample of the obtained expert data from the Masters themselves. We emphasize once again that the numbers do not pretend to be standards, since productivity depends on many factors: the preparedness/condition of the surface, the quality and fraction of the putty, the experience of the Master, tools, etc. Conclusions:
- As can be seen from the table, grinding machines with a larger sole area - with a diameter of 225 mm - have the maximum productivity. But not every Master will be able to work with them for a long time due to the rather serious weight. For example, if a woman is doing the finishing, then this option is probably not for her, even though the Festool Planex is the only machine that has a suction mode to compensate for the effort expended on the weight of the sander. In this case, you should take a closer look at the Mirka Deros grinder. For small areas, with its low weight and mesh abrasive material, it is the best choice!
- Another important conclusion that follows from this table: the presence of effective dust removal (with a vacuum cleaner, not a turbo bag) gives an increase in productivity - from 30% or more. As the Masters say, a vacuum cleaner begins to pay for itself after 1000 square meters. This means that if you have serious projects coming up, then don’t skimp on a vacuum cleaner—the costs will pay for themselves.
List of tools and recommended equipment:
- Festool Planex LHS 225 sanders
- Festool hand sanders with dust extraction 115 x 225 mm
Article MIRKA DEROS - an electric sander with impressive capabilities plus Videos and Reviews
- Sanders MIRKA DEROS
Tools are available in warehouses in Moscow, St. Petersburg and Nizhny Novgorod.
We will deliver to any city in Russia, more details on Payment and Delivery.
Useful notes
Which grinding produces the best surface quality?
There is an opinion that only manual grinding gives the best surface quality; grinding with a machine is not faster, and hand grinding is the fastest and highest quality. This myth is nothing more than a myth. The flatness of the sole provides the necessary flatness. Adjusting the speed helps to select the grinding pace, and the use of grinding material with finer abrasive grains provides the necessary and sufficient level of surface quality with a significant increase in productivity. If we remember that, as a rule, in the old fashioned way for manual grinding, many people use abrasive material of one grain - 100, then this conclusion is not surprising. Yes, you can use sandpaper with one grain, changing the pressure and frequency of movements to bring the surface to an ideal one. You can also dig up the entire field with a shovel... But you and I do not need pure cheapness of work (although this is debatable with manual operations), but a significant increase in productivity while maintaining the specified quality and low costs per square meter. This is exactly what mechanized grinding systems provide (electric grinders combined with dust removal equipment). It is also important to select the right abrasive materials, and if necessary, you can and should use abrasives of finer grains: 180, 240, 320, 400. But for assessing the quality of grinding, your hands are often more suitable than your eyes. It’s not for nothing that women, who naturally have better tactile sensitivity, work as controllers in grinding shops. If you are still used to working manually, then it is better to work with at least dust removal. In this case, you need a set of grinders for all occasions: from small to large “plane”.
How to sand putty correctly?
After applying the putty mass, it should be sanded. Depending on the type of putty applied, abrasive materials are also selected. For coarse (fraction 0.5 mm - 2 mm) and abrasive material is needed more aggressively with a grain of 40 / 60 / 80 / 100 - selected individually due to the differences in the compositions and properties of the putty from different manufacturers. In the process of grinding “finishing” putty, which has a fraction of no more than 0.1 mm, abrasive materials of a smaller grain size can be used - up to 400. Of course, the quality of the sanded surface depends on the quality of the putty itself in the first place. If your “finishing” putty has a too coarse fraction/grain size (as a rule, these are cheap materials), then it will not be easy to achieve good quality with any grinding. And these are labor costs that neither you nor the Customer need. In addition, a poorly prepared mixture also causes a lot of trouble. Therefore, professional Craftsmen with extensive experience do not use cheap materials - it is more expensive for themselves. By the way, a properly selected mixer with a suitable stirrer (whisk) ensures better preparation of the mixture. And with tight deadlines and high customer requirements, it is more advisable to use liquid putties prepared by the manufacturers themselves with strict adherence to the necessary requirements for the composition and properties of the mixture. Don’t forget about the quality of the putty process itself: the cleaner the putty is applied, the less sanding it takes. As the ancient rule of a painter says: “When putting putty, leave less “snot”, so you won’t erase your arms up to the elbows when sanding.”
Useful supplies and accessories
When processing large volumes, additional supplies and accessories will not be superfluous. In particular, an additional extension (each manufacturer has its own), which increases the working height available for work from the standard 2.6 m to 3.5 m. And the use of a support vest with a belt (like Festool) will increase the convenience of work and the productivity of processing ceiling surfaces. Scaffolding and stepladders will not be superfluous.
Stages of work or how to properly sand walls after puttying
The surface treated (for example) with a gypsum mixture has dried for more than a day, and now you can begin to smooth it out.
You need to start with a detailed analysis of the plastered walls (ceiling). Direct the light source perpendicular to the wall and as close as possible to carefully examine the condition of the coating and any irregularities. Circle all identified defects with a simple pencil. It is not advisable to use a marker, because... the remaining paint that has been absorbed into the wall will be difficult to remove.
Having examined the top layer visually (i.e., having examined all the irregularities, protruding fractions and other defects), it is easy to determine which mesh should be selected at the beginning of work for sanding the putty, i.e. sandpaper grain size. As mentioned above, you need to complete the work with a mesh with the largest possible grain.
You need to start work with a detailed surface analysis
Sanding the putty on the walls starts from the ceiling and in a circular motion clockwise, the movement is directed downwards. It is convenient to cover the wall area in narrow strips (up to 1 m). You should not use force when performing it, because... As a result, the top layer can be severely damaged.
The range of building materials includes a starting type of putty and a finishing one. The latter has a smoother appearance of the coating and, when choosing which sandpaper to sand (edit) the finishing putty, you should give preference to smoother types of sandpaper (No. 200-220). The master’s movements should also be light and gentle.
When choosing sandpaper for puttying walls after the initial coating, there are no special requirements. The main thing is that the final result is good.
There are no special requirements when choosing sandpaper for puttying walls after the initial coating.