Advantages of Tise technology
Tise technology is most often used in individual construction. This method is rapidly gaining popularity due to its versatility and increased strength, allowing it to be used on almost any soil. A foundation made using this technology is characterized by increased durability.
This method has become widespread due to a set of exceptional characteristics that allow it to be used both in ordinary country house construction and on a large scale by teams of workers.
A pile created by a TISE drill has a load-bearing capacity several times greater than a conventional cylindrical one
Thus, it has a lot of advantages that distinguish it favorably from competing technologies:
- low price combined with excellent quality;
- high strength of the resulting foundation;
- good thermal conductivity characteristics;
- the possibility of construction on any soil in a variety of climatic conditions;
- excellent frost resistance;
- ease of implementation in a short time.
All this contributes to the extremely wide dissemination of classical Chise technology.
General information
If you have a device that can drill through even the most challenging soil types, you will have a huge advantage. For those soils that have high water content, a hand auger has been modified and can be used to effectively pour the foundation.
For this reason, if you are planning to make a columnar or pile foundation, you should familiarize yourself with how to make a TISE drill with your own hands.
Design Features
The design of the TISE device for manual use, which makes it possible to form wells, is actually simple. This includes:
- A rod that has two connecting parts. The main one makes it possible to carry out drilling work at shallow depths, and the additional one will help to enlarge the wells for the pile. The section is 1.1 meters long. Fixation is carried out using special clamps. Thanks to the design features of each part of the rod, you can connect a rotation mechanism.
- A handle that helps rotate the TISE drill.
- A soil accumulator with a diameter of 25 cm, which ensures loosening and collection of soil. The storage tank has a cylindrical configuration, which ensures vertical formation of the shaft. Thanks to the design features, deviations from the vertical that may be caused by the presence of obstacles are eliminated. The intake of soil that has been loosened is carried out using a screw mechanism located at the bottom of the receivers.
- A tilting device that makes it possible to enlarge the lower part of the foundation recess. You will be able to create an expansion of 50-60 cm. The process is carried out when installing the device according to all design requirements. After the rod is put on, the folding blade should be attached to the soil storage tank with a special pin. The upward movement will be carried out manually, and the downward movement will be carried out under the influence of gravity. For the manufacture of TISE ura, suitable drawings are used.
Types of soil receivers
At the base of the construction site there is a lot of soil of different types (heavy, with the presence of stones, or light with a lot of loose rocks). Because of this, there was a need to manufacture a soil receiver, which makes it possible to increase the productivity of soil drilling.
There are the following types of storage tanks that make it possible to develop:
Heavy ground. A distinctive feature of such a device is that there are four evenly distributed vertical elements having a cone shape.
Companies that make the TISE drill with their own hands, at the request of customers, equip the drill for creating wells with a couple of soil receivers. Piles installed using this drill have a load-bearing capacity that is several times greater than conventional cylindrical elements.
Structure of the Tise-F drill
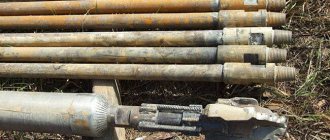
The main working tools for constructing a foundation using this technology can be considered adjustable formwork and a self-drill , from which this method got its name. The Tise-F drill is used for drilling wells for piles that have extensions at the base.
The tool consists of:
- handles for rotation;
- rods (main and extension sections) for adjusting the drilling depth;
- soil receiver (storage) for loosening and collecting soil;
- folding blade for expanding the well.
It is these design features that ensure ease of use.
All work is carried out using the following operating principle:
- Length adjustment is carried out due to the sliding sections of the rod. Each piece is 110 cm long;
- the handle easily fits onto any of them;
- clamps secure each section;
- the soil receiver has a diameter of 250 mm, approximately in accordance with the diameter of the recesses;
- the cylindrical shape of the reservoir ensures the vertical position of the wells;
- the guide pin maintains the given direction in the event of obstacles;
- soil sampling is carried out with plates and cutters;
- the folding foot is attached to the storage unit using pins;
- The cord helps lift the shovel; lowering occurs under the influence of its own weight.
Procedure
- The tip can be made from a drill with a diameter of 10 mm or more so that the drill goes smoothly, because the pile requires vertical accuracy. The drill does a good job of this task. A circular saw blade, which is sawn in half and welded to the pipe, is suitable as cutters for collecting earth.
- The length of the pipe must be selected based on the depth of the future pile. For private construction, a three-meter pipe with an outer diameter of 32 mm and a wall thickness of 2.5 mm is quite suitable.
- It is recommended to make the inclination angle of the incisors approximately 30 degrees, no more, because otherwise it will not work well.
- It is better to make the handle removable, since the drill will go deeper in the process. For the handle, a pipe with a smaller diameter than the main one, for example, 25 mm, is suitable. It is inserted into the main pipe. Holes are drilled. Bolted connection. A cross member is welded to the handle. With its help, the entire structure rotates. It is recommended to weld additional holders. They will make rotation easier, reduce discomfort and fatigue from work.
- A pre-prepared extension adapter is inserted into the connecting part as necessary. The butt part of a pipe of smaller diameter is welded to the main one, the connection is also bolted.
- The plow is the structural element of the TISE drill that allows you to make an expansion where the base of the pile will be, the so-called heel. Concrete with a compressive strength class of 25 MPa works with a huge margin.
- The heel is needed to increase the area of support on the ground. The plow is secured with a rope or thin steel cable. Until the expansion depth is reached, the plow is kept parallel to the pipe.
- When the required depth has been reached and it is time to make the heel, the plow is lowered with the help of a rope and begins to widen the hole. The plow can be made from scrap materials. Corners are welded to the sheet of metal. A short tube is welded to the main pipe.
- A sheet of metal with corners is attached to the tube with bolts, which ensures the mobility of the plow structure. The length of the plow is selected taking into account the desired diameter of the pile heel.
The advantage of making a TISE drill with your own hands is that you can equip your construction tool with various parts. Their choice depends on the nature of the soil at the construction site.
- For heavy soils, including rocky ones, sharp edges of cutting parts are not needed. It is much more important with what slope they are installed, as this affects the amount of soil captured. It is worth paying attention to the fangs, which can loosen heavy soil. The presence of stones up to 5 cm in the ground implies an increase in the distance between the cutting edges. This is necessary so that small stones can easily fall into the soil collector. This design is also suitable for clay soils.
- When constructing an object on loose soil, it makes sense to equip the TISE drill with additional loosening elements. Vertically positioned fangs will cope with this task perfectly. The sharp edges of the drill in this case are located at a smaller angle to the horizontal plane and close enough to allow soil to be collected. It is this design that prevents the collected soil from spilling back into the well.
Making a TISE drill with your own hands is not difficult. If you understand the principle of its operation, the production itself can take several hours. It is also quite simple to use. Before the actual use of the drill, the locations of future wells are marked on the site. It is necessary to remove the top layer of soil and get to the ground. We install the TISE drill vertically, focusing on the soil receiver. Rotate the drill clockwise. The soil that will accumulate as the drill moves deeper must be removed from time to time. To do this, the drill is removed from the well.
The drilling depth must be constantly monitored using a tape measure. At the depth that has been previously determined as the flare or heel level, it is time to use the plow. The well will receive expansion at depth, which will further ensure the strength of the pile and the entire structure as a whole. At this stage, you should be extremely careful and remove the tool from the well only with the plow assembled. Otherwise, the walls of the well can be destroyed.
Making a TISE drill from a garden drill
Another video about a homemade mechanism:
Foundation drill TISE-F This is a manual drill for excavation work, used in the construction of buildings using individual construction technology (TISE). It is indispensable when drilling wells with a diameter of 25 cm for a columnar foundation, which expand towards the bottom. In this case, the expansion diameter is 50-60 cm. This is necessary to give the foundation greater strength and increase its supporting area.
Drilling is carried out by one person manually, which is quite convenient and efficient, thanks to the design of the drill, which is made in the form of a sliding rod. On one side of the TISE foundation drill there is a soil accumulator with two cutters, and on the other there is a crossbar with two handles. The weight of the drill is 11 kg.
A folding plow is fixed above the soil accumulator, which tilts under its own weight. When drilling, the plow cuts off a layer of earth from the walls of the well and forms an expansion. Under the influence of its own weight, the plow lowers and cuts off the soil located closer to the bottom of the well, which makes it possible to create a well with an anchor hemispherical expansion. The cut soil enters the storage tank and rises to the surface.
When drilling, direction must be taken into account. So, rotating the TISE foundation drill clockwise makes it possible to drill a well deeper, but if anchor expansion is required, then the tool must be rotated counterclockwise.
Before you start drilling, you need to remove the turf with a shovel. Just remember that when drilling, if you continue to work with the plow and rotate the drill clockwise, you are thereby creating unnecessary load.
Drilling can be started manually, with a simple earth drill, which will help make shallow wells, while making the process easier and faster. After this, drilling should be continued with the TISE foundation drill. You should not unfold the tool shaft completely; it is better to leave a 10-centimeter margin to prevent the parts from separating.
Depending on the type of soil, you can drill wells either alone or together. When laying out a foundation on dense soils, for example, clayey soils, it is better to involve a partner in drilling.
Every builder knows that the anchor extension should be hemispherical, but the plow does not completely assume a horizontal position, which is explained by the lack of its own mass in order to cut the ground. Therefore, the maximum expansion diameter at the bottom cannot be achieved. However, this fact does not in any way affect the reliability and durability of the foundation.
There are three types of drill: TISE-F200, TISE-F250, TISE-F300
TISE-F is a foundation drill that is used for drilling wells in the ground with an expansion of up to 60 cm. It is equipped with a plow that has three drilling positions - 40, 50, 60 cm.
The foundation drill for excavation work TISE-F is currently out of production, so we ask you to familiarize yourself with the new developments of the TISE company: foundation drills TISE-F200, TISE-F250 and TISE-F300
About the TISE foundation
Video review of the TISE drill for foundation construction
Characteristics
In specialized stores you can buy two versions of the Tise drill, which differ only in the design of the drive.
In light soils, one person can handle drilling, but in clay soils, two people will have to work
General detailed characteristics of the standard tool can be seen in the table:
| Weight, kg | 10 |
| maximum depth, cm | 150 |
| diameter, cm | 25 |
| handle width, cm | 55 |
| length (folded), cm | 125 |
| drill length (extended), cm | 225 |
How does a foundation drill work?
The drilling technology is quite simple and does not require special training.
When performing activities to form wells, perform work according to the following algorithm:
- Mark the pile field and remove the turf in the drilling areas.
- Assemble a TISE hand drill and equip it with the necessary storage device.
- Dig small pits 15–20 cm deep in the drilling area.
- Place the tool at the drilling point, ensuring its vertical position.
- Rotate the homemade TISE drill, applying force to the handle in a clockwise direction.
- Monitor the filling of the soil receptacle and periodically remove soil from it.
- Extend the length of the rod if necessary and clamp its components with a clamp.
- Continue plunging into the soil and form a depression at the bottom of the cavity.
- Pull the cord, lift the paddle and remove the tool from the hole.
Drilling wells for TISE piles
When performing work on light soils, one pit can be formed in half an hour. The duration of drilling on heavy soils is 2–2.5 times longer.
Necessary materials
To make a Tise drill yourself, you cannot do without the following set of tools and materials:
- Bulgarians;
- welding machine;
- electric drills;
- paint brushes;
- approximately 20 cm of water pipe, the diameter of which is about 32 cm;
- profile pipe with a cross section of 40x40 mm, two pieces, the length of which is 150 cm;
- strips of metal measuring 5x25 cm, about 3 mm thick;
- metal strips 3x120 cm, 2 mm thick;
- saw blade with a diameter of 22 cm;
- nylon cord 300 cm long;
- anti-corrosion paint.
Development of TISE pile shafts.
The vertical part of the piles (the shaft) can be drilled in three main ways: with a hand drill, a motor drill and a drilling machine. It is worth saying that first the trunk is drilled to the required depth, and only then the soil accumulator of the drill rests on the bottom of the well and is widened.
TISE pile shaft
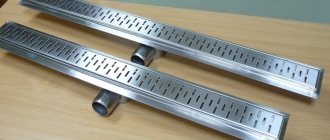
Drill accumulator TISE-F
HAND DRILL.
No matter how good and well thought out the design of a hand drill is, it is still a HAND tool and working with it requires a huge amount of brute physical force. Of course, in soft soil work goes much faster than in hard soil. The most difficult cases are when there are stones, broken stones or rubble in the ground. Even with skilled hands, on average hard soil, it can take 5-7 days, or even longer, to develop 30 widenings with a hand drill. Still, with a small number of piles (from 5 pieces), it is more reasonable to use the following drilling method. The entire series of TISE-F drills are not particularly durable and wear-resistant; the developer clearly expects consumers to regularly update the drills. The most common defect is the twisting of the drill stand; it has to be repaired regularly, which is why many workers upgrade the drills themselves.
Modernized drill stand TISE-F from a 50x50x3 mm turbo
Place where the TISE-F drill is twisted
You can rent an average motor drill for 2–3 thousand rubles per day, plus several hundred rubles for gasoline. A good motor drill that will reduce your time, nerves, and maybe money will cost about 3 thousand rubles a day. A good motor drill requires an unsharpened auger of the required diameter, preferably the auger should have a safety device against hitting stones, the auger should have a sharp knife at the bottom and a powerful engine. Be sure to pay attention to the diameter of the auger; with a smaller auger diameter, the soil sampler of the TISE drill may not fit into the well. In this case, you will have to manually expand the trunks, which is labor-intensive. When a knife becomes dull during work, it makes sense to sharpen the knife by hand, this will save time. The speed of work of two inexperienced people with a good motor drill in soils of average strength will be 10-15 holes per day, possibly more. If there are a large number of stones in the ground, it will go well, but productivity may drop significantly. It makes sense to drill wells with a diameter of more than 300 mm using heavy equipment.
Auger for motor drill
DRILLING MACHINE.
Replacing a drilling machine (Japanese) costs 12-15 tr. plus 30-50 rubles per kilometer of road. The shift is 7 hours, the eighth hour is taken for delivery, installation/assembly of equipment on site. It is worth saying that good equipment will cost about 14-15 thousand rubles. Good technology - this means, first of all, an unsharpened auger (be sure to check its diameter at the beginning; if it is 5 mm less than stated, then it is better to call another machine - a TISE drill will not fit into such a well), a good operator (a bad operator can drill for a long time, and most importantly with low accuracy). When the number of wells is more than 18-20, we use heavy equipment, since it will always pay off economically. On average, such equipment can drill 50-70 wells up to 2 meters deep per shift. I will add that if your scope of work is completed earlier (for example, everything was drilled out in just 2 hours, and not in 7), you can be given a discount, but a minimum one - no more than 2 thousand rubles. It is especially important to use a drilling machine with a large number of piles (from 35 pieces) with a diameter of 300 mm or more.
Drilling machine (Japanese)
There are situations when vehicles on wheels (the same “Japanese”) cannot drive through the site to the construction site. If this problem is likely, then prepare the passage in advance. If preparation is impossible for some reason, then you can use tracked equipment. This equipment is delivered to the site by car, so this option will be more expensive. Changing a drill costs on average 13-15 thousand rubles, but delivery will cost 60-80 rubles per kilometer.
Driller on tracks
Preparation method
The basis of the drill is a water pipe with a diameter of 15 to 20 cm, which will serve as a soil storage tank.
The design and materials of the TISE drill allow you to make it with your own hands as the simplest tool
You can do it this way:
- weld two vertical plates with a pitch of 40 mm into the upper part of a piece of water pipe;
- insert between the welded plates, and then weld a piece of the profile. This will become the main axis of the drill;
- cut the saw blade in half using a grinder;
- Weld two halves of the saw blade on the bottom side of the pipe at an angle of approximately 15°. Weld one side to the body with the cutting edge, and the other to the axis;
- make a profile with an internal dimension slightly larger than the profile pipe using a strip of metal. If the profile is square, you need to weld an eyelet with a hole with a diameter of 8 mm to it and put it on the profile. It is designed to move the plow;
- from another metal strip, bend two U-shaped profiles measuring 40x40 mm;
- weld them to the axle so that you get a square inside, where you need to insert the rod extension. So, the result should be that one profile is attached to the upper part, the other to the lower part, approximately 50 cm;
- from the side of the cutting elements, insert an old drill with a diameter of about 20-25 mm into the axis and weld it;
- Along the edges of the welded plates, make two loops with recesses with a diameter of 8 mm. A plow will be attached to this part in the future;
- cut off a piece of metal whose length will be 12 cm greater than the radius of the pipe;
- drill this part, making a hole with a diameter of 8 mm, and weld a loop in the middle;
- attach the plow blade to the loops, and attach a cord to the loop in the middle of the blade. When it goes up, the blade of the plow will be pressed against the axis of the rod, and when the cord is released, the blade will go down, and because of this, an expansion in the shape of a sphere will be created at the bottom of the hole;
- Weld a cross member about 60 cm long to the axle extension, which rotates the Tise drill.
The finished structure must be cleaned of dirt, degreased and coated with anti-corrosion paint.
Chise drill - advantages and disadvantages of the tool
If you decide to build yourself a house, cottage or outbuilding, then you will need such a tool. Drilling technology in this way is mainly used for individual construction. The method of constructing foundations using the pile method is gaining popularity due to its versatility and increased structural strength. Piles can be used on almost any type of soil. In addition, the pile foundation is characterized by an increased service life.
The chise drill is a purely hand-held tool that is operated by your own efforts. The drill has handles on the end that you will hold onto and make circular movements. The principle of drilling is quite simple: with a shovel you need to make a pit into which the drill is installed, and begin to “drill” a hole in the ground. What are the advantages of the drill?
- It compares favorably with competitors in terms of price - quality. The tool is quite cheap, and if you make it yourself, then the cost is generally petty. Anyone can afford such a drill.
- The resulting hole is of sufficient quality and suitable for constructing a foundation on piles.
- Simplicity and efficiency of work. You don't need any special skills to make the perfect hole yourself using a drill.
- Due to the telescopic design of the tool, the hole depth can reach up to 2.5 m.
The drill will be your best assistant when constructing a pile foundation. The downside is the time and effort required. Since the mechanism is driven by physical force, the speed of digging the pile depends on your strength. Unlike the same gas drill, to dig a well 80 cm, you will need about 40 minutes. This is despite the fact that the soil will have a minimum number of roots, stones and other inclusions. And hard soil is even more difficult to work with. So be prepared to spend a lot of time and effort on your work. But still, the drill is popular and quite suitable for constructing a pile foundation.
How to use
In order to create a well for the foundation, the drill must be placed in a pre-marked place and rotated so that the earth is taken into the storage of the cutting part.
After it is filled, the drill is taken out and cleaned from the soil. After the required depth has been reached, the plow must be released and, by rotating, form a lower widening . In the prepared well, you need to install reinforcement, a glass made of roofing material and fill the pile under the foundation grillage with concrete.
Craftsmen have created a whole host of different designs, with the help of which they make depressions in the soil with an expansion at the bottom in the form of a hemisphere.
How to make such a device?
To make a TISE drill with your own hands, you will need a piece of pipe; its diameter should vary between 25 - 32 cm.
In order for the tool to cut through the soil, you will need half a circular saw blade. These two materials form the basis of the device, but in addition to this, additional tools will be needed.
Other parts of the drill and fixtures:
- welding device;
- a metal rod with a handle (if deeper holes are needed, then you need to have a structure that can be pulled out and a lock);
- part of the pipe made of metal (holes will be made in the ground along its width);
- three pieces of metal loops;
- metal rod (to control the drill plate);
- metal plate;
- circular saw blade (two halves);
- paint against metal corrosion.
As you can see, there are no particularly exotic materials - all this can be found at home if a person is building a country house.
As mentioned above, the basis of the tool will be a pipe from the water supply, which is needed to accumulate soil.
To make a TISE drill with your own hands, it is recommended to have on hand a photo or drawing of the device, which is given above, in order to have a clear example of how it should look.
So, to make such a device yourself, you need, firstly, to weld the saw halves at a slight angle closer to the end of the metal rod.
At the same time, do not forget that welding should be horizontal and you need to leave the tip. The result is two parts that perform the cutting function.
Then you should attach a piece of your pipe above these two saw parts that will accumulate soil while drilling.
Then you need to weld the cutters, which will help make holes even in hard soil under adverse weather conditions.
The cutters must be welded on the outside of the storage pipe. The number of cutters can be made from two to six pieces, as desired. Their number is influenced by the type of soil and what weather conditions the tool will be designed for.
In order to make a hemispherical cavity at the bottom of the hole, it is necessary to weld three metal loops - on a strip of metal and on a rod.
A loop is needed on the strip to form a hemisphere. In principle, the loop may not be completely even, the main thing is that it can create a good foundation for the foundation of the house.
The rod must be secured at the end of the plate.
As a result, thanks to the hinges and the bar, the cutting parts of the saw will be able to rise and fall if necessary.
The width of the hemisphere at the bottom of the hole can be fixed if more loops are welded to the drill rod.
The radius of the wells also depends on the distance to which the plate, which is attached to the drill, is lowered. After the TISE drill is ready, you can coat it with anti-corrosion paint.
Above is a photo of how the two parts of the drill structure are connected.
Video tutorial:
Tips and secrets
You can easily make such a tool with your own hands, and, if necessary, change the design, adapting it to the necessary conditions, depending on the type of soil on which the foundation is being built. It is clear that if you expand the recess at the bottom, then, in any case, there will be some shortcomings in the resulting hole.
So, it is recommended to listen to the advice of craftsmen:
- To use a drill on difficult soils, do not sharpen the edges of the cutters too much;
- if there are a lot of stones in the ground with a diameter of up to 5 mm, then it is better to increase the distance between the edges. In this case, they will not fall into the receiver; otherwise, the stones will constantly get clogged into the teeth;
- in order to loosen the soil, it is worth welding several fangs onto the pipe. First of all, this applies to clay soils, but is also recommended for loose soil;
- If the edges of the cutters are placed close to each other, then such a tool will easily prevent the earth from crumbling.
The TISE drill can easily handle small tree roots and push out individual stones up to 5 cm
Using such a tool is quite simple.
What kind of soil receivers are included with the foundation drill?
The construction of buildings on columnar foundations is carried out both on heavy soils containing mineral inclusions and on light soils with a high concentration of sand fraction. To ensure the possibility of drilling channels for piles on various soils, the tool is equipped with various types of soil receivers. There are certain differences in the design of the soil accumulator:
- To perform work in clay soil and soils with an increased content of small stones, the working tool is equipped with four soil-collecting elements located vertically at the same distance from each other. Small rocky inclusions up to 50 mm in size penetrate into the gap between the fangs along with the soil. When drilling soils with a high content of clay particles, clay adhesion is eliminated;
- for forming wells in loose soils, the working head is equipped with two cutting elements with a serrated edge. The design and location of the horizontal cutters prevent spillage of soil when removed from the cavity of the drilling device. The sawtooth-type working edge ensures the selection of small rocky fractions and effectively loosens the soil.
TISE auger foundation manual universal set
Manufacturers of hand tools, in accordance with the wishes of the customer, can equip the TISE auger with a soil intake of the required design.
Price
If, nevertheless, you decide not to waste time on making a tool, you can simply buy it in a specialized store, and of the required size and configuration.
When purchasing this tool, you need to pay attention to the following:
- the length of the handle, and is it possible to increase it to improve ease of use;
- the diameter of the part responsible for cutting, on which the diameter of the future recess depends;
- quality of the metal component;
- weight. After all, the smaller the drill, the more comfortable you can work.
For some, due to the increased cost and complexity of the technological process, it would be better to rent a drill.
But, if it is needed for repeated work, you can buy a Tise-F foundation drill both in construction stores, markets, and from official dealers.
Prices depend on the specific type and range from 3,500 to 5,000 rubles in Moscow. It is likely that depending on the region, the price will differ slightly.
The average cost of new models can be seen in the table:
| Type | Cost in rubles |
| TISE-2F (200mm) | 3 500 — 4 000 |
| TISE-3F, reinforced (250 mm) | 4 200 — 4 700 |
The Tise drill is a necessary tool designed to make holes during the construction of a pile or columnar foundation. You can always buy a Tise drill in a specialized store, or you can try to make it yourself according to the drawings, while saving on the entire construction.
You can watch the video for more details about making the Tise fundamental drill, designed for drilling wells for piles, with your own hands:
Self-production: materials, tools
A homemade TISE drill allows you to significantly reduce construction costs. A technically competent developer will easily complete the task. The main thing is to have a full-scale sample or drawings of a TISE drill. It is not difficult to make a TISE drill with your own hands, using the following materials and tools:
- Metal pipe with a diameter of 250-300 mm. The size is selected according to the expected diameter of the well.
- Working body of a circular saw.
You can make a drill Tise with your own hands according to the drawing
- Handle tube.
- Elements that allow fixing parts of the rod.
- Metal rods, plates, loops.
- Electric arc welding machine.
- Compositions that protect metal from corrosion.
Method of fastening knives
Removable bolt-on blades
If it is planned to drill wells of different diameters, then the blades on the tool can be made of a removable type. For this purpose, two shelves are welded to the rod and knives are bolted to them, as shown in the top photo.
The optimal angle of attack is 30-40⁰
If you are not going to change the diameter of the blades, then the best option is ø120 mm, and for this, a saw or trimming disc ø125 mm (5 mm width of diamond coating and it will no longer be there) is ideal, which needs to be cut into two semicircles. The ø22.5 mm seat will have to be adjusted to the rod, cutting off the excess by electric welding. For soft soils, the angle of attack is usually 30⁰, and sometimes even 40⁰, but for hard soils it is better to lower it to 22-25⁰.
Components of a garden auger: 1) rod with a point, 2) cutting discs, 3) handle for rotation
Here is a drawing of a homemade garden auger with ø120 mm blades (the diameter of a used cutting disc for diamond-coated concrete). Below is a video on how to make such a tool:
Video: Do-it-yourself garden drill in a home workshop
How to make an earth drill yourself
With a little effort and strictly following the requirements of the step-by-step instructions from the masters, you can make a bracelet with your own hands in a matter of hours.
Selection of materials
To assemble the blanks for the main elements of the drill, you will need:
- For the rod. Round or square pipe. Size - 20*20 mm, 35*35 mm.
- For blade knives. Sheet steel 4 mm thick or a saw blade from an angle grinder or circular saw (optional). Below we will consider the use of each of them.
- For the pen. Round pipe. The diameter is selected according to the circumference of the palm.
- For the pike. A sharpened large diameter reinforcement rod or steel strip is used. A combination of both materials is allowed.
It is better to work with metal wearing protective gloves and goggles.
Tool preparation
The list is like this:
- welding machine with electrodes, protective mask;
- grinder with disc attachments;
- electric or hand drill;
- hammer;
- sharpener;
- vice;
- mites;
- marker, tape measure;
- compass.
For anti-corrosion protection of metal, a primer and a brush are purchased separately.
Drawing or diagram
First, it is recommended to draw a basic diagram of the future product, which will become a template and simplify the assembly process.
Scheme.
1 – steel rod; 2 – welded half-disk knife; 3 – crossbar-handle; L – depth of the hole to be punched. Here, each master makes a drill for himself, selects the dimensions, material, type of construction, calculates the material consumption and its cost. The finished product can be improved during use.
Drill assembly
It is necessary to analyze which blades it needs to be equipped with: stationary or removable.
Stationary blades are simply welded to the rod.
To make them removable, you will need:
- Weld shelves made of thickened steel on one side of the shaft.
- Make them so that the knives diverge at an angle of 25-30 degrees.
- Make 2-3 holes in the shelves for fasteners and 2-3 holes in the blades of the same diameter.
- Secure the blades with a bolted connection.
In both cases, holes must be made in the middle of the blades so that they are tightly connected to the shaft.
Made from sheet steel
To start, it’s easier to cut out a sketch from white paper. After which a circle of steel of suitable diameter is cut along it. A hole is made in the center in the form of a square or circle, depending on the cross-section of the pipe for the shaft. The hole size is taken slightly larger than the rod for ease of welding.
Blades are made in two types:
- From two halves of a circle.
- From an open circle, where the edges shift, resembling a spiral turn. To increase drilling efficiency, the edges are placed at an angle of 25-30 degrees from each other.
This drill is recommended to work on light, soft soils. On dense loams and rocky soil, the blades will begin to deform under load. The reason for this is the use of non-hardened steel. The solution is to reinforce the blades with metal corners.
Auger drill
Schematic diagram of the manufacture of an auger drill
Now let's figure out how to make an auger drill for drilling holes for pillars with our own hands. Such a tool does not have to be removed from the hole every 5-10 cm of passage, since the soil dump moves during rotation to the upper blades of the auger. This significantly speeds up the process, but working with it requires a lot of physical strength, so in most cases such installations are used in conjunction with an automated drive.
All disks are clamped in a vice and the same sector is cut out for rotation
Now the most crucial moment: you need to cut out a trapezoidal sector from all the disks folded together, although these inclined ones will intersect in the center, forming an acute angle.
The bottom line is that when turning each upper disk, the left edge of the cut sector should coincide with the right edge of the lower one. It is, of course, better to first do such things on paper and if everything matches, transfer the markings for cutting to the metal. The number of screw turns will correspond to the number of disks.
Now the welding work begins:
- you place a disk on a plane, and put another one on top of it, but in such a way as to overlap the cut sector, that is, the left edge of the upper one should adjoin the right edge of the lower one; this joint is welded by electric welding and the next disk is placed on top, acting on the same principle; so all the disks are joined and welded, making a compressed spring out of them.
The compressed spring is stretched using a winch
Upon completion of the welding work, this homemade spring needs to be stretched to form a screw.
To do this, the assembly is put on a rod and the lower disk is welded at the desired angle, for example, 30⁰, and something like a ring can be welded to the upper disk so that it hooks onto the winch hook. The rod is fixed on the floor (figure out how to do this yourself - circumstances vary) and the spring is stretched with a winch, after which the upper disk is welded. The rod is released and the entire structure is scalded in a spiral.
Video: Making an auger drill