We build iron barns with our own hands - technology
The structure can be either prefabricated or permanent. There is a separate solution for those who have chosen the capital option.
Work begins with the concrete floor. It is poured onto the surface of the base, the preparation of which is carried out in advance. But the construction of wooden flooring is also allowed.
Floors made of planks require a special approach.
- You need to take a profile pipe with thick walls, with a cross section of 60 by 40 or 60 by 60 mm.
- You will also need a corner whose wall thickness reaches 4-5 millimeters.
The parts can be either metal or wood. They will be needed when we start building a barn frame from a profile pipe with our own hands.
It is possible to create a floor where there are no logs if the structure is small in size. The strapping consists of corners with a thickness of 4-6 mm, with a side of at least 10 cm. The boards will then rest on the shelf of the corner.
The main thing is that the thickness of the board is at least 4 cm. Additional support is needed if the span is large enough. To do this, it is enough to take a profile pipe whose diameter corresponds to the characteristics.
Building an iron frame barn without welding: video
Not everyone knows how to weld, but drilling holes and bolting two elements together is much easier. The video shows the entire process of assembling a decent-sized shed from a profile pipe with bolted connections. Welding is used once: the hinges are welded. You can't get by with bolts here.
DIY barn: frame, wooden, step by step, photos and videos
Kits and kits for drip irrigation: manufacturers and reviews
Metal body and wooden floor
A prefabricated metal structure, like a collapsible one, is made from wall frames. They are welded separately. Bolts are used for connection.
The main thing is that the thickness of the board is at least 4 cm. Additional support is needed if the span is large enough. To do this, it is enough to take a profile pipe whose diameter corresponds to the characteristics.
Metal body and wooden floor
A prefabricated metal structure, like a collapsible one, is made from wall frames. They are welded separately. Bolts are used for connection.
Profiled sheets are used as cladding. It is quick and easy to install with your own hands. It is also recommended to make the roof using corrugated sheets.
Such structures are easy not only to build, but also to dismantle if necessary. They are placed for one season at dachas, which are not additionally protected in any way.
In addition, the industry produces ready-made metal structures that can be assembled on site, like a construction set. They are produced by both domestic and foreign manufacturers, including Chinese.
We build a shed using a metal profile
For example, let’s build a building with our own hands measuring six and a half by four meters. The wall at the front has a height of 2.5 meters. The wall at the back is slightly smaller – 2.15 m.
It is advisable to make the floor concrete. This is true if nothing is stored inside, only tools. Next, we build a shed from a profile pipe.
We take racks made of steel round pipes with a diameter of 6 cm. Such pipes are easy to find in private households, but you can choose other diameters. A profile pipe with a rectangular cross-section is used to create a rack with intermediate piping.
Its diameter is 40 by 20 millimeters or 40 by 60. The walls should be the same thickness up to 2 millimeters.
Consumables will be as follows:
| Name of material | Flow (meters) |
| Pipes of round shape and diameter | 32 |
| Profile with large diameter | 21 |
| Smallest diameter | 156 |
| Corrugated sheeting for profile | 4 sheets with a 3.5-meter length, another 4 sheets of 4 meters. |
| Fence profile with C8 galvanization | For the walls you will need - 4 sheets of 2.15 meters, 16 sheets of 2.5 meters |
These materials are needed only to build the frame. Don’t forget about fasteners for concreting and other types of consumables.
- For the sheathing you need a set of wooden slats. You need to take 6 of them with a length of 6 meters. The diameter should be within 5 by 2.5 centimeters.
- Welding is not complete without electrodes and rivets; you will also need self-tapping screws.
- 1 roll of materials with waterproofing properties is required.
- Gravel in the amount of 7 tons.
- Cement, in 16 bags.
This is part of the answer to the question of how to build a shed from a profile pipe.
Which profiled sheet to choose for building a utility block
A utility block is, albeit a small, but separate building. Therefore, to sew it, it is better to take corrugated sheeting with a wave height of approximately 20 mm. These are brands C20 and C21. Such a profiled sheet will provide the structure with sufficient rigidity so that the building does not become easy prey for intruders and can withstand strong winds and hail without deformation. We do not recommend sheathing outbuildings made of metal profiles for a dacha with wall grade C8 - such a sheet can be bent literally with your bare hands and gain access to the contents of the barn. In this case, the savings will be minimal, since little material is needed to cover the building.
Is it possible to use C8 corrugated sheeting?
Choose brands of corrugated sheets with a minimum wave height only if you are not concerned about the possibility of theft.
But for the roof it is still worth using C21 corrugated sheeting or brands with greater load-bearing capacity. As for the coating, everything is clear: for outbuildings it is optimal to use a profiled sheet with a polyester protective layer. This material is a little more expensive than standard galvanizing, but it lasts 3-4 times longer and looks better. But a utility block made of corrugated sheets coated with pural or PVDF is exotic, which makes real sense only in places with an aggressive climate: on the coasts of salt water bodies, in areas with frequent sandstorms, in areas near chemical plants.
Types of polymer coatings for corrugated sheets
Detailed description of polymer coatings with parameters.
Simple tips on how to make sure that the polymer coating is of high quality and how to keep it intact during installation. It is desirable that the length of the corrugated sheets be equal to the height of the walls of the utility block and the length of the roof slopes. Firstly, this will greatly facilitate the installation of the corrugated sheet, and, secondly, it will significantly reduce the number of places through which water can flow into the building.
Top ↑
We build a shed using a metal profile
For example, let’s build a building with our own hands measuring six and a half by four meters. The wall at the front has a height of 2.5 meters. The wall at the back is slightly smaller – 2.15 m.
It is advisable to make the floor concrete. This is true if nothing is stored inside, only tools. Next, we build a shed from a profile pipe.
We take racks made of steel round pipes with a diameter of 6 cm. Such pipes are easy to find in private households, but you can choose other diameters. A profile pipe with a rectangular cross-section is used to create a rack with intermediate piping.
Its diameter is 40 by 20 millimeters or 40 by 60. The walls should be the same thickness up to 2 millimeters.
Consumables will be as follows:
| Name of material | Flow (meters) |
| Pipes of round shape and diameter | 32 |
| Profile with large diameter | 21 |
| Smallest diameter | 156 |
| Corrugated sheeting for profile | 4 sheets with a 3.5-meter length, another 4 sheets of 4 meters. |
| Fence profile with C8 galvanization | For the walls you will need - 4 sheets of 2.15 meters, 16 sheets of 2.5 meters |
These materials are needed only to build the frame. Don’t forget about fasteners for concreting and other types of consumables.
- For the sheathing you need a set of wooden slats. You need to take 6 of them with a length of 6 meters. The diameter should be within 5 by 2.5 centimeters.
- Welding is not complete without electrodes and rivets; you will also need self-tapping screws.
- 1 roll of materials with waterproofing properties is required.
- Gravel in the amount of 7 tons.
- Cement, in 16 bags.
This is part of the answer to the question of how to build a shed from a profile pipe.
Instructions on how to build a barn with your own hands
Work begins with marking the site. You need to drive pegs in the corners, and then check the diagonal. The twine can then be pulled only if everything turns out smooth.
This detail is important for marking the places where the racks will be installed. Mines up to 60 centimeters deep are made in places marked with a drill.
Metal pipes are placed in them. We take a concrete solution of at least M200 grade and fill it all in.
How to build a garage with your own hands (base for a garage)
The racks are poured in the corners immediately after installation. Fishing lines are tied to them when the concrete hardens a little. They should be both below and above. The rest are aligned according to the first parts fixed in place.
Next, the metal frame is welded. A 60 by 40 mm pipe is welded at the top of the structure. Its wall thickness is 2 millimeters. On the corner pipes it is necessary to mark the level where the floor will be located.
We use a hydraulic level to transfer marks to other parts of the structure. Based on these marks, the twine is tied. Then everything is transferred to other racks.
A 40 by 20 millimeter pipe is tied around the perimeter, the main thing is to comply with the markings. The cross members are welded in the middle following the same principle. You will definitely need two pipes. At this stage, the metal frame for the shed can already be considered assembled.
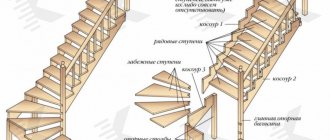
Technology for self-construction of a metal shed
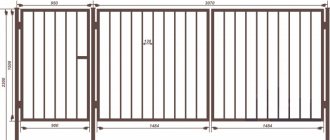
Drawing of a barn with a pitched roof
Assembling a shed from corrugated sheets and metal profiles with your own hands is not so difficult, especially if you have a drawing. However, if the block is completed independently, the ability to work with a welding machine is required.
- Mark the area using wooden pegs. The earth on the site is compacted.
- Recesses are made along the perimeter of the site in the corners and along future walls in increments of 1.5 m. The stands for the future entrance are placed closer - at a distance of 1.2 m, respectively, and the holes are dug at this distance. Depth – up to 60 cm.
- Vertical posts are installed in the recesses and concreted. After the concrete has set, the bottom trim is welded.
- If the structure is not permanent, the lower frame is first assembled, and vertical posts are welded to it. In this case, the main load falls on the lower trim.
- The upper ends of the racks are tied together with the upper strapping. Weld the cross members in pre-marked places.
- If a floor is provided, transverse joists are placed on the lower frame: iron ones are welded, wooden ones are bolted.
- Usually the barn is equipped with a pitched roof. To achieve this, walls are built at different heights. Then the logs are welded from the highest wall to the lowest. If they make a gable roof, it is assembled on the ground. First, the trusses are welded. Then they are placed on horizontal crossbars, and then the entire structure is lifted and installed on the top frame.
- After welding work, the metal structure is primed.
The walls are sheathed with corrugated sheets. Install the sheet so that the relief strips are placed vertically - this facilitates water drainage. Screw the sheets with self-tapping screws to the vertical and horizontal crossbars. The flooring is laid out according to the wave.
The roof is laid in the same way.
If you want to insulate a barn for your dacha using metal profiles, do it from the inside. Insulation is attached between the joints of the frame, waterproofed, and then sheathed with clapboard, boards, and plywood.
Building further - next steps
Then the guides for the roof are assembled with your own hands. First, the metal structure is welded on the ground, and then attached to beams that are opposite each other.
Next, they proceed to welding pipe sections with a transverse arrangement, the diameter of which is 40 by 20 millimeters. You need 10 such parts. After this, the metal frame is completely ready.
After this, you will need a primer; it will help the shed not rust.
The concrete floor is prepared separately. It all starts with the installation of formwork. It is placed outside the frame, retreating 10 cm. The boards are secured with pegs. And they prop it up using bricks. Then the concrete will not put pressure on the structure or push it apart.
We build further - we prepare the foundations.
- Broken brick or crushed stone is driven into the prepared area.
- An ordinary mallet is also suitable for this.
- We lay broken bricks on the surface of the soil and drive them into the ground.
- The result is a more rigid foundation. In addition, after this, the adhesion between level ground and soil improves.
The beacons are placed in a solution that is still thick. These are smooth slats in the form of boards, with a diameter of 25 by 50 mm. They are aligned using a special fishing line.
We mark several points at the ends of the harness below, located on opposite sides. You need to stretch the fishing line between them. Beacon panels are placed along it after the horizontality has been checked.
What other steps are necessary to build a shed from a profile pipe?
You need to wait a little until the solution on the surface of the beacons becomes dry. Then everything is filled with concrete, grade M-250.
Do-it-yourself garage made of corrugated sheets
- They proceed to installing the corrugated sheet casing with their own hands. It's better to start with the main part of the roof. Laying a film with waterproofing properties is the first step, then water will definitely not get on your head.
- First comes one panel, and on it comes the next one. Step – 10 cm. For gluing, use tape with two sides.
- Waterproofing spreads gradually, starting from the bottom and ending with the top.
- The next step is the installation of the profiled sheet itself. The main thing is to position the first sheet correctly, this applies to any sheet material. Further work in this case will go easily and smoothly. For measurements, squares, rulers, and so on are used.
- The sheet is screwed with self-tapping screws after it is exposed.
- Approximately the same principle is followed when it comes to side cladding.
It can take up to 20 screws to attach one sheet.
What's in the final stages?
A frame for a door is welded from a profile pipe 40 by 20 millimeters (find out how to properly weld professional pipes - video instructions). Hinges cannot be attached to the structure without welding either. The door can be sheathed separately from the other parts, and then hung in finished form. The edges of the barn are lined with a metal corner. The sheet itself is placed on rivets. This is necessary not only for decorative purposes, but also to cover any possible cracks.
As a result, the room turned out to be 26 square meters. This is a more than impressive area. As you can see, building everything with your own hands is not so difficult.
Do-it-yourself metal shed made of corrugated sheets: photo
They were built from pipes of different sections and corrugated sheets, with a pitched roof. The dimensions of the barn are 6.5 * 4 meters, the height of the front wall is 2.5 m, the back wall is 2.15 m. The floor is made of concrete: in winter there will be nothing except tools and there is no need for a warm floor.
Materials
Racks made of round pipes with a diameter of 61 mm. They were chosen because they were on the farm. Trim and intermediate posts made of rectangular-section pipe - profile (60-40 mm and 40*20 mm). The wall thickness throughout is 2 mm.
Consumption for pipes: round 32 m, profile larger section - 21 m, smaller - 156 m. MP-20 roofing sheeting took 4 sheets 3.5 m long, and 4 - 4 m each, galvanized fence C8 - 4 sheets for the walls 2.15 m each, 16 sheets of 2.5 m each. This is a list of materials for the frame. And also fasteners and consumables for concreting:
- 16 bags of cement;
- 7 tons of gravel;
- waterproofing (1 roll);
- self-tapping screws, rivets, electrodes for welding;
- Wooden slats for sheathing: 50*25 mm - 3 pcs. 6 meters each.
The list of building materials turned out to be impressive. But the price of such a barn is still cheaper than a brick one.
Step by step construction
Start of work - marking the site. Pegs are driven in at the corners and the diagonals are checked. If they are even, the twine is stretched, and the locations for installing the racks are marked along it. In the marked places, shafts with a depth of 60 cm are made with a drill. Pipes are placed in them and filled with concrete mortar (M200).
First, we placed and poured the racks in the corners. When the concrete had set a little, fishing lines were tied to them - at the top and bottom. The others looked up to them.
The pipes are exposed and concreted
The next stage is welding the frame. A 60*40 mm pipe with a wall thickness of 2 mm is welded onto the top of the pipes. Next, mark the floor level on one of the pipes in the corners. Using a hydraulic level, we transfer it to the remaining corner posts. At these marks we tie the twine and transfer it to all the posts. According to the markings, we weld a 40*20 mm pipe around the perimeter. Using the same principle, we weld the cross members in the middle: two are definitely needed. So that a walk-behind tractor or wheelbarrow can easily enter the doors, they are made wide and high - 1.2 * 2 meters. The base of the metal shed has already been assembled with your own hands.
Frame for a metal shed
Next comes the assembly of the roof guides. Three trusses 6.5 meters long were needed. They were welded on the ground, then welded to the opposite beams. Then we welded transverse sections of pipe 40*20 mm (10 pieces). The frame of the metal shed is completely ready. The next step is priming to prevent it from rusting.
Next we started making the concrete floor. First, the formwork was installed. They placed it outside the frame, retreating 10 cm. They secured the boards with pegs and propped them up with bricks so that the concrete would not move apart. Next, we prepared the base. Crushed stone and broken bricks were driven into the ground. They literally hammered it in - with a rubber mallet. A piece of brick is placed on the ground and knocked until it is almost completely hidden. This makes the base more rigid, and the uneven surface adheres to the ground better.
Installed formwork
Afterwards, beacons were placed on the thick solution - even slats (25*50 mm board), they were aligned with the fishing line: points were marked at the opposite ends of the lower harness and the fishing line was pulled between them. After checking its horizontality, beacon strips were placed along it.
Beacons were placed on broken bricks hammered into the ground
After the mortar on the lighthouses had set, they were poured with M-250 concrete (read about concrete grades and their composition here). They were leveled using the rule according to the exposed beacons and pipes of the lower trim, which were placed at the same level.
This is what a concrete floor in a barn looks like after the mortar has set.
Next, the installation of the sheathing began - corrugated sheets. We started from the roof. To prevent condensation that will form on the metal from dripping onto your head, first lay a waterproofing film on the frame. It is laid with one panel overlapping another by about 10 centimeters, gluing them together with special double-sided tape (sold in the same place where the waterproofing is sold). It is better not to use ordinary plastic film: it does not last longer than several years - maximum -3-5.
Laying the waterproofing begins from the bottom, moving upward, gluing the panels. It turns out that a drop falling from above flows down to the very bottom. The strips were cut longer than necessary and hung a little at the edges (30 cm each) - so that water would drain from them and snow would not get into small gaps during a side wind.
Next, the installation of the profiled sheet began. When laying any sheet material on the roof, it is important to position the first sheet correctly. Then everything will go on easily. Therefore, we carefully measure all the protrusions with squares, rulers, etc. When the sheet is exposed, it is screwed with self-tapping screws. They are placed in a wave - in a ledge. This way there is less chance of water getting into the hole.
With the cladding of the sides, everything is approximately the same, you just have to trim the top sheets because of the slope. You set the first one exactly, then everything goes like clockwork. The new sheet is aligned with the wave and fastened. It took about 20 screws to attach one profiled sheet.
Do-it-yourself ready-made shed made of metal (corrugated sheeting)
The door frame was welded from the same 40*20 mm profile pipe, and hinges were welded on. When covering the door, it was removed and sewn up on a flat surface, hanging it ready-made.
You can read about the construction of sliding gates here.
The metal shed was sheathed in the corners with metal corners. It is mounted on rivets. It serves for decorative purposes, and also closes small gaps that formed during joining at the corners.
The result was a more than capacious structure - 26 square meters. It can be used to store equipment and building materials, dedicating a part to a workshop. This is if it is located on a plot near the house.
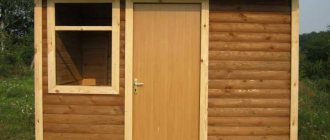
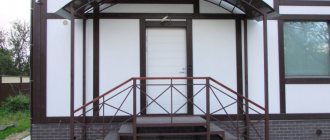
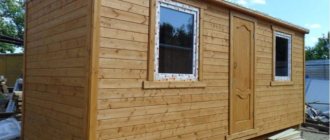
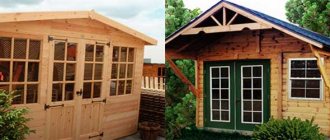
For a dacha without security, a metal shed is a risky business, unless you cover it with wood on top. Then you will have to attach the wooden sheathing to the frame (pictured below).
A barn with wooden cladding on a metal frame is built like this
You can read about the construction of a wooden shed here.