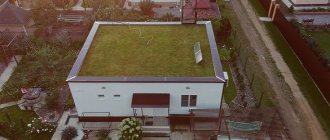
A brick house is strong and beautiful, but... A brick wall is heavy, so it requires a strong foundation. Brick does not hold heat well - it needs to be insulated. There are other additional costs. In general, it's expensive. There is an option to make a structure from timber and cover the house with bricks. It will turn out strong, beautiful, prestigious and... much cheaper.
In this article we will tell you how to properly brick a house.
Covering a house with bricks: pros and cons
Brick cladding has many advantages:
- The brick will well protect the timber from the influence of precipitation, wind, sun and other factors that adversely affect the timber.
- Brick creates a good appearance and increases the price of the house.
- Sound insulation is improved.
- Fire safety is becoming better.
Of the minuses:
- The brick will put additional load on the foundation, you will have to make it wider, which will lead to higher construction costs.
- Before doing brick cladding, you need to wait until the timber house has completely shrunk. Depending on the type and moisture content of the wood used, this will take from 3 to 24 months.
Brick selection
The building materials market offers modern craftsmen a lot of brick blocks for decorative and basic monolithic masonry
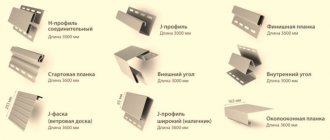
The building materials market offers modern craftsmen a lot of brick blocks for decorative and basic monolithic masonry. There is plenty to choose from. So, you can cover a wooden house with the following types of building materials:
- Ceramic brick. It is made from baked clay and has a medium density. Ceramic blocks can absorb moisture by 14%, which makes them less resistant to water than other types of material. However, ceramic brick retains heat better and is easier to install.
- Sand-lime brick. This type of blocks is less prone to moisture absorption (only 6-8%) and at the same time has a lower cost. Sand-lime brick provides good sound insulation and a reliable, attractive appearance of the house.
- Clinker brick. The most expensive and at the same time material with improved technical characteristics. Blocks are produced by firing at temperatures higher than ceramic bricks (1200 degrees). The blocks are characterized by increased resistance to moisture, frost and ultraviolet radiation.
Important: if the purpose of the cladding is to decorate the house on a low budget, then sand-lime brick is ideal. If there is a desire to strengthen the strength of the building and at the same time provide high-quality heat and sound insulation, then clinker or at least ceramic bricks will be the best options.
Foundation
If, when designing a house, you already knew that you would cover the house with bricks, then you had to make sure that the foundation was calculated both in terms of the width and the weight of the structure.
If the foundation was not originally designed for additional cladding, then it must be expanded. It may also have to be strengthened so that it can withstand the additional load of brickwork. Do not forget to make a blind area around the foundation, which will drain rain and melt water from it. It will also protect against getting wet and accelerated destruction.
First stage
First, you need to understand the scale of the work. To prevent the wood from rotting, there should be a gap of 40–50 mm between the walls of the house and the masonry. If the cladding of a wooden house with brick is accompanied by insulation of the walls, the thickness of the insulation must be added to this gap.
On average, this can be 20–25 cm. This is the size the foundation should protrude from under the walls of the house. You can do without insulation, it's up to you to decide. Then there should be about 15 cm of free space on the foundation. If the foundation of the house does not have the necessary free space for finishing, you need to pour a new one.
And one more important point. Before covering an old house with bricks, you need to measure the roof outlet. The minimum size should be 35–40 centimeters. Otherwise, water from the roof will flow behind the cladding.
Insulation
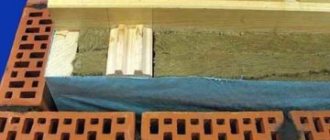
Before facing with brick, it is most likely necessary to insulate the timber walls. By itself, facing brick will not provide almost any additional insulation. If you used timber with a thickness of 150 or 200 mm - this is the most common size in construction, then insulation is definitely necessary.
Of course, first do not forget to treat the timber with antiseptics and fire retardants. Then the walls must be caulked, covered with insulation and windproof film. And after that you can start brick cladding.
What is required and how to apply the lining?
In order to carry out a construction operation according to all the rules, all points should be taken into account:
- A sufficient width of the foundation is required; if it was not originally intended to line the building, the base must be expanded, leaving space for a brick wall, insulation and a ventilation gap;
- It is imperative to use a vapor barrier; it is mounted directly on a log or timber wall, under the insulation;
- The absence of a ventilation gap will lead to the accumulation of moisture on the surface of the thermal insulation material; in the case of using extruded polystyrene foam, this is not critical, but more natural mineral insulation and ecowool are able to absorb water and settle.
For work, it is necessary to use a cement mortar of a grade not lower than M-300 to obtain a reliable and durable wall. If you do not have experience in such work, it is better not to try to do the cladding yourself. Contact specialists who will carry out the work faster and better. A mistake in construction can have very unpleasant consequences.
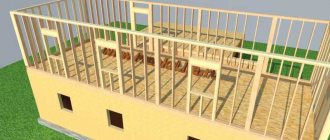
Bundle of timber and bricks
Considering that the brick cladding is made half a brick thick, i.e. by itself it will not be very stable. Therefore, it must be connected to the main timber wall. For this, it is recommended to use welded mesh, usually with a cell of 100 by 100 mm and a thickness of 3-5 mm. Such a mesh must be cut into strips, calculating the width so that on one side it is attached to the beam, and the other side is walled up in brickwork.
Fastening is done through 3-5 rows of bricks, starting from the bottom row and ending with the top one. Such a bond will firmly connect the walls and, at the same time, will not interfere with the timber wall slightly changing its dimensions. And this happens periodically as a result of changes in the humidity of the wall, along with the humidity of the environment.
Wall masonry
Before starting laying, the walls should be prepared. The preparation process includes preliminary cleaning of dust, dirt, and moss. All hanging structures and iron objects are dismantled. After this, they move on to treating the wood with protective materials. Antiseptic treatment is carried out carefully and several times, this will prevent damage to the wood by fungus, mold and various pests. To insulate the walls, you can use mineral wool slabs, but this is at the discretion of the owner.
After all the preliminary work has been carried out, they proceed to lining the walls. To do this, we prepare a cement mortar; the optimal ratio will be one to four. The first layer is laid on the previously laid waterproofing. Waterproofing is usually made from roofing felt; it is enough to lay it in two or three layers. The masonry is not carried out closely; it is necessary to make an indentation of six centimeters from the wall to create natural ventilation.
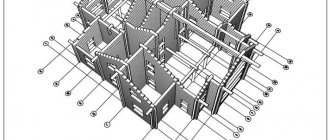
Scheme of facing a wooden house with bricks
Laying the first row will require special care and precision. Any deviations are not allowed; everything must be carefully verified by level and vertical plumb. If these conditions are not met, serious discrepancies and uneven walls may result at the end of construction.
In the second row of masonry, a space is left between the side joints of the brick that is not filled with mortar - this is natural ventilation. The same holes will need to be made in the upper part of the wall in front of the roof. A drainage hole is made in the first row of masonry, it is then covered with a fine mesh to prevent the penetration of pests.
Features of wall lining
The construction of walls is a simple process; it is performed in the same way as conventional brick partitions. But there are some differences and features. If the outer wall is a front wall and no additional processing is expected, the lining is immediately cleaned. All remaining mortar should be removed in a timely manner; it is better to rub the seams with a special device - jointing. The seam itself must be perfectly even; each row is checked with a level and plumb line. To strengthen the walls, a reinforcing mesh is used; it is enough to lay it through three or four rows of masonry.
Strengthening walls
Be sure to connect the brickwork to the wall of a wooden house. This is done using pins, plates, nails or anchors. Part of the metal structure is firmly attached to the wooden wall, and the other is fixed in the masonry. You can treat the metal with an anti-corrosion coating, this will increase the service life of the fastener. The distance between fasteners can be from half a meter to 70 centimeters.
Bricklaying
Before laying the first row of bricks, it is necessary to waterproof the foundation by covering it with special bitumen mastic and covering it with roofing felt or other similar material. Then the laying begins.
As already mentioned, the thickness of the wall is half a brick. Rows of bricks are laid in a checkerboard pattern on a cement-sand mortar.
The thickness of such a wall is 120 mm. Remember that this wall should not be used as a load-bearing wall, because... not intended for this. Therefore, the rafter system, ceilings, etc. should not rest on it.
Calculation of material quantity
Before carrying out facing work, the need for brick material should be determined. A stock created in advance will allow you to avoid unpleasant surprises.
The standard calculation scheme is carried out according to the principle of the need for stones per square meter of masonry. As a rule, from fifty to fifty-five stones are needed to finish such an area. In this regard, we find the area of all external walls, sum them up, subtract window and door openings, multiply the resulting value by the number of bricks required per unit area. After this, we add a margin of ten to fifteen percent for pruning and unexpected combat.
Masonry mortar is determined at the rate of two kilograms per square of masonry. This mixture is made of river sand, lime and cement material, taken in a ratio of 9 to 2 to 1. The ingredients are mixed and diluted with water until the required plasticity is obtained.
Ventilation gap
To prevent the timber and insulation from becoming damp, rotting and mold, it is necessary to leave a ventilation gap between the timber wall covered with insulation and brick, where the air can move freely, taking moisture with it.
Special openings are made in the top and bottom rows of brickwork for free air circulation. Such openings must be covered with rodent bars.
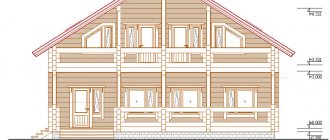
By facing a house made of timber with brick, you can make the house beautiful and durable like a brick one. In this case, you will spend significantly less money.
Advantages of stone cladding
A timber house lined with brick) has a number of advantages obtained as a result of this type of finishing
A timber house lined with brick) has a number of advantages obtained as a result of this type of finishing:
- Brick lining provides durable protection for a wooden house from adverse influences.
- Effective insulation of the structure allows you to save on heating costs.
- This cladding gives the building a solid appearance. Using bricks of one type or another and decorative finishing, it is possible to give the house originality.
- The fire safety of the building increases.
- A house made of timber, lined with brick, has not only good thermal insulation, but also sound insulation.
Beginning of cladding
It is best to cover a built house with bricks one and a half to two years after installing the walls under the roof. During this time, almost all shrinkage deformations will occur during natural ventilation, and the timber will dry out during this time. From the outside, be sure to treat it (immediately after completion of construction) with antiseptic impregnation and fire retardants to protect it from fire.
Foundation
To drain groundwater from the building, a concrete blind area must be installed
Facing a wooden house made of timber with bricks is an additional load on its foundation. Therefore, it must be initially prepared for it: have the required size, take into account the soil conditions on the site and the magnitude of the total load. If this was not foreseen in advance, then the existing foundation is strengthened and expanded. To drain groundwater from the building, a concrete blind area must be installed.
Brick cladding of a private house
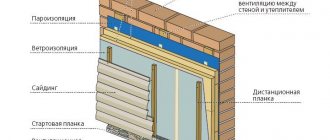
Insulation of timber walls
The energy efficiency of a building can be increased by insulating a wooden wall before cladding. First, it is caulked, then slabs of vapor-permeable heat-insulating material are fixed to it using dowels (fungi) and covered with a windproof film or superdiffusion membrane. The thickness of the insulation is selected based on climatic conditions and the thickness of the wooden wall.
Bundle of timber and brick wall
The walls are fastened to each other using flexible or rigid ties
The walls are fastened to each other using flexible or rigid ties.
In European countries, they do not associate rigid brick cladding with a brick wall, preferring flexible ones. To do this, welded galvanized mesh is cut into strips of 30-40 cm and bent in half at a right angle. One “shelf” of binding is nailed with galvanized nails to a wooden wall. The other is walled up in a horizontal seam of the brickwork.
Instead of a mesh, you can use regular drywall hangers sold in stores. Such bundles will be made every 4-5 rows of brickwork. The step between them is about 1 meter. Fastening the last row of masonry is mandatory. In this case, the multilayer structure can withstand increased loads.
DIY template for laying bricks
Carrying out masonry
The first row of bricks is laid on a layer of waterproofing. This may be roofing felt or other insulating material. The thickness of the walls is half a brick. Cement grade M400 is used as a solution. You can clad the house using either special facing bricks or regular bricks – silicate or red. To reduce the penetration of moisture through a brick wall, treat it with a moisture-repellent impregnation.
The bottom gap between the rafters and the masonry should be at least 15 cm, otherwise the rafters may hang on the cladding when the building shrinks in winter.
Important! It is worth paying special attention to fastening and sealing slopes and window sills on a multi-layer structure.
Features of brick cladding
Before purchasing materials and starting work directly, you need to familiarize yourself with all the positive and negative aspects of such finishing, which we will do below. So, a wooden house lined with bricks – the pros and cons of such a solution:
| Qualities | Features of cladding |
| Positive | Brick cladding has quite a lot of positive qualities:
|
| Negative | As for negative qualities, among them are:
|
Advice! Many home craftsmen, in the process of renovating a house, also remodel it, as a result of which they often ask on forums how to lay brick on a wooden floor in order to build a partition. However, experts for a number of reasons do not recommend doing this, even if the floor boards are strong enough.
Facing brick
Foundation and preparation for work
Cladding the foundation
Cladding a house with bricks with your own hands is a difficult task, but with certain skills and in accordance with technology, this type of work can be quite feasible. The first stage of any construction is laying the foundation. If the house has a wide base, then this stage may not be necessary, but in 99% of cases, wooden houses have an extremely weak base, and it is impossible to do without expanding the foundation.
It is necessary to dig a trench along the perimeter of the entire building, the depth of which will be 50 cm and the width 30-40 cm. The width depends on whether a layer of thermal insulation will be laid; if so, the base should be wider. A depth of 50 cm is applicable for a one-story building, and if the house has 2 or more floors, then accordingly the depth of the foundation should be much greater.
At the second stage, wooden formwork is installed along the entire perimeter of the trench, after which the lower part of the ditch is covered with a layer of sand and crushed stone. The height of this substrate should be about 20 cm. After this, 2 layers of connected reinforcement are laid in the trench. All that remains is to fill everything with concrete. It is recommended to fill in one go. Do not forget about the process of compacting concrete; this is necessary in order to remove air bubbles from the solution. You can’t start the main type of work right away. The concrete must harden completely, which usually takes about 1 month.
The preparation process for cladding consists of several stages:
- It is necessary to dismantle unnecessary elements, such as lining, platband, etc.
- Next, you need to clean the surface of the building from dirt, moss and paint.
- The next step is to treat the surface with special antiseptic agents that prevent the formation of mold and rot.
After completing the work to strengthen the foundation, you can begin the main stage of work.
Types of material
On the construction market, timber is presented in three types: regular (solid), profiled and glued. Each of them has its pros and cons, and also affects the construction features. To make it clearer, let's take a closer look at each type.
- Ordinary. In essence, it is a log, planed on four sides to give it a square or rectangular cross-section. This material is the easiest to buy: it is cheaper and does not suffer from inaccessibility. But you will have to stock up on time, since wood cannot be dried; the built walls will shrink, which can last from 6 months to a year. And only then can you start building the roof. In addition, the wood must be planed yourself or, as an option, the walls must be finished. Another disadvantage is the inaccuracy of dimensions: the cheaper the beams, the more the size will not comply with GOST. Therefore, it is necessary to lay jute insulation between the crowns. However, if separate insulation of the walls is provided, then this beam is most suitable.
- Profiled. This type has a more complex cross-section, thanks to which the elements are securely connected, forming protected joints. It is easier to build houses with such timber, since it has precise dimensions, down to millimeters. This is one of the reasons for the increased cost, because such precision requires money. In addition, the wood undergoes drying, and this requires either large areas that need to be maintained, or special chambers with heaters, which are expensive and also require maintenance. On the other hand, walls are built faster. Material with a tongue-and-groove system also requires the installation of insulation, although this in itself eliminates ventilation in cases where the house is a little windy. But the analogue with the “comb” system does not require insulation between the crowns at all.
- Glued. The most expensive, but the most reliable option. If the previous two types represent a planed log, here it is cut into boards, which are chamber dried, and then processed and glued. Since laminated veneer lumber is not solid, it is not subject to cracking, which cannot be said about regular and profiled timber. The material also has precise dimensions and complex geometries for joining. In addition to the price, this analogue has one more drawback: the use of glue reduces its environmental friendliness.
Advantages of brick cladding
The main advantages of the brick lining of a wooden house are:
- Good thermal insulation and sound insulation properties . Brick holds various sounds and heat well. Moreover, it can be combined with other types of insulation.
- A durable, flat surface that is resistant to various weather conditions: rain, snow, hail, wind, sunlight, etc. Wood is greatly influenced by all these factors. Therefore, if you do the cladding with the correct preliminary preparation, you can ensure the safety of the house for a long period.
- Reducing the level of fire danger.
- Due to its strength, brick provides the house with an increase in service life without repairs over a long period.
- Saving money due to energy conservation.
- Brick makes a house look more solid. This material is highly valued in the construction market. In addition, the variety of colors of facing materials will make the building different from others.
Connection between brick and wooden wall
In most cases, the facing layer is made up of half a brick, and many are interested in whether it can be connected to load-bearing walls. The answer is unequivocal - yes, because this measure helps to increase the indicator of reliability and stability.
This work is carried out using flexible connections, which are the following materials:
- masonry mesh, the free edge of which should be laid on the brick row (to its middle). Such a mesh is attached to the wall using a strip of tin, bent to form a connection grip and nailed to the wall. By the way, this method allows us to partially solve the issue of masonry reinforcement;
- You can use regular wire. It is tied to a nail driven into the wall, and the free ends are brought out onto a brick row and bent in different directions.
The need for connections is determined at the rate of five to six elements per square meter of masonry.