An armored belt is a reinforced concrete structure that is designed to strengthen the walls of a house. This is necessary to protect the walls from loads arising under the influence of external/internal factors. External factors include wind exposure, terrain slope/hilliness, floating soil and seismic activity of the earth. The list of internal factors includes all household construction devices used in the interior decoration of the house. If you make an armored belt incorrectly, then due to these phenomena the walls will simply crack, and what’s even worse, they will corrode. In view of this, it is very important to be aware of how to make an armored belt. The types, purpose and method of installation of the armored belt will be discussed in this article.
Tools and materials
Before starting work, you should prepare the following tools/materials:
- Fittings.
- Cement.
- Sand.
- Crushed stone.
- Wire for tying reinforcement.
- Boards.
- Self-tapping screws.
- Brick.
- Shovel.
- Concrete mixer.
- Crowbar/crowbar.
- Welding machine.
To ensure that all the work you perform is done with high quality, we suggest that you familiarize yourself with the techniques for manufacturing reinforced mesh/framework and formwork.
Pouring stages
To be able to remove the formwork, you need to wait 5 days from the moment the solution is poured.
In order for the filling of the armored belt to proceed as quickly and correctly as possible, it is necessary to adhere to the following algorithm of actions:
- The mixture is poured from a height of up to a meter. This will help avoid delamination of the material. If necessary, use a special gutter.
- The solution is placed directly next to the pouring site to avoid hardening of the material. You need to work with concrete at an air temperature of +5, and the break in pouring cannot be more than 2 hours.
- If there is reinforcement in the pouring areas, it is necessary to “walk” by tapping.
- The armored belt is covered with film from rain, and in hot weather it is periodically irrigated with water.
- Using reinforcement, the concrete is leveled in width.
- Water until completely set.
- After 5 days, remove the formwork and lay the floor.
With correct calculations and following the filling rules, you can get a high-quality armored belt. If you have no experience in creating a solution, you should seek help from professionals, since an incorrectly made reinforcing belt can reduce the quality of the structure. When choosing components for an armored belt or purchasing ready-made material, pay attention to the quality of the components and whether the seller has a certificate.
Manufacturing of reinforcing mesh/frame
In order for the reinforced belt to be of high quality, and therefore the house to be reliable, you need to know how to properly make the reinforced mesh/frame. The connection of the reinforcement bars to each other is carried out using a knitting wire, and not a welding seam. This is due to the fact that during welding, the area near the seam being made overheats, which leads to a weakening of the strength of the reinforcement. But you can’t do without welding seams when making mesh. The middle and ends of the frame are welded, while the remaining connecting nodes are tied together.
The frame is laid in an armored belt.
The rods are fastened to fix the reinforcement in the required position when pouring concrete. For these purposes, thin wire is used; the strength of the mesh/frame does not depend on it.
For the manufacture of armored belts, only ribbed rods are used. Concrete clings to the ribs, which helps to increase the load-bearing capacity of the structure. Such a belt can work in tension.
To make a frame, take 2 wires 12 mm thick and 6 m long, while for transverse reinforcement you will need rods 10 mm thick. The transverse reinforcement should be welded in the center and edges. The rest of the rods are simply knitted. After making two meshes, hang them so that a gap is formed. Weld them from the edges and in the center. This way you will have a frame. There is no need to weld the frames to make the belt. They are laid with an overlap of 0.2–0.3 m.
How is the Mauerlat attached to the armored belt?
The answer to the question of how to make an armored belt depends on what part of the structure it is intended for. One of the most demanding and difficult tasks can rightfully be called the creation of a unloading belt constructed for the installation of a power plate.
The height of the structure should not exceed the thickness of the walls, the optimal value not exceeding 250 mm. Concrete grade M250 is preferable. In this case, it is necessary to ensure a reliable connection of the elements.
The simplest option is studs (12-16 mm) with threads at the end. They are attached to the reinforcement cage before pouring concrete. The distance between the vertical elements should be the same (1000-1500 mm). But these are not all the features of the work.
- To prevent the solution from accidentally getting on the threads when pouring concrete, all studs are wrapped with plastic (for example, food) film. If necessary, fix the material with wire. Another option is to use tape.
- In order to prevent corrosion processes, part of the studs, which will be hidden in the thickness of the concrete, is protected with paint. It is better to use the composition that is intended for metal.
The pitch and location of the fastenings must be calculated so that they are located exactly in the middle between the rafter legs. Otherwise, unexpected problems may arise during the construction of the roof. The length of the outer part of the studs must be sufficient so that after installing the Mauerlat it is possible to screw on 2 nuts and one washer. For example, 50 mm is enough.
Formwork
Installation and fastening of formwork is carried out using several methods. To install wooden panels, you need to pass anchors through them and install plugs on them using electric welding. The purpose of these actions is to fix the formwork in such a way that it is not squeezed out under the weight of the concrete.
To secure the formwork when pouring an interfloor armored belt, a simpler method is often used. A screw with a diameter of 6 mm and a length of 10 cm should be fixed to the bottom of the shield. The distance between them is 0.7 m. So, attach the wooden shield to the wall, drill a hole through it, insert a mushroom into it and drive the screw.
The hole in the shield should be slightly larger than 6 mm in diameter. This is necessary in order to easily install the fungus.
Wooden formwork
The upper part of the formwork is also secured with quick installation. But in this case, you should screw in a self-tapping screw, not a screw. So, make a hole in the face brick. Then drive the reinforcement into it. If the brick is solid, then the situation is simpler - just drive a nail/reinforcement into the vertical seam. Tighten the self-tapping screw and reinforcement with binding wire. The distance between fastening elements is 1–1.2 m. Such fastening is capable of withstanding the upcoming loads.
After the armored belt has hardened, the formwork can be removed using a crowbar/nail puller. In the warm season, concrete sets within a day. In this case, the dismantling of the formwork can be carried out the next day. During the cold season, this procedure is carried out a few days later.
Material calculations
Most often, the amount of required materials per 1m3 of the finished mixture is calculated.
A special calculator will help you figure out how much concrete is needed for an armored belt. But you can also do the calculations manually. The calculation is made for a cube of concrete. It must be remembered that water and sand remove air from the crushed stone, remove bubbles and give a different weight. To do this, you need to know exactly the following parameters:
- brand of cement;
- required plasticity and strength of the solution;
- characteristics of fillers;
- the right ratio.
The materials are best combined with each other in a concrete mixer.
To make the fill, Portland cement PC 400, sand or gravel with a fraction density of up to 20 mm is used. In order for the mixture to turn out to be of high quality, it is necessary to adhere to exact proportions. It is better to mix the components in a concrete mixer. When producing it yourself, you need to make a mixture that will last exactly for a day, since on the second day it is no longer possible to use the prepared ingredients - the material will harden over time. In this case, it is necessary to remember about the frost-resistant additive, which will improve the quality of the solution. For 10 kg of cement you need a kilogram of an additional component. For 1 m3 of M200 concrete, materials are mixed in the following proportions:
- cement - 280 kg.
- sand - 0.5 m3;
- crushed stone - 0.8 m3;
- water - 140 l.
An armored belt 10 m long, with channels 100 mm wide and deep will require 100 liters of concrete. Based on this, you can calculate the required amount of material for construction.
Grillage
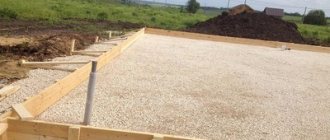
Initially, you should determine the depth of the foundation. This parameter depends on the type of soil, the depth of its freezing, as well as the depth of groundwater. Then you should dig a trench around the perimeter of the future house. This can be done manually, which is long and tedious, or with the help of an excavator, which is quick and efficient, but entails additional costs.
After special equipment is used, the bottom and walls of the trench should be leveled to solid ground. The surface should be as hard and smooth as possible.
Now you need to form a sand cushion, the height of which should be 50–100 mm. If it is necessary to backfill sand more than 100 mm, it must be mixed with crushed stone. This activity may be necessary to level the bottom of the trench. Another way to level the bottom is to pour concrete.
Making a frame for a grillage
After filling the sand cushion, it must be compacted. To complete the task faster, pour water on the sand.
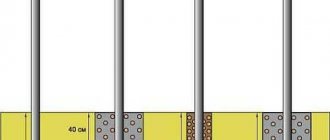
Then the reinforcement should be laid. During the construction process, under normal conditions, you need to use reinforcement of 4–5 cores, the diameter of each rod should be 10–12 mm. It is important that when pouring the grillage for the foundation, the reinforcement does not touch the base. It must be recessed in concrete. Thus, the metal will be protected from corrosion. To achieve this, the reinforcing mesh should be raised above the sand cushion, placing brick halves under it.
Strip foundation grillage
If you are building a house on heaving soil or where the groundwater level is high, then the grillage should be made more durable. To do this, instead of reinforcing mesh, you should use a reinforcement cage. He imagines 2 meshes consisting of 4 wires with a diameter of 12 mm. They should be laid below and above the armored belt. Granular slag is used as a base instead of a sand cushion. Its advantage over sand is that over time, granulated slag turns into concrete.
To make the mesh, a knitting wire is used rather than a welding seam.
For the grillage, M200 concrete should be used. To ensure that the filling height corresponds to the specified value, install a beacon in the trench - a metal peg equal in length to the height of the grillage. It will serve as your guide.
What is it needed for?
This element is designed to strengthen wall structures that may be subject to various adverse deforming effects:
- wind;
- uneven shrinkage of building structures;
- temperature changes that occur seasonally or within one day;
- subsidence of soil under the base of the foundation.
The armored belt (another name is the seismic belt) absorbs the uneven distribution of loads on itself, thereby protecting the structure from destruction.
The fact is that concrete is much more resistant to compressive loads than gas silicate blocks, and the built-in reinforcement helps prevent destruction under tensile loading .
Thanks to the tandem of these two materials, the seismic belt during the construction of a house made of aerated concrete can withstand much greater loads than the standard ones.
Important!
The armored belt creates the necessary stiffening rib in the gas silicate structure and prevents its destruction.
The installation of an armored belt for an aerated concrete house is mandatory for several significant reasons:
- A monolithic aerated concrete belt compensates for the resulting deformations in wall structures with heterogeneous loads or elastic modulus.
- When installing a roof truss system, point overstressing of gas silicate blocks may occur, causing cracks and chips in them. This situation is also possible when attaching the Mauerlat to the load-bearing wall with anchors and studs.
- When using a hanging rafter system, the reinforced belt additionally acts as a spacer that distributes the load from the roof over the entire house.
Reference
Mauerlat is a wooden beam or log used as a base for rafters and the necessary connection between the load-bearing wall and the rafter system.
The main requirement for the quality of a seismic belt is its continuity. It is ensured by continuous circular pouring of this monolithic reinforced concrete section.
Let's learn how to make an armored belt. It is necessary to make an accurate calculation of its dimensions before starting work. The width of the belt should be equal to the width of the wall on which it is installed. Height - from 18 centimeters. Height is of greatest importance.
You can arrange a reinforced belt in several ways. The order of work is as follows:
- installation of formwork;
- insulation (if provided for by the project);
- collection and installation of a frame made of reinforcement;
- pouring concrete mortar.
By and large, the technology is no different from the process of constructing window lintels.
Base armored belt
Before erecting walls, a basement reinforced belt should be poured onto the foundation. It must be poured along the perimeter of the building along the external walls, but this cannot be done along the internal load-bearing walls. The base armored belt serves as additional reinforcement of the structure. If you have filled the grillage with high quality, then the plinth belt can be made less durable. The height of the armored belt is 20–40 cm, concrete M200 and higher is used. The thickness of two-core reinforcing bars is 10–12 mm. The reinforcement is laid in one layer.
If you need to strengthen the base belt, then use reinforcement of greater thickness or install more conductors. Another option is to lay the reinforced mesh in 2 layers.
Formwork for the basement armored belt
The thickness of the basement and external walls is the same. It ranges from 510 to 610 mm. When pouring the base armored belt, you can do without formwork, replacing it with brickwork. To do this, you need to make half-brick masonry on both sides of the wall. You can fill the resulting void with concrete after placing reinforcement in it.
In the absence of a grillage, it is useless to make a base armored belt. Some craftsmen, having decided to save on the grillage, strengthen the base belt, using reinforcement of a larger diameter, which supposedly improves the load-bearing capacity of the house. In fact, such a decision is unreasonable.
The grillage is the foundation of the house, and the plinth belt is an addition or strengthening of the load-bearing capabilities of the reinforced belt for the foundation. The joint work of the grillage and the plinth belt guarantees a reliable foundation even on heaving soils and with a high level of groundwater.
Concrete armored belt
Formwork
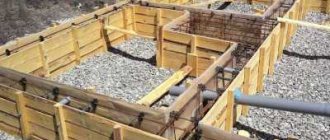
Removable design
The general design of the formwork consists of prefabricated elements - wooden panels made from boards. Instead of boards, you can use old furniture boards.
The formwork is fixed on the wall:
- On the sides (using reinforcing pieces or metal wire)
- On top (stiffeners are constructed from wooden scraps of 40x40 mm, which are nailed to the upper parts of parallel formwork panels in increments of 150 cm).
- To prevent the formwork from shifting, its most loaded lower part is secured with a cross section of reinforcement.
The thickness of the formwork boards is directly affected by the height from which the solution will be poured: the higher the height, the thicker the formwork.
To prevent the solution from leaking out through cracks and gaps, all joints, corners and turns must be securely sealed .
The next step is the installation of a reinforcement frame made of steel elements with a diameter of 12 mm, connected together with knitting wire. Inside the formwork, the frame is installed on plastic stands (in extreme cases, wooden blocks 3 cm wide can be used).
Attention!
When producing the frame, do not weld the elements. This will lead to loss of structural strength and rapid corrosion within the concrete.
Next, the structure is filled with concrete mortar.
The formwork is dismantled using a nail puller:
- In summer - after 24 hours.
- In winter - after 72 hours.
It is worth noting that the thermal conductivity of concrete is several times higher than gas silicate. Therefore, this method of constructing formwork is acceptable only when the walls are fully insulated from the outside or for internal load-bearing walls. Otherwise, there will be constant freezing of the wall in the zone of the armored belt. The next method eliminates this drawback.
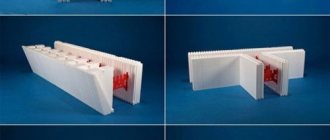
Using U-blocks
In order to prevent significant heat loss at the junction of two different materials (reinforced belt concrete and gas silicate walls), so-called permanent formwork is used.
It is made from factory standard box-shaped U-blocks.
The reinforced belt is constructed as follows:
- An adhesive mixture is applied to the top row of blocks, onto which the U-blocks are installed with the hollow side facing up.
- Additional thermal insulation of the outer side of the wall is carried out by laying polyurethane foam, polystyrene foam or stone wool into the internal cavity.
- A connected metal frame is laid, similar to the formwork method.
- The concrete mixture is poured and compacted.
When installing an armored belt in this way, there is no need to install and dismantle the formwork, which has a positive effect on the speed of work. However, the cost of U-shaped blocks is much higher than that of wooden panels. Also here you will need to saw aerated concrete material for formwork.
Combined method
On the outside of the wall, blocks 150 mm thick are laid on glue. And on the inside, formwork is constructed from wooden panels or OSB boards (pictured below), as in the first method.
Insulation
After installing the formwork, the future seismic belt should be insulated (if comprehensive insulation of the house on the outside of the walls is not provided). Insulation work is carried out using various thermal insulation materials:
- Extruded polystyrene foam (EPPS). This is a dense material with low thermal conductivity. Is the best solution.
- Polystyrene foam brand PSB-25. Its use is also justified. Thermal conductivity is low. A the brittle properties of this material are not a hindrance in this case. In the design of the armored belt, the insulation does not experience loads. In addition, the price of polystyrene foam is lower.
- Mineral wool boards. The main disadvantage is that this insulation absorbs moisture from the concrete solution. When wet, this material loses its thermal insulation qualities.. We do not recommend this type of insulation.
For the Moscow region, an insulation thickness of 50 mm is sufficient. It must be cut into strips of size equal to the height of the armored belt. And install it inside the formwork from the side of the outer wall with the material tightly adjacent to each other. There is no need to fasten the insulation, since it will subsequently be pressed using the poured solution.
Reinforcement
The frame is made of four or more longitudinally located rods with a diameter of 10-14 mm (determined by the project). In cross section it should be square or rectangular in shape. The transverse reinforcement is attached to the main part of the frame using steel wire with a diameter of 6-8 mm, and is located in increments of 40-50 mm. The distance from the edge of the armored belt to the reinforcement is determined depending on the operating conditions of the building (values can be found in the normative documentation for reinforced concrete). The finished frame is placed in formwork and filled with concrete mixture.
Advice
Calculate the reinforcement for the concrete belt in advance and buy it together with the reinforcement for the foundation and wall reinforcement. This way you will save on shipping.
There, buy mortgages and metal corners to strengthen the opening of the front door of your home.
And one more piece of advice.
Buy fittings and other rolled metal products at metal depots . There they sell it by weight. As a result, it comes out noticeably cheaper than in construction markets and hardware stores.
Pouring concrete
If a reinforced belt is being constructed under the Mauerlat, studs are installed before pouring to secure it.
Otherwise, you will have to drill holes for the studs in the finished concrete structure, and this is extra work.
Before performing concrete work, the studs are wrapped in plastic film (you can put on plastic sandwich bags and secure them with tape) so that concrete does not get on the threads.
Advice
You should ask the builder who will be doing the roof whether studs need to be laid, their size and the distance between the studs.
Use factory-made concrete mortar of a grade not lower than M200 with crushed stone. Despite the fact that the brand is determined by the designer, the most common option is a concrete mixture of grade M250 with a filler based on crushed gravel .
Pouring is carried out evenly throughout the entire volume of the formwork at a time using a concrete pump with a special funnel equipped with a locking mechanism. For small volumes, it is allowed to fill the armored belt manually (with the help of cheap labor by carrying the solution in buckets). After this, the mixture must be compacted using vibration loads or using the bayonet method with a piece of reinforcement or a construction trowel.
Attention!
Filling must be done in one go without interrupting the process.
If for some reason (mixing concrete manually, not enough concrete due to incorrect calculation and other force majeure situations) the reinforced belt is not filled completely, make a vertical cut-off, as in the photo below. In this case, the gap should not be located above the window and door ceilings. Filling in layers in 2 or more stages is not allowed!
If it is hot outside, the armored belt needs to be covered with film so that the moisture does not evaporate too quickly. Or periodically water it, similar to a concrete foundation.
Subsequent work on installing a gas silicate floor or Mauerlat can be carried out after several days. In the case of ready-mixed concrete of good quality, work continues after two days. Self-mixed concrete takes longer to set.
Interfloor
An armored belt must also be made between the wall and the floor slabs. It is poured along external walls with a height of 0.2 to 0.4 m. Interfloor armored belt allows you to save on door/window lintels. They can be made small and with a minimum of reinforcement. Thus, the load on the structure will be distributed evenly.
If an armored belt is installed on walls made of poorly load-bearing material, the load from the floor slabs will be distributed evenly along the entire length of the walls, which will have a beneficial effect on their strength characteristics.
Formwork for interfloor reinforced belt
Reinforcement of the interfloor belt is performed with a mesh of ribbed reinforcing bars 10–12 mm thick in 2 cores. If the thickness of the walls varies between 510–610 mm, then double-sided brickwork can be used as formwork, as for the base belt. But at the same time, backing bricks should be used for internal masonry, and facing bricks for external masonry. In this case, the armored belt will have a width of 260 mm. If the walls are thinner, the backing brick should be laid on edge or wooden formwork should be used instead, and the facing brick should be laid on the outside in the same way as in the previous case.
In what cases is an armored belt required in the house?
Armored belt for walls. Reinforcing walls with a reinforced belt is not always necessary. Therefore, there is no need to waste money on it in the following cases:
- under the base of the foundation lies strong soil (rocky, coarse clastic or coarse sand is not saturated with water); the walls are built of brick;
- a one-story house is being built, which is covered with wooden beams rather than reinforced concrete panels.
If the site contains weak soils (pulverized sand, loam, clay, peat), then the answer to the question is the need for a reinforcing belt, obviously. You cannot do without it even when the walls are built from expanded clay concrete or porous blocks (foam concrete or aerated concrete).
These are fragile materials. They cannot withstand ground movements and point loads from interfloor floor slabs. The armored belt eliminates the risk of wall deformation and evenly distributes the load from the slabs onto the blocks.
For arbolite blocks (the wall thickness is at least 30 cm, and the strength grade is not lower than B2.5), an armored belt is not needed.
Armored belt for Mauerlat. The wooden beam on which the rafters rest is called the mauerlat. It cannot push through the foam block, so someone may think that an armored belt is not needed under it. However, the correct answer to this question depends on the material from which the house is built. Fastening the Mauerlat without an armored belt is allowed for brick walls. They securely hold the anchors with which the Mauerlat is attached to them.
Armored belt for Mauerlat.
If we are dealing with light blocks, then the armored belt will have to be filled. It is impossible to reliably fix anchors in aerated concrete, foam concrete and expanded clay blocks. Therefore, a very strong wind can tear the Mauerlat from the wall along with the roof.
Armored belt for foundation. Here the approach to the problem of amplification does not change. If the foundation is assembled from FBS blocks, then an armored belt is definitely necessary. Moreover, it must be done at two levels: at the level of the base of the foundation and at its upper cut. This solution will protect the structure from intense loads arising during the rise and settlement of the soil.
Rubble concrete strip foundations also require reinforcement with a reinforced belt, at least at the level of the sole. Rubble concrete is an economic material, but it is not resistant to ground movement, so it needs reinforcement. But a monolithic “tape” does not need an armored belt, since its basis is a steel three-dimensional frame.
Strip foundation for a house: advantages and disadvantages, how to do it yourself (read more)
There is no need for this design for a solid foundation slab, which is poured under buildings on soft soils.
Armopoyas for types of interfloor ceilings. In panels resting on expanded clay concrete blocks, gas or foam concrete, a reinforced belt must be made.
It does not need to be poured into a monolithic reinforced concrete floor, since it evenly transfers the load to the walls and firmly connects them into a single spatial structure.
Dimensions of floor slabs: features of the use of structures (read more)
An armored belt for a wooden floor that rests on light blocks (aerated concrete, expanded clay, foam concrete) is not required. In this case, it will be enough to pour concrete support platforms 4-6 cm thick under the beams to eliminate the risk of pushing through the blocks.
Under the Mauerlat
The armored belt can be poured under the Mauerlat only after the glue/mortar for masonry walls has hardened. The technology used to lay the reinforced belt on aerated concrete differs in the formwork design, but we will talk about this a little later. The production of wooden formwork is carried out according to a scheme already familiar to you. Concrete is prepared according to the following formula: 2.8 parts sand to 1 part cement and 4.8 parts crushed stone. Thus, you will get M400 concrete.
After filling, eliminate any remaining air bubbles in the mixture. To accomplish these tasks, use a construction vibrator or poke a rod into the liquid mass.
Mounting the Mauerlat
When constructing a monolithic armored belt, the rules for fastening the Mauerlat must be observed. During the installation of the reinforcement frame, vertical sections should be removed from it to the height specified in the project. The reinforcement bars should rise above the reinforced belt by the thickness of the Mauerlat + 4 cm. Through holes must be made in the beam equal to the diameter of the reinforcement, and threads should be cut at its ends. So, you will get a reliable fastening, which will give you the opportunity to carry out high-quality installation of a roof of any configuration.
Pouring concrete mortar
The required strength can be ensured by following the following recommendations:
- The formwork for the armored belt is concreted using technology in one step;
- carry out work continuously;
- It is advisable to pump the solution directly into a wooden form using a concrete pump;
- pour concrete until it covers the reinforcement to a depth of 5 cm;
- it is preferable to use concrete with a grade of at least M 200;
- Air cavities that negatively affect strength are unacceptable. To eliminate this, use special vibrators;
- the use of plasticizers improves the fluidity of the mixture, reduces the concentration of water, which shortens the hardening time of concrete;
- the concrete mass must stand for 3 weeks;
- during hot periods, moisten the surfaces generously with water to prevent cracks and strengthen the hardened mortar.
Reinforced belt for aerated concrete
Aerated concrete is an alternative to brick, which has high thermal insulation qualities along with low cost. Aerated concrete blocks are inferior to brick in strength. If when installing an armored belt on brick walls it is not necessary to pour concrete, since the reinforcement is laid during the laying process, then with aerated concrete things are different. How to make an armored belt on wooden formwork has already been discussed above, so in this subsection we will look at how to make a reinforced belt from U-shaped aerated concrete blocks D500. Although it is worth noting immediately that this technology is more expensive.
In this case, everything is extremely simple. Place the blocks on the wall as usual. Then reinforce their central part, and then fill it with concrete. Thus, the walls of your home will be more durable and reliable.
If you still have questions on the topic, then ask them to a specialist working on the site. If necessary, you can consult with our expert about filling the armored belt. Do you have personal experience? Share it with us and our readers, write comments on the article.
Armopoyas in a house under the Mauerlat, for the foundation, walls, for types of interfloor ceilings
Many people mistakenly believe that the armored belt in a house is an extra element of the structure, and therefore there is no point in building it. This is fundamentally wrong, especially for houses whose walls are built from aerated concrete blocks.
Remove the steel hoops from a wooden barrel and it will fall apart. Remove the reinforced belt from the house and the building will not stand for long. This is a simplified but very clear explanation of the need to strengthen walls. Anyone who is going to build a strong house will benefit from information about the purpose, types and design of armored belts in the house.
On a note! The Mauerlat itself is a mandatory element of the roofing frame in private housing construction. Its main function is to provide a connection between the building and the roof itself. This mandatory condition performs a number of necessary functions, and therefore its construction should be approached with all responsibility.
Construction for a house made of aerated concrete
Using the scheme described above, you can make formwork with your own hands for any type of house. The device is suitable for brick, aerated concrete, concrete. The armored belt promotes high-quality connection of the roof to the building frame. In a house made of aerated concrete, it is secured using additional blocks or formwork. The first option is easier, but more expensive. It is cheaper to make a wooden structure with your own hands. The following instructions will help you build it correctly:
Scheme of section of armored belt in formwork for aerated block
- Drill boards 30 cm high into the aerated concrete wall.
- Attach screeds every 50-70 cm to increase the strength of the structure and prevent deformation under the influence of heavy concrete.
- Place reinforcement with a diameter of 8 to 12 mm inside. The choice depends on the location of the house. If the walls will be exposed to negative environmental influences, then rods with a maximum diameter will be suitable. In regions with calm seismic conditions, you can save on reinforcement by choosing inexpensive models with a minimum diameter.
- The reinforcement is laid on special stars, which creates an active bottom layer on the aerated concrete blocks.
- Tie the rods with wire.
- Pour concrete, compact and level the layer.
If the formwork is installed to secure the roof, then before pouring the concrete, studs are installed to secure the floors. They can be of any length, but it is more convenient to work with specimens less than 1 meter long.
Specialists will help you make the correct formwork for an armored belt for a house made of aerated concrete if difficulties arise. Before work, it is recommended to make calculations to prevent mistakes and purchase the required amount of building materials.